Sunday, 21 February 2016

Pixie's Snippets Playground - Week 217

What a total Godsend it was having Sarn so kindly looking after you last week! The aftermath of the gout session left me with back issues from using the crutches, then walking stick and then limping for weeks. Now that the trotter is more or less fine, the back flared up big time - meaning that time spent at the laptop and desk had to be dramatically curtailed. I can't express how grateful I am to Sarn for her help - even though neither of us expected me to go into Hunchback of Notre Dame mode!

And, what a terrific job Sarn did as well - a huge gold star for sure! AND, bless her little cotton socks, she's volunteered to continue for this coming week to give me a fighting chance of recovering. Thank you so much Sarn, I owe you - BIG TIME! Please go HERE to see Sarn's really darling snippets card - Parsnip has fallen in love :)

This is my snippets card, which I made in little bursts during the week - literally 20 minutes tops at the desk at a time:
I used:

- 5" x 7" white card blank - short edge opening

- a piece of the same card stock, embossed using the Couture Creations 'Bon Jour' folder then trimmed to just slightly smaller than the card front and glued into place

- next I stamped the 'friend' sentiment using Memento 'Tuxedo Black' ink and a stamp from the fabulous Paper Smooches set called 'Sentiment Sampler'. I LOVE this stamp set - great variety of sentiments in quite funky fonts

- then used a little handful of plain card snippets (green, blue and black), all backed with Stick-It adhesive sheet to die cut the poppy using  a Memory Box die called 'Perky Poppy' and fixed it in place on the embossed layer. I made the poppy blue for a challenge - and also as I quite like the change from red

- tickled the poppy petals with Clear Wink of of Stella

- added one little butterfly, die cut using SU's 'Beautiful Wings' embosslit and a little scrap of blue pearlescent card - topped with a small white pearl

I can't remember if I've said this before, these days I don't buy ready cut 5" x 7" card blanks - but I do love the size (which you can't cut from a 12" sheet of card of course). I now buy ready made 7" x 7" square ones and then chop them down to long edge opening, tent style or short edge opening as required. The offcuts are always handy, I can get three different styles of opening and for me it's the most economical way to work - 5" x 7" envelopes can always be bought online or in local craft shops.

Let's take a 'peek at the picks', as chosen by Sarn of course - and she's picked practically the same entries as I would have chosen! I have been peeking each morning on my tablet in bed whilst having the early morning cuppa - always the best tasting one of the day to me! Here we go:
Sarn said: I chose it because I just love the pretty mix of embroidery and stamping.

Isn't it pretty, made by Elly and I'd have picked this card too! Sarn and I generally sing from the same song sheet :)

 Jenny H brought this beauty of a card and Sarn said: This card makes such a lovely Mother's Day card with the lovely die cutting and addition of lace.

Another lovely pick Sarn!

Would you believe that for the next two picks Sarn chose two of our new Playmates - again, choices that I totally agree with too!

Sarn said: This is such a lovely project and I find all the colourful mixed media, embellishments and ribbons really appealing.

This was made by Meena and it really is so pretty!

And finally, this is Sarn's fourth pick of the week. And she said: Loved this fantastic accordion album and tag book. So much detail and very colourful.

Do hop over to Sharada's blog for a peek - the photos inside are just so joyful!

If I'm right, we had five new Playmates this week - if I missed anyone new do email me and I'll showcase you next week (my email addy is on the sidebar). Sarn had already picked out Meena and Sharada as part of her choice this week - so that leaves us with a further three new Playmates to welcome:

546 (1)
Such a pretty card, made by Renata. I love the combination of turquoise and green and such a great design too.


A lovely Birthday card was brought to us by Stefi - great design and such a fun image too. Mia and Livi would love this card as they both ride during the warmer months (right now it's skiing and ice skating, one of the benefits of living in Germany where the seasons are more predictable!).

Butterfly Dream
And finally we had this lovely card from Charlotte (Lady Joyful). I love the bokeh effect and the butterflies are a beautiful addition to such a soft and pretty background.

Out of interest, Charlotte emailed me to say she'd been trying unsuccessfully to comment on last week's post - using Wordpress. If anyone here can help do please hop over to Charlotte's blog - she was trying to use the Wordpress option for commenting but kept being rejected, sigh :(

Hope you all come back to play again really soon!

On the news front, both Sarn and I had independently picked up that Andrea (KandA) is now a proud grandma to the prettiest little baby girl:
Isn't she just adorable? Congratulations from all of us Andrea! And this is the card Andrea made to welcome the new baby, those buttons are from when her daughter (the new Mum) was a baby herself - aw:

Time for the prize draw here now. We had the Woodware 'Wedding Hearts' stamps set - kindly donated by Nina who is the owner of Creativity Cards and Crafts, which is Sarn's local craft shop. And also the Creative Expressions 'Gemini-Cygnus' dies donated by Sarn!

And our winner is:
Well done Val! According to my little book, apart from a small win in the bumper Christmas draw,  Val has only won once before ( in October 2014) - so it was about time too.

I do have your address Val and your prize will be on its way to you as soon as possible.

The Playground prize this coming week is:
Linked to today's snippets card - it's your own Memory Box 'Perky Poppy' die and a Paper Smooches 'Sentiments Sampler' stamp set. Sorry about the light bouncing back, you can see a clearer picture of the stamp set here.

The Snippets Challenge will run for one week and the Playground gates will close at 11am UK time on Saturday 27th February. The gates will open again at midnight UK time on the same day.

I'm trying something new this week! I did some adding up and discovered that out of the 108 entries we had last week - 33 were additional entries within the allowed upper limit of three. So that's almost a third as many again entries to look at and comment on.

As Sarn is being so helpful with the commenting and also due to the recent real upsurge in entries, can I please ask that you only add ONE entry this week. It's wonderful to see so many of you playing along and I don't want to put you off the Playground, but this might just make you stop and ponder over which of your snippets makes you'd like to link in? So many of our cards do contain snippets in one form or another that I can see why entries have risen so dramatically - plus we have a lot more people playing along.

We'll see how that idea goes - it certainly levels the playing field and gives everyone an equal chance if they hope to win the weekly prize. If you don't like the idea, don't just run away - let me know, and perhaps offer suggestions as to how the load can be eased. I really don't want to go down the road of a DT if I can help it (a friend who is very experienced in running challenges with DTs likened that to 'trying to herd cats') but something has to give in terms of the time it's taking to keep the Playground going - on top of this weekly post of course. And I want to keep this as a weekly challenge for now.............you have no idea how many prizes are lined up , can't get the lid on the toy box right now!

So, a maximum of ONE entry this week and please say in a comment if you wish to play and be a possible winner of the prize. If you only want to play for either the die or the set of sentiment stamps then just say so in a comment - if your number comes up then I'll do a further draw for the remaining part of the prize. But, both items are up as one complete prize if you so wish of course. Please also link back to the Playground in your blog post to be eligible for the draw.

Mr Linky is below - please let me know if you have any problems linking, it's easy for me to sort out so don't struggle on alone :)

Enjoy your week - remember it's Rudolph Day over at ScrappyMo's starting on Thursday to the end of the month. It's a shorter month this time round so best to start planning now :)

Who knows, there's a very good chance my snippets card next Sunday will be a Christmas one for Mo's challenge!
 
Di and, of course, Parsnip!
x

Friday, 19 February 2016

School practice run?

Our, much loved, youngest grand daughter will be starting school in September. So, she got to choose a school bag.

In Germany the kids do seem to go for backpacks and carry a lot of stuff to and fro. Here's Livi modelling her choice of bag:
What?!?! It's almost as big as she is - someone's gonna fall flat on her back if she overloads that :)

We did have a good giggle when her Mama sent us this photo.

So thankful for Sarn being Playground Prefect this week - bit of a blip here with the back, sigh. But my eyes and ears are in full working order :)

Di
x

Wednesday, 17 February 2016

Birthday balloons

I needed to make a card for a little neighbour, who is four years old this week, this was the result:
I used:

- 5" x 7" white card blank

- piece of SU 'Real Red' card stock as a 'frame' to the patterned paper, glued to the card blank

- cloud patterned paper is LOTV from their 'Up, Up and Away' paper pad, trimmed to just a little smaller than the red layer and glued in place

- a selection of  plain snippets of card, die cut with a balloon die from the Tim Holtz 'Crazy Things' die set

- using more of the same little snippets of coloured card I die cut the letter using the First Edition' 'Alphabet - Sans Serif' set of dies and then the number 4 using a Memory Box 'Classic Numbers' die

- glued the letters and numbers onto the balloons

- added small loops of red metallic cord round the tied part of the balloon and then stuck lengths of the same cord to hand from behind each balloon. It's much easier to do this as a two part process rather than wrestle with the cord all in one piece around the tied part and then hanging down

- before adding the balloons to the card I stamped the sentiment onto a white card snippet, using Memento 'Tuxedo Black' ink and a stamp from the Hero Arts 'Messages' set

- die cut the sentiment using a Spellbinders plain oval die and mounted it onto a 'Real Red' Spellbinders die cut scalloped oval

-worked out where I wanted the sentiment to go and added three strips of ultra sticky tape 

- added a thin sticky pad to the back of each balloon and stuck all five in place with their dangling cord lengths then pressed onto the sticky tape where the sentiment would go

- added the sentiment, again using thin sticky pads

- to be on the safe side I had cut the cord lengths long enough to be able to trim them down once in place - job done!

I thought this card would be really quick to make - fiddle faddling around with the cord and adding it to the balloons took longer than expected though, sigh.

Di
x

Tuesday, 16 February 2016

Cuttlebug Mania Challenge - I {Heart} You}

Time for the new challenge over at Cuttlebug Mania, and the theme is 'I {Heart} You - have a heart on your creation'.

You do have to use a manual die cutting/embossing machine (it doesn't need to be a Cuttlebug but it must be manual, not electronic). And, you can't mix the two, it must be all manual please. Then make your entry, link into the challenge, link to the challenge in your own blog post and and make sure that you also say what products you used for any die cutting/embossing.

Details of our sponsor this fortnight are over on the challenge - with a nice prize to be won. 

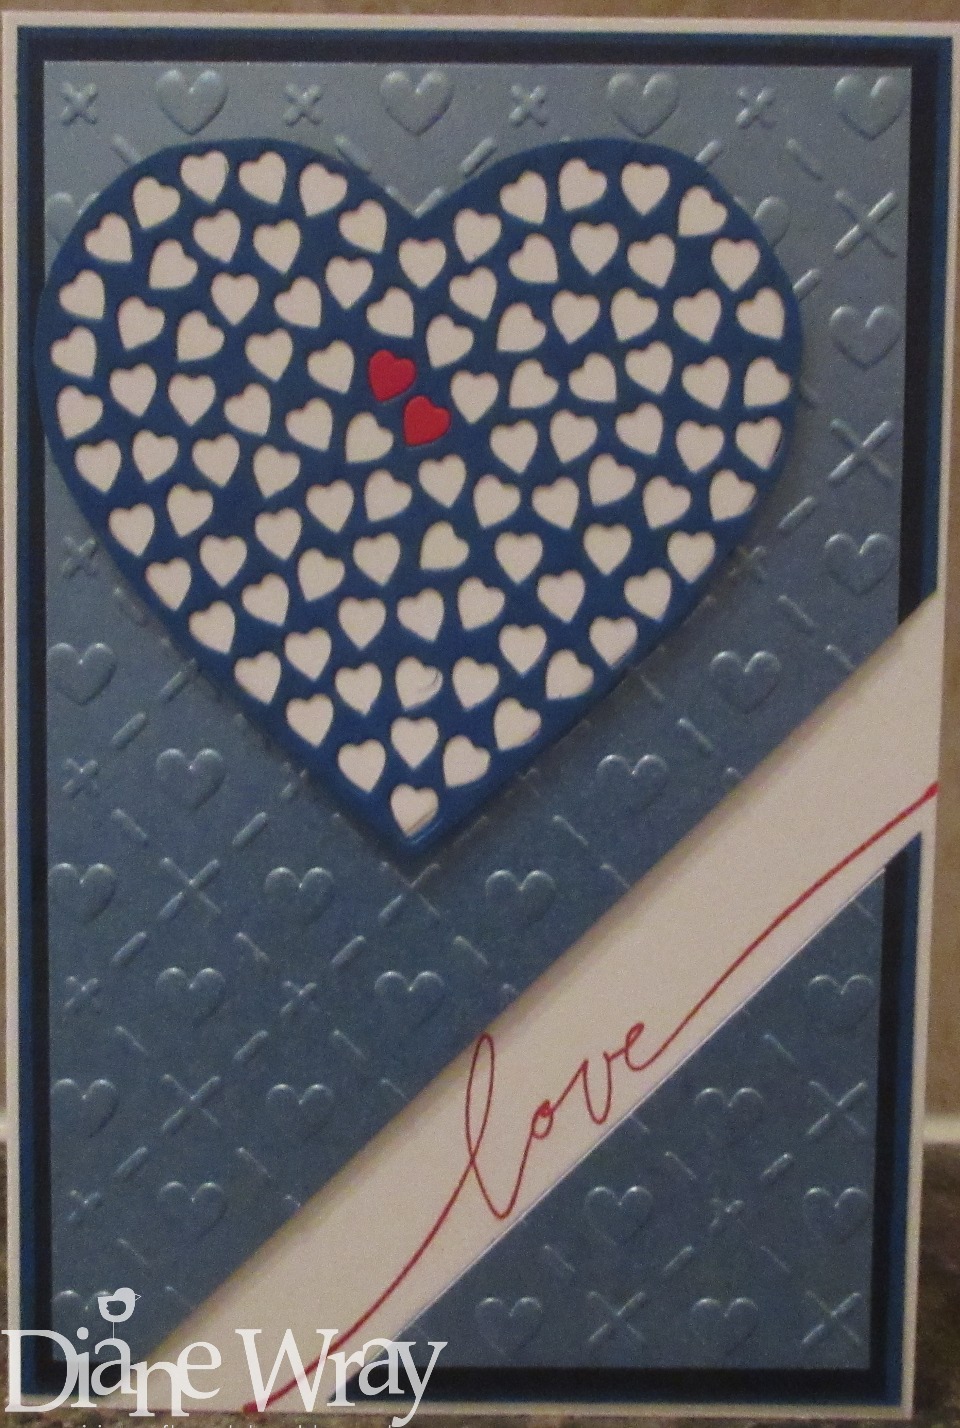
It's  certainly a great theme and hopefully your 'love, hearts and mushy stuff' goodies are all still to hand. This is my DT card:
I used:

- 4" x 6" white card blank

- snippets of darker blue card to form a double 'frame' 

- a snippet of baby blue pearlescent card, embossed using the Xcut 'Hearts and Kisses' embossing folder, trimmed to size and then layered up with the two darker pieces of card mentioned above. LOVE this folder!

- after a lot of juggling around I measured and then cut a diagonal strip out of the layered card, placed it on the card front and lightly penciled along the diagonally cut lines as a guide to the stamping - then set the pieces to one side

- phew, perfect fit when I stamped the 'Love' sentiment using SU's 'Real Red ink. The sentiment is a pre-loved one made by SU, from a set of four called 'Wonderful Words', probably long discontinued

- rubbed out the light pencil lines and then added the embossed panels to the card front

- making the big heart was fun - not! The first attempt was a total failure and I had to think outside the box when I redid it. First of all I die cut a plain white heart from a snippet using the Memory Box 'Cupid Heart' die and put that to one side - so far so good

- after the failed first attempt I'd had a rethink about how to make the big heart made up of little hearts as I wanted it to sit on top of the card with a little border and not be inlaid

- covered a snippet of blue card with Stick-It adhesive sheet and then die cut the heart shaped cluster of hearts using the Memory Box die called 'Heart of Hearts' for the second time. It comes without a frame and that's where I had problems with the first attempt - it's almost impossible to line up the 'Cupid Heart' evenly in order to die cut a nice narrow border around the little die cuts. That's made me realise that the die is not actually meant to be used as a frame - unless you truly want a trip to the Funny Farm! Cluck, baa, moo!

- then came a light bulb moment! I took the solid die (which has a thin perspex inside the outer metal shape so you can see exactly where it's positioned), gently taped it in place over the little hearts and lightly pencilled round the outside before then hand cutting it to form a border - yay!

- peeled off the Stick-It backing and poked out what seemed like hundreds of little hearts then stuck it onto the white heart shape I'd die cut earlier

- from a little snippet of red card I die cut a handful of little hearts, again using the 'Heart of Hearts' die, and then added just a couple into the main heart shape before sticking it onto the card using thin sticky pads

By then I was exhausted and the place was littered with tiny little sticky backed hearts! A few lessons learned there! Luckily I'd already invested in the die a good while ago to use with another MB heart die (Serafina) so at least it's fine with that, plus it's good as a backing for the card I made today and also the butterflies heart shapes - just don't expect borders without needing a session on a couch under a bright light!

Why not join in with the challenge? Surely it can't be any harder than the angst I had with my card - the theme is fine, it was what I tried to do with it! We'd love to see you over at Cuttlebug Mania!

Di
x

Sunday, 14 February 2016

Pixie's Snippets Playground - Week 216

Well, that was a fun week with the Pancake Day shenanigans! I think everything has calmed back down again now - thankfully!

So much so that our ringleader/rebel/reporter has done a total about-turn and is very kindly giving me a little break this coming week. So please welcome Sarn (aka Dick Orem) as your Prefect - she will be commenting on entries and doing the picks for me. As well as that, Sarn made our snippets cards (three of them!) this week and also very kindly has a lovely double prize in store for you. I'll still be here in the background in case anyone has problems linking, seeing who would like to be in for the prize(s) and will still look at your entries (I'm just a sticky beak!), even if I don't comment.

Let's take a look at the three snippets cards Sarn made:
Aren't they absolutely gorgeous? You can hop over to Sarn's to find out more about them - lovely stamps and such pretty colours too.

Time now for a 'peek at the picks' - as always such a difficult job deciding:

I very rarely let on that something I see in the Playground will be a weekly pick, things sometimes change over the week and I can only show so many of your wonderful makes. But, I broke my own rule and this went right to the top of my picks list - and I also told Janis too! Do go and see exactly how Janis made this lovely work of mixed media art - I totally adore it!

I adore this card, made by Helen! So clever to use the newsprint paper for the flowers (yet another idea stored for future use!) - and the stamped central flower stems with Helen's hand doodled shorter stems and border are just brilliant too!

Isn't this fresh and fabulous? Sonia used the inlay technique to make this really pretty card using Distress Inks and a white gel pen - I love it! Sonia entered three times this week and I could have included every single make - chose this one as I felt it's such a great idea to CASE.


We had lots of Valentine's Day cards in the Playground this week - and I loved every single one! I picked this card, made by Sandy, because the paper piecing is great - and also it really made me smile, such a great sentiment too!

I picked this card, made by Lynn, because I love the colours and composition, so pleasing on the eye IMHO. Isn't that wavy die a stunner too?!

As it's Valentine's Day I thought it appropriate to finish the picks with this amazing pop up box, made by Jenny L. Would you believe it's Jenny's very first pop up box card? Totally stunning indeed Jenny!

So that's the 'peek at the picks' - and, I hope Carole D won't mind, we have one very, very happy new Granny in the Playground. Baby Thomas was born on Monday 8th February - and this is the lovely card Carole made, albeit not a snippets entry:
A rocker on a rocker :)

And ............................... here's the little chap himself:
Oh my word, isn't he one of the loveliest babies ever?

We have one new Playmate this week, and it's Darlene who is a friend of Diane H. Together they run a great challenge called 'Double D Challenges' - go here to take a peek. It's already a very popular challenge with some lovely themes! This is Darlene's really lovely card - gosh I so love that die!

Time now to pick the winner of last week's prize of the Crafts-Too 'Butterfly Garden' die and Inkylicious  two-stamp set called 'Sunshine Wishes'. And our winner is:
Well done Jane! I have your address here and will post the die and stamps off to you this coming week.

Onto this coming week's prize, which as I already said is a double one - yay for Sarn!

First of all it's a Woodware 'Wedding Hearts' stamp set , kindly donated by Nina who is the owner of Creativity Cards and Crafts, which is Sarn's local craft shop. Thank you SO much Nina! Sarn used all of her own set of stamps for her snippets cards, with really beautiful and varied results.
And, we also have a beautiful set of three Creative Expressions 'Gemini - Cygnus' dies, kindly donated by Sarn!
Two really lovely parts to this coming week's prize!

The Snippets Challenge will run for one week and the Playground gates will close at 11am UK time on Saturday 20th February. The gates will open again at midnight UK time on the same day.

Maximum of three entries and please say in a comment if you wish to play and be a possible winner of the prize. If you only want to play for either the stamps or the set of dies then just say so in a comment - if your number comes up then I'll do a further draw for the remaining part of the prize. But, both items are up as one complete prize if you so wish of course. Please also link back to the Playground in your blog post to be eligible for the draw.

Mr Linky is below - please let me know if you have any problems linking, it's easy for me to sort out so don't struggle on alone :)

Enjoy your week - whatever mischief you might have planned! And please look after Sarn :)

Di and, of course, Parsnip!
x

Friday, 12 February 2016

Happy Birthday 'Less is More'


It's the 5th Birthday of one of my favourite challenges - Less is More. The theme is 'White on White' and 'accents in metallic or B/W are perfectly acceptable'. I think my black is somewhat more than just an accent (probably I'd go so far as to use the word overpowering!), sigh, but am still linking in to wish all the hardworking girls on the DT a Very Happy Birthday .... and many more to come!
I was trying to achieve a bit of an Art Deco look - 'nul points' as zee French would say when judging zee UK in zee Eurovision Song Contest :)

I used:

- 4" x 6" white card blank

- piece of white card from the same A4 sheet of card, trimmed slightly smaller than the card front and then die cut an aperture at an angle using the Memory Box 'Prim Poppy' die. I kept the die cuts themselves, needed the cut piece from the centre later on and also the poppies will be used at some point

- then backed the aperture with a snippet of white card which I'd covered using medium strength double sided adhesive sheet and set it to one side

- die cut the 'Prim Poppies' again, this time from a piece of white adhesive glitter sheet from the Xcut 'Metallics' set which I'd backed with a snippet of white card before die cutting - that was to make sure the level was right between the background and the poppies - didn't want them to be recessed and they only stand very slightly proud of the backing card

- then tucked the white sparkly poppy die cut into the aperture as an inlay (remember it was already backed with adhesive sheet faced upwards/to the front of the card) and followed that with the plain white die cut piece from the centre which I mentioned earlier

- next die cut the sentiment from black adhesive glitter sheet from the Xcut 'Metallics' set using the Joanna Sheen 'Retro Happy Birthday' die and added that to the card

- wow, what a lot of black against the white in one area - so I punched each corner using a Woodware 'Fancy Corner' punch and added little 1" squares of black card, covered with leftover snippets of the black adhesive glitter sheet behind each one

- used thin sticky pads to adhere the panel to the front of the card

- final touches, a few clear diamante gems around the poppies and one black gem above the letter 'i' in the sentiment

If it wasn't LIM's Birthday I wouldn't bother linking this into their challenge as frankly I don't think it's a success - but I do so want to help them to celebrate!

Lately I've been referring to medium strength adhesive sheet. Just to clarify - my definitions of adhesive sheet start with the strong stuff which is made by the likes of Woodware and comes with a red plastic backing, just like the ultra sticky red line tape. I tend to use that stuff quite sparingly as it isn't cheap - and it also is no good for die cutting IMHO.

Then, the medium stuff is covered with waxed paper backing, it die cuts quite well so long as the die isn't too finely detailed and is pretty robust. If I was using micro beads I'd go for the stronger stuff mentioned above but this will generally hold fine glitter and also gilding flakes without any problems.

And lastly, the lightweight adhesive sheet is 'Stick-It'. The layer of adhesive on Stick-It is very thin and it's really great for those intricate dies so long as you remember that it is deliberately still movable until you've really pressed it in place firmly. If I was layering several thicknesses of card or paper to do the 'camouflage' technique then I certainly wouldn't expect Stick-It to hold several layers onto my project. I would layer up using Stick-It as it's just so good with die cuts - but, the layer right on the card would be held in place with stronger adhesive sheet or even glue.

Hope this made some sense! I found all this out by trial and a good few errors so just wanted to share my thoughts :)

Di
x

Wednesday, 10 February 2016

Chalkboard technique

First of all, a quick addition to the jigsaw card I published here yesterday. Our Playmate Jane W left a lovely comment and also mentioned that she'd done something similar with printed images and jigsaw pieces from a 'Seraphina' CD she has. I love the result and felt quite bad that I'd totally missed Jane's post  - I can't suggest strongly enough that you skip over to the link for a look!

Been meaning to try out the chalkboard technique for ages, and this week's Merry Monday Challenge #191 'Chalkboard' provided the perfect opportunity. I'm also entering my card into Craftyhazelnut's Christmas Challenge plus Craftyhazelnut's Christmas Challenge Extra for February - both are 'Anything Goes'.

This was the result:
I used:

- 4" x 6" white card blank, tent style

- pieces of the same card stock (Hobbycraft's own 300 gsm A4 card), embossed using the Taylored Expressions 'Twirls and Swirls' embossing folder - thought the swirls echo the swirls on the stamped image/sentiment. Then trimmed to just a bit smaller all round than the card front and glued in place

- snippet of matt black card stock rubbed over with an anti-static bag before being stamped using Unity Stamp's Itty Bitty 'Peace and Joy' stamp and a Versamark embossing pad

- then heat embossed the stamped image using 'Detail White' embossing powder made by Stampendous - I love that a few stray specks of white (and I do have some) or some smears don't actually matter on chalkboard cards

- trimmed the image panel to size then went round the edges using a sponge dauber and StazOn 'Cotton White' ink

- glued the chalkboard panel in place on the card front

- picked out a snippet of SU 'Real Red' card plus a snippet of Christmas green card from the snippets folder

- die cut the red part of the poinsettia using Joanna Sheen's All Occasion Dies 'Small poinsettia' set and the green 'skeleton leaves' using the leaf die from the Marianne Creatables 'LR0156' set 

- assembled the red die cuts using Glossy Accents and a cocktail stick as a disposable tool

-added two green leaves and the red bloom to the corner of the chalkboard - using ultra sticky red line tape

- finally, a little dome shaped yellow embellishment was popped in the centre of the poinsettia

I knew which stamp to use right away for this card and at the back of my mind could recall seeing it elsewhere being used for the chalkboard technique - it wasn't until the card was finished that I remembered just where!  Of course, it was our Elizabeth who made this lovely card - and sent me scurrying off to buy the same stamp - back in October 2013!  It only took me two and a bit years - although I did give the same stamp an outing that December, using silver ink on a pale blue Christmas card.

I made three cards exactly the same whilst all the bits and pieces were out :)

Too funny yesterday, if you haven't already been over to Sarns's to read about the Pancake Race then you're missing a real treat! Such cheating, gambling and a bit of 'forbidden liquid' consumption I think as well, and hilarious photos of the 'event' - poor Parsnip staggered in from the Playground shouting for a darkened room! And the stuff you gals brought to the feast! Someone even mentioned Cointreau - and no doubt there would have been a flame thrower involved if at all possible. Ah, maybe that explains someone having his whiskers a bit singed?

Soooooooooooooooo, as a really sobering thought (especially for those of you who indulged in Bad Brenda's 'Rocket Fuel Special' cocktails - but it isn't Brenda I'm gonna refer to!) - just guess who's being a real darling and giving me a bit of a break next week? Talk about being a turncoat!

I'll still be around in case anything breaks but Miss X the Rebel will be miraculously transformed into Dick Orem and will be cracking the whip, commenting, choosing the picks and has also provided the prize(s)!! And her snippets makes are stupendous, I kid you not! Wanna know who it is? Ask Parsnip - he's strutting round here twiddling his bow tie one minute and sighing like a love sick teenager the next!

Di
x

Tuesday, 9 February 2016

It's a puzzle

Ever since I bought the Woodware 'Jigsaw Piece' punch I've had my eye on a few jigsaw dies. Last week I had the time, inclination and well-being (yippee!) to spend time in a branch of 'The Range', which opened at the end of last year, not too many miles from us. Ha, I just checked exactly what date they opened and 'shoo nuff' it was mid-November when I was just a tad laid up :)

I spent quite a while wandering round their craft section needless to say and my eye fell upon this die by DoCrafts called 'Jigsaw Pieces'. BTW, I don't keep the packaging when I buy dies, they're all stored in A4 ring binders on magnetic sheets within strong (side opening) plastic file pouches - and are recorded on white card sheets in the front of each binder:

Anyhow, I replaced my eye from where it had fallen on the die (as you do) and quickly grabbed it as it was all on its lonesome and needed a good home.

I can see loads of uses for this die, I was itching to use it so my card isn't overly exciting - but one thing I subsequently thought could be fun for kiddies would be to use a main image on the front of their card and then included a repeat image inside the card, die cut into the nine piece jigsaw, perhaps with the pieces popped into a little cellophane bag, for them to assemble following the front of the card as a guide?

Anyhow, here's my first play:
I used:

- 5" x 5" square white card blank, tent style

- piece of white card stock which I embossed using Cuttlebug's 'Swiss Dots' folder. The folder isn't quite as wide as I wanted so it was a case of moving it across, running through again and then using a ball ended tool to 're-emboss' where some of the dots had been flattened, groan. Then trimmed it to size and glued onto the card itself

- in my box of Kanban goodies I found a square birdie image with a frame just a teensy weensy bit smaller than the outer edges of the die. Without separating image and frame, backed them with double sided adhesive sheet (the medium strength stuff) and coloured three of the flowers using Whispers markers

- time to play with the new die (DoCrafts 'Jigsaw Pieces, which is approx. 4" square) - just taped in place on the adhesive sheet backed image with low tack tape and run through the Cuttlebug

- had a snippet of black card handy as I wanted that to show up the jigsaw cuts a bit and assembled the pieces which were backed with sticky adhesive from my earlier trickery - one at a time onto it, leaving just a little gap between each one

- trimmed the edges of the black card away and then mounted it onto a piece of SU 'Real Red' card as a frame

- popped it onto the card front using thin sticky pads - job done!

Whilst typing this I thought of another way you could include a little jigsaw in a kiddie's card, just cut each piece in a different colour for the card front and also for your little puzzle to include in the card. Good for kids colour recognition and a great way to use up snippets too :)

It's been a windy old day here today/yesterday (Monday) - I'm sure I spotted a neighbour chasing his shed roof down the road and the whole house here has been whistling, creaking and groaning - despite all the insulation, well sealed windows and such. I absolutely hate wind, and I don't mean that sort - the gales and gusts are so unforgiving!

So, it's up to Sarn as to whether the newly formed tradition of the Playground Pancake Day Race goes ahead or not. I hope it does - Parsnip is poised with his huge plate, and a spoon and fork, at the ready :) I'm standing by with the First Aid kit and a fire extinguisher!


Di
x

Sunday, 7 February 2016

Pixie's Snippets Playground - Week 215

Hi there! What a fabulous selection of entries we had, once again, in the Playground. It truly is so good to see so many of you playing along and finding such clever ways to use up your snippets!

My own snippets card for today came about when I was pondering over which prizes to offer, as is often the way when I make my Sunday Snippets card. Bet you never guessed that one :)

Anyhooooo, whilst thinking, I decided to tidy up a bit and pop some scraps of card into the snippets folder and there was this piece of card stock glaring at me (yet again) from the 'miscellaneous' slot. It was way too pretty to throw away but somehow it had had managed to get an unsightly crumple in it. It's a piece of 'rainbow' card and the pattern runs diagonally - bingo! I worked out that I could chop the card down to a usable size, lose the crumple and have the colour graduations running straight across the card - a bit like a sunrise. How I wish I could produce this background so perfectly using inks!

I did first spot this gorgeous die over at Chris's Ramblings and Chris also used the die beautifully with white as well as black - and also her inky backgrounds were much more inventive than mine. Apart from all that, my card is a pretty unashamed CASE really - thank you Chris for the inspiration!

This was the end result - really quite easy to do once all the measuring was sorted out:
I used:

- 4" x 5.25" white card blank, tent style

- a snippet of black card stock for the 'frame' behind the snippet of 'rainbow' card

- the rainbow card snippet, trimmed to size after measuring the width of the die I wanted to use

- yet another snippet, black card stock again - backed with Stick-It adhesive sheet

- then I die cut the flower border using a Crafts-Too 'Butterfly Garden' die from the black card snippet. Being unsure how it would release from the die I also used a piece of waxed paper between the die and the black card - but I do suspect it would release beautifully as the die feels almost like it has a Teflon coating to me

- at this point I felt brave enough to stick the border to the rainbow card before actually stamping the sentiment. Good grief, this could have been a major disaster - but it worked and I stamped the lovely sentiment using Memento 'Tuxedo Black' ink, my Fiskars stamp press and an Inkylicious stamp from the two-stamp set called 'Sunshine Wishes'

- next assembled the card, black layer and then rainbow layer with the butterfly garden silhouetted on it and the sentiment already stamped of course

- the die comes with seven 'free flying' butterflies - and as seven is my lucky number I used them all and popped them onto the card front fluttering hither and thither :)

Here's a couple of little tips. I hate stamping straight onto card stock but for this card (and many others before if truth be known as I learned the hard way to be cautious) I used a piece of the offcuts of the rainbow card to check how clearly the stamp worked on it rather than wreck the thing. As you can see, it worked fine - but the next thing was how to make sure the card stock didn't slip about when I was actually stamping using the Fiskars press. Often a stamp positioner will hold your piece of card steady - but if that's not going to be the case then the solution is easy peasy - especially if you use a slippery glass cutting mat for your work area. Just apply a couple of stripes of removable tape runner to the back of the piece of card to hold it onto the work surface. After stamping the sentiment - or even an image of course, - just rub your finger over the back of the card stock to ball up the removable tape runner lines.

OK, that was my snippets card for today - let's now take a peek at a few picks from last week. Oh, I like that phrase 'peek at the picks'. This week I've tried to really focus on some ideas and techniques that you may want to try out:
This terrific card was made by Cathy R, and you need to nip over to her blog to see how she used 'rusting powder' to create the wonderful background panel. Clever stuff!

I love any form of paper patchwork to use up snippets, and this lovely card made by Kath really caught my eye!

How cute is this card then? Made by Cornelia and what really caught my eye is the clever way the card top has been split across the heart. A perfect Valentine's Day card.

We had some really great Valentine's Day cards in the Playground this past week, here's one idea that I love - made by Jenny H. The owl stamp is so funky and that sentiment, which you could produce on your computer, is perfect! A card with a difference - I might make something similar for the in-house critic :)

This is such a clever idea too! Liz made it, although it's a different card shown on the thumbnail in Mr Linky - so in case you missed seeing this I thought I'd add it in as well! And, Liz has a link on her blog to a video tutorial if you want to have a go for yourself.

I need to stop there with the picks folks - a basket of ironing is calling me plus I've sat still for long enough.

This week we have three new Playmates joining in the fun:
Louise H came to play twice, and after some deliberation I've picked her second card to show you here. I love Art Deco - so elegant.


Pen came to play three times (must be the lure of the 'hooch' in the tree house) - and I've chosen to show you her third entry - I adore the soft and feathery look!

Erika skipped in to share this really pretty card - paper piecing is one the very best ways to use up snippets isn't it? Lovely card!

Thank you so much for coming to play and we hope to see you all again really soon!

Before we move on, our Barb is celebrating a year since she began her blog, with some really lovely candy. You have until 28th February to add your name into Mr Linky over at Barb's Faraway Cards - and this is the generous and varied prize you can win, if you haven't entered yet what are you waiting for?

Time for the prize draw here now. We had the heart die, the glitter papers and the hearts embossing folder on offer - and our winner is:
Oh yippee, it's a first win for Carole according to my records - and she also whipped into the Playground as one of the last entries, which shows it's never too late to play along! Could you please drop me an email Carole (address is on the RH sidebar) letting me have your snail mail address and I'll post off your prize as soon as possible this coming week.

And the Playground prize this coming week is:
Linked to today's snippets card (as is almost always the case) - it's your own Crafts-Too 'Butterfly Garden' die and Inkylicious  two-stamp set called 'Sunshine Wishes'. I do so like the second sentiment 'Those who bring sunshine into the lives of others cannot keep it from themselves'.

The Snippets Challenge will run for one week and the Playground gates will close at 11am UK time on Saturday 13th February. The gates will open again at midnight UK time on the same day.

Maximum of three entries and please say in a comment if you wish to play and be a possible winner of the prize. If you only want to play for either the die set or the sentiment stamps then just say so in a comment - if your number comes up then I'll do a further draw for the remaining part of the prize. But, both items are up as one complete prize if you so wish of course. Please also link back to the Playground in your blog post to be eligible for the draw.

Mr Linky is below - please let me know if you have any problems linking, it's easy for me to sort out so don't struggle on alone :)

Enjoy your week - whatever you have planned! Valentine's Day isn't far away so I guess we'll have a few entries featuring even more love and mushy stuff this week :)

Di and, of course, Parsnip! (Who says quite adamantly , one kiss blown in his direction and he'll run for cover!)
x

Friday, 5 February 2016

Merry Monday #190 'Santa!'

It's a lovely theme to the current challenge over at Merry Monday this week - 'Santa'.

And, over at Craftyhazelnut's Christmas challenge it's 'Anything goes so long as it's Christmas' - and at Craftyhazelnut's Christmas Challenge Extra for February it's always 'Anything goes'.

So my card for today covers all three challenges - plus I used one of the Bugaboo digital images I recently won over at Hazel's too:
I used:

- 6" x 6" square white card blank

- piece of 6" x 6" white card stock for the front panel onto the bottom centre of which I stamped the sentiment using a pre-loved Hero Arts stamp called 'Merry and Bright' and SU's 'Real Red' ink pad

- embossed the front panel using SU's 'Softly Falling' folder and then embossed two parallel lines across using the Hougie board

- trimmed the embossed panel down to an eighth of an inch smaller than the card blank all around and glued it in place

- as said, the cute 'Stocking Santa sack' digi image was part of my prize chosen from Bugaboo. I just re sized him and printed onto white card before colouring with Pro markers. Then fussy cut round the image and ran the edge of a black Whispers marker right round the image to redefine any areas where I  felt I'd cut slightly into the black outline (OCD strikes again!). I then made Santa sit around and twiddle his thumbs whilst I prepared the trees

- grabbed plain green and holly patterned snippets of paper from LOTV's 'Classic Christmas' paper pad and punched three trees using SU's 'Tree' punch

- at that point I realised that adding paper straight on top of quite heavy embossing maybe wasn't such a great idea so I punched out three more trees from a snippet of thin green card and glued these to the backs of the paper trees

- then noticed that the punched white edges of the LOTV paper showed slightly so just ran a dark green Whispers marker round the edges of each tree

- all that was left was to position Santa and the three trees along the top embossed line, to 'ground' them, and then glue in place

I did add a tickle of clear Wink of Stella to the bobble and fur trim on Santa's hat - which you can't see in the photos. Not surprising really 'cos it's very hard to get it to show up in photos. Snort, especially if you only decide the add the tickles after taking, editing and uploading the photo anyhow :)

Di
x

Wednesday, 3 February 2016

Huge butterfly stamp!

I used:

- 5.5" x 4.25" tent style card blank - made from Crafter's Companion 300gsm water colour card, with half an inch trimmed from the front lower edge

- a black die cut daisy frame which had been lying on my desk, since it arrived as a freebie with an order 

- Penny Black 'Soft Wings' butterfly stamp, stamped onto Crafter's Companion water colour card using Ranger 'Jet Black' Archival ink

- coloured the butterfly using Faber-Castell Polychromos pencils and Sansodor blending solution then tickled over parts of the butterfly with a clear Wink of Stella brush pen

- hand cut the butterfly and set it aside (had a quick lie down to recover)

- die cut a border strip for the bottom of the card as the 'over the edge' element using a snippet of black card stock and MFT's Die-namics 'Faux Crochet Border'

- added the border strip to the card front using narrow red line tape then trimmed off the overhang from either side- so much easier than trying (and in my case it would be failing) to cut the border to length before adding it to the card

- added the daisy frame where I wanted it, using a fine-nibbed glue pen

- then to finish, added the butterfly using thin sticky pads

I do like the happy coincidence that the border die echoes the daisy on the frame :)

Di
x

Tuesday, 2 February 2016

Cuttlebug Mania Challenge - 'Kids (for a child)'

It's a fun theme over at Cuttlebug Mania this fortnight - 'Kids (for a child)'. The DT have used images from our sponsor Fabrika Fantasy and this is what I came up with:
I used:

- 6" x 6" square white card blank

- a slightly smaller layer of mid-blue card stock from the snippets folder

- another, smaller again, layer of dark blue slightly pearlescent paper from the snippets folder

- a layer of patterned paper from LOTV's 'Frosty Christmas' paper pad - glued all the layers together and added them to the card front

- the image from Fabrika Fantasy is called 'Winter Games 2' and I re-sized it and and printed onto white card. I didn't adjust the print quality so rather than waste the 'paler than it should be pre-coloured image' I added some deeper colouring using Faber-Castell Polychromos pencils

- die cut the image using a Spellbinders circle and layered it onto a circle of dark blue paper, die cut using a die from the Tonic Studio's 'Circle Layering' dies set. Handy to mix and match these as it meant I could have a nice narrow border around the image. Glued the image onto the card front and added some tickles of clear Wink of Stella here and there

- the trees were both die cut from a snippet of white card stock which was already patterned with sparkly scroll work - I used two Marianne dies to cut the trees 'LR0136 and LR0174'

- the word 'noel' with the dangly snowflake die cut using the Poppy Stamps 'Noel Snowflake' die (a gift from a lovely blogging pal) and another snippet of the white sparkled card stock. I also die cut it again from dark blue paper to create a slight shadow effect when I layered both die cuts onto the card

- the corners were die cut from more snippets of the dark blue paper using a die from a Whimsy corner dies set

- then just added four sparkly aurora borealis self adhesive gems to the dangling snowflake, the corners and also the top of one of the trees

You do have to use a manual die cutting/embossing machine for Cuttlebug Mania entries (it doesn't need to be a Cuttlebug but it must be manual, not electronic). And, you can't mix the two, it must be all manual please. Then make your entry, link into the challenge, link to the challenge in your own blog post and and make sure that you also say what products you used for any die cutting/embossing.

Di 
x