Wednesday 30 March 2022

Rudolph Days Challenge - March 2022

I've been playing again with the brilliant Penny Black Masterpiece card 'toppers' - plus a new set of dies to frame them - made two at the same time.

I'd like to enter Scrappy Mo's Rudolph Days Challenge for March (it runs to the end of the month so I'm cutting it a bit fine this time) - other challenges I plan to enter are listed, with links, at the end of this post:

I used:

- 5" x 5" white linen card blanks, side opening (the images are printed on linen card, so this works well well them)

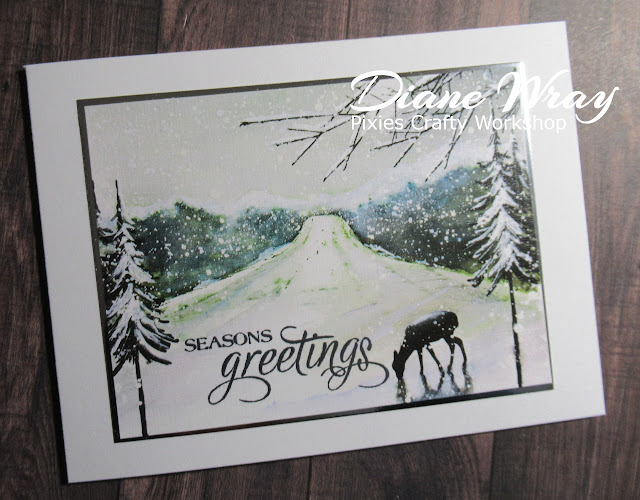
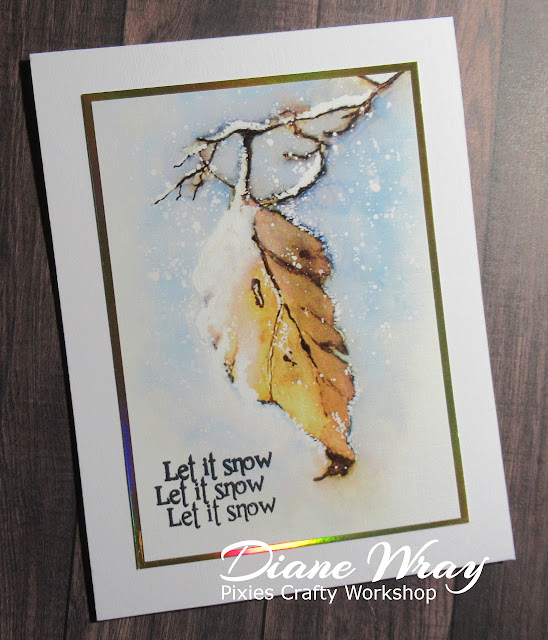
- images from two different Penny Black Masterpieces sets - 'icy winds' (the bird house) and 'pine cones & peace ' (the solitary bird)'. They are all sold at 3.25" x 4.5" and I trimmed them down to a square shape, very slightly under 3.25" square so they sit just under the frames I later added

- used snippets of the same white linen card to die cut the frame border part and then Tonic Gold Mirri card for the mitred inserts. The set of dies I used is also by Penny Black, called 'framed'  - it's different and much more delicate looking than many frame dies, especially with the mitred inserts

- at that point I could more accurately size up the image and frame, which is why I trimmed just a little bit more off the 3.25" square images I'd created

- glued the images in the centre (ish!) of the card blanks

- then added the frames with the gold inserts using a glue pen

- stamped the sentiments using the Misti, Memento Tuxedo Black in pad and a stamp from  Kirsty Wiseman's 'Many Greetings' set. Not sure if it's still available as I've had mine for many years, it was made by Personal Impressions

- finished!

The sentiment stamp is a sort of higgledy piggledy font and near impossible to get straight - even using the Misti plus acetate grids etc. But hey, a blind man on a galloping horse wouldn't notice - wise words from Len, learned at his Mum's knee!

I'd also like to enter the following challenges:

Darnell's NBUS #36. The Penny Black frame dies were having their first outing

Peace on Earth Christmas Challenge #12. This challenge is pretty new to me (a few of our lovely Playmates are on the Design Teams!) and it runs Bi-monthly with Anything Goes (for Christmas!) allowed and some beautiful inspiration boards to whet your appetite - this is the current one:


My cards are really 'Anything Goes' - although I could say that inspiration came from so much snow! Do hop over to see the DT cards - they're such a clever bunch and deserve our support! 

Speaking of supporting others - I recently placed an order for some crafting 'basic supplies' with the UK based Loobi Crafts HERE. It was triggered when I was looking for the new 'Saltwater Taffy' Distress ink pad and so many places were out of stock. The pot of gold wax in a photo on my blog earlier in the week came from there - and of course 'Saltwater Taffy' TH DI pad (fabulous colour) - plus some other lovely bits and bobs (as you do!). The order came in double quick time and was packaged with so much care with items wrapped in bubble wrap. I think the girls who run the family owned shop/website are well worth a positive shout out - they obviously enjoy and take pride in their work. I for one will be more than happy to buy from them whenever possible. Well done to Lynne and Lisa!  

When you hop over to Loobi Crafts, as I hope you do, be sure to check out their Spring Sale page. I only found it as I was typing this post and it's like an Aladdin's Cave! What choice, plenty of well known brands and products, many at as much as a third off. It certainly beats one or two 'sales pages' I peek at online where you're lucky if there's a reduction of 50 pence at times. Just some of the brands I spotted on my scamper through are Woodware, Tim Holtz, Pink and Main, Paper Artsy and the products are too wide ranging to list here. And yes, of course I placed an order - it just had to be done! Go and see, what are you waiting for - whooooosh!!  


Wednesday 23 March 2022

Card for the Allsorts Challenge - and a new gadget

First of all, my goal is to enter as many Allsorts Challenges as possible, still bearing in mind that Christmas cards are also a priority - besides the Snippets Playground of course! It's been so heartwarming to read all your lovely comments about Sarn and I joining forces to run the Playground - happy times ahead!

The current challenge over at Allsorts Challenge #668 is 'Feminine' - and flowers sprang to mind here:

I used:

- A6 white linen card blank, side opening

- piece of the same white linen card to die cut the frame with flowers - called 'Tatty Layers - Lily Rose Panel' by Lisa Horton. The frame can be used without the flowers as a backing for images etc. I know it was one of you lovely Playmates who pointed me in the direction of the Lisa Horton frames with flowers - thank you!

- then glued the frame, with the flower outlines attached, onto the card front, using a fine glue pen

- stamped the sentiment using the Misti, my 'new gadget' - see below, Memento 'Tuxedo Black' ink and a sentiment from the Hero Arts 'Live Life' set of stamps. Sadly, despite being properly stored, the stamps have a slightly yellow hue and are also becoming rather pliable. They're many years old and owe me nothing but I'd be sad if they do become unusable

- and then, as it so often does, the 'red mist of crafting madness' descended upon me and Dopey here decided to infill all the die cut flowers - piece by flipping teeny, tiny piece!

- used one piece of paper from the fabulous Craft Consortium 'Ink Drops - Vivid' set of papers - mostly pink shades on one side and mostly yellows and a touch of green on the reverse, just to add a bit of a varying shades element

- die cut and then pieced each little perisher in place - using a fine glue pen

- 24 hours later - no kidding - it was finally done! Possibly one of the most fiddly things I've ever tackled. The frame just as it is, or with only the inclusion of the die cut floral outlines, is far better for one's sanity, trust me!

I did show the result to Dudley and it was fascinating to see his reaction. His eyes flicked from one side to the other and up and down, repeatedly - taking in every little detail. I suspect he could actually detect stress vibes coming from the card -  he had been party to a few choice words whilst trying to sleep at my feet during much of the process! If he could talk human talk I bet he would say 'Bonkers, Mama, totally bonkers!'.

And the 'new gadget' shown in the main photo above is something that's interested me for a while, since seeing brief glimpses of Jennifer McGuire using one in her more recent videos. As I have arthritis in practically every moving part of my body (apart from my tongue - which does its best to compensate!) - even using the Misti when making a batch of several cards at once gives me wrist ache. So I hunted all over the place and eventually found this:

Ignore the pot of gilding wax, used to prop the tool on its side for a better look (mind you, it's an absolutely gorgeous tone of gold!). Basically the new gadget is a 'Stamping Pressure Tool' - if you're interested in the link then just drop me an email, it took me a lot of searching to find this exact product - with a few blind alleys on the way. It was much cheaper than the one or two branded pressure tools I came across - so long as you can wait for 10 days or so  for it to arrive. It's 3" in diameter and comes with a black self-adhesive felt pad to attach to the base. You then just rub it over the lid of the Misti for a nice even print. And I already love it!

By the way, I've never played 'table top air hockey' but the tool basically seems to be a replacement 'pusher' - someone obviously was quite switched on!

I'd also like to enter this into Darnell's NBUS Challenge #36  for March HERE. The set of dies and the 'Pressure Stamping Tool' were both having a first outing.

If you need me, I can be found wandering around the shrubbery at the local 'Funny Farm'! Gently muttering 'Never again, teeny, tiny die cuts, never again'.


Sunday 20 March 2022

Snowflakes and a snippet

I've wanted to enter the Christmas Kickstart Challenge #60 from the beginning of the month - the theme is 'Snowflakes are Winter's Butterflies'. So it had to be a snowflake, or several  - and it's also my snippets card for the new Snippets Playground Challenge #424 - over HERE:

Ha, ha - without me swinging from the ceiling - you also got me wearing a red top reflected in the mirri card! I tried believe me!

I used:

- 6" x 6" square white card blank - tent style - snigger, purely as I glued the final elements on with the card not sitting in front of me as a side opening one, but I actually like it!! Could have been top opening so I did OK really - phew

- piece of baby blue pearlescent card stock, just slightly smaller than the card blank, glued in place and it is even on all sides, dratted camera is determined to cause issues if it can

- then came a marathon die cutting session, using the fabulous Paper Boutique 'With Festive Love Doily' set of dies

- first die cut the midnight blue pearlescent background, and set it aside

- then die cut the 'snowflakes circle' from just some white fairly lightweight card stock I found in one of the many boxes of Christmas card sheets lurking here

- followed that by using the circle die in the set to fully create the frame - and set that aside for now as well

- reverted to my small Altenew die cutting machine and used a snippet of silver to cut out the backing for the sentiment. Then used leftover white pearlescent scraps, from the centre of the cut out circle, for the actual sentiment and three snowflakes. Very little was left over!

- assembly time! Just glued all the layers in place, using Collall All Purpose glue for the large midnight blue piece and a glue pen for everything else - bit fiddly at times

- for a finishing touch I added some teeny clear gems around the snowflake border, to the centre of the three separate snowflakes and also to 'dot the i's' in the die cut sentiment - just because I felt like it! 

I originally spotted a very similar die set over at Jules' blog - a good while ago. Needless to say I couldn't track the set down and so sort of gave up for a while. Suddenly, a good few months ago, a similar enough one popped up in an online shop and greedy little pig here had to have it. And also a more Summery one, which will be a future Playground prize as I managed to get two of those. But I need a rest before going down that road again

The first shock was a sheer size of the set of dies, in terms of dimension! You need almost a 6" square background/card blank before you get going. I rarely make large cards so that was my first challenge! In the end I just used all the dies included in the set - putting other ideas to one side. At first it seemed quite limiting and I did wonder if I'd been sold a 'one trick pony', to coin a phrase! However, I do think that, as Jules did on one of her later cards, the snowflakes frame is just so perfect to put round an image. I also fancied adding a round snowflakes shaker element in place of the sentiment - but I went with the flow and stuck to the set of dies whilst ahead.

This is my snippets card over at the Snippets Playground. The prize this time has no connection to the above card - but there's some really exciting news! Whooooosh - byeeeeee, you might have at least read to the end of this post!

I'd also like to enter this into Darnell's NBUS Challenge #36 for March HERE - the set of dies was most definitely NBUS!


Monday 14 March 2022

Penny Black 'Masterpieces Made Simple'

I spotted Darnell using the relatively new Penny Black 'Masterpieces Made Simple' card toppers fairly recently - and, being up for anything easy, bought a few sets for my own Christmas cards (which are coming along really well right now, thank you!).

I adore PB 'Stickeroos' as you surely know by now - and the 'Masterpiece' toppers didn't disappoint at all. Similar idea and CAS, which I like rather than messy.

And here are a couple - rustled up in next to no time. Kept them quite plain and, I hope, a bit elegant:

I used:

- two 5.5" x 4.25" white linen card blanks - the horizontal one is side opening and the tall one is tent style (the white linen card works so well with the linen card of the PB 'Masterpieces' and also both of them work perfectly for stamping sentiments - which surprised me)

- both images are from the 'icy winds' set. Trimmed the card images very slightly and then stamped the sentiments directly onto the image panels. I used the Misti, Memento 'Tuxedo Black' ink and the 'Seasons Greetings' sentiment from the smaller version of the Inkylicious 'Seasons Greetings x 4' set of stamps on the deer image. 

 - then used a 'Let it snow' stamp from the Personal Impressions 'Many Greetings'  set of stamps designed by Kirsty Wiseman - onto the snow laden leaf image. A much loved and well used set of stamps

- mounted them onto very slightly larger snippets of silver and gold mirri card - just to give them narrow and simple borders

- then added them onto the card fronts - finished!

There are a lot of few more of these wonderful Penny Black sets waiting here - and also plenty of fun to be had using them. Such a quick and easy way to rustle up Christmas cards.

I'd like to add these cards into Darnell's NBUS Challenge #36 for March. NBUS goodies were obviously the fabulous Penny Black 'Masterpieces Made Simple' images. In the UK, 'Cuddly Buddly' sell them BTW, and they are a reliable and good company!


Wednesday 9 March 2022

Under The Mistletoe

Before Christmas I bought a few of Lisa Horton's 'own brand' products and finally found time to have a little play with a couple of the items:

How very strange, the card looks as if it's behind gauze - yet the sentiment is clear as day and not out of focus. The green of the mistletoe is brighter and the embossing is much more crisp in real life - bet it's that shining silver that confused the camera!

I used:

- A5 white card blank, side opening (not made an A5 card for ages!)

- first hurdle was the 3D embossing. It took several attempts and the whole lot, including the Cuttlebug, almost went through the window at one point. I used white card for my final try which I sort of bent and fondled to break down the fibres a bit and then gave it a good spray of water on both sides using a mini mister - that gave the most successful result

- the slimline embossing folder is called 'Under The Mistletoe' by Lisa Horton and it also comes with a die to cut one sprig of mistletoe

- once the main panel was embossed, I then die cut the mistletoe twice - once from a snippet of pearlescent green and then from a snippet of pearlescent white card

- then embossed both sprigs by sitting them back into the embossing folder and running them through the Cuttlebug before fussy cutting the white berries and gluing them in place onto the green sprig. When I did that gluing step I sat the sprig on the convex sprig outline on the embossing folder so I could press the berries on without fear of distorting either the sprig or the berries - then kept the assembled sprig and berries for later use

- trimmed the mistletoe white embossed panel and layered it onto a slightly larger backing of silver mirri card

- then added the slimline panel to a piece of silver and white trimmed paper from Chloe's 'Crackle' foiled paper pad - my advice, don't expect to find the actual  colours you see on the cover inside the paper pad. - avoid if you expect them

- glued that full panel to the front of the card and, using a glue pen, added the single green sprig of mistletoe   

- thinking my trials were over, I moved onto another Lisa Horton product for the sentiment. It's a very clever idea but loads of issues. It's called 'Festive Banner Sentiments' and is a stamp and single huge 'multiple banners' die 

- having, after a struggle or three, come up with a die cut sentiment I then stuck it in place using very thin sticky pad pieces where it adhered to the embossed panel and thicker pieces where it adhered to the silver 'crackle' paper - to keep it on the same level

- and being a glutton for punishment, I made two at the same time of course! 

Lisa Horton's really great idea with the multiple sentiments stamp and the multiple banners die has even more worrying issues. The stamps appear to be cheaply made of acrylic (too stretchy to risk removing from the acetate backing sheet and no smell - a sure sign, the better quality photo polymer stamps used by larger companies have quite a pong). I left the stamp on the acetate and used removable tape runner on the back of the acetate to stamp, using the Misti. The widest part of the die for cutting the banners is a smidgen over the 6" width aperture on many smaller cutting machines, including mine and despite alignment marks, it still goes 'off kilter'. Almost impossible to not have one or two sentiments cut slightly adrift.

All in all - it's what is NOT said on these products that I have issues with - no definition of the materials the stamps are made from and also absolutely no mention of the overall dimensions of either the width or length of either the stamp or the die, as well as the mis-alignment. And the mis-represented paper pack cover, when I queried it, was blamed on 'photography limitations'. The normal gold and supposed 'rose gold' paper are almost impossible to tell apart - and the rose gold is depicted as a pale metallic rose pink on the pad cover. I actually thought I'd been sent a 'dud' pad of just normal gold and silver but was told pretty sharply, when I phoned to check, that wasn't the case. From the attitude I met with, I bet I'm by no means the first customer to query the discrepancy. 'Null point' for customer service! Buyer, be careful - I could well be wrong but I do smell the aroma of 'overseas production cost cutting' at work.

I suppose the lesson is to drop companies such as those like a hot potato once you find out their true 'modus operandi'.

This is only my personal opinion, but it was born out of bitter experience. To think that one card design would throw up so many problems.

I did want to enter this card into a few challenges such as NBUS - but am now so sickened by what I discovered during the crafting process, I really was hard pressed to even write this post - mostly as a reminder to self!

BTW, I do like the cards I ended up with - it was the journey to get to that point that gave me grief!


Sunday 6 March 2022

New challenge over at the Snippets Playground

No card from me on here today, I had plans but time just ran out. But, it is the final Ruby's Memory challenge right now over in the Snippets Playground, with a special fun prize to be won! Off you go - see you on the swings (Dudley will push swings for treats - which makes me laugh as his little legs aren't very long to be able to reach up!). Or you may prefer just lounging in the tree house, Sarn's toasted crumpets and hot beverages will no doubt be on offer!


Wednesday 2 March 2022

Ukraine

I've been trying enter to Allsorts Challenge more regularly, and originally intended to do some paper piecing for this current challenge. The other option was hand coloring. Then, right in front of where I swivel round to use the laptop there's a set of open shelves and sitting on there, right in line with my eyes, is the very old wood mounted stamp I used and hand coloured today.

Here's the card I made - the sunflower is Ukraine's national flower:

I used:

- 5.5" x 4.25" white card blank, side opening

- piece of the same card stock as the card, embossed using SU's 'Textured Impressions' folder then trimmed to slightly smaller than the card front

- glued the embossed panel onto the card front

- stamped the Penny Black image called 'Hello Sunshine' onto a snippet of white card using Memento 'Tuxedo Black' ink

- coloured the image using Polychromos pencils

- die cut the image using an old but favourite die from the Spellbinders 'Labels Eight' set

- ran a ball-ended tool around the inside of the die cut whilst it was still in the die to create the 'lip'

- removed the die cut from the die and went around the edge of the die cut image using a gold Calligraphy pen. It's a chisel tipped pen and you just use the chisel sideways on - sort of running the edge of the card through the middle of the chisel tip, easier to show than explain!

- added the image panel to the card front, using slightly thicker than usual sticky pads for extra 'lift'

As always, taking a photo of shiny elements on a card is nigh on impossible - the gold edging is just like gold leaf, really pretty and also very shiny!

I'd like to add this card into the current Allsorts Challenge #665.