Tuesday 29 November 2016

Cuttlebug Mania Challenge - 'Light in the darkness'

Time for another Cuttlebug Mania Challenge and the theme this time is 'Light in the darkness'.

For example you can use candles, lanterns or stars on your entry - I'm sure you'll think of some others. I almost went for a Nativity image where the stable was bathed in a lovely glow, so there's another idea for you.

You do have to use a manual die cutting/embossing machine for Cuttlebug Mania entries (it doesn't need to be a Cuttlebug but it must be manual, not electronic). And, you can't mix the two, it must be all manual please. Then make your entry, link into the challenge, link to the challenge in your own blog post and and make sure that you also say what products you used for any die cutting/embossing.

Details of our sponsor can be found over on the Cuttlebug Mania Challenge blog.

This is my DT card, the light here was dreadful when I took the photo needless to say:
I used:

- 4.25" x 5.5" white card blank, tent style

- a piece of white card stock, die cut using a Lil' Inkers Stitched Rectangle die, backed with a panel of white fun foam and glued onto the card front

- Memory Box 'Glowing Candles' die which I die cut from white, silver and green snippets

- the first layer I glued in place was the green layer with all the pieces still in place apart from the white parts of the candles. The Woodware Ultra Fine glue applicator was invaluable when layering up this intricate die

- next took the silver die cut and snipped off the little branches and poked out all the loose pieces then glued it on top of the green layer 

- then poked out the six white candle pieces from the white layer and coated them with clear Wink of Stella before gluing them into the silver apertures. For once I thought ahead :)

- added little red pearlescent gems to the ends of the branches and just a few on the main part of the holly arrangement

- I wanted quite small, raised and very shiny silver lettering so added a peel off sentiment in the top left corner

- final touch was to add some Stickles to the candle flames. The yellow I have would be too bright and the lemon too pale, so I mixed a little blob of both together on a scrap of paper and applied the mix with a very fine paintbrush

I hold my hands up and confess that I got the basis for this card design from the super-talented Loll. I've had my die since October 2013 and this is only the third time I've used it, bad me! Thanks for the inspiration Loll (you popped up on Pinterest when I was looking for general ideas for candles on cards), I loved your card and also it was time to give the die another outing!


Sunday 27 November 2016

Pixie's Snippets Playground - Week 257

OK, so that was a much easier week with the back issues and so long as I still rest when it tells me off (and cuddle up to the heat pad, which is my new best friend) am feeling loads better! Yay 😍

So, I made a snippets card, but nothing on it is on offer this week - due to a very generous prize donation from Viv which I can't wait to share with you. I do still have some wonderful donated prizes in the Toy Box, so please be patient if you sent goodies and I haven't yet offered them.

It was a bit weird to have a totally free hand with my Sunday Snippets card rather than be guided by the prize on offer, and this is what I made:
I used:

- 4.25" x 5.5" white card blank, tent style

- a panel of white card, die cut using a Lil' Inkers 'Stitched Rectangle' die and glued to the card front, with a snippet of white fun foam backing to whole panel to keep it evenly raised

- a selection of Christmas trees, punched using SU's 'Tree' punch and little snippets which were stored in the back of my favourite LOTV ''Frosty Christmas' paper pad

- glued the trees in place on the card front - tip, I arranged them first and then just popped a little pencil dot above the top of each tree to help to position them when I glued them in place - then rubbed the dots off of course!

- pink metallic Josy Rose nail heads on top of each tree

- stamped the word 'joy' using Brilliance 'Mediterranean Blue' ink pad and a stamp from the Personal Impressions 'Many Greetings' set

- final touch, just three pearlescent sequins

I'd like to enter this card for the current challenge over at Merry Monday #223 - Dark Blue, Light Blue & Pink.

Now for the weekly peek at the picks:
Preety showed the journal she's been working on, made using an up cycled diary. There are loads of wonderful photos and lots more detail over at Preety's blog - love it!

I think this is such a lovely card, made by Sue (Zouave Cards). Love the bold butterfly against such a pretty embossed background Sue!

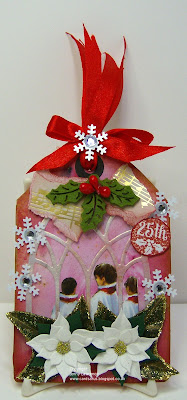
This marvellous Christmas tag really caught my eye this week. Made by Pat - and aren't the wonderful citrus colours fabulous with the gold? So different and really striking.

Isn't this card adorable? I love the Memory Box 'Piestra Tile' die (don't use mine enough!) and those darling little pups - just so cute! Andrea skipped into the Playground waving this lovely card.

I love this card, made by Janice. It's so elegant and really eye catching - a great example of using white with navy and a touch of silver. Great for 'batch baking' too!

This is a great card, made by Kath. Wonderful papers for the blue backing and such a lovely image as well - all pulled together in Kath's very distinctive clean and fresh style.

Gloria came to visit this week, with this card and tag set. Isn't it brilliant? Love the tea set theme and stamping the deer and tree design onto each piece is so clever!

This is the sweetest Christmas card, made by Sandra. The little dancing poppet is just so cute and Sandra added lots of lovely embellishments and pretty paper as well - love it!

And last, but not least, here's another Christmas card with a fabulous image. Made by Hazel (Kbrandy4) and beautifully coloured then co-ordinated as well. 

That's my picks for this week - again, nine in total but as always I could have gone on for a lot longer.

We had 49 Playmates playing along last week (doubtless Thanksgiving kept quite a few of you occupied) and no new little friends joining us.

I did giggle a little while ago at something I spotted on line:
Anyone relate to this after their Thanksgiving turkey dinner? 😃😃😃

Prize draw time now and our winner of the Creative Expressions Sue Wilson Festive Collection 'Silent Night' die set is:
It's about 14 months since Liz last won a prize according to my records. She's almost always the first person to comment on my blog posts (Playground and any others that appear during the week) and rarely, if ever, misses a week in the Playground. Plus, I often choose Liz's fabulous work as a weekly pick - she's one of our die cutting queens and has been responsible for a lot of my 'must rush off and buy that' moments! So this win is well due and very much deserved.

Well done Liz! Can you please drop me an email with your address in and I'll post your prize off as soon as possible! My email address is on the right hand side bar.

As am sure you girls know, I always ask for confirmation of your addresses now - ever since I made a wrong assumption and we almost lost a prize!

This coming week's prize is:

A package arrived here out of the blue recently, containing the above items, very kindly donated by the lovely Viv - it's a single prize consisting of three parts. All from the Creative Expressions Sue Wilson Caribbean Island Collection, there's a St Kitts die set and two co-ordinating stamps called 'Tumbling Leaves' and 'Butterfly Trellis'. The lovely thing about this set, from me peering at the stamps and dies through their packets, is that the co-ordinating stamped images will be beautifully die cut using the largest die in the set. Or you can use the set to layer up the die cuts of course, just like Sue Wilson does. A really super prize - and Sue Wilson again I see!

The Snippets Challenge will run for one week and the Playground gates will close at 11am UK time on Saturday 3rd December. The gates will open again at midnight UK time on the same day.

A maximum of ONE entry and please say in a comment if you wish to play and be a possible winner of the prize. It's so much a 'set' that it will not be split up at all folks! Please also link back to the Playground in your blog post to be eligible for the draw.

Mr Linky is below - please let me know if you have any problems linking, it's easy for me to sort out so don't struggle on alone :)

Here's an important piece of news girls - our Playmate Brenda is having a fabulous Christmas giveaway of a Tattered Lace Crossover Machine over on her blog HERE.

I'm certainly entering into the draw as my beloved Cuttlebug is not working at full steam and I suspect it might be a bit worn out - bit like me really 😞

Have a lovely week! I'll still be rationing time at the desk - plus, I really need to get my rear end in gear for the Big Fat Man in the Red Suit! It's December soon, it's just four weeks to go until Christmas Day when this post appears - help!

Big hugs from Parsnip, and of course me -

Friday 25 November 2016

Gingerbread Boy Christmas card

It's time for ScrappyMo's Rudolph Days challenge folks! I'm hoping all is well with her as the last post she wrote way back at the beginning of November said she'd been in the wars and had badly sliced across her fingers. Let's hope it's just that Mo is very busy right now, rather than still incapacitated. If Mo does publish the latest challenge, remember it runs until the end of the month and is your last chance to play before Santa comes calling!

I've had a really cute Gingerbread Boy die set for ages, unused - slap my wrists! Had a play the other day and this is the result:

I used:

- 4.25" x 5.5" white card blank

- snippet of dark green card, trimmed slightly smaller than the card front and glued in place

- snippet of tartan card, trimmed slightly smaller than the dark green layer and glued in place

- piece of kraft card which was die cut twice using the solid outline die from Frantic Stamper's 'Gingerbread Boy' die set. One of the dies was cut with self adhesive sheet on the upper side

- next took the second die from the Gingerbread Boy set, placed it onto a solid outline die cut (the one without the self adhesive sheet upper layer) and die cut the little apertures for the icing/trimmings Then removed the protective covering from the other die cut's adhesive sheet and then carefully layered them together so that the little apertures were the top layer, backed with exposed sticky sheet

- die cut the icing/trimmings from a snippet of white pearlescent card stock and just inlaid each piece into the little sticky apertures on the Gingerbread Boy

- cut a piece of white card to suit and stamped 'Be Jolly' in the bottom right corner using Brilliance 'Pearlescent Poppy'

- glued the Gingerbread Boy in place, using Collall glue in a Woodware Fine Line applicator

- backed the image panel with another, slightly larger, snippet of dark green card and glued the whole panel onto the card front

Inlaying the icing/trimming pieces was easy once I figured out how I wanted to do it,
the trimmings die has all the little pieces perfectly placed as they would be on the solid body so you really can't go wrong. Plus, being so small, they would be prone to rubbing off if not inlaid.

I did think about adding 'Eat, drink and be merry' as the sentiment - but changed my mind, in deference to the little Gingerbread Boy's sensitivities 😃 


Tuesday 22 November 2016

Upcycled Scottie Dog Christmas card

Wanting to make a card, but not feeling ready for stamping and die cutting, I rootled through the 'shop bought' Christmas cards we've been sent that I save from year to year. Came across a really cute Scottie Dog card and this was the result:
I used:

- 5.75" x 5.75" white card blank

- the Scottie dog card was already shaped at the top half with the solid rectangular bottom half. Just a matter of trimming down the straight edge at the left hand side

- then used a piece of the same white card as the card blank and embossed it using SU's 'Softly Falling' embossing folder before trimming it so that the Scottie Dog panel would sit there with the bottom and side edges totally aligned then glued it in place

- backed the panel with dark green card, trimmed to just slightly larger than the image panel and glued it onto the card blank

- a really quick card, finished!

The lovely thing about the original card is that it came already embellished with a black gem for the eye plus a little strip of dark green velvet ribbon for the collar - and the sentiment was already printed as well of course! Easy, peasy 😃

I'd like to enter this card into the following challenges:

Craftyhazelnut's Christmas Challenge #308 - 'Cute or Anything Goes - so long as it's Christmas'

Craftyhazelnut's Christmas Challenge Extra for November - always 'Anything Goes'


Sunday 20 November 2016

Pixie's Snippets Playground - Week 256


Hi again - well that was a quick week!! There seems at last to be slow improvement (less squealing!) and we did manage a trip out in my wee sports car on Thursday to post prizes, collect prescription and mooch around Sainsburys while they filled the prescription - doing some grocery shopping - with Len 'riding shotgun' as a passenger all the way. But will still be holding off from prolonged crafting sessions just now!

Here's my snippets make, made on Friday, after a week without doing any crafting at all:
I used:

- 4.25" x 5.5" white card blank

- slightly smaller layer of silver mirri card as a frame - from the snippets folder (I always have loads of mirri card snippets!) glued onto the card front

- layer of pearlescent deep blue card - again from the snippets folder - glued on top of the silver 'frame'

- and a fresh sheet of Xcut adhesive silver metal effect sheet was used to die cut the Creative Expressions Sue Wilson Festive Collection 'Silent Night' die (don't worry, I managed to get another two die cuts from the leftovers and also kept some little offcuts)

- added the die cut to the deep blue layer and burnished it using a plastic rounded modeling tool to ensure it stays stuck in place (it works really well! 😅) Oooh look, I discovered Emojis on Blogger!

- final touch, just a single small clear sparkly gem in the centre of the star, the 'in-house critic' deemed that it was fine and nothing more was needed, so I stepped away

The die set comes with quite a lot of other sized stars, but as already said, it seemed that for this particular card .... 'less is more'. And I made three the same - just to keep up with my target if possible - took it in slow stages.

My original idea was to inlay the die cut - but that soon changed when I realised just how many teensy little background pieces there were to consider! Thankfully I twigged early enough as well!

The sticky backed sheet on the Xcut silver card is pretty darned good - but I really do recommend a burnishing tool or similar (the bowl of a teaspoon would work equally well!) just to make sure all the adhesive parts are firmly in contact with the card itself. That also applies to Stick-It adhesive sheets and the like of course.

Now for the weekly peek at the picks - and as can be expected at this time of year, quite a few are Christmas related:
Isn't this Christmas wreath, made by Brenda, absolutely stunning?! Such a great idea to give these to close family instead of Christmas cards.

I love this cute card for a one year old, made by Brenda L. Such a cute image and see how the little circle behind the cow matches the outer gingham frame?

Isn't this a gorgeous Christmas tag? Made by Jenny L and there's so much beautiful detail!

 I love this Christmas card, made by Carol L - such great use of snippet strips too!

Aren't these altered little milk bottles adorable? Made by Glennis - and it reminded me that I have some crackle media lurking here waiting to be used :) I did try it once and it was 'a total disaster dahlings'!

Jane W's Christmas tag really caught my eye this week. Lovely use of snippets and I totally love the copper as well!

I still love GorJuss Girl images, and have this stamp set unused here (for many years as well) so it was really lovely to see Jean using hers to make this darling card! So pretty.

Snowy Hill Slider
I think this slider card, made by Trina, is such fun! Hop over to Trina's and there's even a very quick video clip of it in action :) I know two little girls in Germany who would be tickled to receive a card like this one!

And last, but certainly not least - Diane H hopped in to share this utterly fabulous 'circle side step' card. Isn't it gorgeous? And, Diane has a link over on her blog to a very clear tutorial to make the basic card shape as well. Warning though, it does involve using a craft knife at one point - help! :)

So girls, that's my picks for this week - nine again, and six are Christmas themed! Nine seems to be a fairly constant number each week, but I keep telling myself three is what I should aim for - although it could have been every single entry of course. So many ideas and inspiration each week here - I can't recommend enough that you settle down with a cuppa at some point and go through Mr Linky.

We had 58 Playmates playing along last week and no new little friends joining us.

Prize draw time now and our winner of the LOTV Art Pad called 'Party and Cake and the Impression Obsession set of three dies called 'Birthday Top Edgers' is:
I think it's 18 months or so since Jackie last won a prize in the Playgound - but as I already explained, after so many challenges it takes me ages to check back! Anyhow - I think there'll be a happy dance :)

Well done Jackie! Can you please drop me an email with your address in and I'll post your prize off as soon as possible! My email address is on the right hand side bar. 

This coming week's prize is:
A Creative Expressions Sue Wilson Festive Collection 'Silent Night' die set - the same as the one I used for my snippets card - instant impact I think!

The Snippets Challenge will run for one week and the Playground gates will close at 11am UK time on Saturday 26th November. The gates will open again at midnight UK time on the same day.

A maximum of ONE entry and please say in a comment if you wish to play and be a possible winner of the prize. Please also link back to the Playground in your blog post to be eligible for the draw.

Mr Linky is below - please let me know if you have any problems linking, it's easy for me to sort out so don't struggle on alone :)

Have a lovely week! I'll still be rationing time spent 'sat sitting' at the desk but hope to keep up with commenting - unless I'm out doing a cross country run around the hills and dales of Hampshire of course :) Snigger, no chance!

And Parsnip is wondering if there's likely to be a Nativity Play this year? He's been gargling salt water and singing Christmas Carols all flipping week!

Wednesday 16 November 2016

Taking it easy

No card from me today - right now am taking things easy with little spells of walking around. So no humping of boxes of card stock from shelves and such at the moment. But, am keeping up with the Playground at least!

Although I first posted this on the blog about five years ago, thought you might want to see a photo of yours truly - aged about three - wearing the most enormous bow ever seen on a little kid's head:
It's no flipping wonder I have neck, shoulder and back issues carrying huge adornments like that around - what was my Mum thinking of?! :) Bless her.


Tuesday 15 November 2016

Cuttlebug Mania Challenge - 'Music'

Time for another Cuttlebug Mania Challenge and the theme this time is 'Music'.

You do have to use a manual die cutting/embossing machine for Cuttlebug Mania entries (it doesn't need to be a Cuttlebug but it must be manual, not electronic). And, you can't mix the two, it must be all manual please. Then make your entry, link into the challenge, link to the challenge in your own blog post and and make sure that you also say what products you used for any die cutting/embossing.

Details of our sponsor can be found over on the Cuttlebug Mania Challenge blog.

This is my DT card:
 I used:

- 5.75" x 5.75" cream card blank

- a slightly smaller 'frame' of black card glued onto the card front

- then I die cut the 'happy birthday' panel using a Memory Box 'Grand Happy Birthday' die and a Stick-It backed snippet of tan coloured card and stuck it onto a square of cream card, smaller than the black 'frame'

- die cut part of the 'happy birthday' again using the same die and cream card to inlay the cream parts of the sentiment. I don't always do this but it does give a more 'finished' feel (IMHO)

- then die cut three little guitars using an All Occasion Dies 'Small Guitars' set, Stick-It adhesive sheet and small brown toned snippets of card. It's a sweet little set and you get both a classical and an electric guitar die BTW

- the 'scratch-plates' actually drop out of the die cuts so I just swopped them around to provide contrast and stuck them in place

- then used a Stick-It backed snippet of black card to die cut the 'Musical Score', again with an All Occasions die, and stuck it in place with a few notes on the tan panel as well

- popped some teensy gold gems onto the guitars to cover the cut outs for the knobs (being a purist, in a house with five guitars, I think there's been some poetic licence used when designed the knob placements on the little die)

Having said that about the knobs, I do think that both of the guitar dies are really lovely and they weren't very expensive when I bought them in Coventry the other week either.

This card is for a good pal's hubby, next month, he's into music and guitars :)

Do join in with Cuttlebug Mania if you can - remember you don't need to have music related dies/embossing folders. You could work some music patterned paper or an image/stamp into a card design for example - and use a 'non-music' die or embossing folder as well. 


Sunday 13 November 2016

Pixie's Snippets Playground - Week 255

Hi there! Let's keep things 'short and sweet' - as Parsnip puffs out his chest thinking he's being written about :)

Here's my snippets make for this week:
I used:

- 5" x 5" square white card blank 

- layer of SU's 'Raspberry Ripple' card stock as a frame, from the snippets folder

- slightly smaller layer of metallic grey card stock, also from the snippets folder

- snippet of white card stock, embossed using a favourite Taylored Expressions folder called 'Twirls and Swirls', trimmed and glued on top of the grey layer

- the image is from the now discontinued LOTV Art Pad called 'Party and Cake', die cut using a Spellbinders square die and the edge was embossed by running a ball tool around the reverse side of the image before removing it from the die

- then backed the image square with a slightly larger snippet of SU's 'Raspberry Ripple' card stock

- die cut the word 'Celebrate' from another little snippet of the same pink card using a die from the Impression Obsession 'Birthday Top Edgers' die set, and glued it behind the image 'frame' so that the word sits along the top of the frame

- glued the image plus word in place onto the embossed white backing layer - finished!

This was a fun card to make and a first outing for the 'Top Edger' die set. The die cuts can can be used along the sides of course. Also, you could die cut one of the words along the top of a piece of card before then cutting around the remainder. That would make the square backing piece plus word 'all in one' so that the word is actually part of the same layer. I went for the easier option and it looks just fine in real life :)

Now for the weekly peek at the picks:

How cute is this Christmas card?! Made by Anne and I absolutely adore it :) Everything goes so beautifully together - and loads of snippets used too!

I think there might be a few Christmas cards this week in amongst the picks - I love this fabulous scene created by Sandra (Sandma)! So much depth really draws the eye in - I wish I could make anything half as good with scenic stamps.

Janice hopped in with this fabulous Christmas card - love, love, love it! So fresh and a great design for using up little snippets too. Janice has joined many other crafters in buying dies directly from China (on eBay), apparently they're top quality and so reasonably priced as well! Only sayin' :)

I fell in love with this beautiful Christening card made by Sue T. Just perfect for a baby girl and a wonderful design as well. Everything goes together so perfectly - right down to those lovely little pink flowers.

What a great card, made by Brenda in IN! I love the embossed background and the two leaves (one plain and one in such a pretty plaid) on top of one another plus the sentiment are absolutely all that's needed to make this card stand out in a crowd.

I totally had to include this brilliant card, made by Jenny L. Who would have thought to recycle parts of a PVC table cloth for the clock faces?! Snippets do come from all sorts of materials!

And how about this for another bit of clever recycling then? I do love this card, made by Barb - and the lovely bunny started out life as a piece from a balsa wood container for a macaroni cheese ready meal! See what I mean about ingenuity in  recycling :)

Aileen came racing in with this beautiful card - I adore the design and have also included it here to show that wonderful cards can be made by extending your stamps and then doing some jigsaw piecing with a matching die. What glorious colours as well!

Here's something very different to try - April made the cutest little Father Christmas earrings, using shrink plastic. Complete with matching card and gift box as well. I think these really are such a fun idea!

And what a fun card Carole D made too! Isn't the gingerbread man brilliant?! And such a lovely tag and card for him to adorn as well. Reminds me I have a gingerbread boy die, as yet unused - bad me!

Frosty Wishes
It's a while since Susan (Eden Land Designs) came to play with us. And what a fabulous card she brought to share! Brilliant use of snippets with such a darling snowman - and I'm bowled over by how perfectly the light bulb print paper has been echoed in the image - by carefully choosing Spectrum Noir colours to match the papers. Wonderful!

Crumbs, that's 11 picks! Good job I try to construct this post a bit at a time during the week!

We had 58 Playmates playing along last week, more than we've had for a few weeks - and no 'newbies'. Loads of great ideas and inspirations from you as usual - it never ceases to surprise me how many new and very clever ideas you come up with.

Prize draw time now and our winner of the Apple Blossom 'Woodland Scene' die and the Paper Smooches 'Christmas Sampler' sentiments stamp set is:
Carole is a really regular player, and has been for over two years. I think, but it's getting harder to keep track due to sheer numbers of past challenges, that Carole has only won once before (February this year).

Well done and can you please drop me an email with your address in and I'll post your prize off as soon as possible! My email address is on the right hand side bar. 

This coming week's prize is:
Sorry for the bad photo, taken on a gloomy afternoon. It's a brand new (as always) but discontinued Art Pad by LOTV called 'Party and Cake',  same as I used today. I raced and bought a few things in their 'end of line sale' when they stopped selling paper products a good while ago, and still have some items in the toy box for the future. The prize also includes the Impression Obsession set of three dies called 'Birthday Top Edgers'. Exactly the same of course as I used on my card today. I chose this particular set, although there are quite a few in the range (sold at Dies to Die For), because certainly the 'Celebrate' die can be used for lots of other occasions as well.

The Snippets Challenge will run for one week and the Playground gates will close at 11am UK time on Saturday 19th November. The gates will open again at midnight UK time on the same day.

A maximum of ONE entry and please say in a comment if you wish to play and be a possible winner of the prize. If you have a burning desire for just the sentiments die set or the LOTV Art Pad then please feel free to say and if your name pops out then I'll do a further draw for whichever item you don't want. Please also link back to the Playground in your blog post to be eligible for the draw.

Mr Linky is below - please let me know if you have any problems linking, it's easy for me to sort out so don't struggle on alone :)

Please don't mind if sometimes I get a little bit behind with commenting, it's all a question of trying to keep things in balance here. If I sit for too long you almost have to hoist me out of the chair, still in a sitting position - quite comical really :)

a5ae90e84c0367ecb1748a5c3d45ec0a

Have a lovely week! And a big hug from Parsnip as usual of course - he's currently working out exactly how many new sets of white twinkling Christmas lights are needed here to decorate the front area of the house. Last seen, he was swinging from the topiary - one armed, like a bear possessed with a pencil tucked behind his ear and a note pad in his free hand! I do worry about him :)