Sunday 26 June 2022

Rudolph Days Challenge - June 2022

I've been playing with some NBUS goodies once again, in an attempt to start using and stop buying stuff! That's the problem with the Snippets Playground, new things are always popping up!

I'd like to enter Scrappy Mo's Rudolph Days Challenge for June (it runs to the end of the month). Other challenges I plan to enter are listed, with links, at the end of this post:

I used:

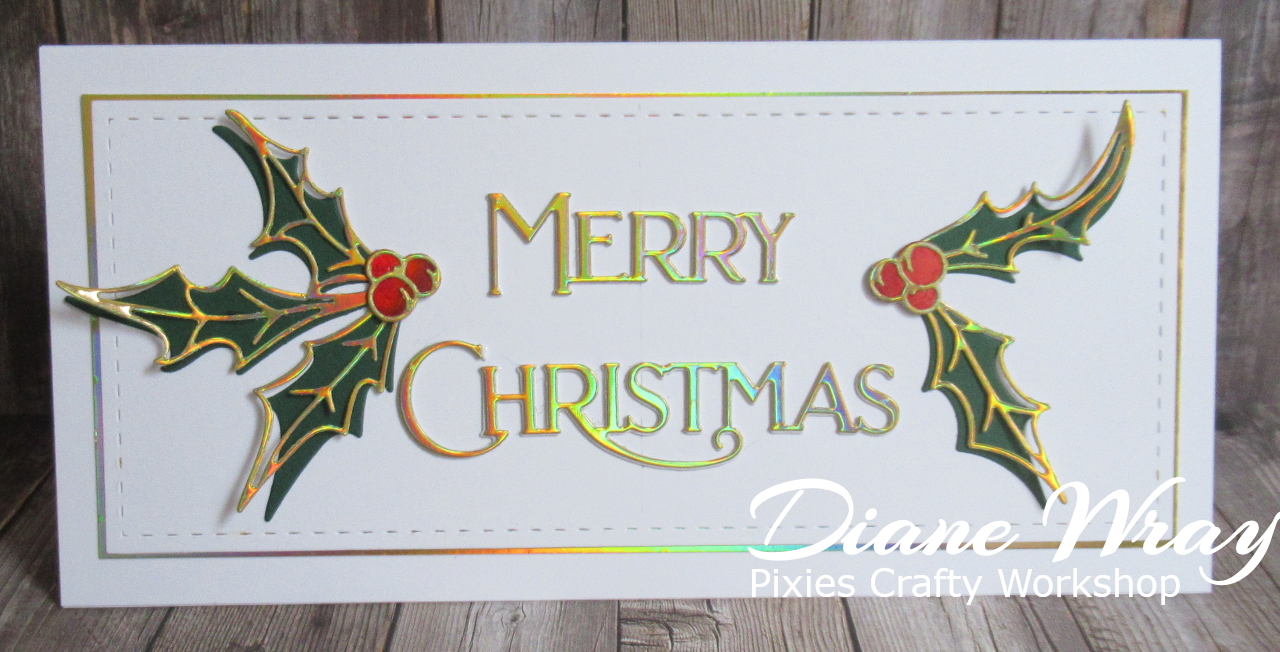
- 8.25" x 4.0" white DL card blank, tent style (bit more about this below)

- the white panel was die cut using a die by Creative Craft Products from their Slimline and DL Nestabilities range, called 'DL Stitched Straight Edge' die set - I used the second largest die in the set

- glued the die cut panel onto a onto a backing of very slightly larger Tonic 'Inca Gold' mirror card - then the whole panel was glued onto the card front and set aside. I wanted to keep the gold border as thin as possible to live in harmony with the gold 'skeleton' leaves

- then used snippets of forest green plain card, 'Firestone Red' mirror card and 'Inca Gold' mirror card to die cut the holly leaves, berries and the 'skeleton' pieces to pop on top - using a NBUS set of Sizzix dies by Tim Holtz called 'Seasonal Sketch'

- used snippets white card and more snippets of the 'Inca Gold' mirror card to die cut the sentiment - two white layer topped with a gold one. The sentiment die set is certainly one that I spotted one or more of you lovely 'enablers' (Greta, Lynne?) using a while back and I rushed straight off to go onto a wait list until it came back into stock. It's by Poppystamps, is called 'Merry Christmas Poe Script' and I LOVE it!

- then I assembled all the elements and the sentiment using a very fine glue pen

- added all the elements to the card, using the same fine glue pen plus some thicker adhesive for the solid parts of the holly and the berry clusters

Being a glutton for punishment, I made three at the same time. Yup, the Christmas 2022 stock is building up really nicely!  

I'm very happy with these cards - the set of dies also comes with a poinsettia - which is lovely as well but somehow the holly stole the show for me! I have a plan for the poinsettia die - which might be best done sooner rather than later, whilst a few things are still left on my desk from the previous session.

One really neat trick I picked up from watching videos recently is an easy way to find and mark the centre of your work - for example I needed to find the centre of the width (from one side to the other) of the stitched panel to add the sentiment. So, I used a narrow strip of scrap card, cut it to the width of the panel and then folded it in half matching the two ends and make a nice crease line at the fold. Then just place it across the panel width and the crease line is your centre point. Mark a point using a soft pencil (easier to erase later on) and  then use your T-square to draw a fine line down the exact centre of your work. So simple and so much easier than struggling with tiny fractions of measurements on a ruler! I have a feeling that I've seen both Jennifer McGuire and Ann  Melvin showing this trick and it's so simple yet infallible! 

Now, along the way I also discovered that there are Craft UK DL cards and envelopes and there are large 'slimline cards' (possibly USA?) - and they differ in size. I won't go into all the detail but the large slimline cards are taller and yet narrower than the shop bought Craft UK DL cards that I've been used to. Just a little word of warning to be careful when buying large slimline dies and make sure you check the measurements. I now have a set of the taller slimmer dies here (mine are made for the USA market), for which I'll have to make not only the card bases but also the envelopes to match. No matter, I'll do it but mentioned it as it might save someone from making the same mistake as I did.

I'd also like to enter the following challenges:

Darnell's NBUS #39. The Poppystamps sentiment die set and the Sizzix 'Seasonal Sketch' dies were both having their first outing.

Peace on Earth Christmas Challenge #18. Anything goes.

Four lovely ladies will be receiving my 'ephemera' such as flowers and fancy embellishments, just as soon as I manage to sort through the boxes and then package stuff to send. The offer is now closed.

Pupdate - I thought there wouldn't be anything much to write about Dudley - in this recent heat he's spent a lot of time finding places to stay cool. However, the other evening it was time for his bedtime treat and I was sitting here at my desk when Len passed the 'much treasured by Dudley little bone shaped treat' over to me so I could give it to Dudley (we try to take turns!). And then we began to talk about something totally unconnected with Dudley and his 'treat' whilst I sat sort of waving the bone treat absentmindedly whilst illustrating a point to Len. And Dudley was beside me, obviously becoming irate as, all of a sudden, up he stood on his hind legs and firmly slapped his paw flat just like the palm of a hand onto the arm of my desk chair as if to say 'Excuse me Missus - I'm down here, still waiting for my treat'!! Len and I just looked at one another and said 'Did he really just DO that?'. Whereupon the little scamp stood up on his hind legs and did exactly the same thing again!! Nothing like a resounding slap of the paw to gain attention - and of course his treat! He does know to give his paw to say 'please' when he's asked - but this was more like a demand. ☺

And last but certainly not least - Sarn has posted the latest Snippets Playground challenge HERE. She's made a duo of lovely snippets cards and has a great prize on offer. And no doubt she will be dispensing some lethal concoction in the tree house!


Monday 20 June 2022

Oopsie - the Christmas Tree fainted!

One of my favourite photos that was doing the rounds ages ago is a decorated Christmas tree lying on its side, with a very guilty dog sat beside it. The caption was - 'Thank goodness you're home - the Christmas tree fainted'. It still tickles my odd sense of humour!

Over the weekend I used the fourth and final puppy image from the MFT 'Happy Pawlidays' set of stamps to make this Christmas card:

I used: 

- 5.5" x 4.25" white card blank, side opening

- image from MFT's 'Happy Pawlidays' stamp set, stamped using Memento 'Tuxedo Black' ink and coloured with Pro markers

- die cut a sheet of paper from Whimsy's 'Blurry Flurries' paper pack using a die from the Lil' Inkers 'Stiched Rectangles' set of dies

- then die cut an almost complete circle from the upper left hand side for the image - using a die from a The Works set called 'Stitched Circles'. Would have preferred a circle die which cut the stitching around the edge of the patterned paper and not just the drop out piece but hey-ho, too late!

- glued the patterned paper layer onto a snippet of baby blue pearlescent card which I'd trimmed to be a bit bigger than the patterned layer

- then glued the tree and ornaments in place - adding the 'innocent' puppy using thin sticky pads

- then, die cut the MFT 'Pawlidays' sentiment using a die from a set of stamps and matching dies by Poppystamps called 'Gilded Christmas Wishes' - and popped it in place using thin sticky pads

- added some clear Wink of Stella to the baubles and tops of the red bulbs as well as some gold Wink of Stella to the star on the 'fainted' tree

- finally, added clear glossy accents to the light bulbs - which needless to say hasn't been picked up by the camera, nor has the Wink of Stella shimmer, sigh

BTW, I never risk adding Glossy Accents directly from the bottle to cards, the result of bitter experience. I always squeeze a blob onto a scrap of paper and pick it up from there in smaller blobs to use, with a fine pointed paintbrush kept just for Glossy Accents, The bristles have solidified over the years yet it's so easy to use. 

Have really loved playing with the MFT Happy Pawlidays set of stamps and dies. It's rare that I find myself using almost every single item in a big set of stamps. I only missed using some of the sentiment stamps. A good reason to have another play sometime! 


Sunday 19 June 2022

The fence peeker!

Dudley is totally the most nosy dog I've ever come across - just the rustle of a piece of wrapping paper - even if it's not the rustle of a packet of cheese - and he's there beside you, watching. It's the same with all deliveries and, apart from food, it's a ritual that he has to be shown everything as it's unpacked. The same when I make a card - he has to look very seriously at the end product and gently bow his nose to it, before it can be put to one side.

Earlier in the week, he was mooching around the back garden and homed in on his favourite place to have a 'nosy' into next door's garden - through their fence. There's a small gap where the fence panel meets the horizontal gravel board (their house and garden is built lower than ours) and Dudley likes to spy on next door's garden, family, children etc.

So there he was, bent down with his rear end and plume of a tail in the air to have a good 'gander' when all of a sudden he literally shot up into the air, hastily backed off and then began barking at the fence.

Len was in the garden and had seen the whole performance, so he went over to quieten Dudley down. Then, he too, bent down to look through the horizontal small 'gap'. And there, staring right back at him, was a pair of very angry looking eyes ........ belonging to 'Teddy De Shih Tzu' who lives next door! You don't mess with Teddy, so whether he'd tried a little snap at Dudley's nose we don't know - but it was quite comical! That'll teach Dudley to be a 'fence peeker'!

Then, the other day, I was thinking about the incident and remembered I made this card as a result of Len and I spotting a different neighbours' cat, spying on us through a knot hole in the fence - well away from Dudley's 'sneaky peek' position:

This was made way back in January 2012 (HERE on my blog if you really want to know more). At the time, using lots of flowers, pearls and lace was 'the thing' that many aspired to when making their cards. 

Life is much simpler now as new ideas, tool and techniques have entered the card making arena! But, at the time a good few of us thought they were very pretty. And I didn't have a clue about image manipulation - what I took on the camera was what I published!

I prefer how we are now, but suddenly remembered that I have a load of really lovely flowers stored in here. Wild Orchid crafts was a favourite place to shop! Plus lots of flat silk ones, leaves, lace, ribbons and bows - plus more for sure.

IF anyone reading this, sorry UK only though, would like me to fill and post a parcel box of flowers etc. to them - please feel free to email me, using my own email address on the right hand side bar. I would love to send you some totally free Happy Mail.

The Really Useful boxes currently housing all those embellishments are never touched these days and would be better put to use storing other stuff. If there are no takers within a couple of weeks or so then I'll try some online sites that I know of - otherwise they will be heading for the bin, which would be a shame.

Remember, the results of Challenge #429 can be found HERE. And there's still a week to play on the current Snippets Playground challenge!


Wednesday 15 June 2022

Christmas Kickstart Challenge #63 - 'Pawfectly Pawsome' - reminder

Jumping in with a reminder that we're halfway through the current Christmas Kickstart Challenge HERE - where I'm delighted to be Jo's Guest Designer. It's one of my favourite challenges and always a pleasure to join in with the fun. ☺ The current theme is one for everyone - 'Perfectly Pawsome' - which can also include not only cats and dogs but also hamsters (hello Darnell!), mice (think Penny Black folks!) and any other creature with paws.

So, I made another card, admittedly using the same base stamp and die set (different image of course!), as I did for my GD card:

I used: 

- 5.5" x 4.25" white card blank, tent style

- images from MFT's 'Happy Pawlidays' stamp set, stamped using Memento 'Tuxedo Black' ink

- did a lot of stamping using the same set all at once and had already die cut all the images using the matching dies and then coloured them all in at one sitting, using Pro markers

- then die cut the sentiment circle from Tonic Mirror card called 'Fire Stone Red' and set it aside before also cutting the same sentiment circle from a snippet of plain white card. The die I used is having its first outing and is made by MFT - called 'Merry Christmas Circle Frame' - I also set the white sentiment aside as I had a leetle plan in mind

- then, trimmed a piece of 'grey stars' paper from the 'Dovecraft 'Back to Basics - Monochrome' paper pack - doing my best to make sure that the stars were even along all the edges

- trimmed a piece of  Tonic 'Fire Stone Red' Mirror card to form a narrow border around the 'grey stars' paper'

- glued mirror card and grey stars paper onto the card front

- then positioned the inner circle from the sentiment I'd cut from white card into the centre of the stars paper panel on the card front, using Collall glue

- added the 'Fire Stone Red' sentiment circle around the white circle - using a glue pen

- then just glued the image in place onto the white circle, rather than using sticky pads, using a glue pen 

Again, no sparkle was added. I do so love the Tonic mirror card - they do quite a few different shades of red, so it's much easier to match up if you use red when colouring an image. My dream would be to win free run of their warehouse! With a huge lorry waiting to bring all the lovely goodies home of course!

Many thanks once again to Jo for inviting me to be a Guest Designer over at the Christmas Kickstart Challenge and I'd really love it if you would come along and join in with the challenge - this is the LINK. It's still open until the end of the month so you have plenty of time.


Tuesday 14 June 2022

Allsorts Challenge #680

The current challenge over at Allsorts is 'Any stamped image' - right up my street! 

After making my DT cards for Jo's Christmas Kickstart challenge, which is HERE - I had some doggie images left over to play with - so I made this card for Allsorts:

I used: 

- 5.5" x 4.25" white card blank, side opening

- image from MFT's 'Happy Pawlidays' stamp set, stamped using Memento 'Tuxedo Black' ink, die cut using the matching die then coloured using Pro markers

- die cut the sentiment circle from a snippet of white card and a further one (for the centre circle) from Tonic Mirror card called 'Fire Stone Red'. The sentiment die is by MFT called 'Merry Christmas Circle Frame'

- trimmed a piece of the 'Fire Stone Red' Mirror card to act as the first layer on the card front and glued it in place

- found a snippet of Neenah 'Desert Storm' card and embossed it using a Darice 'Paw Print Background' folder

- trimmed the embossed piece so that a fairly narrow border of red would show and then glued it onto the front of the card

- positioned the white sentiment circle to the bottom right of the card then added the red mirror card circle - using a glue pen

- then stuck the sweet little image in place using thin sticky pads

- added a couple of pale blue baubles to hide a smudge of red Pro marker add a bit of contrast

- added the sentiment which I'd stamped using Memento 'Tuxedo Black' onto a snippet of white card. None of my banner dies fitted properly so I used a longer die from the MFT 'Stitched Fishtail Flag STAX' set of dies. Tip: Just die cut the strip to the whole length making sure you have the V-shaped end of the die where you want it to be. Replace the die, settling it into 'notches of die cut stitches' at the length you want and run it back through your machine to die cut off the excess, leaving you with a nicely finished stitched straight end

- I added a tickle of clear Wink of Stella to the hat trim. pom pom and the pale blue baubles - just because I felt like it!

One really useful tip I picked up from Jennifer McGuire is that she always uses a T-square when adding items to cards,to make sure they're level. Sentiments and uneven levels are my downfall and since the logic of this this finally clicked into my brain - my T-square is now always out on my desk ready for action. It's been a bit of a game changer for me!

I'd also like to enter this card into Darnell's current NBUS #39 challenge for June - HERE. The MFT 'Merry Christmas Circle' die has been waiting to come out and play for ages - along with the paw prints embossing folder!

However, my basket of NBUS goodies never seems to decrease in size - bad me!

Grab our badge to display on your blog.


Sunday 12 June 2022

My snippets card for Challenge #430

A new challenge (#430) is now open over at The Snippets Playground HERE. To make my own snippets card I raided a favourite paper pad, tipped out the snippets from the envelope 'pouch' stuck inside the back - and this the card I ended up with:

And here's the pile of snippets I tipped out, a few of which I used - the rest were saved for another time:

I used:

- 5.5" x 4.25" white card blank - tent style

- a piece of white card, die cut using Ann Melvin's 'Positively Paper Craft' 'Multi Panel' die set - which I love (her prices are so, so reasonable)

- then glued the 'frame' to the card front as well as the inner white parts which I'd cut all in one pass on the Gemini. Must admit, I fell back onto the original Gemini plates and used the magnetic mat for ease when positioning all the smaller insert dies into the main die

- fiddled around with the snippets of patterned papers (from Lawn Fawn's 'Really Rainbow' paper pack) until I thought the colours and patterns worked together OK

- then used my cute little Altenew die cutting machine to die cut all the coloured paper insert shapes before gluing them in place, using a glue pen

- next step was a sentiment and I used a literally 'hot from the mail' die set by Whimsy Stamps called 'Birthday Word and Shadow Die' which I'd spotted over at Sarah's snippets entry just a couple of days earlier!

- die cut the background for the sentiment Birthday word using a snippet of white card

- die cut the sentiment word using a snippet of black card then glued it on top of the background

- stamped 'Happy' onto another snippet of white card, using a stamp from Uniko's 'Simply Said' set of sentiment stamps and Versafine's Clair 'Nocturne' ink pad

- trimmed the word 'Happy' to size and backed it with a further layer of card just to lift it slightly 

 - glued both the stamped and the die cut elements onto the card front to form a two-word sentiment - yay, finally taking the time to use my set square for levelling

- finished!

I already said how much I love the 'Multi Panel' die I used here - brilliant for using up snippets and every bit as good as any other similar die set on the market, at a price that made me smile!

The Birthday sentiment die is brilliant and it comes with a 'stitched' background die as an alternative to the plain one, or you can use the Birthday word without any background - versatile! I stuck to the plain background as the card was already quite busy - and there was no other stitching on the card to tie it all together. I know it's naughty of me but I truly do recommend that you think about adding the sentiment set of three dies to your craft goodies. Mine was from 'Dies to Die For', bought whilst their Jubilee discount promotion was running.

I'd like to enter this card into Darnell's NBUS Challenge #39 HERE

So that's my snippets card and all that's left is 'Dudley's Pupdate'. He is a little terror for sitting looking very appealing when there's food around - no matter what you might be eating.

I had a sliced up Jazz apple the other afternoon. Of course, Dudley wanted a taste and he actually liked the little bit he had. A while later I was sitting at my desk, speaking to Len, with Dudley's paws up on the chair beside me - 'little nosy parker' always has to be involved. All of a sudden there was one almighty 'burp' - practically in my face. Dudley looked astonished, Len thought it was me (which amazed me as I never burp) - and I reeled back in shock! Would put some humans to shame for sure and he didn't even excuse himself. ☺  Doggy manners training for him!

Love from Di and Dudley!


Tuesday 7 June 2022

Christmas Kickstart Challenge #63 - 'Pawfectly Pawsome'

I'm back as Dotty Jo's guest designer for the month of June - over at the Christmas Kickstart Challenge - HERE! Delighted to be asked again - and also having more time to play, as I keep saying.

I LOVE this 'paws' theme - and had no trouble deciding what stamp set to use for my card - and everything (for once) just seemed to flow perfectly:

I used: 

- 5.5" x 4.25" white card blank, tent style

- images from MFT's 'Happy Pawlidays' stamp set, stamped using Memento 'Tuxedo Black' ink

- I did a lot of stamping using the same set all at once so I die cut all the images using the matching dies and then coloured them all in together, using Pro markers

- then die cut the snowy bank (wider than I needed for the end result) using a die from the Lawn Fawn 'Stitched Hillside Borders' set of dies

- die cut the 'frame' from a snippet of white card using a die from the Avery Elle 'Postage Stamp' set of dies

- then, trimmed a piece of paper from the 'Blurry Flurries' paper pad and glued the 'snowy hill' onto the bottom and them trimmed the overlapping sides of the hillside to fit

- then glued the panel onto the card front - bit of measuring when doing the initial cutting but easier than attaching the frame to the paper then adding it. And that little tip has taken me umpteen years to fathom out - although I do admit the frame I used has enough width to accommodate errors!

- so, the little scene was all set and I just needed to add the image pieces - glue the parcels in place then add the pooch using thin sticky pad pieces

- whilst doing all the initial stamping I'd also stamped some sentiments from the same MFT 'Happy Pawlidays' set so I then die cut one using a die from the Frantic Stamper 'Stitched Fishtail Banners' set of dies

- added the die cut sentiment to the top left hand side of the card - finished

I kept it sparkle free rather than 'over egg the pudding'. Just spotted the funny stripe behind the doggies ear - it's a little shadow as the pooch was adhered using sticky pads!

Many thanks to Jo for inviting me to be a Guest Designer over at the Christmas Kickstart Challenge and I'd really love it if you would come along and join in with the challenge - this is the LINK. It's open until the end of the month so you have plenty of time.

I'd also like to enter this card into Darnell's current NBUS #39 challenge for June - HERE. The MFT stamps and dies have been waiting to come out and play for ages!

Grab our badge to display on your blog.


Sunday 5 June 2022

Platinum Jubilee Weekend - 2022

What a joyful weekend this is to celebrate 70 years of our Queen's reign. Our house front is all decorated and we're doing our bit to show our loyalty and thanks, to the Queen. 

My card today was made to celebrate this a wonderful occasion, and to honour our Queen. I believe that our lives have been blessed by her steady hand steering our United Kingdom for such a long time - often through choppy waters:

I used:

- 5.5" x 4.25" white card blank, side opening

- then I found a 'freebie' crown online, resized and printed it onto white card and set aside for now

- dived into the snippets folder and I found dark blue and red snippets to trim and create the frame so that I could then trim the white image background down to size

- glued all the layers together - after using a black micro pen to draw a curve for the 'bunting' - I used the edge of an oval die as a template

- the bunting was made using one strip of paper chains craft stuff  punched using a SU very old triangles/pennants punch - I needed to use a few pieces of Post It to wiggle the small pieces into the punch (a hint I remember picking up from Sarn many years ago)

- then it was time to fly! So I glued the pennants/bunting in place

- die cut 3 x numbers '70' in silver using a Tattered Lace 'Mini Numbers' die and silver mirri card, before gluing them onto the bunting

-  used a set of dies by First Edition called 'Alphabet Sans Serif' and die cut the E11R from silver mirri card and stuck them in place

- then used the same numbers die as I had for the '70's' and die cut it several times for the years of the Queen's reign - using the dark blue card as used for the frame

- glued those into place and then it was done! It's so hard to centralise when a string of letters or numbers are different widths - but I did my 'bestest'

The Red Arrows aerobatics team almost took our roof off on Thursday on their way to fly over Buckingham Palace! We didn't see them sadly - and they were gone in a flash anyhow. However, TV coverage of the whole weekend has been quite overwhelming and, whilst the atmosphere of actually being in London right now will be incredible - you do see more on the TV!

And here is Dudley Dog - showing off his Union Jack Bandana - looking up at Len standing behind me. He (Dudley) has been proudly wearing it for his walkies over the celebrations.

He's not really a dog for posing and this certainly isn't his best angle - he was sitting nicely but it makes him look like a round dumpling with teensy legs. Yes, he does have a sweet little wonky lower front tooth which doesn't normally show. We think it's endearing and makes him look somewhat vulnerable - but then, we're also rather biased:

The love in those eyes - Dudley wears his heart and soul (and often his hopeful tummy) in his eyes! 
 
Love from Dudley and Di xxx