Monday 31 October 2011

Forever Friends Christmas card and a Cuttlebug to win

First of all - 'eyes right!' and take a peek on my sidebar. My great friend, The Crafty Elf, is offering a Cuttlebug as Christmas Blog Candy! Phew, how generous! Go and see - and, while you're there it's worth taking a good look round all of the Elf's Christmas tips too. I actually know the Elf's 'human' name but am sworn to secrecy - it's a lovely name but I have to respect Elfin secrets!!

And onto today's card, I love this paper pack - it's called Timeless by Forever Friends - and it comes with topper sheets too!  Plus, the papers are an unusual colour for Christmas, sort of shades of mink. There are 12 toppers in the pack and I'm sure there's enough paper to make 12 cards - if I go 'canny-ways' as they say 'oop North' - ie. carefully:

The papers are pearlised so apologies for the light bouncing around - it's was so dark when I took this photo yesterday I had to use the daylight lamp :(

I used:

- 6" x 6" square white card

- image and backing papers from the Forever Friends Timeless paper pack (bought in Hobbycraft)

- pearlised mink and white card - also from Hobbycraft - for the backings

- sentiment from Craftwork Cards, on a die cut circle on mink pearlised card

- organza ribbon from stash

- a twinkling of Glamour Dust on Santa Bear's hat, cuffs and the tree decorations

I made three the same of this card - I seem to like little production lines at the moment, and panic is setting in here just a little bit :)) I don't really want to be like a whirling dervish in December!

Remember to go and see the blog candy, link on my sidebar :)

Di
x

Sunday 30 October 2011

Warren - courtesy of Sandra

I missed out on buying a great 'goody bag' from Craftwork Cards at Ally Pally - they'd run out so that was one penalty of going on the Sunday :( But, my lovely friend Sandra of Stamping for Pleasure took pity on me and sent me a few bits and bobs from the kit which she'd bought on the Saturday - which was very generous as I'd have difficulty parting with them! This is what I made with Warren yesterday:
I used:

- 6" x 6" square scalloped Craftwork card - from stash

- backing paper from a Papermania Capsule Collection A5 Aqua pack

- plummy/purple shimmery card found in my snippets, die cut to back Warren and the sentiment

- Warren himself (he comes already coloured) plus the sentiment from Sandra, along with the most gorgeous leafy die cut which Sandra had also enclosed. I NEED to know which die this is, it's so delicate, I love it!

- dark green ribbon from my stash

And that's it - cheeky Warren hitching a ride in a wheelbarrow :))

Di
x

Saturday 29 October 2011

Red..red..Robin

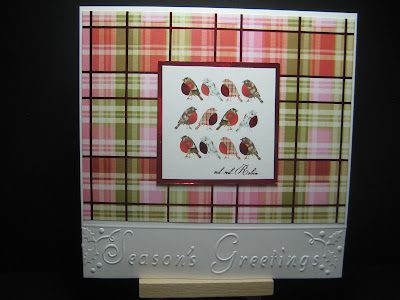
Rootling around in my Christmas stash I came across a load of Papermania papers left over from last Christmas, and the pack had even included some toppers. I also had a new set of Papermania Christmas sentiments embossing folders to play with - which was most fortuitous (sneaked a big word in today!). This is what I made:
The embossing folders are lovely, four different ones in the set. Plus, they are 6" long so just perfect for A6 sized cards or even better for 6" square ones - where you can use them either vertically or horizontally to suit.

I used:

- white 6" x 6" card stock

- embossing folder from Papermania's 'Seasonal Sentiments & Borders' set

- tartan backing paper from Papermania's Stephanie Dyment 'Classic Christmas' 8" x 8" paper pack

- robins topper also from the pack - love their foiled red breasts

- red mirri card to back the topper

Quite a lot of the paper pack and toppers have some red foiling on, which can be nicely picked up by using red mirri card where appropriate.

That's my quick card for today - the sun is shining so let's hope it's a lovely weekend weather wise - and if not, there's always crafting of course :)) Have fun!

Di
x

Friday 28 October 2011

Friday Feast - Chicken with Parma Ham and Cranberries

Well, the pumpkin and I had fun yesterday. I won Round One in the morning and it won Round Two in the afternoon - at the moment of truth! I won't publish a recipe on here if I'm not 100% happy with it so, although that was my first disappointment out of at least four times with the 'pumpkin fun' and it was still perfectly edible (yummy in fact), it didn't look as it should and I'm going to have another go when I get a chance :)

Today's Friday Feast is almost a traditional Sunday roast, but a low-calorie option apparently - although you don't feel terribly self-righteous when scoffing and it's really easy to make! Like a lot of the recipes I save and file away, it came from Woman's Weekly. The Mail on Sunday is another good source of yummy recipes to save :)

Chicken with Parma Ham and Cranberries:

50g butter, softened
2 garlic cloves, crushed
4 large chicken breasts
8 slices Parma ham
300ml hot chicken stock
4tbsp cranberry sauce
6tbsp red wine

Pre heat the oven to 180 C/ 350 F/ Gas 4. In a bowl beat together the butter and garlic. Make a deep slit in each chicken breast. Spread the butter inside each chicken breast and close the chicken back together. Wrap each breast in 2 slices of Parma ham. Place in a roasting tin.

Pour the hot stock around the chicken and roast for 30 mins.

Remove the chicken from the oven and roasting pan and cover with foil and a tea towel. Place the roasting pan on the hob and add the cranberry sauce and red wine. Boil rapidly for 10 mins or until the sauce has thickened.

Slice the chicken and serve with the sauce.
Things I do:
For two of us I still make the full amount of cranberry sauce. I do use red wine but am sure you could substitute either water or cranberry juice.
As I often make this instead of roasting a full Sunday joint, it has to come with the traditional accompaniments of course :)
Enjoy! 
PS I had a lovely surprise yesterday, my friend Joy came to collect the wedding stationery for Stuart (her son) and Jess. And they had sent her along bearing these:
A very sweet thought indeed! :)
Di
x

Thursday 27 October 2011

Pumpkin Pie anyone?

That title (taken from the sentiment on today's card) has reminded me of a recipe to dig out and share! I trotted home from Sainsbury's yesterday afternoon proudly bearing a pumpkin - so this morning there will be a wrestling match between said pumpkin and I in the kitchen. If I win, tomorrow's recipe will be something a bit different to Pumpkin Pie or Soup - if I lose then the recipe will be something else and the subject will never be raised again, snort, snort!! My optimistic OH has already smartly remarked that he awaits the outcome with bated breath - and the First Aid kit to hand :(

Back to today's card, during Tuesday's 'photo rescue' service here that I posted about yesterday, I started this card and just finished it yesterday morning:

Oh my life, this could be me after the wrestling match!! I love this stamp and am ashamed to admit I don't fully recall where it came from - I suspect it was from my friend Bernie?

I used:

- white linen 6" x 6" card stock

- Penny Black 'Apprentice' stamp, coloured using Pro Markers to match the papers I'd already selected

- patterned papers free with a recent issue of Making Cards magazine

- black, orange and green snippets from the snippets folder

- sentiment stamp from Pink Gem Designs

- orange gingham ribbon from stash

- tiny little star shaped gems on the witches hat from Papermania, also from stash

As I used more snippets - yay, that snippets folder is the first place I check now - I'm entering this into Jules Crafty Snippets Challenge Week 42

I'd also like to enter it into the following challenge:

Penny Black Saturday Challenge - week 174 - 'Too Cute to Spook'

I can't see these two cuties spooking anyone!

Last, but not least, although it will be the last of these for now - here's the box of Wedding Save The Date cards and envelopes, all prettied up in an A4 plastic box and tissues paper ready for collection :))

Back tomorrow with a recipe for Friday Feast - pumpkin or otherwise!

Di
x

Wednesday 26 October 2011

WOYWW 125

This is my desk, exactly as I left it last night:
Looking suspiciously tidy too, for a reason in the next photo. It's chucking it down with rain and pitch dark in here so I had to switch the daylight lamp on for any chance of a photo :( Above are the bits I was playing with yesterday afternoon to make a Halloween card. To the right of the Nesties I'd been using is the sweetest little pink pincushion, made by Bernie - brilliant for keeping pins to hand to poke into the nozzles of slightly blocked up Stickles bottles and such.

I was keeping occupied whilst my OH recovered a load of lost photos for a friend from his archery club. She's just returned from an amazing holiday in the Kruger National Park and losing photos from a holiday like that is no fun at all. He used some free software that I came across quite a while back when the same thing happened to me with a whole load of photos from Thailand. It took the deeper recovery operation (about 25 minutes or so) but success! The software is free from Piriform, called Recuva, and can work wonders just so long as photos, or files on your PC, haven't been totally overwritten, even if they are showing as deleted or just 'missing in action'. They are usually still lurking there because of the way indexing systems work (that's how the police - and others - recover files from seized laptops etc. - although their means tend to be more sophisticated). So, if you ever think you've lost a whole load of files - don't do any more fiddling with the camera's memory card or your laptop - go straight here and download the free Recuva software. We did a little dance of joy here when the much loved first sighting of an elephant in the wild reappeared - along with all the other photos :) I do love happy endings - oh, and I'm not on commission for recommending Recuva - it's freeware anyhow!

The 'safari' friend is also an amazing needlewoman and totally loved my poppies 'dumfed' picture that Annie made quite a long time ago :)

And, a quick swing to the right shows why I'm keeping anything messy right OFF my desk right now:
Yay, the completed 'Save the Date' cards all ready to be packed in white tissue into an A4 clear box (oh boy, Hobbycraft was manic when I nipped out later yesterday to buy it - half-term!). I've got some wide aubergine ribbon and a large heart-shaped diamante slider, from my stash, so I can tie the box and make it look pretty and a bit special. All the envelopes have an elegant 'scrolled' heart stamped onto the back in aubergine - thanks to Sandra's recent stamp sale. There's one lying to the back of the ribbon from an extra four that I've stamped to include in the box, in case of mistakes when writing addresses :))

So, that's me for this weeks WOYWW - the rain is lashing against the window here and what better to do than to hop round and see what everyone else if up to today - go to Julia's here and see for yourself :) She's showing off some amazing completed sewing this week - hilarious that her daughter refused to hop onto her desk in keeping with WOYWW though!!

Note: If you go to Home on my blog, there's some candy on offer - there's a 'sticky' posting until next Tuesday. Dumbo here ended up with two sets of heart shaped Nesties dies so one is looking for a new home. No catch, no need to follow or publicise, it's just to celebrate over 300 posts.

Happy WOYWW!

Di
x

Monday 24 October 2011

After the 'production line'

It was a great feeling yesterday afternoon to finish the current batch of wedding stationery - the rush was because these are Save The Date cards to go out ASAP, the actual wedding is next August. So, at least I can have a rest from aubergine until after Christmas, although I've totally loved this whole process and it hasn't seemed like a chore in any way.

So, what to do to celebrate? I didn't want to fiddle round with the blog template so it was an hour ironing or make a couple of Christmas cards? Yup, no competition there, so this is what I came up with:

The main image is a Lili of the Valley square, already coloured and great for rustling up quick cards. These particular Christmas ones came with six different designs per sheet and I made two the same.

I used:

- white 7" x 5" card stock

- Dovecraft 'Let it Snow' paper pad (this pad is just gorgeous and the reverse of quite a lot of the designs are plain, perfectly picking out a colour on the patterned side)

- Lili of the Valley Die Cut Square from a 'Traditional Christmas' design sheet

- sentiment from Craftwork cards

- backings to the LOTV square and sentiment from the reverse of the patterned paper

- punched strip also from reverse of patterned paper, using Martha Stewart's Aspen Snowflakes punch

- a few of the leftover punched out snowflakes dotted here and there, fixed with a Quickie Glue pen and topped with clear sparkly gems

- some little dots with the glue pen on those unusual Christmas trees at the bottom right of the card, then sprinkled with Glamour Dust. 

I've just noticed that the sentiment looks a bit wonky but in real life it's fine - weird!! I think it's the odd effect that I sometimes get when cards almost seem oval - need a better camera perhaps. But, I love my camera as it's nice and easy to use :(

Hey ho, I also notice that I haven't whisked over the cards yet with a big soft make up brush to remove any stray bits of sparkly Glamour Dust. I think I was too busy squeaking here having stupidly rubbed my eye after touching the dust - ouch! Another lesson learned.

Thanks for calling by :))

Di
x

Sunday 23 October 2011

Normal service and some candy just as soon as...........

......I manage to sort out my blog background OK. I'm pretty sure the problems were caused by the template I was using (shame as I liked it!). In the process of searching for another one this morning I came across some which, when previewed on the providers' own websites, had the floating box :) So, if you get the 'dreaded floater', that's most likely gonna be the root cause. It appears that some providers of free templates have their limits and then the likes of Photo Bucket step in to say now they need to pay and that transfers onto your blog too.

So, for now, I have a standard Blogger template - nice and simple with the little flying birdies at the top. I do not want to go down this road again - unless any of you lovely ladies can advise me where to find a lovely simple background that isn't likely to cause future floaters I'm sticking with it! It came in a buff colour but was easy to change to pink. - it has to be pink of course :)) However, you do need sunspecs right now as some elements are in a reddish orange - err, nice :( Whilst you can change the colour of a lot of parts of the text easily in Design mode - it appears that you do need to fiddle around with the HTML code to then be able to change some things. I know, to get 'simple' I have to choose the difficult route :(

So, keep your sunspecs handy for now - once I get my thinking head on and change the HTML without wrecking the blog - normal service will resume.

Before then, I have more wedding stationery to do - but am at the halfway point with a lot of the elements ready just to assemble the last ones. Another three hours should see me breathe a sigh of relief!

But, if you managed to read this far - well done. And as soon as the blog background is fixed I have a little give away to celebrate 300 postings and being a gnats whisker away from 100 followers.

Have a great day :))

Di
x

Saturday 22 October 2011

Not that I have too much time on my hands right now but......

........ages ago I made some Christmas cards using the 'iris folding' technique. I came across a box with the leftovers in the other day, whilst looking for something totally different. I didn't like the green papers in the box so had a rootle through my snippets and found a mix of papers, including some iridescent (yay, today's big word!) paper - in shades of turquoise. I finished making this late last night:
It would be a lie to say I just 'whipped it up' - I'd forgotten how long it takes to do iris folding, almost as bad as a never-ending card :( I think there might only be a couple of these going into my Christmas cards box after all, they seem to take ages to make. Not sure why, I seem to be on a roll with Christmas Tree cards this year - could it be from following the progress of the gorgeous little Christmas tree that The Crafty Elf is showing us how to assemble I wonder?

Yippee though, this qualifies for Jules' Crafty Snippets Challenge Week 41, which I thought I might have to miss this week. And, although it's not quite the 25th of the month, this is my Rudolph Day offering too.

I wonder how many of you were 'sat sitting' in bed with your early morning cuppa today, whilst threading diamante hearts onto lengths of aubergine ribbon? Not much chance of 'the Devil making work for idle hands' here right now!

Hope your weekend has gotten off to a great start!

Edit: That flippng floating Photobucket box is lurking - I can't see it as I blocked it through Firefox yesterday but Kate kindly let me know. Have just heard that it seems to have disappeared - thanks for letting me know Kate! If you do comment, can you please say if you can see it. I've tried to sort it out - have changed my template and got rid of a couple of gadgets. Why is this thing haunting me :( It seems to be a general problem right now according to my searches for help on the web - but that doesn't make it any easier for those of you who see the flipping thing floating up and down as you scroll!! Sorreeeeeeee!!
Di
x

Friday 21 October 2011

Friday Feast - Smoked Salmon and Rocket Quiche

We had the first frost here yesterday and no doubt thoughts will be turning to warm casseroles and soups - as they say, Winter drawers on:)

This recipe is quite Summery, but light meals are a nice change even when the weather is colder and we still try to have salad (aka rabbit food to some) at least once or twice a week. It would also be a pleasant addition to any celebratory (long word) buffet parties you might have over the festive season. Sheesh, I sounded a bit like Marguerite Patten there! OK, showing my age - my Mum's favourite recipe book was a Marguerite Patten one, along with the Bero Baking Book and Mrs Beeton's! Does anyone remember the Bero Flour baking books? I'm sure I have one somewhere as they were still being produced throughout the 70's possibly 80's - must dig it out.

Smoked Salmon and Rocket Quiche
Oops, the clump of parsley on top - does nothing for the photo :(

250g packet shortcrust pastry (or make your own)

For the filling:

90g rocket or watercress, rinsed and dried in a clean tea towel
150g smoked salmon
2 large eggs
200ml creme fraiche or double cream
Salt and ground pepper

Roll out pastry to line a 9" flan tin/dish.

Set the oven to fairly hot, Gas Mark 6 or 200 degrees C.

Prick pastry case, line with greaseproof paper and fill with baking beans.

Bake blind for 15 minutes, Remove baking beans and greaseproof paper and bake for a further 10 minutes. Take out of oven and reduce temperature to moderate, Gas Mark 4 or 180 degrees C.

To make the filling:

Chop the rocket or watercress, making sure you discard any thick stalks. Spread the chopped leaves in the flan case. Then tear the smoked salmon into pieces and arrange on top.

Beat eggs with the creme fraiche or cream and season. Pour mixture into the flan case and bake 25-30 minutes, until just set. Serve warm or cold.

To freeze - when cold, open freeze until frozen then wrap in cling film and then foil. Label and freeze. Use within one month. Unwrap and thaw in the fridge.

Things I do:

Not all smoked salmon comes in 150g packs. If yours is bigger than 150g you can add up to about the same amount of smoked salmon again. I tend to use a 200 to 250g pack - depending which is the better deal :)

Whilst I do try to make my own shortcrust pastry, if I use ready made then I go the whole hog and buy those ready rolled sheets of pastry. Might as well be hung for a sheep as a lamb - and save a bit of messing round with flour and a rolling pin!


Enjoy!

Di
x

Thursday 20 October 2011

A never- ending job

.....eventually turned into a never-ending birthday card for Livi! I almost lost the will to live making it, it took ages, but soldiered on - it's bright at least :))
The front, followed by:
The inside, before I wrote our message, followed by:
being flipped around, followed by:
another view from the top - showing the 'birthday number 2'. This was sent to me by Sarn using the Hippy Chick die - and, I seem to be haunted by the colour, I used an aubergine Pro Marker to colour it to match the papers! Sarn to the rescue once again - thank you so much :))

I used:

- purple card stock for the basis of the card itself

- orange card stock for some of the panels

- Katy Knight 'Totally Tropical' Summer papers, free with Cardmaking and Papercraft magazine a little while back

- a topper by LOTV from their previous range of Cute Squares

- butterflies and sentiment from a Craftwork Cards goody bag that I finally sorted through a couple of weeks ago.

I just managed to squeeze the card into an envelope designed for an 8" x 8" card - so it's going to stand out amongst all Livi's other cards, for its size and brightness at least :))

I'll let you know if we get any photos of the Birthday Baby. Yes, Livi is the little one with curly auburn hair who loves buttons and seems destined to be an engineer of some sort when she grows up. I bet she has this card apart to see how it works in a lot less time than it took to make!

The diamante hearts arrived here yesterday - they're so cute and sparkly. So, it's wagons roll onto the next stage of assembling the Save the Date cards - once I do a supermarket run else someone here could be found slumped in front of the fridge door semi-comatose (a last minute big word sneaked in there) - looking for something to eat :))

Di
x

Wednesday 19 October 2011

WOYWW 124

Eeeek! It's our grand daughter Livi's 2nd birthday on 1st November and I have to make a card PDQ to send it off to Germany today, along with her birthday present, so it gets there in time.
I've just dug some really bright Kate Knight papers out (a magazine freebie), ready to make Livi a 'Never-ending' card. The little instruction page that I keep in my 'file that if OH ever finds it I'm a dead woman as my purchase receipts are in there too' came from a card making magazine and is lurking underneath the bright purple card stock. Many thanks to Angela at Tintin Heart (also in Germany) for suggesting this when I was thinking about what sort of interactive card to make :) I've only made one before and it was such fun to do!

Thankfully, in the time I allotted yesterday, I printed the wedding Save the Date cards and cut both those and the aubergine card stock ready for assembly. They are sitting patiently on my baby laptop at the back of the desk - still waiting for the little diamante hearts to arrive before I can move forward.
A swing to the right shows the green basket full of new goodies to try out before they are stored away, another basket with Christmas cards awaiting inserts and a basket at the front with stuff I'd been playing with when making wedding samples - to be stored away. The notebook (appropriately - today's big word - with hearts on) contains all the sketches and notes for the wedding stationery.
And, centre back is how I store my scissors - on a sturdy mug tree bought from our local charity shop years ago. I don't have the luxury of wall space to use some of the really clever ways other crafters store their scissors, but this works absolutely fine for me. I keep the most used ones at the outside ends of the mug bars so they are first to hand. And, my sewing scissors are kept hidden away in a cupboard - untainted by paper and sticky stuff :))

That's it for me today on WOYWW - loads to do this morning but I'll be back hopping around later on. Why not join me over at Julia's to see what everyone else is up to - it's bound to be much more interesting stuff!!

Di
x

Tuesday 18 October 2011

Easel card with a twist


I posted a similar card to this a good while back, well before I had so many lovely folk hopping in and out of here. I love making twisted easel cards - especially when they're from a Kanban kit with card patterned on both sides and all the elements co-ordinated - quick and easy:
These are much quicker to make than straight easel cards, as well as only needing one base card instead of one and a half - and speed is the name of the game here right now. I woke up in the early hours thinking of different ways to set up the 'stationery production line'!!

Have a nice day - no need to guess what I'll be doing, but have decided to limit myself to two or three hours flat out on the stationery in one burst. Someone here does need some ironing to be done and an occasional meal :))

Di
x

Monday 17 October 2011

A decision has been made.......

......about the Wedding Stationery! Jess and Stuart came over yesterday afternoon and loved the samples (phew!!), and the aubergine is spot-on :) There wasn't a shred of aboulomania (today's long word!) and they almost immediately decided on a later sample style that I made:
The cute little diamante heart shaped ribbon sliders clinched it for sure. The wording is to be changed a bit and will say 'Stuart and Jessica' - plus the addition of their Wedding website and password at the bottom. Minor changes and they liked the font :)

This is the invitation itself - although this sample one says Evening Invitation:
The hotel will produce the place cards, menus and table layout in plenty of time (I hope!), which I'll 'pretty up' for them. Ooops, then there's the Order of Service of course.

We did have a laugh - Jess trotted off with a length of ribbon to use for matching the bridesmaids dresses and it amused us that they will be matched to the stationery, not the other way round :)

So, if you see a mad woman racing round Hampshire today buying up aubergine card from Hobbycraft - that'll be me then :))

It's gonna be busy here as the Save The Date cards need to be ready ASAP. We even had the presence of mind to check the thickness using my posting gauge - and they will go at the normal sized postage rather than large letter.

Sorted............now let the action commence! :)

Di
x

Sunday 16 October 2011

Joyeous Noel

Hmm, I always thought it was Joyeux Noel but there you go! In the process of thinking about wedding stationery ideas I had a little play with a super Marianne Designables folder, which embosses and also does a little bit of cutting at the same time. I got the tip off about this super folder from my friend Dee who sent me a couple of ready embossed pieces of card - and I was hooked. The results it produces are really gorgeous but would be too much work for a whole load of wedding invitations so that idea was shelved.

I'd also previously been playing with a folder I bought at Ally Pally last month which I had thought was a set of long strips rather than one sentiment underneath the other in a single A6 sized folder :( Undaunted I still used it a week or so ago and then carefully slit through the horizontal joins between each message to produce a set of message strips. They also happened to be lying here on the desk - how fortuitous (today's long word!) - they are the same width as the trimmed Marianne embossed piece of card  :)) So, the two (four in fact - so I made two cards the same!) ready embossed/cut pieces of card were sitting here on my desk yesterday when I had a good old tidying session - just asking to be used, and this is what I came up with:
 Phew, the daylight lamp really does make the embossing stand out too, after all the difficulty I had previously :) The card almost speaks for itself - so simple to make once you have the bits and pieces for it. By the way, the holly leaves aren't cut out by the folder, they might look like it in the photo - I added those on top of the white, they're actually dark green.

I used:

- white 5" x 7" card stock (from Hobbycraft and lovely thick card - I think a packet of 50, including envelopes cost about £4.99 or £5.99. A really good deal!)

- white card and Marianne Designables folder (DS0907)

- white card and Crafts Too Christmas sentiments folder which I chopped into message strips as I said earlier

- silver, really shiny, mirri card, layered behind the embossed white card. A trick I used, being unsure about my skills at placing the sentiment and the Marianne embossed piece of card neatly together on the silver backing, I joined them first with a strip of narrow sellotape along the back.

- holly leaves punched out of dark green card with a single vein run up the centre using an embossing tool and an embossing mat for some 'give'. The punch also came from Ally Pally - it's made by Woodware and I think it's going to be mega useful :)

- holly berries are self-adhesive pearls, from Hobbycraft. The red has a bit of a pinkish tinge to it so I deepened the colour using a 'Cardinal Red' Pro Marker

Funny enough, once all the pieces are die cut this is a super quick card to make. It's crisp and clean although the Marianne folder gives it another dimension too. I've been looking for a design to make a bulk batch of cards, to boost my woefully low supply of Christmas cards - and this might just be 'the one' :))

Hope your weekend is going well and that you're finding some time to craft!

Di
x

Saturday 15 October 2011

Winter Wonderland

Itching here to play with the MS Punch Around The Page (PATP) Aspen Snowflakes set, I had a quick little play in between wedding stationery samples.

The colours are a little bit different for a Christmas card:
The background papers are from My Minds Eye - free with Cardmaking and Papercraft magazine. Some really nice papers in the pack, although I wasn't overly impressed with the free toppers - think I need to sit and have a good think about those! However, one paper and a couple of toppers did leap out at me - love the little trees!

I used:

- 5" white square card stock

- chocolate brown backing card (this needs to be quite thin as the PATP snowflake set is quite intricate and doesn't cut thicker card as neatly) - punched with the PATP set

- paper from the MME freebie set, with corners rounded off

- topper from the MME freebie set, backed with a round scallop also cut from the chocolate brown backing card

- sentiment also from the freebie MME set

- a few aurora borealis (two big words today!) gems, some on the tree topper and one in each corner snowflake as, to my eye anyhow, the centres in the corner punch are a bit big compared to the delicacy of the rest of the snowflakes

All done, and another one on the Christmas pile. My 'in-house critic' says this reminds him of chocolate peppermint creams :)) Today is his birthday so maybe the Birthday Fairy will have to see if she can find some real peppermint creams!

Have a great weekend, whatever you have planned!

Di
x

Friday 14 October 2011

Friday Feast - Chicken, Spinach and Potato Curry

Another chicken curry recipe today - no 'blitzing' of chillies, garlic and ginger though in this one, so less washing up :)) It's also a Slimming World recipe and uses no oil so is pretty much guilt free - which can't be bad!  We love it and you certainly don't feel as if you've just been terribly self-righteous (today's big, hyphenated, word). If you're really naughty like me, one or even two of the small Weight Watchers Garlic and Coriander Nan Breads is a great accompaniment :)

Chicken, Spinach and Potato Curry

Serves 4

1 onion, peeled and finely chopped
800g skinless and boneless chicken breasts or thighs, cut into bite-sized pieces
4 large potatoes, peeled and cut into large bite-sized pieces
170g baby leaf spinach, roughly chopped
2tbsp medium or hot curry powder (you can use mild if you prefer)
400g can chopped tomatoes
Salt and freshly ground black pepper
A large handful of chopped coriander and mint leaves

Place a large, non-stick frying pan over a medium heat. When hot add the onion, chicken, potatoes, spinach and curry powder, stir to mix well. Stir-fry for 2-3 mins.

Add the chopped tomatoes and 400ml of water and bring to the boil. Cover, reduce the heat to low and cook gently for 25-30 mins, or until the chicken and potatoes are cooked through and tender.

Remove from the heat and season to taste with salt and black pepper. Stir in the chopped coriander and mint and serve immediately.

Enjoy! Oh, and it's suitable for freezing too.

Friday today and I'm off into town looking for a last minute gift to add to those I already have squirrelled away for my OH tomorrow - I also have one of the M&S £10 gift vouchers in my purse that did arrive as promised from the insurance company a little while back. Going to try one of their Dinner for Two offers - it might not be my birthday tomorrow but a night off from cooking would be good! But, I might make this curry again tonight as it's so yummy - Friday night as curry, or pizza, night is a great way to start the weekend :))

Di
x

Thursday 13 October 2011

Happy birthday to yoooooooooooooooou!

I can almost hear the little dog on this card howling to the music :) It's for my OH as it's his birthday on Saturday but I want to catch a couple of challenges and it's most unlikely he's going to call in here for a peek. He does play the guitar (and is pretty good at it), so as soon as I saw this stamp I just had to have it. In fact there are five of them here (guitars, not doggies!!), can you imagine the luxury of a choice of five embossing/die cutting machines?! :)

Here's the card - my first try at a stepper card in this style and kept quite simple as it's for a chap and they don't go for lace and flowers (well, most of 'em don't....if yours does, check your wardrobe!):

I used:

- deep red card stock for the stepper card

- Lili of the Valley stamp 'Playing Guitar' - coloured with Pro Markers

- deep red backing for the image from snippets

- black and silver 'music' paper - from snippets

- Lili of the Valley sentiment stamped in deep red (Dew Drops Pearlescent Red) onto a snippet of white, then layered onto a snippet of black card die cut into a scalloped circle

- shiny black Josy Rose nail heads

A succinct (ha, thought I'd forgotten the big word did you?) posting today. Now, let me back at that wedding stationery :))

Ooops, almost forgot the challenges:

As it was 'snippets to the rescue here' I just have to run to the playground and add this to Jules Crafty Snippets Challenge Week 40.

Also:
Card Makin' Mamas Challenge #30 - 'Folds'

My Mum's Craft Shop Challenge 27 - 'Remind You of a Song' - this just has to be Elvis Presley and 'You Ain't Nothing but a Hound Dog' :))


Di
x

Wednesday 12 October 2011

WOYWW 123

Well, it's been a fun time in the craft room this past 24 hours! Right now my head is spilling over with wedding stationery ideas - eek though, what if they don't like anything I manage to come up with by next Monday evening! This is the state of the bit of my desk I feel able to show as I left it yesterday evening:
Only two samples finished but lots of bits in the oblong box at the back ready for some square invitations and example place cards, umpteen pairs of scissors, different sticky stuff, ink pads from colouring flowers as shown on the lovely Jules' blog here (great idea and worth a look!) and the hot fix wand - also one of Jules' brilliant gadget ideas :) I know that Elizabeth is very taken with the idea of hot fix nail heads and I promise you wouldn't regret investing in one. Just resist the temptation to touch the nail heads too soon after fixing them - ouch :)

There's an invitation sample with butterflies on and, although I could find aubergine card in Hobby Craft, there was no paper - and the butterfly punch does not do card at all - so, thanks to a little bit of inspiration (today's long word) I bought some aubergine envelopes to match the card and carefully dissected those instead. Not the cheapest way of doing things but at least I can play until I know exactly what shade Jess really has in mind. Carol also sent me some SU eggplant/aubergine card which I can show as an alternative if my definition of aubergine is too dark! Thanks Carol :)) Aren't crafters just the very best at diving in to help!!

Behind the butterfly card you can see a creamy white stick. This is sooo cool - a great find for clumsy folk like me (the arthritis in my right thumb doesn't help either - poor old crock!):
This is it with the lid off for a closer peek. It's a Pinflair Pick Up Tool and can be bought from Amazon, e-Bay and quite a few craft suppliers. The end is like a sticky blob so you can pick up little gems etc. really easily - I use it a lot to help me to pick up/position hot fix nail heads. If the sticky loses its 'tackiness' you just rinse it in warm water and leave it to dry. So far I haven't needed to do this and I've had it for a while - but I do keep the cap on it in between picking up stuff which probably helps.

To see what everyone else is up to today and to have a good nose at their desks etc. - just hop over to Julia's here. Happy snooping :))

Di
x

Tuesday 11 October 2011

Introducing - Miss Lucy Locket :)

Our grand daughters have a new little playmate over in Germany! This is Lucy, who I've already christened Lucy Locket, she's all of 8 weeks old and scrumpdiddlyumptious (ha, I made that long word up!) gorgeous:
Livi. almost aged two, with Lucy - I just hope Livi the Engineer doesn't look for buttons to press :)
Mia, aged almost four, already being like a little Mum to Lucy. Hmm is she checking if she needs a baby wipe somewhere?
Aw, so cute!! I think Lucy is in for a LOT of cuddles :))

Unlike someone here who could have been a UFO if you looked in the sky last night. Late afternoon I spent ages looking for wedding bits in HC, went to Staples, the Post Office, Sainsbury's and then tottered home. I already had dinner under way later and 'someone' came into the kitchen and asked when dinner would be ready - at the same time tapping his watch!!! Oh man, it takes a lot to rile me but you do NOT tap watches at me (remember that if we ever meet up!) - the rocket fuel was lit pronto and I'm surprised 'said someone' wasn't seen flying over Hampshire wearing the curry saucepan as a flipping hat!!! All is now quiet on the Western Front - and it does make for an entertaining verbal boxing match now and then. Love him really.........and the curry was great in case you wondered!

Have super day whatever you're up to!


Di
x

Monday 10 October 2011

Happy Kiss-mas card

Firstly, thank you all so very much for the positive comments about those embossed cards yesterday - and also for the tips and pointers about the wedding stationery. Bubbles even emailed me with some thoughts. You're all so helpful - that's what's so great about crafting and blogging :) Hetty Wainthropp had a successful trip to the wedding fayre (no hidden cameras were involved) - and this week it's 'wagons roll' on a few ideas I'd already had. Yesterday's reconnoitre (sneaked the big word in!)  did confirm some of my thoughts, which is a great relief.

On WOYWW I had the makings of today's Christmas card in a little basket, all goodies gathered together. This is the result:
It definitely works for me to pull stuff together - before even colouring an image. There seems to be less angst in the long run :)

I love this Penny Black stamp featuring two of my favourite creatures - a hedgie plus a robin, bought recently 'pre-loved' from another crafter. It's so worthwhile looking out for things, especially stamps, on the blogs you follow and of course e-Bay. Just don't dither like I sometimes do if you spot something you'd really like - else someone else will likely beat you to it!

I'll list what I used below - but this is the first time I've used one of the poinsettias I took apart and covered with Twinklets. I did show about these not so long ago, and Bev Rochester has a great tutorial on how to do them - good fun and quite therapeutic. I snipped off the green leaves layer at the back though before adding the flowers to the card - the green just clashed. And, I made two cards almost the same - just slightly changing the colouring of the hedgies scarf and the scalloped oval behind the image. Another two for the box - a few simpler ones are called for to speed things up, but I did love putting all the bits in this card together :)

I used:

- Penny Black 'Wishes for Kisses' stamp, coloured with Pro Markers, and a little dot of Opal coloured Liquid Pearls on the mistletoe berry :)

- image and backing oval cut using Nesties dies. The backing scalloped oval was cut from a Dovecraft Noel Pad

- papers on the card itself are from an Echo Park 'Seasons Greetings' paper pad, some really lovely papers in this set :)

- hard to spot but there is some dark cream broiderie-anglais ribbon, threaded with dark red seam binding, tied into a bow. I found the seam binding in a rummage box in either Hobbycraft or my local haberdashery shop - yards and yards of it for £1

- the sentiment is an Elzybells one

That's my offering on this dull and overcast Monday morning - I'm off out later to scout round HC as my first port of call for aubergine paper/card!

I'd like to enter this card into the following challenges:

My Mum's Craft Shop - All Creatures Great and Small

Scrapbook Sisters #55 - Christmas Flowers

Christmas Inspirations - Birds or flowers ( this card has both a bird and a flower - but a few other entries do too so maybe it qualifies OK)

I've just spied a new follower - Patchezzie - I can't see a blog but welcome to the Crafty Workshop! I seem to be moving towards 100 followers, and that's gonna have to be candy time to celebrate :))

Have a nice Monday!

Di
x

Sunday 9 October 2011

The art of making cards that are impossible to photograph

Fiddling round here yesterday I had what seemed like a good idea at the time:
Yikes! It's almost impossible to photograph embossing and this one above is the best I could do with the light coming in sideways from a window :( It's a real bummer shame as they do look very tactile (a grown-up word!) in real life. I bet they would look good using the ink pad, brayer then emboss technique too.

The cards are 8" x 8", embossed with dots that look a bit like snow, bought from The Range. Embossed Christmas trees were done using a folder I bought at Ally Pally to replace a Cuttlebug one that was misaligned from the word go. It's the only folder I've ever had like that so I was skipping for joy when I found this even nicer one at AP. Gems and pearls came from my stash, along with the ribbon and the backing card behind the trees (Glossy Black and Silver Mirri). Each tree was topped off with a Josy Rose silver star nail head.

I'm off out shortly - to snoop saunter round a Wedding Fayre at our local Community Centre. I have a ton of ideas whizzing round in my head for the wedding stationery I'm about to begin playing with - but, it's always good to see what others are doing. And, if I'm cheeky, to ask if anyone knows where I can get plain card stock in aubergine :)) Man, I've searched the internet in vain - I have mulberry paper and a lovely embossed paper, both in aubergine, but also want some plain card to play with :(

Thank you so much by the way for the advice about keeping it 'simples' - noted :) !

Right, time to get ready, put my Hettie Wainthropp outfit on, then go out investigating :)) Hope you're having a fun Sunday!

Di
x

Saturday 8 October 2011

Spike update, ribbons and wedding stationery

Firstly, it looks as if Spike the hedgehog might have hibernated. He trotted along several times a night over recent weeks, gorging on his food (topped up with cashew nuts - his food of choice for sure) but for the past few nights not a sign of him! He's a big hedgie so we have to hope he has hibernated (big hedgies will often hibernate as early as September) and that he hasn't been out playing with the traffic :( Fingers crossed here.

Secondly, a big 'Eeek'!! I'm going to be making a load of wedding stationery for my friend's son and his fiancee - so long as they like what I can come up with. I know that Jess peeks at this blog so I hope she won't be put off by me saying it's quite daunting. I can do production lines OK but want Jess and Stuart to have a choice of options so this week coming I'll be putting together some samples, mood boards (get me!!) and so on ready to show them. All I know so far is that 'aubergine' is the main colour so not a lot to go on as yet.

So, for the samples, I've managed to track down aubergine card, mulberry paper and such for layering or whatever but I had the devil's own a bit of a job finding aubergine ribbon. Eventually I stumbled across The Ribbon Shop and the wide range of colours they have included aubergine! They do a good range of ribbons and their double sided satin ribbon comes in umpteen widths. I ordered a few 1 metre lengths of the satin ribbon in different widths plus some aubergine organza too (err, some other ribbons for me also fell into my shopping basket!). But, in the great scheme of things it was a very small order for them.

The order was placed on Wednesday and on Thursday the most scrumptious (today's big word) little parcel arrived, less than 24 hours after I placed the order. In my haste I didn't keep the beautifully striped outer wrapping with a gorgeous oval cream and gold address label on but just look at this:
This is the gold box, carefully lined with tissue paper and a hand written receipt for the order.
And this is what lay inside the tissue paper. Folded, and not squashed, ribbons - each carefully tied with ivory ribbon and a delicious little hand written tag describing the ribbon and the length provided. Oh boy, someone takes real pride in their service and I'm still opening the box now and then to peek at such pretty contents.

As you'll probably know, I adore ribbon and this is such an amazing change from ribbon being tightly folded or even stuffed into little polythene bags when it arrives in the post!

I just thought I'd share this with you - the art of beautiful packaging and presentation lives on in The Ribbon Shop for sure and I for one will be looking there first when I want more ribbons. You can never have too many say I!

Hope your weekend is going well and thank you for calling by!

Di
x

Friday 7 October 2011

Friday Feast - Bobotie

Pronounced ba-boor-tea, Bobotie is the national dish of South Africa - delicious curried meat topped with an egg custard (not dissimilar to Moussaka). Oh go on - please let Moussaka be today's long word :)

I always think of an amazing lady we knew called Maxie whenever I cook this dish. She had escaped from their farm in Zimbabwe after her husband was murdered and was making a new life over here. Sadly, she too died just over a year ago and the world is a duller place without her. She had not one ounce of self-pity despite her illness and the loss of everything back in Zimbabwe - a real inspiration!
Ahem, 10 minutes less would have been good. The top's a bit brown (but it still tasted as good as ever!)
Bobotie 

Serves 4-5


1 medium slice white bread, crust removed
1 tablespoon oil
1 medium onion, peeled and chopped
2 level tablespoons curry powder
2 teaspoons caster sugar
1 tablespoon lemon juice
500g (1lb) minced lamb
2 bay leaves
Salt and freshly ground
black pepper
FOR TOPPING:
1 medium egg
2 level tablespoons plain flour
150ml (¼ pint) milk

Set the oven to 200°C or Gas Mark 6.

Place the bread in a bowl, pour 100ml (3½fl oz) water over it and leave it to soak while cooking the onion and mince.

Heat the oil in a large pan and add the onion. Cook the onion over a medium heat for about 5-7 minutes, stirring it occasionally until it starts to soften. Stir in the curry powder, sugar and lemon juice and cook for a further minute, stirring well to mix them together.

Add the minced lamb to the pan and cook until the meat turns brown. Add the bread to the pan, and any remaining liquid from the bowl. Stir well to break up the bread and mix it into the mince. Remove the pan from the heat and turn the meat out into an ovenproof dish, pressing it down well to level the surface. Place the bay leaves on top.

To make the bobotie topping: Break the egg into a bowl and gradually whisk in the flour, then whisk in the milk and season well with salt and pepper. Pour the mixture over the mince.

Place the dish in the centre of the oven and bake for about 40-50 minutes, or until the topping is a light golden colour.

Remove from the oven and serve your bobotie immediately with salad or vegetables.

Things I do: At first I didn't realise just how much this is akin to a soft meat loaf - I always worried that I was making it too dry. To be honest, I don't think the egg topping goes very far and sometimes I double the quantity - if I remember!

The recipe says it isn't suitable for freezing but I have frozen leftover Bobotie successfully.

Whilst looking into the story behind Bobotie just now, I found some similar recipes using beef mince instead of lamb. Next time I make this dish I think I'll try it using beef instead of lamb for a change.

Maxie always signed off with 'Hambe kahle' - which means 'Go well' and today's recipe is for Maxie.

Thank you for calling by today and I hope you have a wonderful weekend - in the words of Maxie, 'Hambe kahle'!

Di
x

Thursday 6 October 2011

Waiting for Santa and a walk down Memory Lane

Well, what a lovely reaction yesterday on WOYWW to those 'shparkled brads' - thank you for the positive comments, and mind those fingers when the brads are hot :) Glossy accents won't work, I did try it a while back and it's messy, doesn't like slippy surfaces, is too 'gloopy' and just soaks up the fine glitter. It is great though for chunkier glitter such as Twinklets Diamond Dust where it doesn't matter if you end up with a thick, uneven layer of sparkle, such as on the poinsettias I've been making - it likes paper and card :)

Anyhow, rootling through my Christmas stash I found this little card, buried and made a looooong time ago - I think it shows in the lack of patterned papers, layers and stamping :) But, I think the idea is still worth showing and I might even make some more as I also found a load of windows already made up - so much stash and right now so many ideas - and not enough hours in the day!
I made it so long ago that I can't remember where I sourced a lot of the stuff but these are the basics:

The card is an A6 red hammered card from Craft Creations - way back in the days when they really only sold paper, card and peel offs. I still use them for cards and envelopes - and a few extras always seem to fall into my basket along the way :) The little black cats are ready cut dies, bought from Dies to Die For way back in the days when Kirsty Wiseman owned the business. Not sure who made the window peel offs but I suspect I bought them from Craft Creations as well. The peel offs were stuck onto acetate and then the outline was cut round and the windows cut so that they open. Then it was backed with a layer of sparkly dark blue paper with some 'snowy' mesh on top. I ran a black Whispers pen along the window sill and then added the cats so they were sort of sitting looking out. Ha, the star is a silver sequin (the age of all this stuff is really showing) and the sentiment was from Lakeland, back in the days when they stocked craft supplies. I used to think their stuff was great and they came up with some good ideas given that crafty things were not so prolific (yay, today's big word) and there certainly wasn't the choice elsewhere that there is now. I added the little gems just now :)

It's cold here today, the boiler has just been serviced (at 8am!) ready for the Winter and I can smell freshly made coffee wafting from the kitchen. Tomorrow is Friday Feast and I think it's going to be something warming for the day's recipe. Tonight here it's sausage, onion gravy, mashed potato and greens - real comfort food - and not one I'll be posting a recipe for. We can all make bangers and mash :)

I need to hop round some blogs - lagging behind on WOYWW visits this week I'm afraid. I'll be with you ASAP though:)) And thanks again for all your lovely, supportive comments.

Di
x

Wednesday 5 October 2011

WOYWW 122

Ahem, I've been thinking about Christmas here - big time! Firstly, I did manage to commandeer (today's biggish word) - for that read swipe - our chrome vegetable trolley, used purely to house cleaning things, that I'd been hankering over. A swift trip to buy a robust plastic one to house the cleaning things, which are kept out of sight anyhow (just the way they should be kept - out of sight) freed it up and into my gleeful sticky little paws :) The increasing amount of Christmas stuff I wanted to hand was driving me nuts on my desk and this is a great solution:
Stamped and coloured images, papers, sentiment, lace, seam binding, glittered poinsettia - all selected ready for a couple of cards.
The lot popped into a little grey plastic basket.
Then tucked into the chrome trolley - which also has Christmas glittering bits, ribbons, plastic boxes with ready made and glittered poinsettias etc in (need a load more of these!)...and the trolley still has plenty of spare space, for now at least.
Pushed under the desk - it actually goes right back leaving plenty of room for my short little legs but no way was I going to push it right back then crawl round on the floor taking a photo - I might still be under there next Wednesday :) Brilliant solution!!

Ha, that leaves space for me to carry on making these:
Sparkly brads! I can't recall where I saw this idea, so if it's been on a WOYWWer's blog already I apologise. I think the original idea used plain gold or silver coloured brads but the plain metal ones I currently have are really tiny, so I raided my coloured ones. I've used nail polish to colour brads in the past, but these are something different. The makings are in the photo above, heat proof mat, embossing powder, sparkling stuff (a bit like 'less fine' Glamour Dust but no label on the pot although it came from Art of Craft), brads, looooong tweezers, piece of polystyrene (just the stuff they pad parcels out with) and a heat gun.

Hold the brad by its legs firmly in the long tweezers and heat with the heat gun for about 20 seconds. The colour of the painted brads will change slightly as they're painted, but the paint didn't bubble or even smell. Then dip the hot brad into the pot of clear embossing powder and straight into the glitter. I did try giving a quick reheat once the embossing powder was on, and even after glittering the brad but it wasn't necessary, I found that the brad is hot enough to end up with a coating of melted embossing powder on anyhow. Neither the embossing powder of the glitter suffered by me dipping straight into the pots. Then, stick the brad into a piece of polystyrene to cool. I found I could do all of this holding it in the long tweezers - do not touch hot brads! I'd already poked some holes into the polystyrene using the end of an embossing tool. And the result:
Some more centres for poinsettias, snowflakes, flowers and such! I used clear embossing powder but you could use coloured which would be fun to experiment with. And/or coloured glitter - lots of possibilities!

That's this weeks offering from me - a good use for a vegetable trolley and making glittered brads. For more ideas, or just to nose at what folk have on their desks, hop over to Julia's here. Make a cup of tea or coffee first as you could be a little while :)

Di
x

Tuesday 4 October 2011

It's October and.....

......it's been unseasonably (today's big word!) warm, or even hot for a lot of the UK. But, it's forecast to change PDQ and then it'll be a shock - mad scramble for Winter woollies maybe.

I drove up to Warwickshire and back on Sunday and some of the Autumn colours on the trees are stunning already. So, when I was tidying up in here yesterday morning I had a thought. At Ally Pally I'd been given a smallish leaf shaped stamp, free, gratis and for nothing with some purchases and, as it happened, I was also re-inking those dried out Distress Inks I've jabbered on about a few times. I figured that I'd invested too much to ditch them, and the re-inkers should last a good long while so I bought some. How glad I am that I did too - those ink pads slurped the ink up like camels drinking at an oasis after a trek across the Sahara! Brilliant, plus there's still plenty in the bottles to re-ink the pads a few times over - and I promise you, I now know what they should have been like all along :)

Of course, being me, I wanted to test the re-inked pads out so had a little play and this is what I came up with:


I just used some cream coloured background card and a selection of TH inks then stamped 'willy-nilly'. The colours are brighter/richer and much more Autumnal in real life, no matter how many photos I've taken! The background cards are a rich cream so that shows how the colour has washed out in the photo - and this is the pick of a large bunch:(

I used:

- A6 cream linen card stock

- mustard/gold Core'dinations card for matting - snippets again

- the stamped leaves background - TH Distress inks in Peeled Paint, Scattered Straw, Dried Marigold, Old Paper and Walnut Stain

- Art Impressions tree stamp - G-1277 (also a great stamp for Christmas cards with the twinkling technique over it). Stamped using Versafine Vintage Sepia with a little whisk of it round the edges

- the green strip and chopped up greeting were in a Craftwork cards goodie bag I'd had for ages. After Sarn's success with her Warren goodie bag, yesterday I went right through the ones I'd put to one side in disappointment about a year ago, fished out the best stuff and put it all nicely away. I was surprised how much better it all looked when out of the pouches and separated out - together a lot of it just 'jarred' as a kit. A shame as I like so much of their stuff.

I'd like to enter this for the following challenges:

Phindy's Place Challenge #75 - Autumn/Fall

That's me for today!

Di
x

Monday 3 October 2011

We all think differently....

...and crafting is a good example!

Edit: If you came here from WOYWW 123, I'm sorry, I added the wrong link - you should be here instead - signed, Mrs Potato Head.

On Thursday I spent a jolly craft afternoon round at a friend's, doing 'show and tell' and swopping stash. She's really into decoupage (the biggest word I can think of for today) so I took a lot of House Mouse decoupage sheets for her along with some other bits and bobs. Then she produced a load of stamps asking if I'd like any of them. Quite a few were not really our style (she bought a job lot at the local charity shop) but one in particular caught my eye. 'I'm never going to colour that parcel' said Pauline - but I could see potential. I was honest and explained that I'd use it for paper piecing just in case she might still want it - at which the stamp was still dropped into my bag by Pauline :) Funny, she does amazing decoupage work but baulked at the thought of paper piecing!

This is what I came up with - one of the fastest cards I've made for a while:  
Without my specs on I'd actually thought the message was Happy Christmas until I got it out to have a play here. But, it's a very simple Birthday card instead :)

So, I'm quite early this week to enter this into Jules Crafty Snippets Challenge - Week 39.

I used:

- White A6 card stock

- pink slightly glittered background layer card from snippets

- image stamped using using the 'third-hand' un-named Anita's stamp and a pink teeny ink pad from 'I know not where', but I have a load of these little square beauties,   :)

- paper pieced using paper with teensy flowers on, from snippets


Di
x

Sunday 2 October 2011

How's your eyesight?

Having just gone through the traumas with Len's eye problem and a couple of years for me trotting back and forwards to hospital after I was unfortunate enough to develop Herpes Simplex Keratitis, which would not go away - I feel able to post this little tale. Our eyesight is so precious - especially to us crafters!

But, I was thinking about a very sweet friend called Kath who is one of life's innocents. If there's a pickle, she gets into it - you know the sort of person I expect? Kath wears glasses all the time and noticed that she was developing a film over both eyes. So, off she trotted to the local surgery to see her doc. - fearful of cataracts. He checked her eyes then picked her specs up from his desk and held them up to the light. Trying to stifle his laughter he then said, 'Mrs B, your eyes are fine. But can I suggest you take your glasses off when you use hairspray!'. Poor Kath scuttled out of his surgery at a rate of knots! Bless.

Di
x

Saturday 1 October 2011

The results of looking for something else......

....can turn up things you forgot you had in a craft room, n'est ce pas?

Whilst gathering together Christmas backing papers I stumbled across a whole flipping KanBan kit, bought quite a while ago, called 'Birds of Paradise'. It came with all the card stock, toppers and messages plus other bit and bobs. I'd even got as far as carefully removing all the toppers and messages from their sheets before carefully putting them into cello bags - and then hiding them! This is what I quickly rustled up yesterday:
The card and toppers are all black and white with lovely holographic (today's big word!) silver highlights. And, all you need to do is to choose what goes with what - not always easy as there are so many combinations. These would be great to make up and send to St Luke's in Sheffield.

All I did was use an A4 sheet from the pack, score and fold it to A5 size, ponder over the multiple choices, stick using sticky pads (the peacock has an extra layer of the image for dimension), then add some organza ribbon from my stash. This ribbon, from Hobbycraft ages ago but I think they still stock it, is great as it has little silver sparkly swirls on it. For a long time I avoided ribbon like this as it comes wired but it's so simple to just cut your length and then pull the wire out from the end. It does widen the choices too :))

The peacock brought back a few memories - not least my Mum's superstition that peacock feathers in the house were a definite 'no-no'. Something to do with the evil eye and all that - although in Asia, the feathers of the peacock are considered auspicious and protective. Whatever, I think they are beautiful creatures and will never forget seeing a pure white peacock showing it's fabulous lacy white tail off.

It's lovely and hot here again so I hope you're enjoying whatever you have planned for the weekend. I'm driving up to Warwickshire for a meeting tomorrow - my old school association's committee meeting. And if they ask for volunteers to make 200+ table favours for the next reunion, I for one will not be standing up waving and squeaking 'Pick me, pick me!!!'. Been there, done that one :(

Have a fun weekend!

Di 
x