Sunday, 31 July 2022

A touch of tartan - up cycling for Christmas

One of the Christmas card fronts I die cut last week ready to up cycle has a 'touch of the tartan' in the pile of wrapped gifts - and that was my starting point for this card:


I used:

- 5.5" x 4.25" white card blank, side opening

- the up cycled image from a shop bought kraft card sent by a friend last Christmas, die cut using a Presscut 'Oval Stitch Hole' die

- a panel of green tartan paper, which was a snippet already cut to almost the right size and tucked inside the back of the paper pad 'envelope pouch'. The paper pad is one of my very favourite LOTV pads called  'Classic Christmas' - and there's not much of it left in the pad!

- then a further poke around the same 'Classic Christmas' snippets pouch pad turned up a strip of red tartan paper - a fairly good match (IMHO) to the tartan wrapped gift in the image panel to pull it all together 

- glued the strip of red tartan across the green tartan , snipped the really small overhang off, then glued it to the card front

- final step, after spending ages dithering over a possible sentiment and deciding against it, was to glue the oval image panel in place

A little hunt through my crafting downloads in the middle of writing this post turned up LOTV's 'Classic Christmas' papers in digital form - hooray! I bought them back in 2017, forward planning there! ☺ 

I've posted the results of our 'Christmas in July' themed Challenge #432 over on the Snippets Playground HERE.

Dudley Pupdate - a quiet week really. Dudley is certainly happier that the scorching temperatures have dropped somewhat. So are we! Having written that the other day, they seem to be climbing again!


Wednesday, 27 July 2022

Rudolph Days Challenge July 2022 - up cycling

The other day, I grabbed a handful of shop bought (great source) Christmas card fronts, saved from Christmas 2021 that we'd been sent, and had a little session using the Gemini, die cutting the elements I wanted to 'up cycle'. It's a good way to do it by having a 'session' as I did. I wrote which die I'd used on the back of each die cut and also kept a few snippets of the same card fronts to potentially use for sentiments, on some cards, not all.

A day or so later I rustled up a very quick recycled card from the batch, in readiness for the current Rudolph Days Challenge over at ScrappyMo's HERE:

I used:

- 5.75" x 5.75" square white card blank, side opening

- the gorgeous gold embossed edged front panel of a card which originally had a lovely embossed Christmas tree die cut on it - it's kept kept to one side to be played with another time. We've had the same 'tree' card (probably from the same friend who feels that hand made ought to be repaid with a special card) which I up cycled last year I think/know!

- the centre of the panel had the very slight and thin remnants of the glue from sticky pads on but, I knew that would be covered by the image I wanted to add

- trimmed the front square panel to the same size as the card blank and glued it in place 

- then pulled out a die cut really adorable robin image, from the front of another card, which I'd previously cut using a 4.5" diameter 'Stitched Circles' die by The Works

- glued the image onto the card front

- I always add printed or stamped inserts with Christmas greetings into our cards, so didn't spoil the front of the card by trying to add a sentiment

Very simple I know, but if the up cycled elements are pleasing, then try to work the card around them and let them shine and have a second outing. Better than being swamped with too much unnecessary 'stuff'. IMHO only of course!


Sunday, 24 July 2022

Laminating paper napkins

A while back, I discovered Ann Melvin and her numerous online card making videos, particularly different ways to use a laminating machine. One technique had me gripped - laminating paper napkins, you can watch it HERE. So, I dutifully sent off for a selection of paper napkins as well as some matte laminating pouches (I bought A5 size pouches which are perfectly adequate for my needs), my existing folders were all glossy ones. And this is a Christmas card I made:

I used:

- 7" x 6" white card blank, tent style (bit more about this below)

- rounded the corners of the card blank using my We R Memory Keepers corner half an inch rounder (it cuts through two layers at once, so I would be sure of them matching exactly when the card is closed)

- I'd laminated the image a few weeks ago, following Ann's video and using a rather Scandinavian or possibly German style of napkin

- mounted the image onto white card using double sided adhesive sheet, trimmed it to size and rounded the corners with an X-Cut half inch corner rounder

- then made a backing 'frame' using Tonic pearlescent 'Red Velvet' card, again with the corners rounded

- glued the image panel onto the card front

- grabbed a long narrow snippet of leftover Tonic pearlescent 'Red Velvet' card and trimmed it to half an inch width using my old faithful Woodware rotary trimmer with the changeable blades (I used the 'deckle' blade)

- glued the strip across the width of the card and trimmed any overhang from the back of the card using sharp scissors

- the sentiment was stamped using left over white snippets from trimming an original 8" x 8" card right at the start of making the card blank (I never use huge card blanks these days so didn't feel at all guilty)

- for the sentiment I used a stamp from the Poppy Stamps ''Gilded Christmas Wishes' set of stamps , the Misti and Memento 'Tuxedo Black' ink

- then die cut the sentiment using a matching die from the same Poppy Stamps set

- finally. popped the sentiment onto the deckle edge strip using thin sticky fixers

I made six all the same! At this rate I ought to be finished all my Christmas card making well ahead of time. 

The images really do look and feel like vellum when laminated using matte (or matt) pouches - a fun way to use napkins. I'm so glad I never disposed of my Woodware rotary trimmer - still have loads of different blades, even some spare ones, cutting track inserts and even a spare handle. 

The reason the cards ended up measuring 7" x 6" is that I needed the 7" width for the image panel, 7" x 7" would cost Large Letter postal charges (eek!) and 7" x 5" just didn't leave enough space for a decent sized sentiment below the image. So, I'll set to sometime soon and make some envelopes, rather than leave them until the last minute.

By the way, I found some USA large size slimline envelopes at Bumbleberry Papercrafts HERE. 50 for £4.99 so not too badly priced either. They're longer than DL envelopes and perfect for anyone who, like me, slipped up and bought USA sized slimline dies, thinking the measured the same as our DL ones. Bumbleberry also stock mini slimline envelopes by Gina K. But, they are far from being a realistic price (£7.99 for eight) and would probably cost more than it takes to make a small card, so I'll just make my own.

Pupdate - during the excessive heat last week, Dudley had little inclination to go looking for mischief. Basically we were all trying to keep as cool as possible. We celebrated his 4th Birthday on Friday, all quite low key. He proudly wore a new 'Birthday Boy' bandana the whole day and looked adorable. ☺ This is he:

It took umpteen shots to even capture this one as he doesn't pose nicely for photos.

As soon as the nights were cooler than in the midst of the heatwave - he's been sleeping on our bed all night, making up for lost time we think. 

And last but certainly not least - Sarn has posted the latest Snippets Playground challenge HERE. The theme is still 'Christmas in July'. A lovely card made by Sarn plus another cocktail recipe await you over in the Playground!

My cocktail recipe is nothing like as imaginative or exotic as Sarn's are - basically my first thought was cranberries as so many of us associate them with Christmas. So my offering is:

Vodka Cranberry - also known as Cape Cod Cocktail
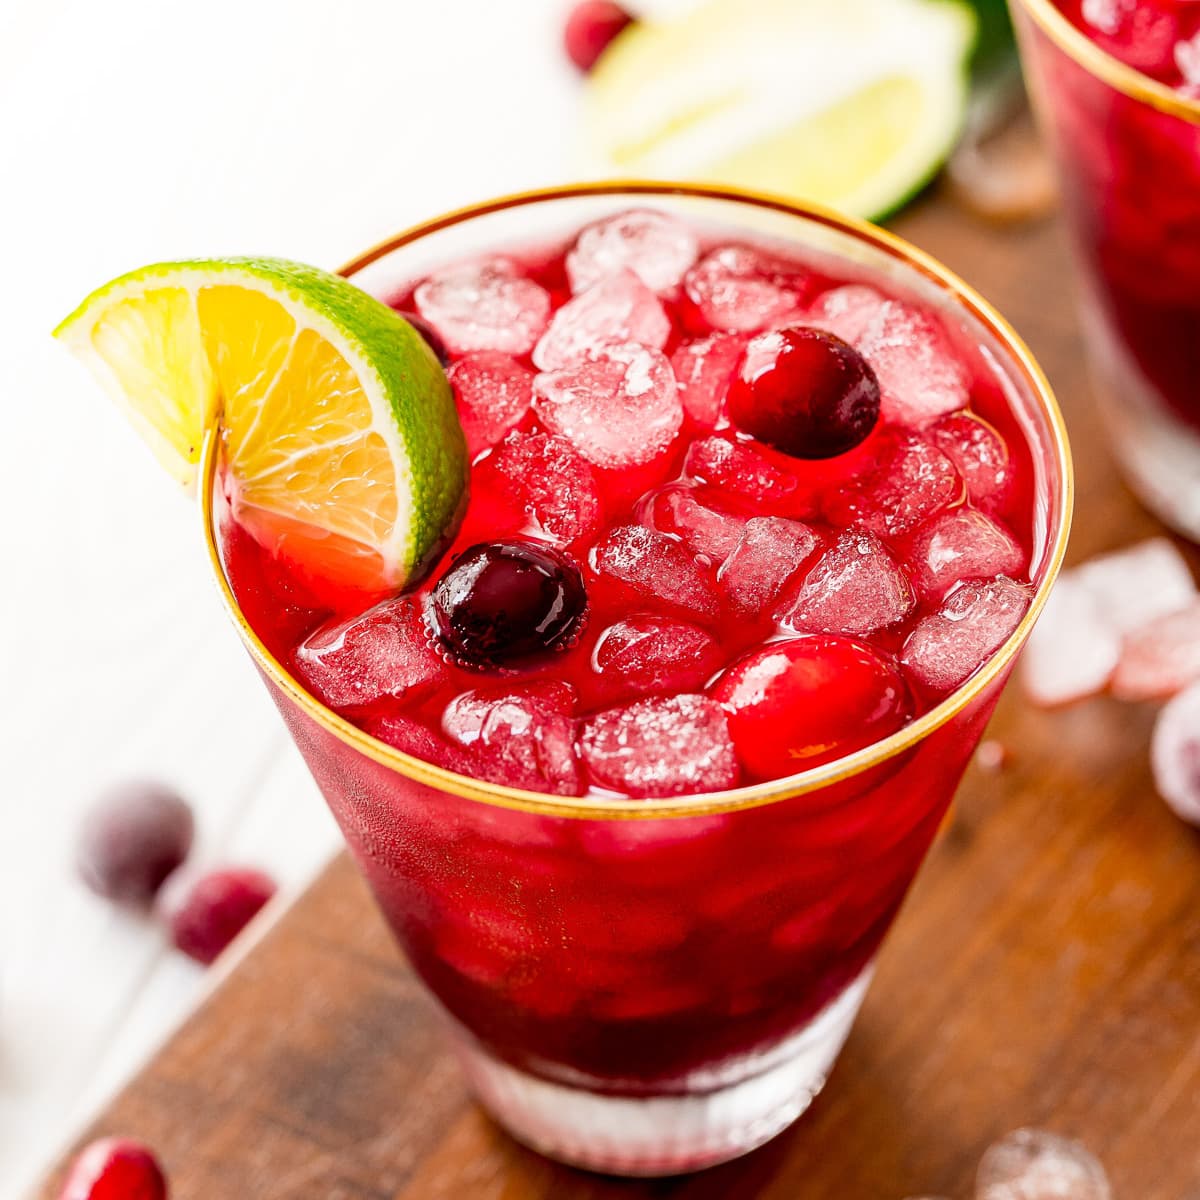
Vodka Cranberry Cocktail - Cape Cod Drink - Mom On Timeout
Image from the internet

So easy to make. 1 oz. vodka, 4 oz. cranberry juice, wedge of lime - plus a little 'simple syrup' if you like it sweeter. Fill a whisky tumbler two thirds full of ice (really?). Pour in the vodka and cranberry juice and stir. Add a little squeeze of the fresh lime wedge then pop it onto the rim of the glass as a garnish. For a longer drink, just double the ingredients and use a highball glass. Float three or so cranberries on top if you have them to hand. Personally, I'd leave them out for fear of anyone 'virtually' choking on them, unless you provide a virtual straw to drink through! 

Love from me and a woof from Dudley.


Sunday, 17 July 2022

Christmas Stickeroos

I rustled up four Christmas Snippets cards, two identical ones of each design, the other afternoon: 

I used:

- the last of some light cream card stock to make cards sized 5.5" x 4.25" (tent style) and 4" x 4" (side opening)

- I'd already stuck some Penny Black 'Berry Delight' Stickeroos onto snippets of Tonic pearlescent 'Majestic Gold' card so I just trimmed them down properly and rounded the corners

- then set to rifling through snippets of light cream and also Tonic Mirror 'Fire Stone Red' card for backing layers

- trimmed those to size, rounding the corners of the cream layer

- used the Misti and Memento 'Tuxedo Black' ink to stamp sentiments onto the cream layers - using stamps from Uniko's 'Christmas Sentiments' set of stamps

- then glued the red and cream backing card layers onto the card fronts

- glued the Stickeroo image on its gold panel onto the card front

- finished!

The camera is a funny thing isn't it - in real life the pretty images look as if they're just mounted onto a pearlised card backing - but if you look at the photos above - they can give the illusion that they're set into a shadow box. Weird! 

I rounded the corners using a new (to me) X-Cut Small 2-in1 Corner Rounder punch -  bought to round the corners on some envelopes I plan to make. It also does an inwards curve which I've seen a few people doing lately and want to try for myself. 

So that was something NBUS I used making my cards and I'm off to join in with Darnell's NBUS Challenge #40 HERE

I'd also like to enter the Holly card into the current Allsorts Challenge #685 Challenge HERE.

It's been far too hot this past week to tackle the promised sort out of the flowers etc. that I'll be sending to a few people. This coming week is set to be even hotter so please bear with me.

It's also Dudley's 4th Birthday on the 22nd. We have no special plans other than me making a card and perhaps getting him a Birthday bandana.

Speaking of Dudley, thank goodness he was trimmed just before this heatwave hit us. He's been very restless during the night and has been wanting to be out in the garden sniffing the night air several times a night - in the small hours. The other night I was fast asleep and Dudley was pestering Len to be allowed out for the umpteenth time, around 1:30 am. Len played possum and Dudley did settle down until around 4am - when he had his paws up on Len's side of the bed, asking to go out yet again. This time Len took him down and let him into the garden. That poor little dog had been hanging on, really needing to poop! Lesson there, no matter how many times he asks to go out - one of them could well be for more than a sniff of the night air! Me? I slept through it all. ☺

Sarn has been shaking up some brilliant cocktails in the tree house. My own offering is still under wraps - still waiting for the gold leaf flakes to arrive don'tcha know?! Wink.

Remember, the results of Challenge #431 can be found HERE. And there's still a week to play on the current Snippets Playground challenge - the theme is 'Christmas in July'.


Wednesday, 13 July 2022

Snowman in a Jar

When I spotted that the current Challenge#64 over at Christmas Kickstart was 'Show Us Your Snowfolk - out came my NBUS basket - with a Woodware stamp set fairly quivering in excitement to at last be coming out to play. And this is the card I ended up making:

I used:

- A6 white card blank, side opening

- covered almost all the front of the card with paper from the LOTV 'Frosty Christmas' paper pad, die cut using the largest die from the Heffy Doodles 'A6 Stitched Rectangles' set of dies

- to be fair, I had already worked out all the colours etc. I wanted to use, before choosing the backing paper for the card front

- then I set to making the snowman in a jar using a NBUS Woodware 'Snow Jar' set of stamps

- used Memento 'Tuxedo Black' ink to stamp the jar main image of the set three times - twice onto plain white card, then the sky portion onto paper from Sticker Kitten's 'Celestial' paper pack

- then trimmed the main jar as a whole, ran a black Whispers brush pen right round the cut edges and set it aside

- next trimmed the 'sky background' from the 'Celestial' paper, ran a black Whispers  brush pen right around the cut edges and set it aside

- then did the same with the second full stamping onto white card - this time trimming all along and around the snowman - again running around the edges with black pen

- coloured the snowman's carrot, hat and the robin (plus a little separate robin from the same stamp set) using Polychromos pencils

- to assemble I used a medium glue pen and adhered the snowy blue sky onto the main jar panel then coloured the stamped 'snowflakes' using a white gel pen

- then glued the snowman and hillside part of the scene, all one piece, onto the 'sky' layer - wallop, it suddenly sprang into life!

- now I had the jar panel all ready, and having left the screw portion of the neck clear, I could add a length of black and white gingham ribbon with a little knot at the front - used red line tape across the back of the neck to secure it

- added the 'Snowman in a Jar' to the front of the card using thin stick pads to add dimension

-  popped the extra robin I'd cut and coloured earlier so that it sits on the rim of the jar, used a tiny piece of red line tape and a sliver of thin sticky pad

- whilst stamping right at the beginning, I'd also stamped both sentiment strips which came as part of the set and trimmed them using scissors  

- added the sentiment strips using the same medium glue pen

- final touch, a few subtle tickles of clear 'Wink of Stella' on the tree, hat brim and pom pom, here and there on the snowy hillside and a touch on each snowball - none of which show up on the photo but that's nothing new, sigh

- finished!

And, of course I made two at the same time.☺

I'd also like to enter this card into Darnell's NBUS Challenge #40 HERE. The 'Snow Jar' stamp set was having a first outing.


Sunday, 10 July 2022

Pass the parcel - for Christmas!

Time for a new Snippets challenge HERE - the theme is 'Christmas in July' - and to enter you must make something that adheres to the Christmas theme and also uses one or more identified snippets. We have two consecutive challenges with the 'Christmas in July' theme - and also two bumper Christmas goodies prizes, one per challenge, to be won in plenty of time for your Christmas crafting!

Here's my Christmas snippets card:


I used:

- a mini slimline white card blank, measuring 6.25" x 3.25 - tent style

- then covered the front of the card using a piece of beige (not as lilac as it flippin' looks in the photo) toned paper from a Whimsy Stamps slim line paper pack called 'Champagne'. That had been die cut using the biggest die from Lawn Fawn's stitched border 'Large Mini Slimline Stackables' set of dies 

- the outline for the parcels 'line-up' was die cut using a snippet of 'Tonic Gold' mirror card and the Simon Says Stamp die called 'Brilliant Gifts'. This is yet another goodie first spotted in the Playground here. Probably over at Lynne R's blog as I dutifully fall in love with all of her new stuff! 

- at the same time I die cut the sentiment using more little snippets of 'Inca Gold mirror card (every scrap is always too precious to throw away) - using a Tonic Studios 'Mini Moments Merry Christmas' die

- then glued the 'line of die cut parcels outline' onto the card front using a fine glue pen. Man, that was tricky-woo!

- next I used a piece of 'shades of gold colour' designer paper, chosen from Lawn Fawn's 'Watercolor Wishes' petite paper pack for the main portions of the parcels. Used the paper running 'down' the shades rather than across as they suggest - to create an ombre effect across the little line up and making life easier than lots of mixed colours - for this first play

- and, 'one piece at a time', carefully glued each empty space in the parcel line-up and added its matching 'shades of gold' Lawn Fawn paper insert

- finally, added the die cut sentiment to the top right hand corner

- and, of course I made two cards exactly the same!

The slim line pack of paper is absolutely gorgeous - very reminiscent of the Whimsy 'Blurry Flurries' 6 x 6 paper pad, which I also adore

This card is for Darnell's NBUS Challenge #40 over HERE.

Pupdate: It's been a bit of a time for Dudley lately, bath, home clip and scissor trim, claws clipped and his monthly application of Advocate anti-flea meds. Add him being sick on a car journey and he's been through the mill! Poor little scrap. It's certainly not left him much time to get into mischief!


Sunday, 3 July 2022

Far out!

It's been a week since I posted on here, for various reasons. I began this card hoping to join in with the Allsorts Challenge for a 'girlie' card but didn't finish it in time for the closing deadline. However, I would like to enter it into the current Allsorts Challenge #683, choosing the option of 'Anything Goes':

I used:

- a UK sized DL white card blank - side opening

- a sheet of patterned paper from the wonderful Whimsy Stamps 'Taffy' slimline paper pack which just had a little trimmed from both ends. It's such a psychedelic pack of papers! Or did I just dream that? ☺

- the image is from a lovely (discontinued) stamp set by MFT called 'Far Out', can't even find any images of it on the internet

- stamped the image and sentiments onto pieces/snippets of white card using Memento 'Tuxedo Black' ink pad

- fussy cut the image using tiny embroidery Fiskars scissors, reserved purely for use on paper

- coloured the image using Polychromos pencils - to pick out the background paper colours

- glued the panel of psychedelic paper onto the card front

- then (sigh) decided that the image would be swamped if placed directly onto the vibrant background. So, I die cut a white snippets backing using two dies from the Spellbinders 'Hemstitch Rectangles Venise Lace' set of dies ** then glued the image onto it (a waste of that fussy cutting!)

- snipped up the sentiment words using scissors

- then glued the  image to the panel, image panel to the card front and then the snipped up words

- finished!

Despite the Whimsy slimline papers being a little on the tall and narrow side, they are all so lovely! This pack especially is reminiscent of the days of LSD etc.Not that I ever ventured, a little before my time I promise, but we've all seen enough films about the visual effects of 'dabbling'.

And as so often happens, it's brighter in real life too - the light was streaming onto wherever I tried when I took the above photo.

** The rectangular hemstitched dies I used for the white panel came from my own duplicate set of the Spellbinders die set, forming part of this current challenge's prize. Well worth playing and still plenty of time to hop over and enter!

As the MFT stamps set, the Whimsy papers AND the set of hemstitch dies were having their very fist outing, I'd like to enter my card into Darnell's NBUS Challenge #40 HERE.

Dudley 'Pupdate'. A quiet week on the 'trouble' front for Dudley with no news of mischief - either he's hiding it or we're getting used to it! When he was not 100% toilet trained he did sometimes hide a little 'poop' in the dining room, nice choice of room - so nothing would really surprise me. The hedgies are out and about every evening, and they fascinate him - he never touches them but they do get a good sniff! He's four years old later on in July - how did that happen, where did time go? He had a bath yesterday so we all got a good soaking - right now he's really white and fluffy, still with those pretty peach tinged ears. And, they're growing back nicely since Len had to give them a serious trim a while back.


Sunday, 26 June 2022

Rudolph Days Challenge - June 2022

I've been playing with some NBUS goodies once again, in an attempt to start using and stop buying stuff! That's the problem with the Snippets Playground, new things are always popping up!

I'd like to enter Scrappy Mo's Rudolph Days Challenge for June (it runs to the end of the month). Other challenges I plan to enter are listed, with links, at the end of this post:

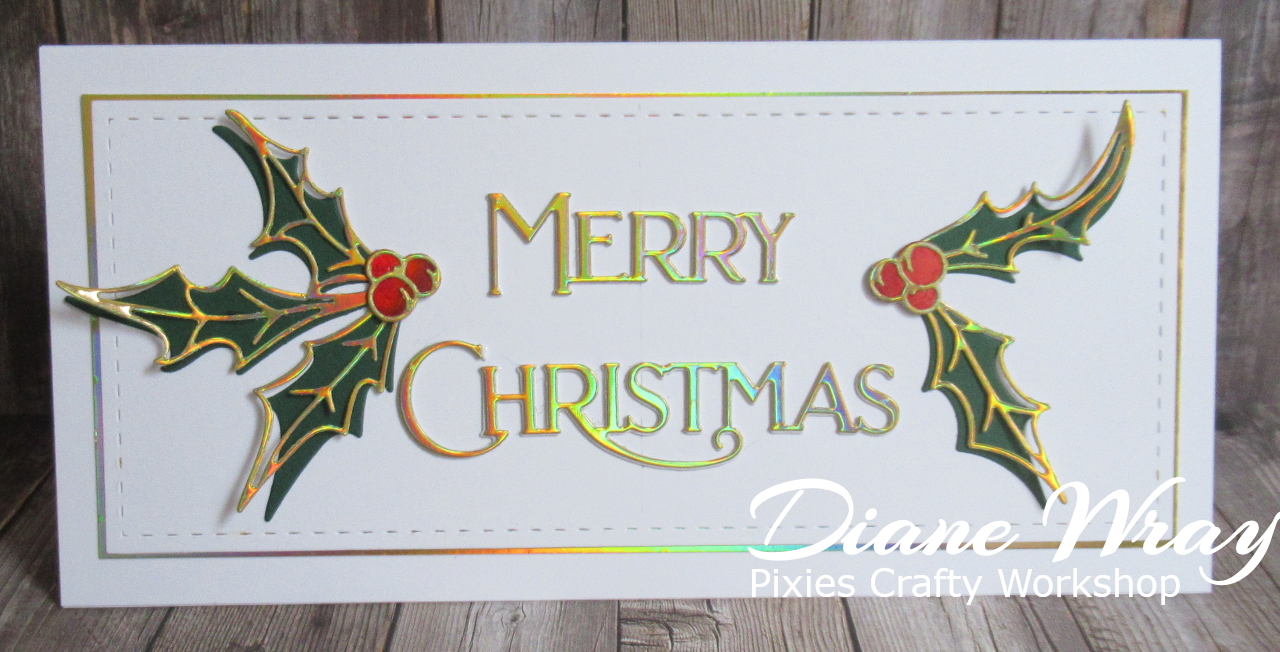
I used:

- 8.25" x 4.0" white DL card blank, tent style (bit more about this below)

- the white panel was die cut using a die by Creative Craft Products from their Slimline and DL Nestabilities range, called 'DL Stitched Straight Edge' die set - I used the second largest die in the set

- glued the die cut panel onto a onto a backing of very slightly larger Tonic 'Inca Gold' mirror card - then the whole panel was glued onto the card front and set aside. I wanted to keep the gold border as thin as possible to live in harmony with the gold 'skeleton' leaves

- then used snippets of forest green plain card, 'Firestone Red' mirror card and 'Inca Gold' mirror card to die cut the holly leaves, berries and the 'skeleton' pieces to pop on top - using a NBUS set of Sizzix dies by Tim Holtz called 'Seasonal Sketch'

- used snippets white card and more snippets of the 'Inca Gold' mirror card to die cut the sentiment - two white layer topped with a gold one. The sentiment die set is certainly one that I spotted one or more of you lovely 'enablers' (Greta, Lynne?) using a while back and I rushed straight off to go onto a wait list until it came back into stock. It's by Poppystamps, is called 'Merry Christmas Poe Script' and I LOVE it!

- then I assembled all the elements and the sentiment using a very fine glue pen

- added all the elements to the card, using the same fine glue pen plus some thicker adhesive for the solid parts of the holly and the berry clusters

Being a glutton for punishment, I made three at the same time. Yup, the Christmas 2022 stock is building up really nicely!  

I'm very happy with these cards - the set of dies also comes with a poinsettia - which is lovely as well but somehow the holly stole the show for me! I have a plan for the poinsettia die - which might be best done sooner rather than later, whilst a few things are still left on my desk from the previous session.

One really neat trick I picked up from watching videos recently is an easy way to find and mark the centre of your work - for example I needed to find the centre of the width (from one side to the other) of the stitched panel to add the sentiment. So, I used a narrow strip of scrap card, cut it to the width of the panel and then folded it in half matching the two ends and make a nice crease line at the fold. Then just place it across the panel width and the crease line is your centre point. Mark a point using a soft pencil (easier to erase later on) and  then use your T-square to draw a fine line down the exact centre of your work. So simple and so much easier than struggling with tiny fractions of measurements on a ruler! I have a feeling that I've seen both Jennifer McGuire and Ann  Melvin showing this trick and it's so simple yet infallible! 

Now, along the way I also discovered that there are Craft UK DL cards and envelopes and there are large 'slimline cards' (possibly USA?) - and they differ in size. I won't go into all the detail but the large slimline cards are taller and yet narrower than the shop bought Craft UK DL cards that I've been used to. Just a little word of warning to be careful when buying large slimline dies and make sure you check the measurements. I now have a set of the taller slimmer dies here (mine are made for the USA market), for which I'll have to make not only the card bases but also the envelopes to match. No matter, I'll do it but mentioned it as it might save someone from making the same mistake as I did.

I'd also like to enter the following challenges:

Darnell's NBUS #39. The Poppystamps sentiment die set and the Sizzix 'Seasonal Sketch' dies were both having their first outing.

Peace on Earth Christmas Challenge #18. Anything goes.

Four lovely ladies will be receiving my 'ephemera' such as flowers and fancy embellishments, just as soon as I manage to sort through the boxes and then package stuff to send. The offer is now closed.

Pupdate - I thought there wouldn't be anything much to write about Dudley - in this recent heat he's spent a lot of time finding places to stay cool. However, the other evening it was time for his bedtime treat and I was sitting here at my desk when Len passed the 'much treasured by Dudley little bone shaped treat' over to me so I could give it to Dudley (we try to take turns!). And then we began to talk about something totally unconnected with Dudley and his 'treat' whilst I sat sort of waving the bone treat absentmindedly whilst illustrating a point to Len. And Dudley was beside me, obviously becoming irate as, all of a sudden, up he stood on his hind legs and firmly slapped his paw flat just like the palm of a hand onto the arm of my desk chair as if to say 'Excuse me Missus - I'm down here, still waiting for my treat'!! Len and I just looked at one another and said 'Did he really just DO that?'. Whereupon the little scamp stood up on his hind legs and did exactly the same thing again!! Nothing like a resounding slap of the paw to gain attention - and of course his treat! He does know to give his paw to say 'please' when he's asked - but this was more like a demand. ☺

And last but certainly not least - Sarn has posted the latest Snippets Playground challenge HERE. She's made a duo of lovely snippets cards and has a great prize on offer. And no doubt she will be dispensing some lethal concoction in the tree house!


Monday, 20 June 2022

Oopsie - the Christmas Tree fainted!

One of my favourite photos that was doing the rounds ages ago is a decorated Christmas tree lying on its side, with a very guilty dog sat beside it. The caption was - 'Thank goodness you're home - the Christmas tree fainted'. It still tickles my odd sense of humour!

Over the weekend I used the fourth and final puppy image from the MFT 'Happy Pawlidays' set of stamps to make this Christmas card:

I used: 

- 5.5" x 4.25" white card blank, side opening

- image from MFT's 'Happy Pawlidays' stamp set, stamped using Memento 'Tuxedo Black' ink and coloured with Pro markers

- die cut a sheet of paper from Whimsy's 'Blurry Flurries' paper pack using a die from the Lil' Inkers 'Stiched Rectangles' set of dies

- then die cut an almost complete circle from the upper left hand side for the image - using a die from a The Works set called 'Stitched Circles'. Would have preferred a circle die which cut the stitching around the edge of the patterned paper and not just the drop out piece but hey-ho, too late!

- glued the patterned paper layer onto a snippet of baby blue pearlescent card which I'd trimmed to be a bit bigger than the patterned layer

- then glued the tree and ornaments in place - adding the 'innocent' puppy using thin sticky pads

- then, die cut the MFT 'Pawlidays' sentiment using a die from a set of stamps and matching dies by Poppystamps called 'Gilded Christmas Wishes' - and popped it in place using thin sticky pads

- added some clear Wink of Stella to the baubles and tops of the red bulbs as well as some gold Wink of Stella to the star on the 'fainted' tree

- finally, added clear glossy accents to the light bulbs - which needless to say hasn't been picked up by the camera, nor has the Wink of Stella shimmer, sigh

BTW, I never risk adding Glossy Accents directly from the bottle to cards, the result of bitter experience. I always squeeze a blob onto a scrap of paper and pick it up from there in smaller blobs to use, with a fine pointed paintbrush kept just for Glossy Accents, The bristles have solidified over the years yet it's so easy to use. 

Have really loved playing with the MFT Happy Pawlidays set of stamps and dies. It's rare that I find myself using almost every single item in a big set of stamps. I only missed using some of the sentiment stamps. A good reason to have another play sometime! 


Sunday, 19 June 2022

The fence peeker!

Dudley is totally the most nosy dog I've ever come across - just the rustle of a piece of wrapping paper - even if it's not the rustle of a packet of cheese - and he's there beside you, watching. It's the same with all deliveries and, apart from food, it's a ritual that he has to be shown everything as it's unpacked. The same when I make a card - he has to look very seriously at the end product and gently bow his nose to it, before it can be put to one side.

Earlier in the week, he was mooching around the back garden and homed in on his favourite place to have a 'nosy' into next door's garden - through their fence. There's a small gap where the fence panel meets the horizontal gravel board (their house and garden is built lower than ours) and Dudley likes to spy on next door's garden, family, children etc.

So there he was, bent down with his rear end and plume of a tail in the air to have a good 'gander' when all of a sudden he literally shot up into the air, hastily backed off and then began barking at the fence.

Len was in the garden and had seen the whole performance, so he went over to quieten Dudley down. Then, he too, bent down to look through the horizontal small 'gap'. And there, staring right back at him, was a pair of very angry looking eyes ........ belonging to 'Teddy De Shih Tzu' who lives next door! You don't mess with Teddy, so whether he'd tried a little snap at Dudley's nose we don't know - but it was quite comical! That'll teach Dudley to be a 'fence peeker'!

Then, the other day, I was thinking about the incident and remembered I made this card as a result of Len and I spotting a different neighbours' cat, spying on us through a knot hole in the fence - well away from Dudley's 'sneaky peek' position:

This was made way back in January 2012 (HERE on my blog if you really want to know more). At the time, using lots of flowers, pearls and lace was 'the thing' that many aspired to when making their cards. 

Life is much simpler now as new ideas, tool and techniques have entered the card making arena! But, at the time a good few of us thought they were very pretty. And I didn't have a clue about image manipulation - what I took on the camera was what I published!

I prefer how we are now, but suddenly remembered that I have a load of really lovely flowers stored in here. Wild Orchid crafts was a favourite place to shop! Plus lots of flat silk ones, leaves, lace, ribbons and bows - plus more for sure.

IF anyone reading this, sorry UK only though, would like me to fill and post a parcel box of flowers etc. to them - please feel free to email me, using my own email address on the right hand side bar. I would love to send you some totally free Happy Mail.

The Really Useful boxes currently housing all those embellishments are never touched these days and would be better put to use storing other stuff. If there are no takers within a couple of weeks or so then I'll try some online sites that I know of - otherwise they will be heading for the bin, which would be a shame.

Remember, the results of Challenge #429 can be found HERE. And there's still a week to play on the current Snippets Playground challenge!


Wednesday, 15 June 2022

Christmas Kickstart Challenge #63 - 'Pawfectly Pawsome' - reminder

Jumping in with a reminder that we're halfway through the current Christmas Kickstart Challenge HERE - where I'm delighted to be Jo's Guest Designer. It's one of my favourite challenges and always a pleasure to join in with the fun. ☺ The current theme is one for everyone - 'Perfectly Pawsome' - which can also include not only cats and dogs but also hamsters (hello Darnell!), mice (think Penny Black folks!) and any other creature with paws.

So, I made another card, admittedly using the same base stamp and die set (different image of course!), as I did for my GD card:

I used: 

- 5.5" x 4.25" white card blank, tent style

- images from MFT's 'Happy Pawlidays' stamp set, stamped using Memento 'Tuxedo Black' ink

- did a lot of stamping using the same set all at once and had already die cut all the images using the matching dies and then coloured them all in at one sitting, using Pro markers

- then die cut the sentiment circle from Tonic Mirror card called 'Fire Stone Red' and set it aside before also cutting the same sentiment circle from a snippet of plain white card. The die I used is having its first outing and is made by MFT - called 'Merry Christmas Circle Frame' - I also set the white sentiment aside as I had a leetle plan in mind

- then, trimmed a piece of 'grey stars' paper from the 'Dovecraft 'Back to Basics - Monochrome' paper pack - doing my best to make sure that the stars were even along all the edges

- trimmed a piece of  Tonic 'Fire Stone Red' Mirror card to form a narrow border around the 'grey stars' paper'

- glued mirror card and grey stars paper onto the card front

- then positioned the inner circle from the sentiment I'd cut from white card into the centre of the stars paper panel on the card front, using Collall glue

- added the 'Fire Stone Red' sentiment circle around the white circle - using a glue pen

- then just glued the image in place onto the white circle, rather than using sticky pads, using a glue pen 

Again, no sparkle was added. I do so love the Tonic mirror card - they do quite a few different shades of red, so it's much easier to match up if you use red when colouring an image. My dream would be to win free run of their warehouse! With a huge lorry waiting to bring all the lovely goodies home of course!

Many thanks once again to Jo for inviting me to be a Guest Designer over at the Christmas Kickstart Challenge and I'd really love it if you would come along and join in with the challenge - this is the LINK. It's still open until the end of the month so you have plenty of time.


Tuesday, 14 June 2022

Allsorts Challenge #680

The current challenge over at Allsorts is 'Any stamped image' - right up my street! 

After making my DT cards for Jo's Christmas Kickstart challenge, which is HERE - I had some doggie images left over to play with - so I made this card for Allsorts:

I used: 

- 5.5" x 4.25" white card blank, side opening

- image from MFT's 'Happy Pawlidays' stamp set, stamped using Memento 'Tuxedo Black' ink, die cut using the matching die then coloured using Pro markers

- die cut the sentiment circle from a snippet of white card and a further one (for the centre circle) from Tonic Mirror card called 'Fire Stone Red'. The sentiment die is by MFT called 'Merry Christmas Circle Frame'

- trimmed a piece of the 'Fire Stone Red' Mirror card to act as the first layer on the card front and glued it in place

- found a snippet of Neenah 'Desert Storm' card and embossed it using a Darice 'Paw Print Background' folder

- trimmed the embossed piece so that a fairly narrow border of red would show and then glued it onto the front of the card

- positioned the white sentiment circle to the bottom right of the card then added the red mirror card circle - using a glue pen

- then stuck the sweet little image in place using thin sticky pads

- added a couple of pale blue baubles to hide a smudge of red Pro marker add a bit of contrast

- added the sentiment which I'd stamped using Memento 'Tuxedo Black' onto a snippet of white card. None of my banner dies fitted properly so I used a longer die from the MFT 'Stitched Fishtail Flag STAX' set of dies. Tip: Just die cut the strip to the whole length making sure you have the V-shaped end of the die where you want it to be. Replace the die, settling it into 'notches of die cut stitches' at the length you want and run it back through your machine to die cut off the excess, leaving you with a nicely finished stitched straight end

- I added a tickle of clear Wink of Stella to the hat trim. pom pom and the pale blue baubles - just because I felt like it!

One really useful tip I picked up from Jennifer McGuire is that she always uses a T-square when adding items to cards,to make sure they're level. Sentiments and uneven levels are my downfall and since the logic of this this finally clicked into my brain - my T-square is now always out on my desk ready for action. It's been a bit of a game changer for me!

I'd also like to enter this card into Darnell's current NBUS #39 challenge for June - HERE. The MFT 'Merry Christmas Circle' die has been waiting to come out and play for ages - along with the paw prints embossing folder!

However, my basket of NBUS goodies never seems to decrease in size - bad me!

Grab our badge to display on your blog.


Sunday, 12 June 2022

My snippets card for Challenge #430

A new challenge (#430) is now open over at The Snippets Playground HERE. To make my own snippets card I raided a favourite paper pad, tipped out the snippets from the envelope 'pouch' stuck inside the back - and this the card I ended up with:

And here's the pile of snippets I tipped out, a few of which I used - the rest were saved for another time:

I used:

- 5.5" x 4.25" white card blank - tent style

- a piece of white card, die cut using Ann Melvin's 'Positively Paper Craft' 'Multi Panel' die set - which I love (her prices are so, so reasonable)

- then glued the 'frame' to the card front as well as the inner white parts which I'd cut all in one pass on the Gemini. Must admit, I fell back onto the original Gemini plates and used the magnetic mat for ease when positioning all the smaller insert dies into the main die

- fiddled around with the snippets of patterned papers (from Lawn Fawn's 'Really Rainbow' paper pack) until I thought the colours and patterns worked together OK

- then used my cute little Altenew die cutting machine to die cut all the coloured paper insert shapes before gluing them in place, using a glue pen

- next step was a sentiment and I used a literally 'hot from the mail' die set by Whimsy Stamps called 'Birthday Word and Shadow Die' which I'd spotted over at Sarah's snippets entry just a couple of days earlier!

- die cut the background for the sentiment Birthday word using a snippet of white card

- die cut the sentiment word using a snippet of black card then glued it on top of the background

- stamped 'Happy' onto another snippet of white card, using a stamp from Uniko's 'Simply Said' set of sentiment stamps and Versafine's Clair 'Nocturne' ink pad

- trimmed the word 'Happy' to size and backed it with a further layer of card just to lift it slightly 

 - glued both the stamped and the die cut elements onto the card front to form a two-word sentiment - yay, finally taking the time to use my set square for levelling

- finished!

I already said how much I love the 'Multi Panel' die I used here - brilliant for using up snippets and every bit as good as any other similar die set on the market, at a price that made me smile!

The Birthday sentiment die is brilliant and it comes with a 'stitched' background die as an alternative to the plain one, or you can use the Birthday word without any background - versatile! I stuck to the plain background as the card was already quite busy - and there was no other stitching on the card to tie it all together. I know it's naughty of me but I truly do recommend that you think about adding the sentiment set of three dies to your craft goodies. Mine was from 'Dies to Die For', bought whilst their Jubilee discount promotion was running.

I'd like to enter this card into Darnell's NBUS Challenge #39 HERE

So that's my snippets card and all that's left is 'Dudley's Pupdate'. He is a little terror for sitting looking very appealing when there's food around - no matter what you might be eating.

I had a sliced up Jazz apple the other afternoon. Of course, Dudley wanted a taste and he actually liked the little bit he had. A while later I was sitting at my desk, speaking to Len, with Dudley's paws up on the chair beside me - 'little nosy parker' always has to be involved. All of a sudden there was one almighty 'burp' - practically in my face. Dudley looked astonished, Len thought it was me (which amazed me as I never burp) - and I reeled back in shock! Would put some humans to shame for sure and he didn't even excuse himself. ☺  Doggy manners training for him!

Love from Di and Dudley!


Tuesday, 7 June 2022

Christmas Kickstart Challenge #63 - 'Pawfectly Pawsome'

I'm back as Dotty Jo's guest designer for the month of June - over at the Christmas Kickstart Challenge - HERE! Delighted to be asked again - and also having more time to play, as I keep saying.

I LOVE this 'paws' theme - and had no trouble deciding what stamp set to use for my card - and everything (for once) just seemed to flow perfectly:

I used: 

- 5.5" x 4.25" white card blank, tent style

- images from MFT's 'Happy Pawlidays' stamp set, stamped using Memento 'Tuxedo Black' ink

- I did a lot of stamping using the same set all at once so I die cut all the images using the matching dies and then coloured them all in together, using Pro markers

- then die cut the snowy bank (wider than I needed for the end result) using a die from the Lawn Fawn 'Stitched Hillside Borders' set of dies

- die cut the 'frame' from a snippet of white card using a die from the Avery Elle 'Postage Stamp' set of dies

- then, trimmed a piece of paper from the 'Blurry Flurries' paper pad and glued the 'snowy hill' onto the bottom and them trimmed the overlapping sides of the hillside to fit

- then glued the panel onto the card front - bit of measuring when doing the initial cutting but easier than attaching the frame to the paper then adding it. And that little tip has taken me umpteen years to fathom out - although I do admit the frame I used has enough width to accommodate errors!

- so, the little scene was all set and I just needed to add the image pieces - glue the parcels in place then add the pooch using thin sticky pad pieces

- whilst doing all the initial stamping I'd also stamped some sentiments from the same MFT 'Happy Pawlidays' set so I then die cut one using a die from the Frantic Stamper 'Stitched Fishtail Banners' set of dies

- added the die cut sentiment to the top left hand side of the card - finished

I kept it sparkle free rather than 'over egg the pudding'. Just spotted the funny stripe behind the doggies ear - it's a little shadow as the pooch was adhered using sticky pads!

Many thanks to Jo for inviting me to be a Guest Designer over at the Christmas Kickstart Challenge and I'd really love it if you would come along and join in with the challenge - this is the LINK. It's open until the end of the month so you have plenty of time.

I'd also like to enter this card into Darnell's current NBUS #39 challenge for June - HERE. The MFT stamps and dies have been waiting to come out and play for ages!

Grab our badge to display on your blog.


Sunday, 5 June 2022

Platinum Jubilee Weekend - 2022

What a joyful weekend this is to celebrate 70 years of our Queen's reign. Our house front is all decorated and we're doing our bit to show our loyalty and thanks, to the Queen. 

My card today was made to celebrate this a wonderful occasion, and to honour our Queen. I believe that our lives have been blessed by her steady hand steering our United Kingdom for such a long time - often through choppy waters:

I used:

- 5.5" x 4.25" white card blank, side opening

- then I found a 'freebie' crown online, resized and printed it onto white card and set aside for now

- dived into the snippets folder and I found dark blue and red snippets to trim and create the frame so that I could then trim the white image background down to size

- glued all the layers together - after using a black micro pen to draw a curve for the 'bunting' - I used the edge of an oval die as a template

- the bunting was made using one strip of paper chains craft stuff  punched using a SU very old triangles/pennants punch - I needed to use a few pieces of Post It to wiggle the small pieces into the punch (a hint I remember picking up from Sarn many years ago)

- then it was time to fly! So I glued the pennants/bunting in place

- die cut 3 x numbers '70' in silver using a Tattered Lace 'Mini Numbers' die and silver mirri card, before gluing them onto the bunting

-  used a set of dies by First Edition called 'Alphabet Sans Serif' and die cut the E11R from silver mirri card and stuck them in place

- then used the same numbers die as I had for the '70's' and die cut it several times for the years of the Queen's reign - using the dark blue card as used for the frame

- glued those into place and then it was done! It's so hard to centralise when a string of letters or numbers are different widths - but I did my 'bestest'

The Red Arrows aerobatics team almost took our roof off on Thursday on their way to fly over Buckingham Palace! We didn't see them sadly - and they were gone in a flash anyhow. However, TV coverage of the whole weekend has been quite overwhelming and, whilst the atmosphere of actually being in London right now will be incredible - you do see more on the TV!

And here is Dudley Dog - showing off his Union Jack Bandana - looking up at Len standing behind me. He (Dudley) has been proudly wearing it for his walkies over the celebrations.

He's not really a dog for posing and this certainly isn't his best angle - he was sitting nicely but it makes him look like a round dumpling with teensy legs. Yes, he does have a sweet little wonky lower front tooth which doesn't normally show. We think it's endearing and makes him look somewhat vulnerable - but then, we're also rather biased:

The love in those eyes - Dudley wears his heart and soul (and often his hopeful tummy) in his eyes! 
 
Love from Dudley and Di xxx


Monday, 30 May 2022

Rudolph Days Challenge - May 2022

Gosh I'm running a bit close to the wire here with my Rudolph Days entry. It's mainly as I got myself bogged down by starting off a batch of totally different Christmas cards before realising that there was more to them than I thought!

So, I switched horses mid-gallop and made a Penny Black 'Masterpieces Made Simple' card as I had a few ready cut frames handy:

I used:

- 5.5" x 4.25" white linen card, side opening

- snippet of the same card to cut the 'frame' using a die by MFT called 'Stitched Rectangle Scallop Edge Frame' 

- image from the Penny Black 'Masterpieces Made Simple set called 'snowfall serenity'

- stamped the sentiment onto the image using a Memento 'Tuxedo Black' ink pad and a Kirsty Wiseman 'Many Greetings stamp 

- then backed the image with fun foam and set aside

- backed the outline scalloped frame with Tonic 'Majestic Gold' pearlescent card then glued onto the card front

- finally, glued the image into the frame - finished!

I'd like to enter this card into ScrappyMo's Rudolph Days Challenge for May.

And, also into the current Allsorts Challenge #678, where the theme is 'Anything but Birthdays'. 


Sunday, 29 May 2022

Getting ready for the Platinum Jubilee

..............and of course had to kick off Sarn's new Snippets Challenge HERE with a card:

I used:

- 5.5" x 4.25" white card blank, side opening

- all patterned papers from an ancient Forever Friends 'Best of British' paper pack - either from the 2020 London Olympics or perhaps the Queen's Diamond Jubilee, which makes it 10 or 12 years old

- die cut the papers, plus a snippet of plain white, using a great new die from Ann Melvins small but so reasonably priced online shop. It's called 'Pin Wheel' - and here's a link to Ann's shop. Stuff sells out quickly but seems to be restocked pretty fast

- then just glued the main dark blue background piece onto the card front and filled in the spaces using the curved pin wheel pieces (love that the insert pieces have stitched edges)0

- stamped 'let's celebrate' using Memento 'Tuxedo Black' ink and a stamp from Lil' Inker's 'Just Sayin' stamp set

- then I added a little Yeoman of the Guard (aka Beefeater) teddy bear 'topper' - which also came in the paper pad - after stamping the word 'hello' using the same set of stamps and ink pad. I should have added a '70' to the rosette but my dies are bigger and would look silly

This was my second go at making the card - basically I hand wrote greetings on the first one and it looked a mess!

As it was a first outing for the pin wheel die, I'd like to enter this into Darnell's NBUS Challenge #38.

So, we're ready and waiting in the Playground - the bunting is now strung around the Playground, Union Jack paper chains adorn the inside of the Playhouse (making those took me back to my childhood), hand held flags for waving are all lined up, the food preparations are organised to within an inch of their lives - and Sarn will be waving bottles around as she makes up various lethal concoctions cocktails for you all to try out! There's also an extra little surprise for you - go and see!

Dudley is beside himself with excitement as he's going to be Sarn's 'barman assistant' (not sure if she knows yet) and he has a sweet little Union Jack bandana to wear as well. He's been practicing his 'tray above the head carrying' skills.  Must take a photo of him which will be posted during the celebrations - if he can still stand up! Apparently, so he tells me, waiters get to lick up the slops as well as eat any food they can scrounge!!

And, although drinking vessels will be provided by Sarn - I'm going to take my own. It has survived many, many house moves around the World (Army child) and is still without a single chip or crack:

Although our Queen has been our Monarch for 70 years, her actual Coronation wasn't until June 1953. We Brits do know how to put on a big show of pomp and pageantry but of course it took many months of planning and preparation. Not to mention the installation of a good few 'new-fangled' black and white televisions in private homes. Of course, I was fast asleep in my pram and missed it all, snigger! History lesson over for today ☺

See you in the Snippets Playground!