Showing posts with label Rudolph Day. Show all posts

Thursday, 30 April 2026

Rudolph Days - April 2026

Alomose missed the date but I am, with a quickly made card for the April Rudolph Days Challenge HERE:

I used:

- 5.5" x 4.25"  white card blank, side opening

- the image is carefully selected ** from an 8" x 8" Stamperia paper pad called 'The Owl's House', trimmed to 5.25" x 4" and glued onto the card front

- the 'labels' sentiment is from a Clarity set of self-adhesive Christmas sentiments - just popped onto the bottom right hand corner

** The sheet of paper that I used is double sided and with some careful measurement I managed to get two images and one piece of backing paper out of the same sheet - two from the front and one from the reverse, I do like a challenge! Watch this space for the other two yet to come.

Quick and easy - phew!


Friday, 27 February 2026

Rudolph Days - February 2026

Short month 'tis February - so here I am with a 'short on all sides' card for the February Rudolph Days Challenge HERE:


I used:

- 4" x 4" square linen white card blank, side opening. Just used a scrap but the back side of the card is at least the same shade as the front

- the image is upcycled from a Christmas card we received this year, trimmed down to 3.5" x 3.5"

- covered the whole front of the card with a layer of Amazon 'Stella Weds' dark green card (perfect for Christmas cards, IMHO)

- then glued the image panel onto a snippet of Tonic pearlescent 'Majestic Gold' card, slitghtly trimmed down to just a gnat's whisker larger than the image panel

- finally, added the framed image panel to the green card front using very narrow foam strips, and called it 'done'

Quick and easy - phew!


Sunday, 28 September 2025

Sunday Snippets - Christmas tree, from Dudley

Dudley, clever little chap that he is, popped a couple of dies in with his recent Birthday card to me - and this card uses one of them:


I used: 

- 7" x 5" white card blank, side opening

- an unbranded Christmas tree die, it's BIG, but so perfect on a 7" x 5" card. I die cut it, plus two others, from large pieces of Tonic pearlescent 'Navy Dazzle' card

- glued the navy tree outline piece to the card blank - having first found a die for the 'star' so I could position it with similar space above and below

- die cut the 'star' using a die from a set of snowflake dies bought from The Works a good while ago - and a snippet of silver mirror card from my 'on desk' snippets basket - then glued it to the top of the tree

- at this point, I actually had three identical card blanks, each with a tree and snowflake on - the number three was important to my plan

- then used the tree die again to die cut into a precious sheet of LOTV 'Frosty' paper - carefully hoarding the leftovers of course

- it happened to be the snowflake patterned paper so I glued the top piece into the top gap in the tree and worked my way down, gluing the right piece into every third gap. So long as I kept count it was much easier than die cutting three differently patterned sheets then playing with all the pieces out of the die - that was a disaster begging to happen knowing my luck!

 - did the same with the other two sheets - of course, the final one was a doddle!

- added the fallout of the pots to the bottom of the tree then popped a silve die cut bow on, from an unbranded set of small assorted bow dies

- lastly, out came the Josy Rose Hot Fix Nailheads and I added a sprinkling of silver star nailheads towards the top of the card where it looked a bit bare

- three more cards towards Christmas - yay!

These cards were great fun to make and three different papers seemed to be just the right balance IHMO. Bonus - I later found a packet of more LOTV Frosty papers squirrelled away! 

I'd like to enter this card into the folowing challenges:

- Rudolph Days August Challenge HERE 

- Allsorts Challenge #833 HERE - under 'Anything Goes'

- Darnell's NBUS Challenge #78 HERE - the Christmas Tree is a NBUS die

Remember, I've just kicked off a new challenge over in the Snippets Playground HERE

Dudley Pupdate: Dudley is delighted to know that the slow progress with my hand here gets him out of being groomed - bit by bit it's improving but still annoyingly slow. Len is having surgery on Thursday so that will mean two of us not running on full power, happy days! Earlier this week I suddenly realised that Dudley had been missing for over an hour, right through us eating our evening meal and for a good while after - and he's never far away if there's food around! Searched the house high and low and my gut told me he'd been locked outside in the back garden. Eventually, Len checked and there he was, sitting quietly on the back lawn gazing at the back door - quiet as a mouse. Not one little woof even to let us know where he was!  He dashed straight to me for a cuddle and his fur was like cold silk - but he's fine and bounced right back. Yesterday was Dudley's 'Gotcha Day' - 7 years since he came home with us to live. And of course he had an extra treat or two! Photo taken just before we picked him up from the breeder:


Love as always, Dudley Dog and me


Sunday, 31 August 2025

Sunday Snippets - Santa Claus

I'm baaaack! Am still recovering but every day brings an improvement in movement, less swelling and pain plus the spectacular bruising is fading nicely. I can type reasonably well at last and even managed to use a guillotine for my snippets card by leaning on the blade with my left hand - tricky but do-able!

My snippets card for this week was made using an already assembled decoupage Santa, a matching sentiment, a snippet/surround of red satin mirror card and a white card blank: 


I used: 

- 7" x 5" white linen card blank, side opening

- an already assembled decoupage 'Santa Claus' image by Katy Sue - it's the last of the ones I assembled last Christmas

- trimmed a snippet of Tonic satin mirror card ('Scarlet Organza') and glued it to the back of the decoupaged image 

- added the ready trimmed sentiment to the top right hand corner of the image panel - once again with Katy Sue decoupage there are a couple of extras included which are small matching Santas for the back of the card plus the envelope

- finally added the image panel to the card front using glue - finished!

I'd like to enter my card into the following challenge:

- Rudolph Days August Challenge HERE

Remember, I've just kicked off a new challenge over in the Snippets Playground HERE

Dudley Pupdate: I'm still not out of the woods here and Dudley is a constant companion, if not beside me then mostly in his little office - aka the shower room off our bedroom! I think we need to set up a 'hot desking' rota! 

Hope to see you on the swings in the Snippets Playground! I'm gonna sit in the corner just watching and will be wearing a Mr Blobby suit for protection............. just in case of any further tumbles!!


Very fetching, innit?! 

Love as always, Dudley Dog and me


Sunday, 26 May 2024

Sunday Snippets - Kitty Claws card

I made this snippets card from literally bits and pieces found easily to hand on my desk, no scrabbling around lifting heavy stuff just yet:
 
I used:

- 5.25" x 4" pale ivory linen card blank, side opening

- a snippet of pale ivory linen card, flipped to the flat reverse and stamped using a Stampendous 'Kitty Claws' stamp and a VersaFine Clair 'Morning Mist' ink pad

- the coloured snippets were already selected so I coloured the image using Polychromos pencils to perfectly match the green and rust coloured snippets - not that the camera confirms that of course!

- a snippet of sparkly rust coloured card was trimmed to form a narrow border and glued behind the trimmed image panel

- then a snippet of Tonic 'Inca Gold' iridescent mirror card was trimmed to add a narrow border behind the rust sparkly card layer, and glued in place (I favour Tonic 'Inca Gold' iridescent mirror card these days as it's such a pure colour and not at all garish as some gold mirror card can be) 

- trimmed a snippet of slightly corrugated green card (sent by a lovely blogger from The Netherlands) to just quarter of an inch smaller than the card front, ran a matching green 'Whispers' brush pen around the white edges and put it to one side the dry

- next trimmed another snippet of Tonic 'Inca Gold' card to just a tiny bit bigger than the green layer

- glued the green panel onto the gold one and then glued them onto the card front

- finally, added the small ;framed' image panel onto the card front, using thin sticky foam tape and a glue stick

- didn't add a sentiment - finished!

Apologies, I did use a lot of snippets but the leftovers were generally so tiny I didn't take a photo of them. I did add a touch of clear 'Wink of Stella' to Kitty's pompom after the photo was taken BTW.

I'd like to enter this card into:

May's 'Rudolph Days' Challenge HERE

The current 'Show Us Your Pussycats Challenge' HERE  is celebrating the 100th Challenge and remembering dear Ike, founder of the challenge, who left us in 2022.

Darnell's NBUS Challenge #62 HERE, the 'Kitty Claws' stamp was having its first outing

Dudley Pupdate: I've often said what a pickle Dudley is on car journeys - hollering for England non-stop. Earlier on in the week I had a post-op check-up on the first eye, which is progressing well. That exercise entails Len dropping me off, going back home and then doing it in reverse once I phone to let him know I'm ready to leave. Luckily, we don't live too far from the Clinic. So that's four car trips for Dudley per appointment - 24 trips in total by the end of this, if all goes as planned. 

Miracle of miracles, on the final two trips on Wednesday - there was hardly a peep out of Dudley. In fact, once he'd greeted me with his tail wagging like a windmill for the final drive home he curled up in his doggie booster box and went to sleep! We think that Sarn's theory that he's finally learning that whenever we go out in the car he always comes back home is spot-on! 

Sarn has just kicked off a new challenge over in the Snippets Playground HERE  Hope to see you on the swings - we have mixed weather so bring your shorts .......... as well as your wellies!

Love as always, Dudley Dog and me,


Thursday, 25 April 2024

Rudolph Days - April 2024

I was delighted when my entry into Rudolph Days Challenge in March was picked as one of the top three. And am even happier to be this month's Rudolph Days Guest Designer HERE - thank you so much Helen! 

This is my card:


I used:

- 5.5" x 4.25" white card blank, side opening

- a backing piece of Tonic pearlescent 'Red Velvet' card, trimmed to a whisker under the size of the card front

- a snippet of really lovely holly patterned silver card, which I think was used by a friend to protect the Christmas card she enclosed it with - and I've saved it ever since, today is its day to take a bow!

- die cut the snippet of silver card using a die from the Taylored Expressions 'Petite Scallop Rectangle Stacklets' set, to make the main front panel. There was literally just a whisker of waste left on all four sides after the cutting was done

- used a snippet of white card and trimmed across it using a Spellbinders 'Curved Edge' with a line of stitching die

- then die cut the bottom edge and up the sides in one do using the scallop edge die I'd used on the silver background 

- glued the white piece onto the bottom of the silver panel

- glued the red layer and the silver panel onto the card front

- then came the drawn out part - die cutting the deer and all the extra bits and bobs ..... all from snippets using a Spellbinders die set called 'Magical Deer'

- the white body and head are double layered and the 'beard' plus the  piece down the centre of the face were die cut using a snippet of 'pale ivory' linen card, on the reverse smooth side

- the little cutouts on the deer's face and body were backed with snippets of red velvet card - used the same red velvet card for the cover/saddle  over the reindeer's back

- the antlers were die cut using a dark brown card snippet, which I then topped with second layers, die cut from a snippet of black velvet card

- the little hooves and nose are die cut from black velvet card and the ears and tail had a little bit of pink die cut card added

- ran away for a rest

- glued the main body with the additional pieces in place to the card front

- then used very narrow red line tape to stick the bottom part of the antlers to the back of the deer's head before adhering it to the image using glue pen for the antlers and small pieces of thin sticky pad for the actual head - to give it some dimension

- die cut a selection of red, pink and white flowers and adhered them to the deer's antlers

- final touch - added some tiny flat silver gems to the flower centres - plus one last cheeky one, right in the centre of the deer's cover/saddle

- tottered away ................ and lay down in a darkened room to recover!

This might well be the only time I ever use this die set - I just counted 32 die cut shapes, 34 if you count the double layering of the main body and head. It seemed to be never ending!

Didn't add a sentiment as it's already busy enough. Besides, reindeer in snow with a background of holly patterned paper and sparkly touches sort of points to Christmas, IMHO.

I'd also like to enter this card into the following challenges:

Christmas Kickstart Challenge #85 HERE. The theme is 'Santa and his Sidekicks' - any deer surely is one of the best known of Santa's sidekicks!

Darnell's NBUS Challenge #61 HERE. The 'Magical Deer' set of dies was having its first (and possibly last) outing here.

You have until the end of the month to enter all three challenges I've linked to in this post. Go on, you know you want to.


Wednesday, 27 March 2024

March 2024 Rudolph Days - Little Town of Bethlehem

It's Helen's Rudolph Days Challenge HERE until the end of the month - and this is my entry:

I used:

- 5.75" x 5.75" square white card blank

- a piece (snippet) of Tonic 'Majestic Gold' card trimmed to 4.25" x 4.25" and set aside

- snippet of black 'velvet' card stock, die cut using Britannia Dies 'Bethlehem Scene' die, trimming away the lovely crescent shaped upper part to leave just the town itself - at 4" wide

- a piece of carefully chosen backing paper from the Altenew 'Celestial' paper pack, trimmed to 4" x 4" to form the background for Bethlehem. Basically, the background paper and some carefully chosen positioning is the real secret to this card with enough light to show through the windows and a pretty aura over the town with a starlit sky for the star to shine down from

- then glued the silhouette Bethlehem town die cut onto the backing paper using a glue pen. 

- glued that layer onto the Majestic Gold layer to form a frame - using Collall All Purpose glue

- die cut a star from a little snippet of 'Majestic Gold' card using the smaller die in the Memory Box 'Star of Wonder' set of two dies and glued it in place using a glue pen

- finally, used very narrow double sided foam tape, with a glue stick, to adhere both the panel onto the front of the card blank

- didn't add a sentiment, it speaks for itself - and there will be an insert of course

Len spotted it on the craft room desk the following morning and exclaimed -'Wow, that is brilliant'! So nice when chaps recognise your work without any prompting!

And of course, I made two the same whilst at it.  Thanks to Sarn for reminding me with one of her recent cards just how eye catching a wider white border can be!


Thursday, 29 February 2024

Rudolph Days Challenge - February 2024

Helen Nile has stepped up and taken over the Rudolph Days Challenge - hooray, well done Helen! And many thanks to Maureen (Scrappy Mo) and her DT for running it for so long.

I decided to try to get a bit further ahead with my 2024 Christmas card making and did an 'assembly line' run of 10 cards, same basic design, a mixture of various sentiments  - and 10 different Penny Black 'Masterpieces made Easy' ready printed images:

This card, using an image from 'Winter views' is my entry for the current Rudolph Days Challenge - HERE.

I'd also like to add it into Darnell's NBUS Challenge # 58 HERE - the sentiment stamp sets were having a first outing

I used:

- 5.5" x 4.25" white linen card base, folded to be either tall tent style or side opening, on the short side

- used pieces of the white linen card left from cutting the card bases to die cut rectangles using a Lil'Inkers 'Stitched Rectangles' die

- used snippets of Tonic Pearlescent card in 'Majestic Gold' and 'Luna Silver' to cut rectangles to just add a narrow 'frame' around the outside of the stitched white layer

- stamped a sentiment onto each of the Penny Black 'Masterpieces made easy' images using VersaFine Clair 'Nocturne' ink and stamps from two small Penny Black sets called 'song of peace' and 'winter vibes'. The sentiments are a little different to usual Christmas ones and there are times when I do need Christmas cards with more thoughtful messages and sentiments 

- assembly time!  Glued the images to the stitched white linen card rectangles, then glued the pearlescent pearlescent layer to the back of each stiched/image layer

- used very narrow double sided foam tape to stick around all four sides of the back of the completed front panels

- used a glue stick to allow some movement room and then adhered the completed panels onto the card blanks 

- 10 Christmas cards, finished!

This is another one of the cards, very typically Penny Black as you can see:


And here are the other eight cards - for my own records as much as anything:


I'm such a greedy little Piglet - I've bought every single set of Penny Black 'Masterpieces made Easy' over the years they've been producing them. They're rather addictive and I still have a bunch of unused ones to play with!

Both the hedgehog images came from the 'adorable amour' set and the rest came from five different sets - I won't list them but Buddly Crafts are a UK stockist and all images can be seen on their website. I do recommend them, for their stock of USA craft items, decent prices and great service! Click the link - I dare you! 😂


Wednesday, 27 September 2023

Christmas decoupage and some challenges!

I recently posted a set of decoupaged  'robin Christmas cards' on here - and it reminded me of what a gentle and relaxing technique it is. 

I then spotted someone selling, in a FB 'Decluttering Group', a huge (24!) Christmas bundle of Katy Sue's die cut Christmas decoupage sheets. I've assembled a few images and really love them. This is the first completed card:

I used:

- 6" x 6" square white scalloped card blank, made by Craftwork Cards - it's years since I used a scalloped card and have fallen in love with them all over again - just as well as I have a box full of them in various sizes!

- decoupage sheet called 'Bear with Snowman' from the Katy Sue 'Christmas decoupage bundle' 

- popped out all the pieces, keeping them in their respective layers - snipping off the little 'pips' of card where they'd been attached to the whole sheet as I went

- and this is where things almost went askew (to put it politely) - I usually use thin snipped up sticky pads for the assembly process - but had a wild idea that Pinflair silicone glue for decoupage would be quicker and even cheaper and so had ordered some from Amazon

- I really love the end result but almost gave up in despair partway through - that stuff is sticky and oily at the same time and I hated using it!

- layered the completed decoupage panel, using Collall glue, onto a 5.5" x 5.5" square piece of Tonic 'Firestone Red' mirri card - having run a silver calligraphy pen around the edges of both the image panel and the red mirri card 

- then glued the whole panel onto the front of the card

- added a little tag which also came in the decoupage sheet, having also run a silver calligraphy pen right around the edge - I added the label using thin sticky pads as by then the silicone glue had been given its marching orders - amazing how quickly the tube goes down as well - not a money OR time saver

- before sticking the tag to the image panel I made a dinky little bow using red metallic cord and glued it onto the tag using a tiny drop of 'Glossy Accents', which I'd weighted down using a thick very heavy old acrylic stamping block to let it dry and not make a leap for freedom!

- finished off by adding a couple of the 'extras' including a border strip from the decoupage sheet to the envelope - not something I usually think of doing but am always impressed when others decorate their envelopes!

So, my big lesson was that silicone glue and I do NOT get along well together - it took ages to clean up my glass mat as well as any tool that had come near the stuff - thank goodness for  having a bottle of 'Sticky Stuff Remover'!

Another thing I realised was that some of the topmost layers on the few images I've assembled so far are too small and fiddly to add without jeopardising the look of the whole  thing. So I just glue those flat onto the topmost layer using a glue pen. I'm referring to really teeny, tiny pieces - and it doesn't spoil the 3D effect in any way.

I'd like to enter this card into the following challenges:


Darnell's NBUS Challenge #54 - the whole set of decoupage sheets was my NBUS item 

Sunday, 25 June 2023

Sunday Snippets and Rudolph Days Challenge

I made my snippets card for the current Rudolph Days Challenge HERE, as well as for my Sunday Snippets post.

The images were already stamped and sent to me by a lovely friend after I commented on her blog how much the stamp reminded me of Dudley. I tend not to publish names of friends who stamp images for me just in case the Copyright Police come knocking at the door - however - you know who you are and a massive thank you once again!  And not just one copy - there were 20 all the same in the envelope!


I used:

- 5.5" x 4.25" white card blank, side opening

- have already explained about the adorable Penny Black 'Reindeer Pup' image  - which I coloured using Faber Castell Polychromos pencils then die cut using a die from the Penny Black 'Zigzag Stackers Rectangles' set of dies - I LOVE these dies!

- next I stamped a small sentiment directly onto the image - using my Misti and a VersaFine Clair 'Nocturne' ink pad along with a stamp by Personal Impressions designed by Kirsty Wiseman from a set called 'Many Greetings' - this is possibly my most loved and used Christmas sentiments set of stamps! And I've had it for many, many years

- then took a piece of tartan paper, die cut to a smidgen under the size of the card front - leaving a lovely narrow border. I used the largest plain die from the Spellbinders 'Hemstitch Venise (sic) Lace Rectangles' set of dies and the paper is from Craft Consortium's Essential Papers 'Tartan' pad. The main reason for using the die was to centre the tartan pattern properly - OCD strikes again!

- glued the tartan paper and the completed image panel onto the card front using Collall All Purpose glue - and it was finished!

The images came on white card trimmed to around 4" square - and I'm counting those as my snippets. I have a further 19 images which are about two thirds of the way through a batch baking session - that will boost numbers in the Christmas card box for sure!

I'd like to add this card into Darnell's NBUS Challenge #51 HERE. The 'Penny Black 'Reindeer Pup' images as well as the paper pad were both having a first outing.

We have a new Challenge, run by Sarn, over in the Snippets Playground HERE - with a lovely prize made up of several goodies. 

Dudley Pupdate: The little guy has had yet another haircut - fast on the heels of his previous one, only four weeks ago! I think that Len is possibly a bit 'trimmer and scissor happy' - I'm going to start calling him' Edward Scissorhands'! 

Dudley put up the usual good fight but is now all nicely trimmed (aka scalped!) and even more able to cope with the heat here. He never bears a grudge, no matter how much of a fight he puts up at the time - he's such a sweet natured little pup and always looks so tiny for a couple of weeks. Until the hair grows back with a vengeance!

On the down side of life - Honka Duck had to be removed from Dudley, discretely, and hidden in the garden shed for now, as Dudley was being sick for no apparent reason. Len puts it down to poor manky ole Honka Duck. And I tend to agree as it stopped immediately he could no longer lick and mouth Honka. So right now we have a slightly bemused Dudley not actually 'taking' to the newest version of Honka - which has been within his range for months now! He's slightly bereft, to put it mildly! Watch this space. 😔

Love from Dudley - and of course me,  


Sunday, 30 April 2023

Sunday Snippets and Rudolph Days challenge

I rustled up a snippets card the other day - for the current Rudolph Days Challenge HERE, as well as for my Sunday Snippets post:

And here are the snippets I started off with:

It's a pity the camera hasn't really picked up the sparkle in the stars and dots on the patterned paper

I used:

- 5.5" x 4.25" white card blank, side opening

- snippet of red patterned paper from a very old Fizzy Moon paper pad called 'Festive Fun' - it was the very last of the decent designs in the pad so the rest went into the bin! Shock, horror, so ruthless

- the snippet of patterned paper was just big enough for me to die cut it for a background, using dies from the Spellbinders 'Hemstitch Rectangles Venise Lace' set of dies

- glued the die cut background onto the card front

- then used a snippet of iridescent white card to die cut the Poppystamps 'Snowflake Corner Frame' 

- also used the Memory Box 'Joy Posh Script' set of two dies to cut the sentiment - the backing using a snippet of vellum and the top layer using a snippet of the iridescent white card 

- glued the snowflakes frame and the sentiment to the card front

- final touch, added some sparkly diamantes to the centre of each snowflake

I'd like to add this card into Darnell's NBUS Challenge #49 HERE. The 'Snowflake Corner Frame' and the 'Joy' sentiment dies were having their first outing.

We have a new Challenge over in the Snippets Playground HERE - with a lovely prize. Sarn is in charge this fortnight - but I'll be keeping a close eye on things in case it becomes too riotous! I know ALL about the contents of her satchel - and it ain't homework in there either!

Dudley Pupdate: It only seems five minutes since I wrote his last news, and nothing much has changed. We did have a mini Tsunami when he had his bath earlier in the week, but that's nothing new. The secret is for me to immediately wrap Dudley up in one of his bath towels like a Burrito and pat as much of the water away as possible before letting him go scatty running around and shaking himself dry.  Then comes the crazy 'break dancing' as he's given a blow dry!

I did laugh on Friday - Len was busy in the back garden whilst we were expecting a delivery. So he told Dudley to 'stay on security guard duty' in his favourite place, at the top of the stairs, to watch the front door. The next time I looked at Dudley he was flat on his back with everything on display (albeit within his fluffy coat I'm glad to say), head to one side, paws flopped half in the air - snoring for England! 💤 So much for listening to instructions! As Len said, typical security guard really. On the other hand - if a leaf dares to rustle past the front door he's up like a shot - so we were in safe hands/paws really. 😃

Hope you all have a lovely week - we're on countdown to the Coronation now. Let's hope the sun shines! Or at the very least, it doesn't rain. However, the British won't let that spoil things - it's in our genes to complain about the weather ..... yet make the best of it when we have to. Today, Saturday, is beautiful here, it's sunny and quite warm.  If we have this next Saturday it would be perfect. 


Sunday, 26 March 2023

Rudolph Days Challenge - and Snippets Playground Results!

First of all - did you remember to change your clocks. Spring 'forward' by one hour in a lot of countries! 

I found a second piece of card buried on my desk - abandoned after playing without much success with my long-neglected Brushos the other month. After the rather 'flat' looking turquoise blue Brushos result, I dry embossed then sprayed it with Glimmer Mist and added touches of Cadence Silver Gilding Wax here and there ....... before sighing and abandoning it as a lost cause. 

Found it the other day and thought it deserved a second chance. So, here's my Rudolph Days Challenge entry for March over at Scrappy Mo's, and it's also my Sunday Snippets card:


I used all of the snippets, apart from the long blue piece - which looks more purple thanks to the camera

I used:

- 5.5" x 4.25" white card blank, side opening

- the turquoise blue Brushos panel, for which I'd used Strathmore Mixed Media card, a Darice 'Snowflake Swirls' embossing folder, Glimmer Mist and some silver gilding wax was trimmed to 5.25" x 4"

- then layered the panel onto a slightly larger snippet of Tonic pearlescent 'Navy Dazzle' card 

- ran a silver Calligraphy pen around the edges of the navy card and adhered the whole panel to the card front using strips of very narrow foam tape

- used a snippet of vellum to die cut the back surround for the Memory Box 'Merry Christmas Posh Script' sentiment and set it to one side

- then die cut the top layer of the sentiment using the more detailed die from the same Memory Box set - twice from a snippet of pearlescent white card then glued them together using a glue pen, before attaching the vellum 'profile' layer to the back

- finally, used micro dots to attach the sentiment

I did dither a bit about possibly adding a few self-adhesive little clear sparkly gems but thought it might be too glitzy - plus, there was a very strong chance that the self adhesion on the gems wouldn't like the gilding wax and they would promptly drop off as I found when attaching the finished sentiment to the card front in the final step of making the card!Glue pen didn't work but, for now, micro dots seem to be doing the trick with the sentiment! The more I use them, the more I like them.

I would like to also enter this card into Darnell's latest NBUS Challenge #48 HERE as the silver gilding wax and the Christmas sentiment die were having a first outing.

Must admit, I'm a bit hooked on vellum backed die cut sentiments right now. I lifted the initial scroll of the white letter 'M in Merry' after taking the photo by the way - before storing it away in my growing box of Christmas 2023 cards as I noticed it had made a bid for freedom. ☺

The results of Snippets Playground Challenge #449 can be found HERE - and there is still one week to run on Challenge #450 HERE.

Dudley Pupdate: It's been a busy week and my snippets card was a bit of a rush. Dudley has spent a lot of time dodging the rain and then sleeping under my desk. It seems to be a cosy kennel for him now! He mislaid Honka Duck one morning during the week and the absolute panic on his face was heartbreaking. I spotted Honka out of Dudley's line of view - on our bed - and as soon as I pointed he leapt up to embrace Honka as if he'd just come back from an around World Cruise! 

Speaking of embracing, on Friday morning we missed the chance of an adorable photo of Dudley - fast asleep, lying on his side literally with both front legs wrapped around Honks in such a loving cuddle. But if we'd made a move to grab a phone or camera he would have woken up and the moment would have been lost - so we just made the most of watching him for a while. 


Tuesday, 28 February 2023

Rudolph Days Challenge - February 2023

Eek, Mo's February 2023 Rudolph Days Challenge is due to close - so I'm racing in with an upcycled Christmas card:

I used:

- 6.5" x 3.25" white mini slim card blank, tent style

- piece of Tonic 'Scarlet Organza' Tonic satin mirri card, die cut using a die from the Lawn Fawn stitched border 'Mini Slim Stackables' set and glued onto the card front

- I'd already chosen the card to upcycle, so I chopped it down to sit inside the red satin mirri 'frame'

- next I added a silver mirri card sentiment, backed with a white card die cut for dimension - cut using a Tonic Studios 'Mini Moments Merry Christmas' die

- then backed the image layer using thin white foam sheet and Collall All Purpose glue

- then glued it onto the red layer and called it done

I do so love the Tonic range of mirri, satin mirri and pearlescent card for Christmas cards. Their variety of red mirri shades is quite extensive and 'Scarlet Organza' is such a perfect match for the red car!

When cutting down the upcycled card I was pretty ruthless and cut off  the top half which was a background scene of a horse and cart, some hills, trees and a few houses in the distance. I like that the focus is now drawn to the tree with the cardinals - as well as the car - and furry passenger! The card is still quite busy but the original was over fussy, IMHO.

And I still have a good selection of 2022 bought card fronts from ones we've been sent, in reserve to play with!


Wednesday, 25 January 2023

Playing with gilding flakes

In a few of Chrissie's YouTube videos, she uses gilding flakes - and that set me thinking back to when I too used to play with flakes and double sided adhesive sheet - and so, this Christmas card came about:

 
A closer peep at the shiny leaves!
I used:

- 5.5" x 4.25" Pale Ivory Linen Silkweave card blank (using a sheet of A4 card)  

- then covered a panel of light brown card with a snippet of double sided self-adhesive sheet before applying a coating of Cosmic Shimmer 'Mulled Wine' gilding flakes, gently patting them on at first (you don't need much!) then spreading and buffing them using a piece of 'scoochy foam'

- next, die cut the leaves using an unbranded 'Fragmented Leaves' die bought for me by a special friend - and it's probably my favourite die in the whole world right now!

- the leaves felt slightly sticky after I'd finished, so after having a little think I sprayed them with hairspray and it worked perfectly as a sealant

- more die cutting - a snippet of brown card and a Memory Box 'Woodland Branch' die - which I glued onto the card front using a glue pen

- then die cut the 'JOY' frame onto the card front. It was cut from a snippet of Craft Perfect Pearlescent 'Red Velvet' card using a Die-namics MFT 'JOY photo card frame' die

- stuck the frame onto the card front using very narrow foam strip around the edge (again I used Chrissie's trick of running a glue stick over the sticky surface of the tape before popping it in place onto the background and pressing it down - it's a real game changer!)

- die cut a sweet little bow from the same Red Velvet card, using a Gummiapan 'Rosetta' die

- and finally, popped two leaves and the bow onto the card, to 'hang' from the branch

I made four cards in total - two of the one above and two where I used a pearlised gold 'Joy' frame with the same red bow, leaves and branch, and I like both of them equally.

I'm nothing if not a keen follower of others, possibly too easily influenced for my own good, and Chrissie's videos led me to the Swedish company 'Gummiapan'. Oh my word - their little dies are so detailed and adorable! I hopped over for something else altogether - and the little bows somehow fell into my basket! Their prices are actually very reasonable - so long as you factor in postage and try not to get stung at your end for Customs Duty etc. It was a treat I tell myself and not something I would do every day! 

So - I would like to enter my card into some challenges:


First of all, Charlotte of 'Lady Joyful' runs a super challenge called 'Christmas Craft Creations' - HERE. AND, this month the theme is 'snippets'! Yay! So, I'm entering my snippets card and hope you perhaps will also follow suit. The challenge is open for another couple of weeks and it would be really great if you could steal a march on your 2023 Christmas cards and join in. 

And, of course it's our lovely Mo's Rudolph Days Challenge HERE. This is one challenge I never miss.

Plus, another 'must play along with' challenge - Darnell's NBUS Challenge - HERE. The leaf die set and the little Gummiapan bow dies are both NBUS goodies! 


Thursday, 27 October 2022

Rudolph Days Challenge October 2022

It's the latest Rudolph Days Challenge, over at ScrappyMo's - and here's my entry:

I used:

- 5.5" x 4.25" white linen card blank, tent style

- a very slightly smaller panel of Tonic 'Majestic Gold' pearlescent card

- then a slightly smaller again layer of patterned paper by Magnolia called 'A Christmas Story - Angels Calling'

- then die cut the holly sprig from a snippet of white card using Penny Black's 'Holly and Berry Branch' die - also die cut the berries area from a snippet of red card

- dug out what ended up as five lightish green small sized stamp pads - from SU and also Tsukineko then used a couple of small makeup blending brushes to colour the leaves

- coloured the 'twig' part of the die cut as well as the very parts where the leaves join the twig with a brown Zig marker and coloured the berries with a red Zig marker

- carefully fussy cut around the red die cut berries and glued that piece on top of the main die - it was a perfect match so really I hadn't needed to colour the berries, that was done in case I slipped up at all with the fussy cutting

- then glued the holly and berry die cut onto the card front

- added a Memory Box 'Christmas Fairy Dewdrops' embellishment to each holly berry

- die cut the sentiment using Tonic Studios 'Mini Moments Merry Christmas' die, one from a snippet of Majestic Gold card and the top layer from another snippet of the same red card I'd used for the berries. Then glued them together, before giving the finished sentiment a coating of clear Wink of Stella and giving it a short time to dry

- glued the sentiment in place using a glue pen - finished

Love how those berries shine in a muted way! There's some 'light bounce back' in the centres - but in real life it's not there). I fished the lovely 6" x 6" sheet of Magnolia patterned paper out of a box I rummaged around in about a week ago for the green and gold backing paper for the poinsettia cards I made. The contents date back to around 2008! There might be one or two sheets of the same paper still lurking in there for duplicates - but I know it's long been discontinued, sigh, a shame as it's such a gentle and soft pattern which makes a nice Christmas background without overly dominating the card. My quest is to try to checkpoint myself and see if there are more pieces of the same patterned paper to be used for duplicates - especially now that it's been made once. Always makes re-iterations simpler.

It was a first outing for the Memory Box dewdrops, as well as the Penny Black holly die, so I'd like to enter this into Darnell's NBUS Challenge #43.


Wednesday, 28 September 2022

Rudolph Days - September 2022

Time for another Rudolph Days challenge over at ScrappyMo's HERE. I made four really quick Christmas cards - two of each design and the first one is my Rudolph Days entry:


I used:

- 8.5" x 3.5" slimline white card blanks, tent style. I made my own card blanks using a UK size A4 sheet of heavy weight (300gsm) white card. Our A4 is only 8.25" wide so I had to make them 'down the length' of the sheet of card, meaning more waster/more snippets for ATCs perhaps

- next stamped the sentiments using stamps from Penny Black's 'Yuletide Wishes' set of sentiment stamps - and a Memento 'Tuxedo Black' ink pad - onto the chosen images

- topped the card fronts with the Whimsy Stamps image papers - from the 'SurReally Cool Christmas' set of Slimline papers, using Collall All Purpose Glue

- super fast - four cards done!

Yesterday was Dudley's 'Gotcha Day' - four years since he joined us here. And he still manages to surprise us! Little does he know that plans are afoot to sneakily replace Honka Duck with a new one, today if possible. Followed by a bath/shower tomorrow - he's gonna be pretty fed up I can see! ☺


Sunday, 28 August 2022

'Tis the Season to be jolly .........

Here's my  card for ScrappyMo's Rudolph Days Challenge for August:

I used:

- white DL card blank, tent style

- first of all I coloured the pre-stamped Penny Black 'Snow Family' image using Polychromos pencils and Sansodor blending fluid - matching the colouring to the background paper 'scene' I'd selected to use

- die cut the image using Penny Black's 'Snow Family' set of dies and tickled the pale grey fluffy pom poms on their hats using Clear Wink of Stella

- used a piece of SU 'Wisteria Wonder' card for the main backing - die cut using a die from Phill Martin's Slender Collection set called 'Elegant Eyelets' and glued onto the card front

- the background paper is from Whimsy's 'Frozen' Slimline paper pack - LOVE this set of papers so much! Trimmed the paper to nicely sit on top of the die cut backing card - just a sliver from the top and sightly over 3/4" from one side

- stamped a sentiment onto the bottom left of the 'scenic' panel using the Misti, Memento 'Tuxedo Black' ink and a stamp from Clearly Besotted's 'Simply Said Christmas' set of sentiments 

- glued the 'scenic' panel onto the card front so that the 'Wisteria Wonder' layer formed a frame 

- then added the die cut 'Snow Family' using thin sticky pads to add a little dimension (but still keeping it under the limit for standard postage letters) 

- the 'Snow Family' die comes with some lovely snowflake dies and I used the three smallest ones to die cut a selection of flakes from the leftover card that the main image had been stamped onto, then tickled them with Clear Wink of Stella on a scrap of paper and left them to dry

- finishing touch was to add a scattering of said snowflakes using a glue pen to 'lift' the background

In real life the colours are a little more vibrant and of course, just to make life easier when the Christmas panic sets in, I made two exactly the same. Partly as I found two ready stamped images and couldn't bear not to use both of them. I suspect that a sweet friend sent me the stamped images ages ago. Before I bought the same 'pre-loved' stamp several years later ............. then I followed it up with the matching set of dies, probably within the last 12 months or so. Funny what you come across when looking through boxes of stuff you've almost forgotten about. ☺

Another Christmas Challenge that I love is 'Peace on Earth' - it's always 'Anything Goes' but their mood board does have a snowman on it. So I'd like to play along with their current Peace on Earth Challenge #22.   

And, I just found 'Christmas with the Cuties' Challenge #62. Anything cute and Christmas, with an optional theme of 'Frosty the Snowman, was a jolly happy soul'. I just had to join in as my sentiment includes the word 'jolly' - as all snowmen should be! I think it's my first time playing over there - but there's at least one familiar DT name! Hi Sarah. ☺

As both the 'eyelets' DL dies as well as the Penny Black 'Snow Family' die set are NBUS - I'd like to join in with Darnell's NBUS Challenge #41

The results of Challenge #434 are over at the Snippets Playground HERE

Dudley alternates between being very solemn and then running round like a crazy dog! On Thursday evening Len sneaked up the 'bedtime treat chalk bone' as Dudley was snoozing in the hallway. Swiftly, Len popped it onto my desk and whispered 'Hide it' - and we reckon it truly could have been done in one massive bound from downstairs - there was Dudley beside me waiting, paws up on my desk chair, tongue out with a cheeky smile, literally as I reached out to pick up the treat! He's a total scamp!

Then there are the times he looks at life through the serious end of the telescope and spends time almost meditating with some of his most loved toys, and of course his 'bestie' Honka Duck. On Friday, whilst taking a piccie of today's card by placing it on our bed (hunting for light!), I looked up and Dudley was steadily watching me, from his position surrounded by toys on the bed! Usually he would move, but this time he didn't and I managed a quick and sneaky photo:
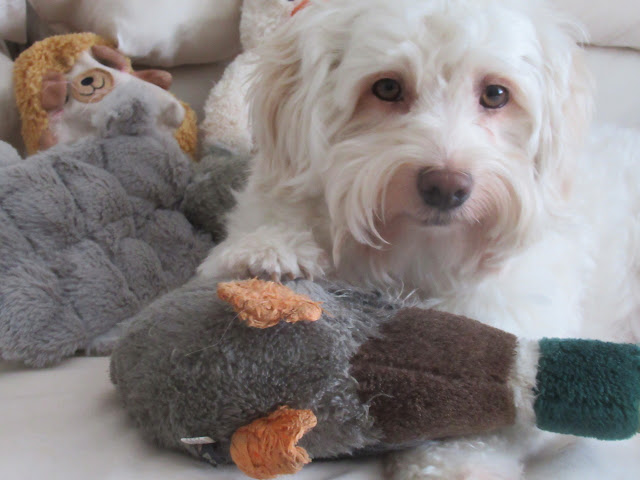
I really love this 'spur of the moment' photo of him. Dudley isn't a dog who poses nicely when asked - you have to take 'pot luck'. He has one paw on top of, and protecting 'Honka',peeping from behind him is a cheeky chick toy and beside him are an upside down flying squirrel .......... plus a much loved hedgehog, sent by his much loved 'God-dog Mum' when he arrived here almost four years ago now. Yup, he still has it and uses it as a little pillow often during the night, so cute. Version 2 is on my desk, 'awaiting Mama's surgery' as it's got a  split seam (ouch!), but let's not tell him that!

The thing that really gets me is the depth, wisdom, and even a tinge of sadness in the look in his eyes, talk about 'Let me look right into your soul Mama'!

Or, to look on the bright side, most likely, 'Hey Mama, where you gonna try and hide the next treat?'!! Let me try my pensive look on you - ha!'.

He (Dudley) knows I'm typing about him as he just popped out from under my desk to say 'a big hello, from your Friendly Security Guard'. His timing always cracks me up!

Love from both of us - Dudley and of course me,