Edit: Apologies, I tinkered with this post and for a while the image went missing - all fixed now though!
This week's challenge over at Merry Monday is 'Getting sentimental', where the team want your entry to have the sentiment as a focal image. I went for a lovely swirly script stamp that's a real favourite of mine. Also revisited a fairly similar card I made over two years ago in cream and copper, here's the end result this time round:
I used:
- 5.5" x 4.25" white card blank
- the embossed background was done next, using a Cuttlebug folder called 'Scrollwork'
- next I stamped the sentiment using an Inkylicious stamp called 'Merry Christmas 004' and a Delicata 'Silvery Shimmer' ink pad. I had thought about embossing the sentiment but the ink pad is so rich and radiant (their words!) that I didn't think it necessary
- trimmed the sentiment panel to fit the card front leaving a narrow border and glued it in place
- the skeleton poinsettia leaves were die cut using a die from a Marianne Creatables set (LR0156) and a snippet of silver card
- the poinsettia flower was die cut from plain white card using the three part Joanna Sheen All Occasion die called 'Small poinsettia' and then the layers were coated with clear Wink of Stella before being glued together using Glossy Accents
- glued the skeleton leaves and poinsettia flower in place on the card front, using Glossy Accents and then added a single pearl in the centre, which had been lightly coloured with a silver Pro marker
Did a little batch bake, so that's another three for the box :)
Di
x
Friday, 8 April 2016
Wednesday, 6 April 2016
Christmas baubles
For some reason my enthusiasm for making Christmas cards is very low right now - usually I'm happy to make them almost in preference to other cards. In an effort to overcome this 'lull' there was a little scrabble through some as yet unused stamps and I unearthed a Jennifer Ellory designed set of Christmas stamps which came free with Quick Cards Made Easy magazine - possibly in 2014.
This is the card I made - and there are three the same as I was test driving the Misti:
I used:
- 6" x 6" square white card blank
- a square of slightly smaller deep red satin finish mirri card, with a gold calligraphy pen run around the edges to leave a very narrow gold border (and to hide the white core of the mirri card) - glued in place
- a slightly smaller square of white card onto which I stamped the holly bough (did all three card fronts, one after another at each step), then the baubles, using a Delicata 'Golden Glitz' ink pad (thanks to Kathy K for the heads up about these ink pads - they're fabulous! And finally the sentiment, stamped using Memento 'Tuxedo Black' ink
- then I just coloured the holly bough using Whispers markers, ran the gold calligraphy pen around all four edges and glued the panel in place on top of the deep red layer
- resisted the urge to add any gems to the baubles, or even a tickle of glossy accents to the holly berries - and kept hands well away from clear Wink of Stella. I wanted to retain the crispness, even though it was tempting to add more stuff
So that's three more cards for Christmas at least. Whilst I love the font of the sentiment it's not a perfectly produced stamp - but it was a freebie and I had fun anyhow!
I'm entering this into the following challenges:
Craftyhazelnut's Christmas Challenge #275 - 'vintage or anything goes'. I chose 'anything goes'.
Craftyhazelnut's Christmas Challenge Extra for April - always 'anything goes'.
Di
x
This is the card I made - and there are three the same as I was test driving the Misti:
I used:
- 6" x 6" square white card blank
- a square of slightly smaller deep red satin finish mirri card, with a gold calligraphy pen run around the edges to leave a very narrow gold border (and to hide the white core of the mirri card) - glued in place
- a slightly smaller square of white card onto which I stamped the holly bough (did all three card fronts, one after another at each step), then the baubles, using a Delicata 'Golden Glitz' ink pad (thanks to Kathy K for the heads up about these ink pads - they're fabulous! And finally the sentiment, stamped using Memento 'Tuxedo Black' ink
- then I just coloured the holly bough using Whispers markers, ran the gold calligraphy pen around all four edges and glued the panel in place on top of the deep red layer
- resisted the urge to add any gems to the baubles, or even a tickle of glossy accents to the holly berries - and kept hands well away from clear Wink of Stella. I wanted to retain the crispness, even though it was tempting to add more stuff
So that's three more cards for Christmas at least. Whilst I love the font of the sentiment it's not a perfectly produced stamp - but it was a freebie and I had fun anyhow!
I'm entering this into the following challenges:
Craftyhazelnut's Christmas Challenge #275 - 'vintage or anything goes'. I chose 'anything goes'.
Craftyhazelnut's Christmas Challenge Extra for April - always 'anything goes'.
Di
x
Tuesday, 5 April 2016
Snippets Playground notelets
I've posted cards which I enclose with Playground prizes here using this same stamp previously, recently I ran out and had to make some more. I varied the design this time - and must say that the Misti was brilliant for stamping repeats in the batch baking session.
Parsnip the Peril had to feature needless to say - and I made the cards in two different colourways:
I used:
- 3.5" x 3.5" pink and blue pearlescent card blanks
- snippets of white card, trimmed to 3.25" x 3.25" square
- the little bear stamp was free with Craft Stamper magazine and the 'hugs' sentiment stamp is from the Paper Smooches 'Sentiment Sampler' set
- I just popped the piece of card into the corner of the Misti and added a magnet to keep it in place before positioning the un-inked stamps just where I want them to stamp, face downwards onto the little square of white card
- then I closed the Misti lid and it picked up both stamps from the card - so they were now sitting just where I wanted them on the inside of the lid
- I stamped the image and sentiment in one go, using Ranger 'Black Archival' ink
- then repeated the process for all nine of the remaining pieces of white card- only once did I need to re-stamp (one of Parsnip's ears came out a bit faint). Wow, the Misti really is one good piece of kit!
- next I coloured the images using Twinkling H2O's for the flower, a pale pink Whispers marker for inside the ears, and a black fine liner for the nose
- that left the lines on the flower, the flower centre and the little heart to be finished off - for those I used the utterly fabulous Signo sparkly pens that Sarn had us all raving about over HERE. Gold on the blue cards and silver on the pink ones :)
- then I punched opposite corners away using a punch/emboss punch made by XCut
- then glued the image panel onto the card black using Collall All Purpose glue
I've had the punch for years and years and although it's very well made I do question the design of it as, unlike many punches, it's really difficult to 'feel' or see when the corner is properly set in place ready to punch - I totally wrecked two finished images (yup, there were 12 to begin with) and had to do a little bit of trimming on others. It doesn't have a definite V-shape that you can see, unlike more recent punches - a bit soul destroying after doing a fair bit of work painting and colouring :(
Another item for the bin I fear :(
Di
x
Parsnip the Peril had to feature needless to say - and I made the cards in two different colourways:
I used:
- 3.5" x 3.5" pink and blue pearlescent card blanks
- snippets of white card, trimmed to 3.25" x 3.25" square
- the little bear stamp was free with Craft Stamper magazine and the 'hugs' sentiment stamp is from the Paper Smooches 'Sentiment Sampler' set
- I just popped the piece of card into the corner of the Misti and added a magnet to keep it in place before positioning the un-inked stamps just where I want them to stamp, face downwards onto the little square of white card
- then I closed the Misti lid and it picked up both stamps from the card - so they were now sitting just where I wanted them on the inside of the lid
- I stamped the image and sentiment in one go, using Ranger 'Black Archival' ink
- then repeated the process for all nine of the remaining pieces of white card- only once did I need to re-stamp (one of Parsnip's ears came out a bit faint). Wow, the Misti really is one good piece of kit!
- next I coloured the images using Twinkling H2O's for the flower, a pale pink Whispers marker for inside the ears, and a black fine liner for the nose
- that left the lines on the flower, the flower centre and the little heart to be finished off - for those I used the utterly fabulous Signo sparkly pens that Sarn had us all raving about over HERE. Gold on the blue cards and silver on the pink ones :)
- then I punched opposite corners away using a punch/emboss punch made by XCut
- then glued the image panel onto the card black using Collall All Purpose glue
I've had the punch for years and years and although it's very well made I do question the design of it as, unlike many punches, it's really difficult to 'feel' or see when the corner is properly set in place ready to punch - I totally wrecked two finished images (yup, there were 12 to begin with) and had to do a little bit of trimming on others. It doesn't have a definite V-shape that you can see, unlike more recent punches - a bit soul destroying after doing a fair bit of work painting and colouring :(
Another item for the bin I fear :(
Di
x
Sunday, 3 April 2016
Pixie's Snippets Playground - Week 223
Hope that everyone has recovered from the 'chocolate-fest' of Easter - and that Spring is finally showing her face wherever you are. We had rotten weather over Easter but it's improved as the week's gone on - thankfully!
My snippets card today is linked to the prize for this coming week - but nothing I used on the card is part of the prize. Ha! Bet that makes a lot of sense - not! You'll find out the link if you read on - this is my snippets card, and once again the camera tells a big fat fib 'cos the green wood is very green IRL, sort of olive/leaf green:
I used:
- 5.75" x 3.75" white card blank (I made it this size to fit the snippets I wanted to use, rather than the other way round)
- the backing papers are snippets from LOTV's 'Heartfelt' paper pad - glued together then trimmed to size
- then stamped the image using Memento 'Tuxedo Black' ink and a Stampendous stamp called 'Heart Stack'
- using the same stamp and ink I then stamped another image onto a snippet of pale pink paper from the same LOTV paper pad
- fussy cut the hearts and glued them in place onto the image I'd stamped onto the green background part of the panel
- wrapped a snippet of pink ribbon round where the papers overlap and glued the front panel onto the card blank
- using Memento 'Tuxedo Black' ink and a stamp from SU's 'Good Greetings' hostess set I stamped the sentiment onto a little snippet of the pale pink LOTV paper and punched it out using SU's 'Word Window' punch
- punched a backing layer for the sentiment using another snippets of the darker pink paper and SU's 'Modern Label' punch
- stuck the sentiment to the backing layer then stuck it onto the card front
- finished off with a small white pearl either side of the word 'celebrate'
There are clues to this coming week's prize in this card - the word 'celebrate' is one and also 'hearts' is another. Tee, hee :)
Let's move straight onto this week's peek at the picks:
The lovely Sarn has been really busy this past week - loads of lovely cards on her blog. This one has been so admired by many of you, it's a stunner isn't it. And, if you haven't already checked it out - the inside holds a great secret - a star shaped aperture pop out thingy (there must be a proper term for it!). I just spotted that Princess Judy had been wondering if a die could be used for the same effect and am sure she's on the right track - just a bit of careful measuring, placement and cutting of the aperture with a die and some scoring to create the pop out piece. Such a great idea too - love it Sarn - really pretty as well.
I know that Easter has gone but am sure you'll love this idea brought to us by Carol L. Darling little holders for choklit - and those sheep are brilliant! One to refer back to next Easter :)
Still on the subject of Easter - I have to show you this adorable photo of (KandA) Andrea's little grand daughter/Easter Bunny:
So, so cute!!
How about this for an utterly fabulous Golden Wedding card then? Great use of snippets and such a lovely design - brought to share by Viv. Love it!
Hettie (Sam) has been really busy with other things lately, so it was lovely to see her hop into the Playground waving this absolutely gorgeous Christmas card. It's a real stunner isn't it - great work Sam!
I'm very aware that a lot of you haven't signed up the Flickr and can't comment on a couple of our Playmates' entries. But, I really wanted to let you see this beautiful CAS card, made by Karen Ladd - I think it's terrific, so elegant!
Lynn of Lynn's Crafty Corner made this stunning card to share with us. I really love the layout, colours and wonderful stamping. The clincher for me was the background of birds behind the plane - really clever touch. And of course, lots of snippets used as well!
I absolutely could not leave this fantastic card out of the peek at the picks - to me it's outstanding, beautifully made and such a perfectly composed design. The sentiment is just perfect! Diane H made this stunner and I totally love it! Another snippets buster too of course.
As always, I could include every single entry here - so I really do urge you all to try and take a peek at the entries. Even if you don't have the time to comment - although comments really do make people so happy I'm sure.
We have one new Playmate this week:
Sharon brought a lovely set of Christmas cards to share with us - featuring LOTV images of course. I still grit my teeth at the fact LOTV discontinued such a successful product - lovely work Sharon!
Time now for the prize draw for the Frantic Stamper 'Thanks Word Band' die. And our winner is:
Well done Sue, and it's lovely to know that Roy has improved enough to be 'released' from visits to the rehab unit for checkups. Keep on at him to continue the exercises though - threaten him with us lot if you have to :) I have your address here (your last win was almost four months ago) and will post your die off to you ASAP this coming week.
Now for this coming week's prize(s), plus a bit of an explanation first of all.
I'm sure that many if not all of you will be well aware that Jules, of 'Always with a Heart', first started this challenge off - over five years ago now.
Since then she has gone from strength to strength with her bespoke Wedding Stationery business, her gorgeous work for Quick Cards Made Easy magazine - and of course her really inspiring blog. It was such a thrill recently to hear that she won Favourite Card Designer in the 2016 British Craft Awards and, being Jules, she did a surprise giveaway on her blog a couple of weeks ago as a thank you to everyone who had left supportive comments. This was the prize, won by our very own Playmate Eve:
A fabulous selection of goodies ranging through two lots of luscious papers, die cut labels/tags, pearls, hessian die cut flowers, twine, some lovely daisies that I know Jules will have made using her daisy loom, pretty charms, stencils (hearts of course, and cogs), mini album components, a really great edge punch - in fact everything you see in the photo above.
It's a super selection of goodies - and Jules sent a duplicate to me to offer as a Playground prize!! It's open to anyone who submits an entry this coming week. How generous is that?! I pinched the photo from Jules' blog but the goodies she sent to me are identical. So this week's prize is a real bumper one!
The Snippets Challenge will run for one week and the Playground gates will close at 11am UK time on Saturday 9th April. The gates will open again at midnight UK time on the same day.
A maximum of ONE entry and please say in a comment if you wish to play and be a possible winner of the prize. The prize is everything you see in the photo, and won't be split in any way - the winner takes all :) Please also link back to the Playground in your blog post to be eligible for the draw.
Mr Linky is below - please let me know if you have any problems linking, it's easy for me to sort out so don't struggle on alone :)
Di and, of course, Parsnip! (who is restored to his usual pristine white self - phew, it took three goes through the washing machine though............just kidding!)
x
My snippets card today is linked to the prize for this coming week - but nothing I used on the card is part of the prize. Ha! Bet that makes a lot of sense - not! You'll find out the link if you read on - this is my snippets card, and once again the camera tells a big fat fib 'cos the green wood is very green IRL, sort of olive/leaf green:
I used:
- 5.75" x 3.75" white card blank (I made it this size to fit the snippets I wanted to use, rather than the other way round)
- the backing papers are snippets from LOTV's 'Heartfelt' paper pad - glued together then trimmed to size
- then stamped the image using Memento 'Tuxedo Black' ink and a Stampendous stamp called 'Heart Stack'
- using the same stamp and ink I then stamped another image onto a snippet of pale pink paper from the same LOTV paper pad
- fussy cut the hearts and glued them in place onto the image I'd stamped onto the green background part of the panel
- wrapped a snippet of pink ribbon round where the papers overlap and glued the front panel onto the card blank
- using Memento 'Tuxedo Black' ink and a stamp from SU's 'Good Greetings' hostess set I stamped the sentiment onto a little snippet of the pale pink LOTV paper and punched it out using SU's 'Word Window' punch
- punched a backing layer for the sentiment using another snippets of the darker pink paper and SU's 'Modern Label' punch
- stuck the sentiment to the backing layer then stuck it onto the card front
- finished off with a small white pearl either side of the word 'celebrate'
There are clues to this coming week's prize in this card - the word 'celebrate' is one and also 'hearts' is another. Tee, hee :)
Let's move straight onto this week's peek at the picks:

Still on the subject of Easter - I have to show you this adorable photo of (KandA) Andrea's little grand daughter/Easter Bunny:


I'm very aware that a lot of you haven't signed up the Flickr and can't comment on a couple of our Playmates' entries. But, I really wanted to let you see this beautiful CAS card, made by Karen Ladd - I think it's terrific, so elegant!

As always, I could include every single entry here - so I really do urge you all to try and take a peek at the entries. Even if you don't have the time to comment - although comments really do make people so happy I'm sure.
We have one new Playmate this week:

Time now for the prize draw for the Frantic Stamper 'Thanks Word Band' die. And our winner is:
Now for this coming week's prize(s), plus a bit of an explanation first of all.
I'm sure that many if not all of you will be well aware that Jules, of 'Always with a Heart', first started this challenge off - over five years ago now.
Since then she has gone from strength to strength with her bespoke Wedding Stationery business, her gorgeous work for Quick Cards Made Easy magazine - and of course her really inspiring blog. It was such a thrill recently to hear that she won Favourite Card Designer in the 2016 British Craft Awards and, being Jules, she did a surprise giveaway on her blog a couple of weeks ago as a thank you to everyone who had left supportive comments. This was the prize, won by our very own Playmate Eve:
It's a super selection of goodies - and Jules sent a duplicate to me to offer as a Playground prize!! It's open to anyone who submits an entry this coming week. How generous is that?! I pinched the photo from Jules' blog but the goodies she sent to me are identical. So this week's prize is a real bumper one!
The Snippets Challenge will run for one week and the Playground gates will close at 11am UK time on Saturday 9th April. The gates will open again at midnight UK time on the same day.
A maximum of ONE entry and please say in a comment if you wish to play and be a possible winner of the prize. The prize is everything you see in the photo, and won't be split in any way - the winner takes all :) Please also link back to the Playground in your blog post to be eligible for the draw.
Mr Linky is below - please let me know if you have any problems linking, it's easy for me to sort out so don't struggle on alone :)
Di and, of course, Parsnip! (who is restored to his usual pristine white self - phew, it took three goes through the washing machine though............just kidding!)
x
Labels:
LOTV,
paper piecing,
pixie's crafty snippets challenge,
snippets,
SU,
sweet friend
Friday, 1 April 2016
April Quick Cards Made Easy magazine
The April (Issue 151) edition of Quick Cards Made Easy magazine will be hitting the shelves right now, in fact my guess is that it will already have done so. My subscription copy came last week by post - and the 'pop-up box cards kit' free gift is great!
I've made pop-up boxes from scratch and thoroughly enjoying doing so - but I know a few folk who are wary of trying this style of card, thinking them too daunting.
If that's you - take a peek at a pop-up box card I whipped up using the kit in no time at all, sticking more or less to one of the suggested designs:
I just stuck with the bits and pieces that came with the kit to make this and here's the cover sheet from the kit packet:
Apart from scissors and glue (although I used red line tape instead of glue) absolutely everything you need is included. Four little boxes, just ready for you to fold and tape one small side section, four themed die-cut sheets (I had pieces left over from the sheet I used) four matching envelopes and an acetate sheet for the fluttering die-cut embellishments (my packet had two acetate sheets in - but one is enough).
It's a great free gift and instructions are included in the magazine itself. I have no links to QCME magazine, just thought I'd like to share.
I know that lots of you have made these boxes yourselves, I've featured some real beauties in the Snippets Playground weekly picks, but perhaps this will tempt anyone who hasn't yet had a try. Plus you get the magazine to read as well!
Di
x
I've made pop-up boxes from scratch and thoroughly enjoying doing so - but I know a few folk who are wary of trying this style of card, thinking them too daunting.
If that's you - take a peek at a pop-up box card I whipped up using the kit in no time at all, sticking more or less to one of the suggested designs:
I just stuck with the bits and pieces that came with the kit to make this and here's the cover sheet from the kit packet:
Apart from scissors and glue (although I used red line tape instead of glue) absolutely everything you need is included. Four little boxes, just ready for you to fold and tape one small side section, four themed die-cut sheets (I had pieces left over from the sheet I used) four matching envelopes and an acetate sheet for the fluttering die-cut embellishments (my packet had two acetate sheets in - but one is enough).
It's a great free gift and instructions are included in the magazine itself. I have no links to QCME magazine, just thought I'd like to share.
I know that lots of you have made these boxes yourselves, I've featured some real beauties in the Snippets Playground weekly picks, but perhaps this will tempt anyone who hasn't yet had a try. Plus you get the magazine to read as well!
Di
x
Wednesday, 30 March 2016
Mint is the colour for today!
This is the latest card I made, I wanted the colour mint to be the focal point of a fresh and quite clean looking card, and it IS soft shades of mint not turquoise (camera lies yet again):
I used:- 4" x 6" white linen card blank (these date back to my really early card making days)
- first of all stamped four butterflies using Memento 'London Fog' ink and all four stamps from the Inkylicious 'Flutters 2' set onto a snippet of white card stock
- then selected three shades of mint from my Pro markers and coloured the butterflies in before fussy cutting round them
- hunted for suitable papers to match the butterfly colours - would normally do this the other way round but wanted to be sure the butterflies were a true mint green and was prepared to compromise if I couldn't find any mint papers to match
- success though, the background papers are from a Kaisercraft paper pad called 'Blue Bay' - and a lot of the papers are mint green rather than blue or turquoise, yay! I cut a piece of the distressed looking beige paperfrom the pad and added just a margin of mint from one of the papers which is actually a design of planks of weather worn wood
- taped the edge of the beige paper to overlap the margin of mint and only then did I trim the paper top and bottom - that way you aren't trying to avoid one piece being a sliver too big or small
- the pad also includes sentiments and I chose a round one - love the words!
- then it was just a matter of gluing everything on place
A quick and easy card - love the paper pad I used. Interestingly it's six and a half inches by six and a half inches in size rather than the usual six by six.
A lifesaver was my latest toy, the Misti stamp positioner - which I'd dithered over for absolutely ages. Bought it from Dies to Die for last week and was really lucky as Tracey had just had a new shipment, the next shipment isn't due until May. Sure, it's going to be great for batch baking cards as I tend to do a fair bit of that - but, the real bonus I think is being able to re-ink and stamp so precisely over a poorly stamped image. Love it!
Di
x
Tuesday, 29 March 2016
Cuttlebug Mania Challenge - 'Monochrome'
Time for another fortnightly challenge over at Cuttlebug Mania - and this time the theme is 'Monochrome'. Having discussed this, it isn't just shades of black/white/grey - it can be colours with a little bit of white/black if you wish. I went for the colours option - any excuse to use some pink snippets :)
You do have to use a manual die cutting/embossing machine for Cuttlebug Mania entries (it doesn't need to be a Cuttlebug but it must be manual, not electronic). And, you can't mix the two, it must be all manual please. Then make your entry, link into the challenge, link to the challenge in your own blog post and and make sure that you also say what products you used for any die cutting/embossing.
Our sponsor is Crafty Sentiments Designs (more details about the prize over on the Cuttlebug Challenge blog) and this is the card I made:
I used:
- 4.75" x 4.75" square white card blank
- snippets of pink card for the 'quilting'
- first I cut the outline piece from pearlescent pink card using the MFT 'Quilt Square Cover-up' die and backed it with double sided adhesive sheet, leaving the backing on but each of the patchwork slots then had a nice sticky surface just waiting for the patchwork pieces
- die cut a further three pieces of pink card in different shades and popped the pieces in place where I wanted them to go
- peeled off the backing behind the completed patchwork to reveal the self adhesive sticky sheet and mounted that onto a piece of pink card, which I then trimmed down to size
- wrapped some natural twine around the patchwork panel and stuck it onto the card front
- stamped the word 'Hi!' using Memento 'Tuxedo Black' ink and a stamp from the Stampendous 'Happy Messages' set
- die cut the sentiment using an X-cut 'mini die - gift tag die and left the tag in the die while I outlined it with little faux stitches using a Stabilo Fine Liner
- hot glued the label in place
- slotted a piece of doubled natural twine through a pink button and tied a bow
- hot glued the button onto the label
I think the secret of working with this die is to use the adhesive sheet as I did and also to try to keep the patchwork pieces together within the die cut shapes to be sure to pick the right ones for the framework you already cut - some of the pieces do vary!
The photo (OCD strikes again) has slightly picked up the white inner core of the patchwork frame, making it look a bit as if there are gaps - in fact the pieces fit really snuggly, sigh :( One to remember here in future, use card stock without a white core!
I got the design idea from this blog, by Barbara Anders. She's on the MFT DT and has some wonderful cards to see - looks as if the card I CASE'd has had its image deleted from her blog though. Thankfully it was still on the MFT site and it's still worth hopping over to see her work!
Why not make a snippets entry using some of those monochrome snippets you must have lurking - making sure you do some manual machine embossing/die cutting of course - then you can enter both at the same time :)
Di
x
You do have to use a manual die cutting/embossing machine for Cuttlebug Mania entries (it doesn't need to be a Cuttlebug but it must be manual, not electronic). And, you can't mix the two, it must be all manual please. Then make your entry, link into the challenge, link to the challenge in your own blog post and and make sure that you also say what products you used for any die cutting/embossing.
Our sponsor is Crafty Sentiments Designs (more details about the prize over on the Cuttlebug Challenge blog) and this is the card I made:
I used:
- 4.75" x 4.75" square white card blank
- snippets of pink card for the 'quilting'
- first I cut the outline piece from pearlescent pink card using the MFT 'Quilt Square Cover-up' die and backed it with double sided adhesive sheet, leaving the backing on but each of the patchwork slots then had a nice sticky surface just waiting for the patchwork pieces
- die cut a further three pieces of pink card in different shades and popped the pieces in place where I wanted them to go
- peeled off the backing behind the completed patchwork to reveal the self adhesive sticky sheet and mounted that onto a piece of pink card, which I then trimmed down to size
- wrapped some natural twine around the patchwork panel and stuck it onto the card front
- stamped the word 'Hi!' using Memento 'Tuxedo Black' ink and a stamp from the Stampendous 'Happy Messages' set
- die cut the sentiment using an X-cut 'mini die - gift tag die and left the tag in the die while I outlined it with little faux stitches using a Stabilo Fine Liner
- hot glued the label in place
- slotted a piece of doubled natural twine through a pink button and tied a bow
- hot glued the button onto the label
I think the secret of working with this die is to use the adhesive sheet as I did and also to try to keep the patchwork pieces together within the die cut shapes to be sure to pick the right ones for the framework you already cut - some of the pieces do vary!
The photo (OCD strikes again) has slightly picked up the white inner core of the patchwork frame, making it look a bit as if there are gaps - in fact the pieces fit really snuggly, sigh :( One to remember here in future, use card stock without a white core!
I got the design idea from this blog, by Barbara Anders. She's on the MFT DT and has some wonderful cards to see - looks as if the card I CASE'd has had its image deleted from her blog though. Thankfully it was still on the MFT site and it's still worth hopping over to see her work!
Why not make a snippets entry using some of those monochrome snippets you must have lurking - making sure you do some manual machine embossing/die cutting of course - then you can enter both at the same time :)
Di
x
Labels:
Cuttlebug Mania,
Die cutting,
general card,
hints and tips
Sunday, 27 March 2016
Pixie's Snippets Playground - Week 222
Happy Easter everyone - and I do hope that those of you who should have changed your clocks overnight remembered to do so. We had glorious weather here on Good Friday - and since then it's been rain all the way, and predicted to remain that way over the whole holiday weekend. Such a shame :(
Meanwhile, I want to know who set fire to the tree house whilst toasting hot cross buns! This was quickly followed by a Vesuvius-like eruption of hot melted chocolate - which I'm still scrubbing off the walls and also off Parsnip. I just knew that making Easter eggs using those old moulds I had from years ago was a silly idea :(
Once things calmed down and Parsnip stopped screaming like a very silly littlewhite (snigger) mottled brown bear of no intelligence at all - I set to and made my snippets card for this week:
I used:
- 5" x 7" white card blank, tent style
- next I used a Frantic Stamper 'Thanks Card Band' die to cut out the word 'Thanks'. What's great about this die is that the word mostly is cut away but the card remains attached at the top and bottom of the letters - really neat
- then covered the top and bottom sections of the card blank with a snippet of what I think is one of SU's designer papers. I'd used part of the reverse of the paper and was left with the snippet and a large design that really I'd even thought about throwing away - wash my mouth out with soap! I deliberately left a white border round both the pieces of DP
- then I backed the cutaway 'Thanks' with a snippet of (according to my SU swatch) 'Blackberry Bliss' card stock - just glued at the top and bottom behind the word. I suspect that 'Rich Razzleberry' was the plain card meant to go with the DP, but I'm fresh out of that
- and to finish off (neat freak) I backed the inside of the card front with a full sized panel of white card to hide the band of 'Blackberry Bliss'
Have to admit, I'm quite tickled with the result and it's a great way to use up quite bold papers.
I chose to back my plain white 'Thanks' using the coloured card stock immediately behind the word. Other options would be to just leave the word as it is (it's quite sturdy enough) and perhaps colour it with Pro markers if you don't intend doing anything extra inside the card to make it show up more, use coloured card of course, add a contrasting strip to the inside (back half) of the card lined up with the word or perhaps back the word with acetate - the list goes on :) It's a really fun die!
Onto the weekly 'peek at the picks' as usual - let's have some Easter/Spring ones first:
Not only did Chris bring this card to the Playground, she also sent it to me as a thank you for her recent prize win (and managed to use a die, an image and also a sheet of the paper from the win). It's absolutely gorgeous and really beautifully made - I love it! And the branches and , flowers and leaves are all snippets too.
Carole brought this really fresh looking Easter card to share with us , such pretty colours and a really sweet image too - as well as a recent photo of baby Thomas:
Hasn't he grown in just six weeks? And what a darling little chap he is!
This is such a clever design, brought to show by Krisha. I love how the stamped, coloured then fussy cut tulips sit within the white frame on the beautifully toning background paper snippet, which then extends to form the outer frame. Brilliant!
Alison had been playing with snippets and circle dies - this is one of three great ideas over at her blog - go HERE to find out more. I love this idea and will be having a play as soon as possible. The beauty of these designs is that you can make them for male or female recipients, just by changing the papers you use. Strong and bold for a chap - pretty and soft for a lady :) That's the traditional theory anyhow - these days it's often the other way round in real life!
Sonia always brings really lovely work to share with us, and this is no exception is it?!
My final pick of the week is this card, made by Jane W. It just cracked me up - the sentiment goes perfectly with the look on the penguin's face - it looks as if it's on the 'lemons diet'. That's the one where you have fourteen lemons for breakfast and, by the time your mouth unpuckers, it's time for breakfast the following day :)
We had five new Playmates this week as well as a total of 66 entries - no doubt sneaking hot cross buns and choklit into the Playground at the same time! Let's say 'Hi' to our new Playmates:
Francesca brought this fabulous Magnolia card to share - so much beautiful detail!
I love the sheer joy that truly does spill out of these journal pages - fabulous colours! Brought to us by Rachel.
Tanvi made three gorgeous letter racks and this is the one she entered into the Playground this week, do go and take a closer look at the side views on her blog HERE. Really great!
I love this 'vintage' Christmas card, brought to share with us by Marianne. It appeals to my 'neat freak' side - yet still has a vintage look!
And finally, Margaret M hopped into the Playground with this really pretty snippets card to share with us -and a clever way to use the ribbon and bow too!
Hope to see you again really soon!
There's also some news to share - I think a lot of you will already know about this but just in case you don't. The lady who made this fabulous card ......
...... is headed over to England in July! It's our fun-loving Playmate Darnell of course (ha, I wonder if England is actually ready for her?!). She will be moving around the country a bit and one purpose of her visit is to spend a weekend at the 'Happy Little Stampers' Retreat in Swindon (which was fully booked up some while ago) - as well as meeting as many of us bloggers/Playmates as possible. I think Darnell's itinerary is pretty much set now, so it's safe to let you know that she would love to meet any of us on her travels:
Darnell's first port of call (that's appropriate!) is Southampton (Grand Harbour Hotel) and there is a get together (aka soirée - snigger) planned for Tuesday 19th July. I'll be there, aided and abetted by Parsnip (if the choklit is all cleaned up from his fur), along with a few othernotorious Playmates/bloggers.
After that, Darnell plans to spend time in various parts of the UK (Salisbury, Somerset, Bristol, Manchester area (Knutsford I think), then the Swindon Retreat itself with lovely folk such as the Less is More gals, Kathy K and others - followed by a short time in London (Pimlico area) before she heads back home on Wednesday 3rd August.
If you want more details I think it's best for you to contact Darnell directly (her email link is in her blog profile). If you get stuck (I can never get those email links to work on my Linux operating system!) then feel free to contact me and I'll forward any emails onto Darnell. Even if you're unsure about arriving on your own - don't be! You're a lovely little band of crafters and will soon find that everyone will be welcomed with open arms. Exciting (and probably slightly scatty) times ahead!
Time now for the prize draw for the Woodware stamps 'Boxed Daisies Trio' and Cone Flower'. And our winner is:
Ha! It was actually around last Easter when Diane won, so this is certainly due! I still have your address from then Diane and will post the stamps off to you this coming week - well done.
Now here's this coming week's prize(s):
Of course, it's a die the same as the one I used for my snippets card today - a Frantic Stamper 'Thanks Card Band' die. Not a massive prize but hopefully it's a little bit unusual and something you'd like to win.
The Snippets Challenge will run for one week and the Playground gates will close at 11am UK time on Saturday 2nd April. The gates will open again at midnight UK time on the same day.
A maximum of ONE entry and please say in a comment if you wish to play and be a possible winner of the prize.Please also link back to the Playground in your blog post to be eligible for the draw.
Mr Linky is below - please let me know if you have any problems linking, it's easy for me to sort out so don't struggle on alone :)
Di and, of course, Parsnip!
x
Meanwhile, I want to know who set fire to the tree house whilst toasting hot cross buns! This was quickly followed by a Vesuvius-like eruption of hot melted chocolate - which I'm still scrubbing off the walls and also off Parsnip. I just knew that making Easter eggs using those old moulds I had from years ago was a silly idea :(
Once things calmed down and Parsnip stopped screaming like a very silly little
I used:
- 5" x 7" white card blank, tent style
- next I used a Frantic Stamper 'Thanks Card Band' die to cut out the word 'Thanks'. What's great about this die is that the word mostly is cut away but the card remains attached at the top and bottom of the letters - really neat
- then covered the top and bottom sections of the card blank with a snippet of what I think is one of SU's designer papers. I'd used part of the reverse of the paper and was left with the snippet and a large design that really I'd even thought about throwing away - wash my mouth out with soap! I deliberately left a white border round both the pieces of DP
- then I backed the cutaway 'Thanks' with a snippet of (according to my SU swatch) 'Blackberry Bliss' card stock - just glued at the top and bottom behind the word. I suspect that 'Rich Razzleberry' was the plain card meant to go with the DP, but I'm fresh out of that
- and to finish off (neat freak) I backed the inside of the card front with a full sized panel of white card to hide the band of 'Blackberry Bliss'
Have to admit, I'm quite tickled with the result and it's a great way to use up quite bold papers.
I chose to back my plain white 'Thanks' using the coloured card stock immediately behind the word. Other options would be to just leave the word as it is (it's quite sturdy enough) and perhaps colour it with Pro markers if you don't intend doing anything extra inside the card to make it show up more, use coloured card of course, add a contrasting strip to the inside (back half) of the card lined up with the word or perhaps back the word with acetate - the list goes on :) It's a really fun die!
Onto the weekly 'peek at the picks' as usual - let's have some Easter/Spring ones first:


We had five new Playmates this week as well as a total of 66 entries - no doubt sneaking hot cross buns and choklit into the Playground at the same time! Let's say 'Hi' to our new Playmates:


Hope to see you again really soon!
There's also some news to share - I think a lot of you will already know about this but just in case you don't. The lady who made this fabulous card ......

Darnell's first port of call (that's appropriate!) is Southampton (Grand Harbour Hotel) and there is a get together (aka soirée - snigger) planned for Tuesday 19th July. I'll be there, aided and abetted by Parsnip (if the choklit is all cleaned up from his fur), along with a few other
After that, Darnell plans to spend time in various parts of the UK (Salisbury, Somerset, Bristol, Manchester area (Knutsford I think), then the Swindon Retreat itself with lovely folk such as the Less is More gals, Kathy K and others - followed by a short time in London (Pimlico area) before she heads back home on Wednesday 3rd August.
If you want more details I think it's best for you to contact Darnell directly (her email link is in her blog profile). If you get stuck (I can never get those email links to work on my Linux operating system!) then feel free to contact me and I'll forward any emails onto Darnell. Even if you're unsure about arriving on your own - don't be! You're a lovely little band of crafters and will soon find that everyone will be welcomed with open arms. Exciting (and probably slightly scatty) times ahead!
Time now for the prize draw for the Woodware stamps 'Boxed Daisies Trio' and Cone Flower'. And our winner is:
Now here's this coming week's prize(s):
Of course, it's a die the same as the one I used for my snippets card today - a Frantic Stamper 'Thanks Card Band' die. Not a massive prize but hopefully it's a little bit unusual and something you'd like to win.
The Snippets Challenge will run for one week and the Playground gates will close at 11am UK time on Saturday 2nd April. The gates will open again at midnight UK time on the same day.
A maximum of ONE entry and please say in a comment if you wish to play and be a possible winner of the prize.Please also link back to the Playground in your blog post to be eligible for the draw.
Mr Linky is below - please let me know if you have any problems linking, it's easy for me to sort out so don't struggle on alone :)
Di and, of course, Parsnip!
x
Labels:
challenge,
Die cutting,
pixie's crafty snippets challenge,
snippets,
SU
Saturday, 26 March 2016
A final Easter card
I almost forgot to blog this Easter card:
I used:
- 4" x 5.75" white card blank, with a teeny bit trimmed off the bottom so that the fancy die cut sits at the very edge
- image from LOTV's 'Bunnies' paper pad, die cut using a Spellbinders 'Labels Eight' die. Leaving the die cut still in the die I then ran a ball ended tool round to create the 'lipped edge'
- the sentiment stamp I used is an old favourite by Pink Gem Designs, stamped using SU's 'Certainly Celery' ink
- piece of white card stock, die cut using a Spellbinders 'Labels Eight Decorative' die
- glued the layers onto the card front and called it done
Di
x
I used:
- 4" x 5.75" white card blank, with a teeny bit trimmed off the bottom so that the fancy die cut sits at the very edge
- image from LOTV's 'Bunnies' paper pad, die cut using a Spellbinders 'Labels Eight' die. Leaving the die cut still in the die I then ran a ball ended tool round to create the 'lipped edge'
- the sentiment stamp I used is an old favourite by Pink Gem Designs, stamped using SU's 'Certainly Celery' ink
- piece of white card stock, die cut using a Spellbinders 'Labels Eight Decorative' die
- glued the layers onto the card front and called it done
Di
x
Friday, 25 March 2016
Rudolph Days - March 2016
And it's time for Rudolph Days once again over at Scrappy Mo's. You have from today until the end of the month to enter - so what are you waiting for? As always, Mo has a lovely prize on offer - and this is what I made as my entry this month:
I used:
- 5.75" x 5.75" square slightly off-white card blank (the white in the image panel is also slightly off-white, hence the choice of card blank
- a piece of Christmas green plain paper, which came free with a magazine years ago, it just happened to go with the greens in the image pretty well
- I found the sweet House Mouse image in a hidden Really Useful Box, already decoupaged some years ago when I had time to fiddle on snipping and layering decoupage, originally bought from Joanna Sheen - can't recall which set it was but would expect it's on the CD she stocks
- layered the image onto the piece of plain green paper and trimmed it to just slightly bigger than the image panel before sticking it onto the card front
- in the cello bag where the decoupaged image was carefully stored I also found the matching sentiment, already cut ready just to stick in place. I popped it across the top of the card, mostly to hide a little bit of a crinkle in the glossy paper that the decoupage was printed on
- then just added a few red self-adhesive pearls on top of the printed holly berries
Job done, in double quick time! So glad I opened that Really Useful Box to see what was lurking within.
This card is also for Craftyhazelnut's Christmas Challenge #273 (Cute or Anything Goes this week) as well as Craftyhazelnut's Christmas Challenge Extra for March 2016 (always Anything Goes).
That's 40 cards in the box for Christmas - but I'm lagging a bit behind as my target was 12 per month beginning in December, eight more to make before the end of March. It's all down to time lost at the desk when I couldn't sit for very long - and to be honest, a bit of apathy on my part :( I can see some 'batch baking' ahead!
Di
x
I used:
- 5.75" x 5.75" square slightly off-white card blank (the white in the image panel is also slightly off-white, hence the choice of card blank
- a piece of Christmas green plain paper, which came free with a magazine years ago, it just happened to go with the greens in the image pretty well
- I found the sweet House Mouse image in a hidden Really Useful Box, already decoupaged some years ago when I had time to fiddle on snipping and layering decoupage, originally bought from Joanna Sheen - can't recall which set it was but would expect it's on the CD she stocks
- layered the image onto the piece of plain green paper and trimmed it to just slightly bigger than the image panel before sticking it onto the card front
- in the cello bag where the decoupaged image was carefully stored I also found the matching sentiment, already cut ready just to stick in place. I popped it across the top of the card, mostly to hide a little bit of a crinkle in the glossy paper that the decoupage was printed on
- then just added a few red self-adhesive pearls on top of the printed holly berries
Job done, in double quick time! So glad I opened that Really Useful Box to see what was lurking within.
This card is also for Craftyhazelnut's Christmas Challenge #273 (Cute or Anything Goes this week) as well as Craftyhazelnut's Christmas Challenge Extra for March 2016 (always Anything Goes).
That's 40 cards in the box for Christmas - but I'm lagging a bit behind as my target was 12 per month beginning in December, eight more to make before the end of March. It's all down to time lost at the desk when I couldn't sit for very long - and to be honest, a bit of apathy on my part :( I can see some 'batch baking' ahead!
Di
x
Wednesday, 23 March 2016
Hooked on die cutting
Although I still get a lot of pleasure out of stamping and colouring, lately I've been playing with more and more dies and very recently made a card using a die from the utterly fabulous Memory Box Open Studio 'Baptisia Distressed Collage' die set. I know that Liz (see this card!) has been playing with this lovely set of dies recently (and I just fell in love with it!) - and am sure I've seen it being used elsewhere in the Playground. This is my first play ......... as I did wait a little while before giving in to temptation:
I used:
- 4" x 5.75" white card blank, tent style
- slightly smaller piece of white card stock, with opposing corners die cut using a die from the Memory Box Open Studio 'Baptisia Distressed Collage' die set
- worked out where I wanted the sentiment to go and stamped it using Memento 'London Fog' ink and a stamp from the 'SU 'Sincere Salutations' set (discontinued)
- used a Memory Box 'Geneva Vine' die to cut out the central die cut, then inlaid it with green and pink die cuts, from snippets
- backed the whole piece with double sided adhesive sheet and layered it onto a piece of pink card
- the corner die cuts now had exposed sticky (as intended!) so I then sprinkled Crystal Glamour Dust over and gave it a good brush over with a soft brush to remove the excess. I use a long handled Avon blusher brush for this - bought specially for the purpose
- finally, added tickles of clear Wink of Stella to the pink flower heads. In real life I like that the corners really twinkle and it's when you turn the card for the light to catch it that the more subtle shimmer shows on the flowers
Edit: Thanks to Andrea for pointing this out to me - this card fits in with the current Memory Box # 10 challenge which is blossoms and/or bunnies. Where have I been all this time, what a great challenge - especially if you adore Memory Box products as much as I do!
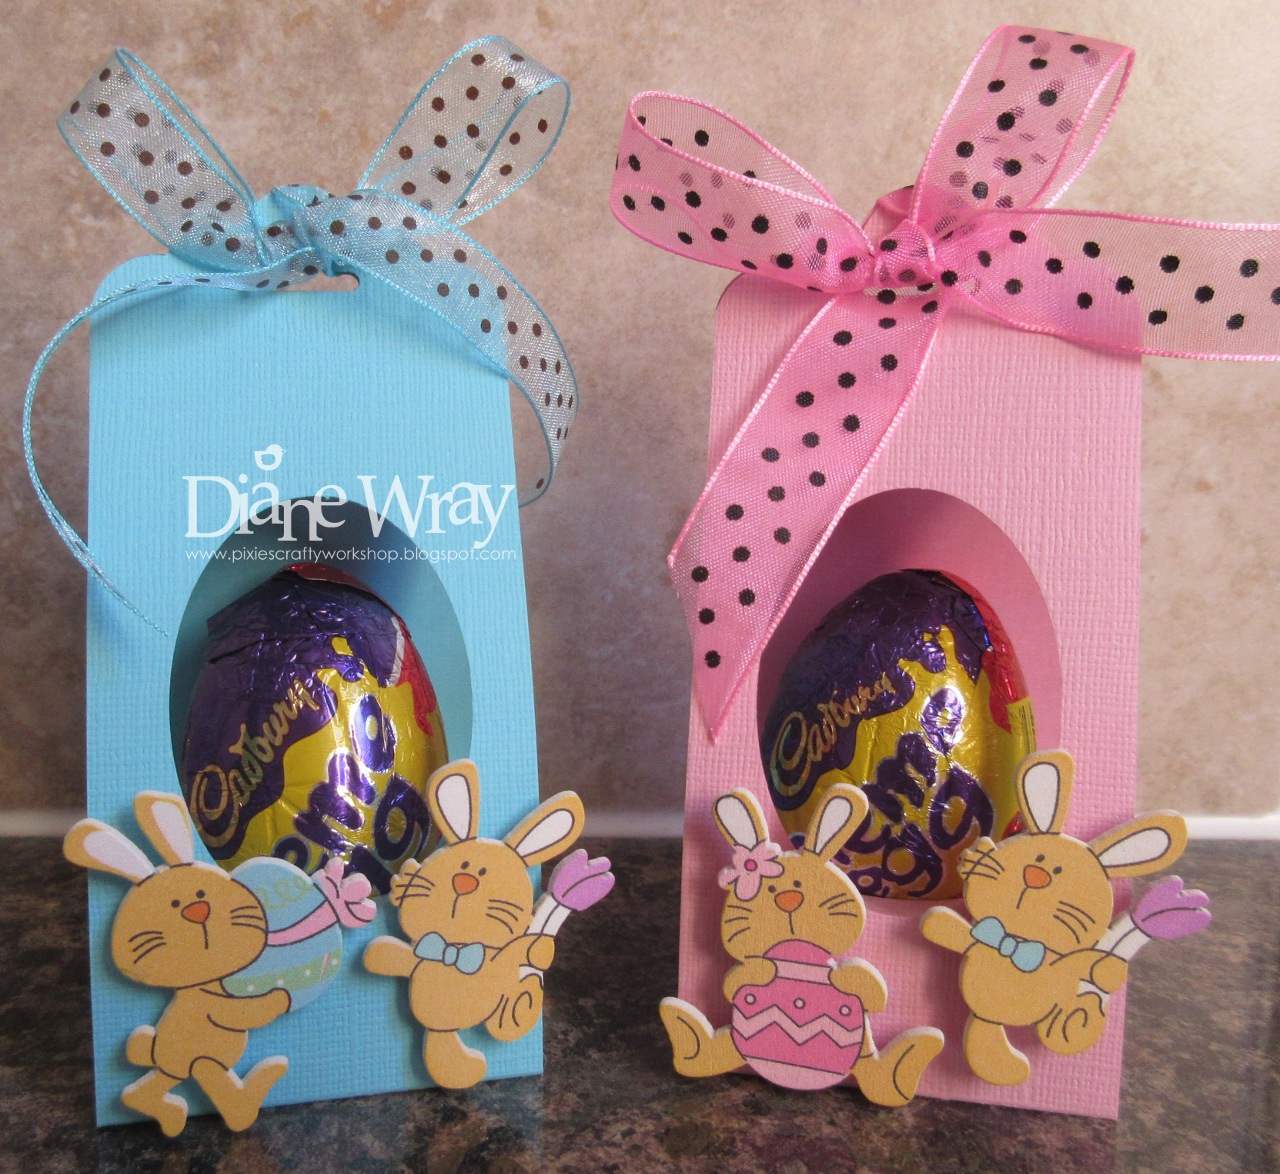
And, thanks to Sarn's encouragement HERE, I hopped out into the sunshine yesterday and bought some Cadbury's Creme Eggs. Did a few bits of shopping elsewhere (including buying the bunnies in Hobbycraft) and then came home and quickly made these:
We have a lovely young neighbour who usually calls by with a small Easter egg for us. So there are three of these little 'eggs on thrones' waiting for Hemma - one for her, and one each for Gerry and Nina, her Mum and Dad. Ha! And there's two left over in the box of five to be scoffed too :) Well I never!
Thanks Sarn for the idea - nice one :)
And slap my wrist, due to going out to play in the sunshine I neglected the Playground today - will catch up ASAP!
Di
x
I used:
- 4" x 5.75" white card blank, tent style
- slightly smaller piece of white card stock, with opposing corners die cut using a die from the Memory Box Open Studio 'Baptisia Distressed Collage' die set
- worked out where I wanted the sentiment to go and stamped it using Memento 'London Fog' ink and a stamp from the 'SU 'Sincere Salutations' set (discontinued)
- used a Memory Box 'Geneva Vine' die to cut out the central die cut, then inlaid it with green and pink die cuts, from snippets
- backed the whole piece with double sided adhesive sheet and layered it onto a piece of pink card
- the corner die cuts now had exposed sticky (as intended!) so I then sprinkled Crystal Glamour Dust over and gave it a good brush over with a soft brush to remove the excess. I use a long handled Avon blusher brush for this - bought specially for the purpose
- finally, added tickles of clear Wink of Stella to the pink flower heads. In real life I like that the corners really twinkle and it's when you turn the card for the light to catch it that the more subtle shimmer shows on the flowers
Edit: Thanks to Andrea for pointing this out to me - this card fits in with the current Memory Box # 10 challenge which is blossoms and/or bunnies. Where have I been all this time, what a great challenge - especially if you adore Memory Box products as much as I do!
And, thanks to Sarn's encouragement HERE, I hopped out into the sunshine yesterday and bought some Cadbury's Creme Eggs. Did a few bits of shopping elsewhere (including buying the bunnies in Hobbycraft) and then came home and quickly made these:
We have a lovely young neighbour who usually calls by with a small Easter egg for us. So there are three of these little 'eggs on thrones' waiting for Hemma - one for her, and one each for Gerry and Nina, her Mum and Dad. Ha! And there's two left over in the box of five to be scoffed too :) Well I never!
Thanks Sarn for the idea - nice one :)
And slap my wrist, due to going out to play in the sunshine I neglected the Playground today - will catch up ASAP!
Di
x
Tuesday, 22 March 2016
Less is More - #268 - What's outside your window
The current challenge over at Less is More has the theme of 'What's outside your window' this current week. Either real life or in your imagination. I went for real life as we get hours of pleasure from watching the antics of a variety of birds in the garden, not least when they all queue up for a bath. The Stampin' Up stamp I used for my card sums it up really - they flick the water everywhere (some of the cleverer birds just sit underneath the bird bath and take a shower) and it's a constant job to keep topping up the water level for them.
Plus, over the past two weeks, we've spotted that our resident male robin has been joined by a 'wifelet' - so Spring must be in the air if he's let her onto his territory!
Bird bath plus robins - that's the focus of my Less is More entry this week:
I used:
- 4" x 5.75" white card blank
- a slightly smaller piece of white card stock, embossed using SU's 'Square Lattice' folder and glued onto the card front
- a stamp from SU's 'For the Birds' set, stamped using Memento 'Tuxedo Black' ink and coloured in using Whispers Markers (they really do have the finest small tip on one end, ideal for colouring in little images)
- die cut the image using a die from the Lil' Inkers 'Stitched Rectangles' set
- attached the image panel to the card front using thin sticky pads
I just looked back through the blog and it's just over three years since I posted about a really unusual phenomenon which occurred in said bird bath:

I know a good few of you were already visiting the blog/Playground back then - but for those who weren't and might want to see the original post about the 'ice spike' which appeared overnight - it's HERE. And it also appears on Wikipedia - fame for the Playground!
Di
x
Plus, over the past two weeks, we've spotted that our resident male robin has been joined by a 'wifelet' - so Spring must be in the air if he's let her onto his territory!
Bird bath plus robins - that's the focus of my Less is More entry this week:
I used:
- 4" x 5.75" white card blank
- a slightly smaller piece of white card stock, embossed using SU's 'Square Lattice' folder and glued onto the card front
- a stamp from SU's 'For the Birds' set, stamped using Memento 'Tuxedo Black' ink and coloured in using Whispers Markers (they really do have the finest small tip on one end, ideal for colouring in little images)
- die cut the image using a die from the Lil' Inkers 'Stitched Rectangles' set
- attached the image panel to the card front using thin sticky pads
I just looked back through the blog and it's just over three years since I posted about a really unusual phenomenon which occurred in said bird bath:
I know a good few of you were already visiting the blog/Playground back then - but for those who weren't and might want to see the original post about the 'ice spike' which appeared overnight - it's HERE. And it also appears on Wikipedia - fame for the Playground!
Di
x
Labels:
Die cutting,
embossing,
general card,
less is more,
SU,
whispers pens
Sunday, 20 March 2016
Pixie's Snippets Playground - Week 221
OK, who stole this past week then? I can't believe how fast it flew by! The weather has been up and down - Parsnip is switching between a body warmer and his sunshades!
This week I have two snippets cards of mine to share - I was on a roll the other afternoon and spent a couple of hours stamping and colouring. This is the first card I made:
I used:
- white DL sized card blank
- stamped the image onto a snippet of white card using Memento 'Tuxedo Black' ink and the fabulous Woodware 'Boxed Daisies Trio' stamp
- also stamped the image onto a snippet of spotty mauve paper from the Wild Rose Studio 'Wintry Christmas' paper pack - you'll see why in a minute
- coloured the image on the white card using Pro Markers and then trimmed round the inner edge, cutting carefully around the leaves and petals which flow out of the frame
- next I trimmed the outer edge of the spotty mauve stamped image, leaving the black edge showing
- that formed a mauve spotty frame so it was just a case of gluing the coloured image in place
- stamped the sentiment using Memento 'Tuxedo Black' ink and a stamp from the Stampendous 'Happy Messages' set - directly onto the card front - ha, before doing anything else!
- glued the image panel in place on the card front and added a tickle of clear Wink of Stella' to the daisy centres
- confession - I'd done a little bit of wonky cutting on the right hand side of the image and needed to cover up the mistake so I die cut three butterflies from a deeper mauve snippet of the same spotty paper and stuck two on the image and one just fluttering inside the sentiment. Really I'd have preferred not to have added the butterflies - but needs must when the Devil drives :(
- added little mauve sparkly gems to the butterflies
This is the second snippets card I made - told you I was on a roll:
I used:
- white DL sized card blank, again
- stamped the image onto a snippet of white card using Memento 'Tuxedo Black' ink and another fabulous Woodware stamp called 'Cone Flower'
- coloured the image on the white card using Pro Markers and Whispers Marker pens for the fine detail such as flicking the little hairs onto the flower centres
- added clear Wink of Stella to the flower petals and the leaves
- then trimmed round the inner edge of the frame leaving a white band right round the frame
- mounted the image onto a snippet of black card stock, trimmed to just a teensy bit bigger than the image panel it was just a case of gluing the coloured image in place
- stamped the sentiment using Memento 'Tuxedo Black' ink and a stamp from the Stampendous 'Happy Messages' set - directly onto the card front - again, before doing anything else! The words 'Thank You' were in one line, so with heart in mouth I carefully snipped them apart - much more versatile now
- glued the image panel in place on the card front
I love both of these stamps, they're quite fresh and funky looking and there's also scope to paper piece.
Onto the weekly 'peek at the picks', which gets tougher all the time. I know we don't have a theme each week, other than use snippets, but I decided to make the first three of this week's picks all Easter related:
Love this sweet little Easter basket, brought to share with us by Tiziana. Such a cute little bunny as well :)
How clever is this mug, holding Easter treats, made by Carol L. A really great idea and the traditional Easter colours are fabulous too.
I really smiled at this sweet bunnies card - made by Sam (Whisper). They do look as if they're celebrating :)
Onto a few other entries with some clever ideas for you to think about:
Such a pretty card, made by Heather. I love the design but what really adds even more to the card are those layers on the little lady's dress - they're vellum which has been inked in different colours and the effect is just fabulous!
And here's a totally amazing card, made by Janis of Her Peaceful Garden. I love the finished card in any case but (although some of you have already hopped over to comment) - I wonder if you can guess how those beautiful background roses were stamped? Think lettuce and you'd be getting warmer. Go and see - you won't regret it!
And last, but by no means least, how about this glorious card - made by Diane H? I just adore it and how clever to have all those beautiful flowers peeping out of the turned down corner. Amazing - and a delight to look at.
We had no new Playmates this week, although with 57 entries the Playground was still busy of course.
Time for the prize draw for the House Mouse stamp, and those lovely dies donated by Barb. And our winner is:
Well done Meg, your last win was August 2015 so it's good to see your name first out of the hat this week. I still have your address and will post the prize off to you this week.
I'm a bit conscious that those of you who opt for just one part of a prize might feel that your name never seems to come up as a winner. Please rest assured that I'm very happy to split prizes even though it would cost extra postage - so don't feel it lessens your chances! It's just the luck of the draw, everyone has an equal chance now and it's far better that you don't win something you don't really want. So please still feel free to opt for just part of a prize, Mr Random will pick you sooner or later I'm sure.
Now here's this coming week's prize(s):
Linked to today's snippets cards - it's two of the same Woodware stamps that I used on my cards today ('Boxed Daisies Trio' and Cone Flower').
The Snippets Challenge will run for one week and the Playground gates will close at 11am UK time on Saturday 26th March. The gates will open again at midnight UK time on the same day.
A maximum of ONE entry and please say in a comment if you wish to play and be a possible winner of the prize. If you only want to play for one or other of the stamps then just say so in a comment - if your number comes up then I'll do a further draw for the remaining part(s) of the prize. But, both stamps are up as one complete prize if you so wish of course. Please also link back to the Playground in your blog post to be eligible for the draw.
Mr Linky is below - please let me know if you have any problems linking, it's easy for me to sort out so don't struggle on alone :)
Di and, of course, Parsnip!
x
This week I have two snippets cards of mine to share - I was on a roll the other afternoon and spent a couple of hours stamping and colouring. This is the first card I made:
I used:
- white DL sized card blank
- stamped the image onto a snippet of white card using Memento 'Tuxedo Black' ink and the fabulous Woodware 'Boxed Daisies Trio' stamp
- also stamped the image onto a snippet of spotty mauve paper from the Wild Rose Studio 'Wintry Christmas' paper pack - you'll see why in a minute
- coloured the image on the white card using Pro Markers and then trimmed round the inner edge, cutting carefully around the leaves and petals which flow out of the frame
- next I trimmed the outer edge of the spotty mauve stamped image, leaving the black edge showing
- that formed a mauve spotty frame so it was just a case of gluing the coloured image in place
- stamped the sentiment using Memento 'Tuxedo Black' ink and a stamp from the Stampendous 'Happy Messages' set - directly onto the card front - ha, before doing anything else!
- glued the image panel in place on the card front and added a tickle of clear Wink of Stella' to the daisy centres
- confession - I'd done a little bit of wonky cutting on the right hand side of the image and needed to cover up the mistake so I die cut three butterflies from a deeper mauve snippet of the same spotty paper and stuck two on the image and one just fluttering inside the sentiment. Really I'd have preferred not to have added the butterflies - but needs must when the Devil drives :(
- added little mauve sparkly gems to the butterflies
This is the second snippets card I made - told you I was on a roll:
I used:
- white DL sized card blank, again
- stamped the image onto a snippet of white card using Memento 'Tuxedo Black' ink and another fabulous Woodware stamp called 'Cone Flower'
- coloured the image on the white card using Pro Markers and Whispers Marker pens for the fine detail such as flicking the little hairs onto the flower centres
- added clear Wink of Stella to the flower petals and the leaves
- then trimmed round the inner edge of the frame leaving a white band right round the frame
- mounted the image onto a snippet of black card stock, trimmed to just a teensy bit bigger than the image panel it was just a case of gluing the coloured image in place
- stamped the sentiment using Memento 'Tuxedo Black' ink and a stamp from the Stampendous 'Happy Messages' set - directly onto the card front - again, before doing anything else! The words 'Thank You' were in one line, so with heart in mouth I carefully snipped them apart - much more versatile now
- glued the image panel in place on the card front
I love both of these stamps, they're quite fresh and funky looking and there's also scope to paper piece.
Onto the weekly 'peek at the picks', which gets tougher all the time. I know we don't have a theme each week, other than use snippets, but I decided to make the first three of this week's picks all Easter related:

Onto a few other entries with some clever ideas for you to think about:


We had no new Playmates this week, although with 57 entries the Playground was still busy of course.
Time for the prize draw for the House Mouse stamp, and those lovely dies donated by Barb. And our winner is:
I'm a bit conscious that those of you who opt for just one part of a prize might feel that your name never seems to come up as a winner. Please rest assured that I'm very happy to split prizes even though it would cost extra postage - so don't feel it lessens your chances! It's just the luck of the draw, everyone has an equal chance now and it's far better that you don't win something you don't really want. So please still feel free to opt for just part of a prize, Mr Random will pick you sooner or later I'm sure.
Now here's this coming week's prize(s):
The Snippets Challenge will run for one week and the Playground gates will close at 11am UK time on Saturday 26th March. The gates will open again at midnight UK time on the same day.
A maximum of ONE entry and please say in a comment if you wish to play and be a possible winner of the prize. If you only want to play for one or other of the stamps then just say so in a comment - if your number comes up then I'll do a further draw for the remaining part(s) of the prize. But, both stamps are up as one complete prize if you so wish of course. Please also link back to the Playground in your blog post to be eligible for the draw.
Mr Linky is below - please let me know if you have any problems linking, it's easy for me to sort out so don't struggle on alone :)
Di and, of course, Parsnip!
x
Subscribe to:
Posts (Atom)