Showing posts with label stencil. Show all posts

Sunday, 9 August 2020

Pixie's Snippets Playground - Challenge #384

I've ventured out twice this week - dentist on Monday for a regular (albeit delayed by a few months due to COVID) hygienist appointment and then back out on Tuesday to collect a repeat prescription for strong painkillers. They'll last me for ages I hope but it's good to have them handy just in case.
 
It's still extremely hot and humid here - we had a sprinkling of rain during the night on Wednesday but not enough to write home about. In fact, it's so hot that Dudley is sleeping downstairs a lot during the night where it's generally cooler and there are plenty of tiled floors to choose from. Now and then he scampers upstairs to check on us and have a quick cuddle - before trotting off again. He has a full grooming session booked for next Saturday and will no doubt be glad to be rid of some of his coat.

Let's get straight on - here's my snippets card for this fortnight:
I used:

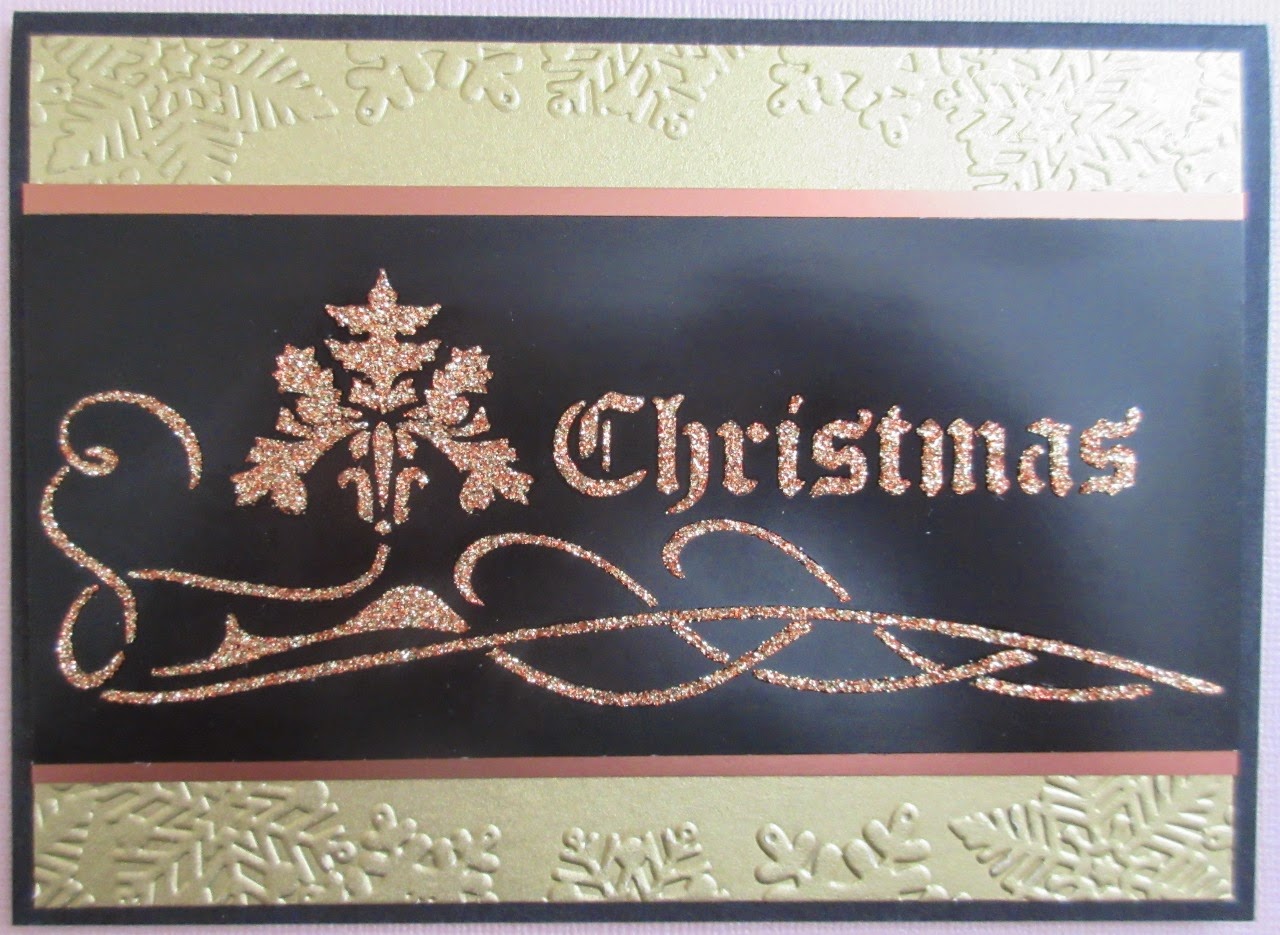
- 5.5" x 4.25" white card blank, side opening on the short side

- piece of white card, onto which I stencilled a trellis background using soft cosmetic brushes, Tim Holtz 'Broken China' Distress ink pad and Joanna Sheen's 'Diamond Lattice' stencil

- die cut the trellis piece using a die from Lil' Inkers 'Stitched Rectangles' set of dies and put it to one side

- then I took a dive into the snippets folder for little pieces of green, two shades of pink and also a snippet of black card

- used my much loved Altenew mini die cutting machine to cut a selection of leaves, fronds and flowers - using every die in Sweet Dixie's 'Daisies' set of dies

- glued the foliage and flowers, with black stamen centres, onto the lattice piece of card - using a Zig glue pen

- then glued the panel to the card front, using Colall All Purpose glue

- added a black and white sentiment  sticker from the super-useful Clarity set of sentiment stickers called 'Christmas and Celebrations'

- final touch, a medium sized diamanté gem in the centre of each 'daisy' - finished!

I went to town making this card and double layered the daisies, not really necessary but it was my first play with the set of dies. I later spotted an example of a really elegant card on the 'net which used black and shiny gold for the die cutting - very dramatic.

Our lovely Viv included a set of these dies in a package she sent for the Playground toy box absolutely ages ago - so of course I bought myself a set to make this card! A girl's gotta do what a girl's gotta do after all. This is the last offering from that lovely package - thanks Viv! I still have a lovely die that Jackie T sent, waiting it's turn - I keep a little notebook and do know it's ages since Jackie sent it. It will appear ASAP I promise Jackie!

And of course, here's the prize for this fortnight:
It's a Sweet Dixie set of 'Daisies' die from Viv - and a Joanna Sheen 'Diamond Lattice' stencil plus a set of Clarity Stamps 'Christmas and Congratulations' sentiment stickers from me. And, as usual - I don't split Playground prizes up although you're welcome to play and give anything you might not want to another crafter where you live.

As always, the Snippets Challenge will run for two weeks and the Playground gates will close at 11am UK time on Saturday 22nd August. The gates will open again at midnight UK time on the same day.

It's a maximum of ONE entry, please say in a comment if you wish to play and be a possible winner of the prize. Please also link back to the Playground in your blog post to be eligible for the draw.

Remember, if you link into the Playground and don't say clearly that you want to be in the draw in a comment on here, then you will be bypassed if your name comes out of Mr Linky. I'm sure you all know I ask for a positive 'yes' on the blog post itself - just in case you're only playing for fun - otherwise I don't add you to my little list.

As I used the dies and stencil for the first time, it means I can join in with Darnell's NBUS #17 challenge HERE!

All prizes were posted on Monday - so I'm totally up to date.

Stay safe my lovely friends.

Lots of love from us all - Parsnip, Dudley and of course me,


Sunday, 29 September 2019

Pixie's Snippets Playground - Challenge #362

I did post on Thursday that Dudley is back to normal - phew! What a worry it's been and it's so wonderful to have him sticking his nose into everything. He's eating heartily and his 'system' is back to normal ...... so no need for Len to have to collect the dreaded samples after all! And his weight is back up to 6.4kg again.

We've had torrential rain here, like a lot of the UK has. Several places were flooded and a local cinema had to be evacuated during Tuesday afternoon's monsoon downpour. It's not something we're often affected by but when the rain is non-stop, after a long dry spell, it's bound to cause issues. At least the pathways and grass in our local park had a good 'wash down' which, if Dudley did pick up a bug on one of his walks, should lessen any future risk.

And here's my snippets card for this fortnight, using a set of stamps and dies I've had for a while, but not everything I used to make the card is duplicated in the prize I'm offering:
I used:

- 4" x 4" white card blank

- snippet of white card, die cut using the biggest (4" x 4") die from MFT's 'Stitched Square Scallop Edge Frame' set of dies

- snippet of white card, 'Broken China' Distress ink pad and Sugar Pea's 'Waves stencil. I used a Clarity stencil brush whilst the stencil was held in place on the piece of white card

- trimmed the 'background waves' panel to 4" x 4" and stuck it onto the card front

- then die cut a couple of snippets of Neenah 'Desert Storm' card using a stitched edged die from Spellbinder's 'Curved Borders One' set of dies, trimmed them and added them to the waves panel to depict the sand dunes under the sea - deliberately using a tape runner (the reason why is further down)

- next added the white scalloped frame using narrow red line tape, so that was the background piece all sorted out

- next I stamped the sentiment, seahorses, bubbles and a heart from the Lawn Fawn 'Sea-Horsin' around' set of stamps onto another snippet of white card using Memento 'Tuxedo Black' ink

- the seaweed is a solid stamp so I stamped four of the clumps using a couple of quite old, small, square SU green ink pads (Certainly Celery' and Old Olive')

  - die cut all the little stamped elements using the matching set of dies and carefully trimmed the sentiment down to the size I wanted

- then it was just a case of building up the little scene and adding the pieces using a glue pen. Having just used a tape runner on the little 'sand dunes' meant I could carefully lift them to tuck bottoms of the seaweed underneath - bit of forward thinking for once!

- finally, added the sentiment strip using red line tape

And the prize this fortnight is:
A Lawn Fawn 'Sea-Horsin' Around' set of stamps with matching dies - plus a Sugar Pea 'Waves' stencil - and all items in the photo make up one prize.

I'm sure most of you know that I stopped the option of splitting prizes a while ago  - which makes life easier and also helps to save some postage. But, a couple of very sweet people have said they were playing just for fun as they don't live in the UK. All prizes that I offer will be posted to anywhere in the World folks and I would hate for anyone to feel they shouldn't play along purely through living in a different country. This Playground is our 'happy place' and you should play for prizes if you want to win them, regardless of where you live.

As always, the Snippets Challenge will run for two weeks and the Playground gates will close at 11am UK time on Saturday 12th October. The gates will open again at midnight UK time on the same day.

It's a maximum of ONE entry, please say in a comment if you wish to play and be a possible winner of the prize. Please also link back to the Playground in your blog post to be eligible for the draw.

Remember, if you link into the Playground and don't say clearly that you want to be in the draw in a comment on here, then you will be bypassed if your name comes out of Mr Linky. I'm sure you all know I ask for a positive 'yes' on the blog post itself - just in case you're only playing for fun - otherwise I don't add you to my little list. I sometimes spot people saying in their blog post that they're playing for prizes but am afraid that I ignore that. As Scrappy Mo says over on her Rudolph Days challenge, it's not a lot to ask for people to leave a comment on the challenge blog post itself if they wish to be in the prize draw.

And finally, since his recovery, Dudley seems to have taken up smoking big fat cigars:

He looks a bit like Dracula here - I think his fangs look a bit scary! And yes, that is a hide bone chew. We know there are very mixed opinions about them but even before we had him from the breeder he was keen on them. We're very careful to remove any small pieces he manages to chew off as well as not leaving him alone with a hide bone chew. And to be honest, even when you do everything by the book as we did with Advantix, absolutely everything you can give to a dog has both good and bad reports. He loves them, and to us it showed how well he'd recovered when he finally became interested in a chew again.

Lots of love from us all - Parsnip, Dudley and of course me,


Friday, 26 July 2019

Rudolph Days Challenge - July 2019

So here we  are in a heatwave - making Christmas cards! And of course. they're for a challenge I don't like to miss - it's ScrappyMo's Rudolph Days challenge, which you can find HERE.

And this is my entry:
I used:

- 5.5" x 4.25" white card blank, side opening

- piece of red mirri card, which is an eighth of an inch smaller on all sides (ie. 5.25" x 4"), glued onto the card front

- then I did the image panels using a really lovely stencil which a very sweet friend recently sent to me - it's by Kaisercraft and is called 'Flourish Tree'

- used white card stock, trimmed to 5" x 3.75" and placed the tree stencil onto the panel using purple tape - leaving room for a sentiment at the bottom of the panel

- used a Brilliance Dewdrop ink pad (Pearlescent Ivy) and an Inkylicious 'mini smoothie' foam pad to add the ink through the stencil 

- next I die cut the sentiment using a Tonic Studios 'Mini Moments Merry Christmas' die and Stick-It backed gold mirri card

- popped the sentiment in place and then ran the panel through the Cuttlebug again just using the die cutting plates but without the die - to adhere the sentiment properly to the panel (works a treat!)

- then glued the image panel on top of the red mirri card panel

- finishing touches are hot fix Josy Rose nail heads, gold stars and red round ones for 'berries' - and to pick up the red of the mirri card frame

Not a great photo - had to turn the card slightly to one side to pick up the mirri card shine, plus the camera was fighting bright sunshine so it's slightly out of focus.

Whilst at it I made four cards all the same. There were a good few bits and pieces to get out to make this card so (to me) it made sense to make four. 

The stencil is so lovely, thank you again my lovely friend! And, I spotted the sentiment die over at Elizabeth's blog the other week - and instantly knew I had to have it! So many people are to blame/thank for my ever-increasing craft stash.

It's sweltering here in Hampshire - thank goodness we got Dudley a puppy cut the other week!


Wednesday, 3 July 2019

Less is More #398 - one layer and spots

It's absolutely ages since I joined in with many of the challenges I used to play in (when I had more time), and one of those is Less is More.

I have a big Really Useful Box, stuffed full of unused items such as stamps, dies and stencils (or NBUS as Darnell would say). Some are to be used for my Snippets Playground challenge samples, and some are items I either bought just for me, or have been sent by lovely friends.

This card is a mixture, the stamp set is a one off that I fell in love with and bought last year - there was only one in stock, and it doesn't seem to be available here in the UK right now. However, the stencil has a duplicate in the Toy Box and that will be on offer, sometime fairly soon.

So - the theme is one layer over at Less is More #398 - and you also have to include spots. This is my offering:
I used:

- 6" x 6" white card blank (in fairness, Hobbycraft's card blanks are a teensy bit smaller even though they quite cheekily sell them as 6" x 6" (the envelopes are 6" x 6" though) and I usually trim them down slightly to 5.75" x 5.75" - as I did in this case

- the stamp set I used is such a fun one - it's by Your Next Stamps and is called 'One in a Chameleon'. Really great images and also some very cheesy sentiments as well. Also I especially like that the images lines are lovely and thick, which makes them perfect for masking

- stamped the chameleon and one of the flowers onto a piece of Woodware Magi-film, using Ranger Archival ink (wasn't sure whether Memento would possibly smear when I was fussy cutting the images so played safe) - and then spent ages carefully fussy cutting out the two masks

- then stamped the chameleon and the flower onto the card front, using the Misti of course

- popped the masks onto the images on the card front and then adhered the stencil in place using some low tack tape before stencilling the green spots using an Altenew 'Feeling Dotty' stencil, SU's 'Wild Wasabi' ink pad and a Clarity stencil brush

- removed the stencil and the two little masks then coloured in the flower and the chameleon using Whispers brush pens

- then added the two sentiments (using Memento 'Tuxedo Black' ink) with the help of the Misti and some clear acetate with grid lines on for the initial alignment - and naturally also did a check before 'going for it'!

- final touch, a coating of Glossy Accents on the eyes - and I also checked that the Glossy Accents wouldn't react with the pupil of the chameleon by trying it on a snippet of card first - me not always as daft as me looks!

Finished! As I said, this is such a fun set of stamps and it's ages since I did any masking so am quietly pleased with the result. I did Google to look for ideas to colour in the chameleon and came across some images where folk had used the colours of the rainbow - which I admit I unashamedly followed and then I thought I'd do the same when colouring the flower). And I do love his little 'two-fingered salute ☺

It also struck me that, as it's a celebration of World/Gay Pride at the moment, it's quite appropriate.


Friday, 19 May 2017

Sympathy card for a friend

One of my friends from our old school reunions recently suffered the sad loss of her husband. We weren't at boarding school together, her prison term was a few years before mine,  but we became friends whilst working on the School Association Committee a few years ago. As her husband had been a farmer, I wanted something 'depicting nature' for the card I made to send to her. And this is what I came up with:
I used:

- 4" x 6" (ie. A6) white card blank

- then created a butterfly stencil using the Memory Box 'Darla Butterfly' die and a snippet of card stock

- fixed the die cut stencil to the card blank with low-tack tape and, using a sponge, added some Adirondack inking with 'Cloudy Blue' and 'Peach Bellini'. The colours are deeper in real life (thanks camera!), although still quite subtle

- left the stencil in place and, using the Misti, stamped the little birds/branches using a stamp from the Stampin' Up 'Serene Silhouettes' set and Memento 'Tuxedo Black' ink

- finally removed the stencil and added the sentiment using a Penny Black 'Special Thoughts' stamp and Memento 'Tuxedo Black' ink

Quite an easy one layer card to make, once I came across the idea for the design on Pinterest. This is the blog post I eventually traced it back to - loads of good ideas to be had there and on the rest of Shel's blog, especially for those of you who are Stampin' Up enthusiasts!


Wednesday, 29 June 2016

Less is More Week 282 - Use a Stencil

Bit of a gasp here when I saw what this week's challenge is over at Less is More - 'Use a Stencil'!

I confess to having a host of pretty ink pads, plenty of brushes and a good variety of stencils - mostly unused due to the fact that I like stamping and die cutting more than messing round with other stuff. But, undeterred out came the stencils, ink pads and a Clarity Stamp brush - and this was the result:
I used:

- 6" x 6" square white card blank

- a piece of Clarity white coated/silk card onto which I stencilled the sunburst using a Stamposaurus stencil and Distress Ink pads (plus the Clarity brush of course). The Distress Ink pads were 'Scattered Straw', Wild Honey' and 'Dried Marigold'

- took away the removable tape and stencil, which revealed a white circle for the sun itself. Dithered about cutting a circular aperture through which I could add ink to cover the white but just decided to go for it without and added Adirondack 'Peach Bellini' ink to cover up the white sun

- stamped a couple of birds onto the centre of the sun using Black Archival Ink and a little stamp from the Lawn Fawn 'Float my boat' stamp set - then put the 6" square sun and rays to one side whilst I fiddled on with the rest of the card

- die cut a square aperture in a piece of white card stock which had been trimmed to an eighth of an inch all round smaller than the card front

- decided to stamp the sentiment next rather than risk wrecking a completed card front, using black Archival ink and a stamp from the Inkylicious set called ''Sunshine Wishes'

- selected which part of the 'sun burst' I wanted to use in the aperture and trimmed it to about quarter of an inch bigger than the aperture before sticking in place from behind using red line tape

- added the completed panel to the card blank using Collall All Purpose glue

Apart from the time it took to clean up the trail of stuff scattered all over the desk, including stamps, brushes and stencil, I really enjoyed playing so watch this space. But don't hold your breath either :)

Di
x

Sunday, 26 July 2015

Pixie's Snippets Playground - Week 187

Well, I bet this might have some of you flummoxed - 'yes' you did see my snippets card for this week over at Less is More yesterday and also on my blog. This week's challenge over at Less is More is to use snippets and I would be so thrilled if you could try to join in. To be honest, a clean and simple card isn't always easy using snippets - but if I can do it then am sure anyone can. To recap, and to save making another snippetty card for today (me not as daft as I look), this is what I made:
I used:

- 5" x 7" white card blank

- then I stamped the sentiment using Memento 'Tuxedo Black' ink and a stamp from the 'Good Friends' set by Hero Arts - I do usually stamp sentiments first, purely to save spoiling a finished card which could have taken ages, with a smudge or whatever :) And it IS straight I promise, it's the photo that's 'on the wonk'!

- next I masked off a panel across the card using Scotch removable tape, plus some Post-its for good measure, before adding clouds using a duster brush, Tim Holtz 'Tumbled Glass' ink pad and an A6 stencil by Dutch Doobadoo called 'Clouds'. It's fine to use this stencil on bigger cards, just remember not to go right up to the side edges before moving it across a bit

- then came the snippets fun :) I first of all die cut the balloon from a snippet of black card using a fabulous Joanna Sheen Signature die called 'Hot Air Balloon'. I'd backed the black card with 'Stick-It' adhesive film which did make the whole process much easier. I then stuck the balloon onto the cloud panel - my measuring had worked a treat as I wanted the gondola itself to be against the white background rather than the sky

- next I lined up six little snippets of card and backed them with 'Stick-It' adhesive film. They were literally just little strips of snippets so I did have to take great care to make sure I cut and lined up them properly when cutting out the little panels, one by one, sigh :( Never choose the easy route of course!

And here's a tip - after I'd stuck the black outline die cut of the balloon onto the card front, but before adding the coloured panels - my OCD kicked in. Even the microscopic width of the cut around each panel could have meant some white card peeking from behind - so I inked around the inside of each panel with a black Whispers marker! It made the visual lining up of the die cut panels much trickier I must admit, but with the aid of a really strong pair of specs and my daylight lamp it was feasible and of course when properly lined up they do sort of 'slot down' into place :) And no 'white bits/bikini marks' as they say :)

And it was also a special Birthday for Chrissie over at Less is More, she's celebrating being 70 years young, which made it all the more exciting :)

OK, back down to earth (pun totally intended!) and here are this week's Playground Picks - and I've had to limit my choice this week. After the Less is More post went live yesterday it was mayhem here, I really was blown away by how kind everyone has been about my GD spot - mwah!! And, as the icing on an already  luscious cake, my 'Graduation card' made it into the top five over at The Allsorts Challenge - everything seemed to come along at once:

Shaz in Oz made this fabulous card to show us, I especially love the gold embossed panel - looks so rich and just perfect for the clockwork theme. And a perfectly designed card I'm sure you will agree.

Isn't this just the cutest norwhal ever (they're also known as 'The Unicorn of the Ocean'). Wonderful watery background and if you look closely at it you'll see that April used a really neat trick for the circular bubbles - the end of a sponge dauber and a marker dipped in white ink. My guess is that it's the hollow opposite end to the sponge itself that April used - very clever!

Now this image above is just the tip of the iceberg! ScrAPamondo scampered into the Playground and brought an amazing mini album - crammed full of wonderful detail and using up many, many snippets. This is the cover - and you really do need to hop over and see how the cat was cleverly created from a modified Sizzix die cut.

And finally, this was one of Sazzle Dazzle/Sarah's fabulous snippets cards made for Chrissie over at Less is More. I totally love the vibrancy and how clever to die cut the numbers from chevron pieced card stock. Wonderful!

I do hope you understand why I've cut down on the picks a bit this week - there were loads more I'd have loved to include, given the time. Remember, the thumbnails are still on last week's Playground post for you to check out.

And we had one new playmate this week too:

Dana brought this super card to show. Now, Dana is also a relatively new blogger with just a handful of followers, so it would be brilliant if you could hop over to say 'Hi' - and no doubt frisk her for sweeties whilst there! I did giggle, like quite a few people who come to play for the first time, Dana admitted to 'stalking' the Playground for a while.So glad you finally joined in!

And onto the draw for last week's prize, which was the Just Inklined 'Tutu Cute Washing Line' stamp - and our winner is:
I still have your address honey and will take a trip to the Post Office and send the stamp off this week.

Now let's see the prize for this coming week, which is all connected to my Less is More Snippets card:
And we have a Dutch Doobadoo 'Clouds' stencil, a Joanna Sheen Signature die called 'Hot Air Balloon' - plus a packet of A5 sized Stick-It sheets to make fiddly die cutting and sticking easier - all the same as I used on my snippets card above.

The Snippets Challenge will run for one week and the Playground gates will close at 11am UK time on Saturday 1st August. The gates will open again at midnight UK time on the same day.

Maximum of three entries and please say in a comment if you wish to play and be a possible winner of the prize. Also, if you already have or aren't really interested in part of the prize but still would like to play for one or two items - please say so and if your number is picked as the winner then I'll do a second draw for the rest of the items. However, the prize IS for all three items unless I'm told otherwise in a comment. Do remember that you should also link back to the Playground in your blog post to be eligible for the draw.

Mr Linky is below - please let me know if you have any problems linking, it's easy for me to sort out so don't struggle on alone :)

Finally, remember that it's Rudolph Day over at Scrappymo's - you have until the end of July to enter, and the prize is a fabulous Memory Box 'Merry Christmas' die.

Di and of course, Parsnip!
x

Saturday, 25 July 2015

Less is More Challenge - 'Snippets'

I've been sitting on a BIG secret for weeks here, first of all, it's a very special Birthday for Chrissie over at 'Less is More'. 'Happy Birthday' Chrissie!!

The next part of the secret is that this coming week's theme for the LIM challenge is 'Snippets' - and Sarah kindly asked me to be their Guest Designer!! Wahoo, and then panic set in of course. Much running round the walls and chewing of nails here. And that was Parsnip little white fluffy bear, forget about me!!

We all know that it's not always that easy to make a snippets card whilst keeping the card clean, crisp and having plenty of 'white' space - but it is 'doable' I promise:
I used:

- 5" x 7" white card blank

- then I stamped the sentiment using Memento 'Tuxedo Black' ink and a stamp from the 'Good Friends' set by Hero Arts - I do usually stamp sentiments first, purely to save spoiling a finished card which could have taken ages, with a smudge or whatever :) And it IS straight I promise!

- next I masked off a panel across the card using Scotch removable tape, plus some Post-its for good measure, before adding clouds using a duster brush, Tim Holtz 'Tumbled Glass' ink pad and an A6 stencil by Dutch Doobadoo called 'Clouds'. It's fine to use this stencil on bigger cards, just remember not to go right up to the side edges before moving it across a bit

- then came the snippets fun :) I first of all die cut the balloon from a snippet of black card using a fabulous Joanna Sheen Signature die called 'Hot Air Balloon'. I'd backed the black card with 'Stick-It' adhesive film which did make the whole process much easier. I then stuck the balloon onto the cloud panel - my measuring had worked a treat as I wanted the gondola itself to be against the white background rather than the sky

- next I lined up six little snippets of card and backed them with 'Stick-It' adhesive film. They were literally just little strips of snippets so I did have to take great care to make sure I cut and lined up them properly when cutting out the little panels, one by one, sigh :( Never choose the easy route of course!

And here's a tip - after I'd stuck the black outline die cut of the balloon onto the card front, but before adding the coloured panels - my OCD kicked in. Even the microscopic width of the cut around each panel could have meant some white card peeking from behind - so I inked around the inside of each panel with a black Whispers marker! It made the visual lining up of the die cut panels much trickier I must admit, but with the aid of a really strong pair of specs and my daylight lamp it was feasible and of course when properly lined up they do sort of 'slot down' into place :) And no 'white bits/bikini marks' as they say :)

Thank you so much to the LIM Team for asking me to be their guest designer and for choosing the theme 'Snippets', you really totally amazed me there. And of course, once again, I hope that you, Chrissie, 'Have a fantastic day' - as the sentiment I used says :)

OK Playmates, it would be great if you try to join in with Less is More, I'd be thrilled to see some LIM snippets cards in the Playground.

AND, of course I don't normally do a blog post on a Saturday, but I will be back tomorrow with the Snippets Playground write-up plus a pretty good prize selection - all linked to today's card :) Snigger :)

Di
x

Wednesday, 24 June 2015

A couple of challenges with one card

This card fits in with a couple of challenges, yay! First of all, the current Less is More challenge for week 229 is 'Stencilling'. Tick!

And also, there's a new monthly challenge which promises to be great fun - so this card is also for the Memory Box challenge #1 - Butterflies. To enter you just have to use a Memory Box product - not difficult here for sure! Tick!
I used:

- A6 white card blank

- a snippet of white card

- a Memory Box die called 'Wild Blooms' which I die cut, then used the negative as a stencil with a makeup sponge and SU inks ('Old Olive' and 'Melon Mambo')

- then die cut the rectangle using a Lil' Inkers 'Stitched Rectangle' die

- the sentiment is from a Stampendous set called 'Happy Messages', stamped using Memento 'Tuxedo Black' ink

- final touch, two butterflies die cut from a pale blue snippet using SU's 'Beautiful Wings' Embosslit

I think this will be an OK card to enclose with a Snippets Playground prize too :)

Di
x

Sunday, 17 May 2015

Pixie's Snippets Playground - Week 177 and Merry Monday #158 {Stencils}

My snippets card today has absolutely nothing to do with the prize for this coming week :) It's for the current challenge over at Merry Monday which is 'Stencils'.

Oh help :( I really wanted to use embossing paste, rather than just ink through a stencil, but had never really recovered from my one try last Christmas time. But, I had taken advice from a few of you at the time (when I was struggling with Sweet Poppy paste and adding loose glitter) and had bought some Imagination Crafts sparkly paste - so the decks were cleared, the NBUS pastes were cracked open and off I went. This was one of the results - complete with light bouncing off the black card strip:
I used:

- A6 black card blank, tent style

- a snippet of matt gold card stock, embossed using a Crafts-Too 'Snowflake Banner' folder

- the black panel is Imagination Crafts satin card stock, which I then stencilled using a 'Christmas Holly' stencil made by Sweet Poppy and Imagination Crafts 'Metallic Sparkle' sparkle medium paste

- then I just trimmed the panel down to size and backed it with a piece of copper satin mirri card to act as a border above and below 

Couple of tips, first of all this embossing folder actually has a plain band across the middle as well as a scrolled panel in the centre. Most of the time I don't make a feature of the centre, or indeed the plain band - although I did on THIS card last Spring. So, not all embossing folders need to be used as originally designed :)

Secondly, I do like the Imagination satin card stock, and it isn't too slippery for stencil paste either. However, it's black on one side and white on the other - which means that, when trimmed, you end up with an outside line of white showing. To cover this I just ran a black Whispers marker round the edge before layering up.

And moving swiftly onto the picks for this past fortnight, which was a double headache in a way as you might guess. But, having the Playground open for a two week run did actually help me enormously, with us being away and all that. In fact, I'll need to do this again in a week or so as it's my school reunion very soon and I'm lucky if there's even time to sleep, let alone blog! I'm away for five days this time too :) But, this coming week in the Playground is just one week!

So here are the picks:
I totally love, love this card - made by Cathy R - the woodgrain background and that beautiful window with the perfect window box  of tiny flowers are just fabulous!

Such a fun filled card, made by Shaz in Oz - and plenty of snippets used too :)

This is one of the most elegant cards I've seen in a while, it was made by Ann, and it's just stunning!

You truly should hop over to Kathy T's and see the inspiration photo that Kathy used for this fabulous card. Such a clever working in of the key elements - and squeal, look at the teeny flowers!

I could go on forever with picks, but have kept this to four as I need to do a few prize draws this week! Don't forget that the thumbnails are still showing if you haven't already had a browse HERE.

Before I forget, we also have two new playmates:
How cute is this, made by Irene Mendes.

And we also have a new playmate called Vibula, over on Flickr HERE. As I've said before, I can't copy and paste images from Flickr so the best I can do is the link above.

And now onto the winners of the main prize for the last couple of weeks, the Sheena Douglass 'Simply Sweet' stamp sets.


Well done girls, I do hope you have fun playing with your prizes - I have your address already Janis, but could you please drop me an email with yours April - to di_wray@hotmail.com. Thanks! The prizes will be on their way this week.

And next, the four STIX2 runner up prizes. For these I didn't go through all the rigmarole of copying, cropping and then pasting each Mr Random result, although I did actually use the generator.

Our winners are: #39 Jane W, #20 Kathleen, #55 Sarn and #50 Lucy.

I have all of your addresses girls and will post the STIX2 goodies of to you ASAP.

And, it's time to reveal the prize for this coming week, which I actually used on this DT card for the current Cuttlebug Mania challenge earlier in the week:

Yay! It's a Spellbinders die cutting set called 'A-2 Fancy Ribbon Threader' - a very pretty set of dies:

The Snippets Challenge will run for one week and the Playground gates will close at 11am UK time on Saturday 23rd May. The gates will open again at midnight UK time on the same day.

Maximum of three entries and please say 'Yes please' (or similar) in a comment if you wish to play and be a possible winner of the prize. Do remember that you should also link back to the Playground in your blog post to be eligible for the draw.

Mr Linky is below - do please let me know if you have any problems linking, it's easy for me to sort out so don't struggle on alone :)

Di and of course, Parsnip!
x