Wednesday, 13 November 2013

'Tis the season to be jolly

fa-la-la-la-la-la-la-la-la- laaaaaaaaaaaa :) Aw, come on, join in. And despite many folk resisting, there aren't too many days until the big fat man in the red suit arrives. And maybe I ought to just whisper this, I just reached my target of 100 cards made for Christmas! As there are lots of challenges right now with the theme of Christmas, plus I do have loads of quite a few Snippets prizes connected with Christmas too - I'll just keep making 'em anyhow.

This card really does remind me 'decking the halls with boughs of holly'. I took a peek in the garden earlier and our quite young variegated holly bushes sort of cowered - they're still babies though so are safe this year.

I used:

- 6" x 6" square white card blank - still my favourite shape and size of the moment

- the image is from LOTV's pre-coloured Art Pad, called 'Festive Foliage' - bought on Sunday at the NEC, die cut with a round Nestie and then layered onto a scalloped round Nestie which was cut from green Core'dinations card

- the patterned backing paper is also LOTV, from their 'Classic Christmas' pad - popped onto more of the same plain green Core-dinations card

- added a 'belly band' which was punched from a snippet of the green card using Martha Stewart's 'Traditional Scallop' punch, topped with a strip of lace and then a red 'saddle stitched edge' bow added

- the sentiment is LOTV too, from their 'Christmas Grungy Messsages' set - stamped using SU's 'Real Red' then just rimmed and popped onto the card with sticky pads

- the corners started out life as gold ones, I 'frantaged' up a few a little while ago - here's a link to how I did them

- and the finishing touch was just a few red gems here and there on the wreath

Now, here's a little tip girls. To stick down the bow I would usually use ultra strong adhesive tape or perhaps the glue gun - but I knew I already had to work out how to stick the metal corners firmly as well, without glue clogging up the holes in the filigree and showing through. I picked up this idea from here on Bev Rochester's blog ages ago but this is the first time I've used Crafter's Pick Incredibly Tacky Glue:

It's white, not too runny like some clear strong glues but it dries clear, and truly is incredibly strong. To make life easier I did what Bev does and decanted some into a clean smallish glass jar - I think some sparkly stuff was the original occupant. Then you don't have issues with the top of the bottle clogging or even worse deciding it won't open at all - and you just pick up what you need on the end of a cocktail stick or an old pokey tool. It's great stuff and I'm very impressed with the results - it's made in the USA but can also be bought online in the UK from EBay and good craft suppliers (I got this ages ago and only just used it for the first time - shame on me).

BTW, I'm not on commission :) Chance would be a fine thing.

Di
x

Tuesday, 12 November 2013

Playground Field Trip

I went to the NEC for the NEC Birmingham Hobbycraft Show on Sunday at the 'crack of sparrows'. This is what greeted visitors as they walked into the show:
The most amazing life sized tableau, entirely made from paper - bet there were a few snippets left after making this fabulous exhibit! The fur on the dog made you want to reach over and stroke him :) After that I totally forgot to take any more photos - there WAS a lot going on and it was almost overwhelming to see so much in one place.

Managed to snag quite a few excellent bargains as well as doing some 'craft celebrity' spotting.

Di
x

Monday, 11 November 2013

Ode of Remembrance


They shall grow not old, as we that are left grow old:
Age shall not weary them, nor the years condemn.
At the going down of the sun and in the morning,
We will remember them.
 
Di
x

Saturday, 9 November 2013

Pixies Snippets Playground - Week 98

Crumbs, we're almost at Week 100! And, there was another milestone here in the Playground this week................I finally made my very first 'white on white' card :)

I used:

- 5" x 7" white card blank

- lots of snippets of white pearlescent card

- the snowy background was embossed using one of the very first embossing folders I ever bought - Cuttlebug's 'Snowflakes' - sadly discontinued. Although I've discovered that Sizzix do a really nice 'falling snow' one as part of a double set called 'Christmas Words and Dots'. I know that a few of you have been looking for this particular folder so it's worth Googling. Prices vary vastly so do shop around, I've found the set available in the UK, USA and Australia

- the adorable reindeer were die cut using 'Deer Trio', by Memory Box and popped behind a die cut 'Lamp Post Frame', also by Memory Box. I might add some Stickles to the light/lamp itself, the jury is still out here :)

- the silver lettered greeting is by Craftwork Cards, popped onto a larger oval punched using SU's 'Large Oval' punch

- added a snippet of white pearlescent ribbon across one corner - I often use ribbons this way on gifts but have never thought to do it on a card. Spotted the idea on a blog this week - sigh, I can't recall whose blog to give it credit though :(

- and the final touch, die cut snowflakes, layered up and then a clear glass brad added to the centre - the dies are from Whimsy's 'Layered Snowflake Die Set'

I'd like to enter this card into the following challenges:

Craftyhazelnut's Christmas Challenge, where this week's theme is 'Outdoors'

Craftyhazelnut's Christmas Challenge Extra for November where it's always 'Anything Goes'

Allsorts Challenge - week 232 'White Christmas'

So, as ever, such a hard job to select a few 'Playground Picks' this week:

Today is Remembrance Sunday when here in the UK and across the Commonwealth there will be many local church services plus the Cenotaph service in London where we remember all those who fought and gave their lives so that we might live and be free. Jenny made this beautiful tribute.

Cathy R made this fabulous card featuring loads of snippets to make the gorgeous Christmas wreath. A perfect card I think.

 
Lynn brought this really clever mug to show, and there's also a link to a tutorial on her blog post - what a great way to give a gift of sweets. Or even snowman soup - watch this space, it's on my 'to do' list :)

Sam made this gorgeous layout, with a photo dating back from when she first discovered 'dandelion clocks' - soooooo cute. I love the clever addition of the clock face plus all the lovely stamping, not to mention the really sweet photo of course. Who'd have thought she'd grow into such a little scallywag :)

I just love this terrific altered box for Kim's hubby, just perfect for storing seeds in. It started off life as a cat food box :)

What a clever idea this is - AJ brought a 'Mousetrap Noteholder/Fridge Magnet to show. There's a link to Marks Finest Papers in AJ's post if you want to find out more.

ScrappyMo brought this amazing Masons Jar Candle Holder - isn't it great?!

I really couldn't leave this fantastic wrap around Christmas card out - made by Karen P. What really blew me away is those amazing sand dunes. So beautifully brayered and layered - (that rhymes!) I love this!

We have two new Playmates this week as well - please welcome:
Kyla, who made this beautiful card - and even made the little Buddha using air drying clay, something I'd love to try.

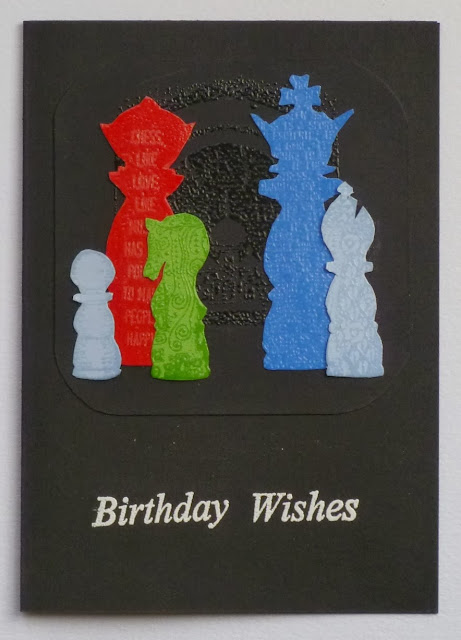
And Pat, who made this really cheerful chess pieces card. I see that Pat hasn't been blogging for very long so it would a terrific if you could call by and say hello. We all started off longing for visitors, I still love every single comment I'm left of course - it gives you such a buzz. Also, do please say Hi to Kyla too.

Welcome girls, hope you come back and play really soon :)

Phew, that was a marathon this week - we had 56 entries so I'm really hoping we hit the magic 60 in time for the 100 weeks milestone!

And the winner of last week's prize of the Penny Black stamp donated by Viv, and the My Mind's Eye paper pad is:
Well done Irene, can you please drop me an email reminding me of your address to save me hunting for it :)

And our prize this coming week? Two of the die sets I used on my card today:
The Memory Box 'Deer Trio'


And, the Whimsy 'Layered Snowflake Die Set'.

The Playground gates will close at 11am UK time on Saturday 16th November and the gates will open again at midnight UK time on the Saturday as usual. Maximum of three entries and please say 'No thank you' in a comment if you wish to still play but not be the winner of the prize this week, as shown above. In fact, you might want to play for only one part of the prize - both items do constitute one prize but if there's only one thing you'd use please do say in a comment and I'd just draw again for the second item as well.

Mr Linky is below - do please let me know if you have any problems linking, I can sort it out for you quite quickly and am always happy to do so.

Have a lovely week! I'm off on - a little trip up to the NEC in Birmingham to the Hobbycrafts Show. I

And just to keep you on your toes, I'm posting this at 10pm UK time on Saturday 'cos it's an early start in the morning and I want to be sure it's up and running and the gates are open for you OK :)

Di (and Parsnip of course, who is whispering ideas about how to celebrate 100 weeks of the Playground here)
x

Saturday Supper - Chowder

This seems a bit cheeky as I know it's a very popular dish over in the USA and I bet there are some wonderful recipes used by our Playmates over the pond - but here goes anyhow.


Chowder

Serves 4 - once again I think this is more likely to fill two 'Hungry Horaces' than four people

2 tablespoons oil
250g unsmoked bacon chops - I used a gammon steak, no bacon chops to be found - trimmed of all fat and cut into small pieces
1 medium onion, chopped
375g potatoes, peeled and chopped into about half inch cubes
800ml hot chicken stock
325g (or thereabouts) can of sweetcorn, drained

Heat 1 tablespoon oil in a large saucepan and cook the bacon/gammon for 4 minutes, remove and set aside. Add another tablespoon of oil, add the onion and cook until soft. Add the potato and stock, cover and simmer for 15 minutes.

Remove half the mix and set aside with the bacon. Puree the rest of the potato and onion with the stock and half the sweetcorn in a processor.

Season with pepper and return to the pan (and if you used an electric blending stick thingy as I did, wipe away the splatters from the cooker hob, glass splashback, tiled wall, front of apron and even your specs - sigh).

Add the bacon mix and remainder of the sweetcorn, heat thoroughly and serve.

Things I do: served it with fresh crusty bread, ate it and then washed the kitchen floor. Mental note, in future I'll use the food processor rather than go for the so-called easy option.

By the way, it was delicious - the two-legged mouse voted it a hit - after he stopped laughing at the huffing and puffing as I cleaned up the mess!! Mind you, it looked much worse until I realised a lot had hit my specs :)

Enjoy!

Di
x

Friday, 8 November 2013

A modern Tipsy Tree

Both Jules and Sally used this fabulous stamp last Christmas, and being a greedy little piggy-wiggy I just had to have it too. Shame on me though, it just had its very first outing in the 11 months since I bought it :( It just cries out to be paper pieced and you can bling it up, do a modern twist as I did, make it 'country' - endless possibilities:

I made two cards while I was at it, just switching the tree layers round a bit.

I used:

- 5" x 5" square white card blank

- Woodware 'Tipsy Tree' stamp, the trunk was coloured with a Pro Marker and the rest paper pieced using papers from Wild Rose Studio's 'Wintry Christmas' Paper pack

- plain turquoise card, topped with backing and a 'belly band' from the same patterned paper pack

- sentiment was going to be a separate embellishment but in the end I got very brave and stamped it directly onto the finished image - without the aid of a safety net or even a stamp positioner - using a stamp from the 'Tipsy Tree' set plus Memento 'Elderberry' ink pad

- white Josy Rose nail heads

A couple of tips about paper piecing. One I bet you all know is to pop the glue onto the stamped image and not the little scraps you're trying to stick onto it - I use a Quickie Glue pen and learnt this trick from Jules ages ago.

The second tip is really how to cheat a bit. If you look closely at the top card you will see some white showing at the bottom edge of the lowest (purple) layer of the tree. It isn't there now - as soon as I saw the enlarged image I polished me specs and realised there were a few teeny white bots?!?!?!?! showing - so funny, I just left that typo, I meant to say white BITS!! Anyhow, they're easy disguised using a very fine liner to carefully fill in any small gaps - I used my Black Whispers pen which has a very fine nib at one end, or a micron pen such as you use for Zentangling would work well. That's one reason why I generally use a black ink pad when paper piecing.

Oh, and don't even think about using a Pro Marker or similar as it'll just bleed and you won't have a nice crisp line - sigh, another one I found out about the hard way ages ago.

I'd like to enter this into the current Artistic Inspirations Challenge, which is 'Anything Goes/Spots and Stripes'.

Yay, it's Friday and I bet many of you are on the starting blocks to let the weekend begin - have a good one!

Di
x

Thursday, 7 November 2013

Bling it up - in pink

The current challenge over at Craftyhazelnut's Christmas Challenge is to 'Bling it up' and this card is pink because I had a load of pink paper snippets lying on my desk. Where I needed more thickness for the die cut star and the backing to the sentiment I just used double sided adhesive sheet to stick the paper onto some card before cutting:
I used:

- 6" x 6" square white card blank

- stamped background in 'Versamagic 'Pink Petunia' using 'Starry Background' stamp by Inky Doodles - the beauty of this clear, almost A6, stamp is that you can line up the edges so easily to extend the pattern

- the image is also by Inky Doodles from the 'Star Angel' set, stamped in SU 'Smoky Slate' onto white card, partially coloured with Pro Markers, cut out, paper pieced with snippets and then mounted onto the pink background

- SU's 'Smoky Slate' card as backing on the background and also the mounted image

- sentiment also comes from the 'Star Angel' set, again stamped using SU 'Smoky Slate' - love this colour as it almost looks silvery without any 'goo' that you get from some metallic pads. Die cut with a Nesties Labels Eight die and mounted onto hand cut pink backing

- the 'bow' was die cut using Memory Box 'Crisp Bow die' and then a pink die cut star (I used the MFT Die-namics Star set) popped onto the bottom. I love that the bows come in two styles and lend themselves to having all sort of goodies 'dangled' from them :)

- and then came the 'bling', Glamour Dust on the wings and also the star on the sentiment, lots of teeny sparkly clear gems and some Josy Rose silver star-shaped nail heads

This is also for Craftyhazelnut's Christmas Challenge Extra, where it's always 'Anything Goes'.

Di
x

Wednesday, 6 November 2013

Livi's Birthday

Remember me making this card?
 I think it ticked all the boxes the other day :)
 Then it was time for the parcel we sent
Aw bless her, I did say the parcel was almost as big as Livi :)

And then, I think this was the star of the show on the day - Livi's very own 'pony' - with big sister Mia hitching a ride:
Apparently four year old Livi kept saying during the day 'is it MYYYY Birthday ??.... TODAAAY ??!!' Bless her little cotton socks :)

Their Mum, our lovely 'adopted daughter' Kai, sent these so we could see the fun and frolics. I wonder when the girls will want a real life pony of their very own?

Aren't grandchildren wonderful?! Thank you Kai!! Mwah xx

Di
x

Tuesday, 5 November 2013

Oops, I did it yet again

Trotted off on holiday without making a card needed a few days after we returned home, and even worse forgot about it until the very day it should have been there last week. And EVEN worse, it was for a boy - which I always struggle with anyhow :( Kenny K to the rescue:
I used:

- 6" x 6" square white card blank

- pre-coloured and die cut Kenny K image

- papers from papers from the 'Quilting Bee' paper pad by My Mind's Eye, the red dog tooth check is the first cut into the sheet I ended up using as a snippet on Sunday's card - as I said then, although the fronts of most papers are sewing themed, the reverses are perfect for cards for chaps, young and old

- sentiment is by Craftwork Cards, popped onto more red dog tooth check paper

- red card candi dots

Card made in 10 minutes flat, literally. You can see by the blurred photo that I was hopping up and down with stress before running out to post it!

Di
x

Monday, 4 November 2013

The Playground

EEEEK! Yesterday I don't really think I got any time to comment girls, and didn't even have time to craft at all :(

Will catch up as soon as I can. Brilliant to see the entries coming in already - it's very wet here in the Playground and we have a cute little frog out playing in the puddles :)
 
Di
x

Sunday, 3 November 2013

Pixies Snippets Playground - Week 97

Another busy week in the Playground, but I want to know just WHO picked all the pumpkins and left carvings all over the place without even a little thank you note, lit pumpkin or even a choklit bar?! Parsnip won't tell so I bet he's been bribed :(

My snippets card this week is for a little neighbour who will be five on Guy Fawkes night and who absolutely adores his bicycle:

I used:

- 6" x 6" square white card blank

- image is another pre-coloured one by LOTV

- papers from the 6" x 6" 'Quilting Bee' paper pad by My Mind's Eye, the red dog tooth check is a snippet from the pad and the grey is a whole sheet. What's great about this pad is that, although the fronts of most papers are sewing themed, the reverses are perfect for cards for chaps, young and old

- snippet of red card to back the main image and the Craftwork cards sentiment, die cut with Nesties scalloped dies

- I even managed to squeeze the number 5 out of the teeniest snippet of leftover red card, die cut using a number set by Britannia Dies

- then I just popped 'JOSH' on, using white card candy plus their tiny little lettering stamp set and SU 'Real Red' ink pad

Josh and his little brother Luke were amongst our Halloween visitors - bless, when I held the Halloween tub of treats out for them, little Luke (who's not yet two) smiled up at me and promptly dropped one of his own candy bars into the bucket :) He'll learn I know but it was so sweet and innocent.

OK, onto this week's picks:

Cornelia actually showed us two similar versions of this card, this one is my favourite but just by a whisker - so elegant. I have giggled this week a bit as I know that Cornelia would love to come and play more than three times in a week - I have visions of her twitching impatiently waiting for the Playground to reopen each week :)

The only reason I limit entries to three is to make the random draw fair. Even if I ignored fourth and fifth etc. entries my mathematical brain tells me that the probability/odds would still be skewed so we'll stick with three. Mind you, more than one snippets card in a single post but with just one link is still fine :) And I don't mind, if it 's within the weekly three, if folk link two different makes from the same post either - I really do need to write up them 'rools' to make it totally clear :(


I just love this card made by Sally, it's perfect in my eyes - right down to the little gems or touches of pearl drops on the musical notes. Err, our Sally is now a Karate Brown Belt - so any nonsense this week such as building a mahoooosive bonfire in the Playground and I'll be sending for Sally! Well done chick from all of us :)

And we have a new Playmate as well so please welcome Mary Anne K who brought this lovely card, with the most wonderful sentiment:
Hope you come back to play often!

So, onto last week's draw - and the winner of the poinsettia dies and the Winter Bunny stamp (drawn by Random Number) is the lady who made this fabulous card:
 Well done to:
Can you please drop me an email (di_wray@hotmail.com) and your prize(s) will be in the post 'toot sweet' :) It's Jenny's first win so I'm extra pleased.

Which reminds me girlies, I did go out on Friday and post all your prizes that were drawn during and after holiday.

This week's prize is a mix of Christmas of and non-Christmas - first up it's this lovely Penny Black Slapstick 'Warmest Wishes' stamp, kindly donated by Viv:


as well as the same paper pad from me, well a new one of course, that I used in my snippets card today by My Mind's Eye called 'Quilting Bee', you can see what I meant about it being a mix of sewing and also good for masculine cards:
The Playground gates will close at 11am UK time on Saturday 9th November and the gates will open again at midnight UK time on the Saturday as usual. Maximum of three entries and please say 'No thank you' in a comment if you wish to still play but not be the winner of the prize this week, as shown above. In fact, you might want to play for only one part of the prize - both items do constitute one prize but if there's only one thing you'd use please do say in a comment and I'd just draw again for the second item as well.

Mr Linky is below - do please let me know if you have any problems linking, I can sort it out for you quite quickly and am always happy to do so.

Have a lovely week!

Di (and Parsnip who is sitting right beside me here waving at you)
x

Saturday, 2 November 2013

Saturday Supper - Squash Gratin

I really should have posted this recipe in time for Halloween:
Squash Gratin

Serves four - not on your Nellie, more like two!

1 tbsp olive oil
2 leeks, halved lengthways and finely sliced
1 garlic clove, peeled and chopped
6 sprigs fresh thyme
1 butternut squash, peeled and thinly sliced
150ml double cream
150ml vegetable stock, made from a cube
2 tbsp hazelnuts, roughly chopped
4 tbsp breadcrumbs

Heat the oven to 220°C/200°C fan/Gas 7. Heat the oil in a pan and cook the leeks, garlic and 4 of the thyme sprigs for 15 minutes, stirring occasionally, until softened.

Place a layer of squash in the bottom of each of four individual ovenproof dishes, top with a few of the cooked leeks and season. Repeat the layers until you’ve used up all the mixture.

Mix together the cream and stock and divide this between the four dishes. Top with the hazelnuts, breadcrumbs and remaining thyme leaves.

Cover the dishes with foil and bake for 20 minutes. Remove the foil and bake for a further 20 minutes, until the squash is tender and the tops are golden brown.

Things I do: Or rather should have done :( The recipe implies that you pop whole thyme sprigs into the leeks and garlic at the start of the recipe. I did that and then realised that whole sprigs would be rather chewy so I removed them before layering the dish up - and I used one shallow dish rather than separate ones. To my mind removing the thyme made the end result a bit bland so in future I'll strip the leaves from the stalks for the whole of the recipe. I served this with seeded rolls but the two-legged mouse and I agree that it would go really well with bacon or a grilled pork chop.

Having said all that, it is one I'll try again!

Di
x

Friday, 1 November 2013

Butterfly Hello

I needed some little cards to tuck in with Playground prizes, so I whipped up half a dozen of these very quickly:
I used:

- 3" x 3" cards, made from SU's 'Primrose Petals' and 'Pacific Point' card stock

- 'Butterfly' stamp set by Inkadinkado. The butterflies were stamped onto the card using 'Tuxedo Black' and then I stamped them again onto white thick paper using SU's 'Regal Rose' and Memento 'Teal Zeal' ink pads before snipping the wings out and adding them on top of the black stamped images just with a line of sticky tape down the line nearest to the butterfly body so that the wings stand up

- black pearls down the bodies - made by Papermania

- and then I stamped the little greeting in white - big mistake :( The Brilliance 'Moonlight White' inkpad I used came out all patchy - Dee Zarster! So, I just added some wiggly lines over the top using my Signo white pen

Not my finest hour and I almost threw them away, but I really do need to get the Playground prizes in the post today if possible.

Di
x

Thursday, 31 October 2013

A Teddy Bear snow angel

Aw, this cute little LOTV image reminds me so much of Parsnip, lying down in the Playground making snow angels:
I used:

- A5 white card blank

- LOTV pre-coloured image from the 'Furry Christmas' art pad, just trimmed down to fit behind the frame

- the red frame was a freebie with a recent order from 'Dies to Die For'. I've had a little scout to find out more and it's called 'Joy Photo Card Frame' and seems to be a new die from MFT/Die-namics. They also do a landscape one with 'Merry' as the word, both dies are 4" x 5.25", the link above will take you right there. I reckon you could carefully slice the letters off and have a very nice plain frame too for all sorts of uses.

- the white and red starry paper is from Fizzy Moon's 'Festive Fun' paper pack

- matt red mirri card

- red ribbon with silver holly leaves on to cover the join in the paper, am sure this came from Germany a couple of years ago

- I didn't add any sparkle, for some reason I liked the plainness of the image as it is

It's Halloween of course, and this year I haven't made any Halloween cards at all - shame on me. I guess we're less 'into it' here in the UK. But, no doubt this evening we'll have up to a couple of hours worth of little visitors at the door so we'll at least be putting out some Halloween decorations and a lit pumpkin - with the box of treats to hand :)

Di
x

Wednesday, 30 October 2013

One day..................

....................I'll be brave enough to make a totally 'white on white' card. This actually started off with those intentions but then I got side tracked :)
I used:

- 6" x 6" square white card blank

- silky matt red mirri card

- white backing card embossed with Crafts-Too 'Lattice' embossing folder

- Memory Box 'Glowing Candles' die, cut once in white and then again in sparkly silver sticky backed paper. The silver pieces were then painstakingly peeled apart to fill in the gaps  in the white die - I'll never learn about saving time!

- the oval was cut with a Nestie from the Floral Ovals die set. This set is so popular right now, I keep seeing it pop all over Blogland, and rightly so as it's lovely

- the sentiment is Craftwork cards, popped onto a silver sparkly oval and then onto a scalloped matt red mirri oval - both punched with my usual SU punches

- some red and silver Josy Rose nail heads to finish off

The 'white on white' will happen soon I promise :) If only 'cos this place seems to be overflowing with white snippets - mind you, I reckon WOW will be murder to photograph, this one was bad enough.

Another one for the Christmas card box - I peeked at them yesterday and realised that a lot of recent ones still need inserts though. So that's gonna be one mind-numbingly exciting session here ASAP.

Di
x

Tuesday, 29 October 2013

'Angels calling'

That's the name of the backing paper I used for this card. But, having read the lyrics to the hymn, which is 'Hark, I hear the angels calling' I don't think it's actually a Christmas hymn. However, Magnolia produced this lovely soft and slightly shabby looking backing paper for their  'A Christmas Story' range so who am I to get picky over the fine print:
I used:

- 6" x 6" square cream card blank

- Image is  from LOTV's 'Christmas Angels' art pad - pre-coloured, die cut with a Nesties circle die. That particular LOTV art pad is a real beauty 

- backing paper by Magnolia, 'Angels calling' from the 'A Christmas Story' range

- SU 'Soft Suede' plain backing card, behind the patterned paper and also used to die cut a scalloped circle using a Nestie die - and the brown does look softer in real life :)

- the holly flourishes were fun, I wanted those to pick out the holly in the angel's head dress but a frantic search here revealed that I had not one teensy little scrap of dark green card (I'd used it all up on my snippets card yesterday) - so out came a 'Holly' coloured Pro Marker. I coloured a scrap of white card, then let it dry thoroughly before die cutting it - the flourish is quite delicate and it struck me as easier than risking wrecking the little swirls, even though potentially wasteful in terms of Pro Marker ink I guess. The die I used is Cheery Lyn's 'Holly Flourish' and I ran the flourishes through the Xyron to add the sticky backing

- no sentiment again, really wanted the image and  backing paper to speak (or even sing) for themselves. Not even one sign of ribbon or a bow, for the same reason - but I did add three brown pearls in each corner :)

This card was made especially for a challenge I try to enter each week, Craftyhazelnut's Christmas Card Challenge and this week's theme is 'music'.

And am also linking this into Hazel's monthly challenge too, where it's always anything goes.

Di
x