Showing posts with label embossing. Show all posts

Sunday, 7 August 2022

Through the window snippets card

I recently bought a few Stampin' Up goodies and couldn't resist the 'Better Days' set of stamps. I loved the rather versatile and classic look, and to me it instantly shouted 'paper piecing!' (Hello Lesley!!) - even though it does come with some gorgeous stamps to create the stamped hills using inks, a background stamp and also a couple of sentiment stamps.This was my first play with the set - which is perfect for snippets of course!


The lovely ombre shaded Lawn Fawn coloured paper snippets, waiting to be 'fussy cut', main image is at top left and also my rough paper  'template for placing snippets' - is at the top right hand side

I used:

- 5.5" x 4.25 white card blank, tent style (for a change)

- the rustic brick/stone background was created using a Sizzix Tim Holts rustic brick wall die given to me some years ago, embossed onto white card and then rubbed over with a soft brush and Stampin' Up 'Smoky Slate' ink, just to tone down the white

- trimmed, then glued the brick work panel onto the card front

- the centrepiece 'window' was created by stamping the main image onto a snippet of white card using Memento 'Tuxedo Black' ink then fussy cut leaving a narrow border

- whilst the mini-Misti was out, I also selected a few snippets from my usual 'envelope inside the back cover of a pad storage' - from Lawn Fawn's 'Watercolor Wishes' pad, photo of them above, and stamped the relevant parts of the main stamp onto them

- this was made really easy to do by stamping the full image onto a snippet of white printer paper and nestling it into one corner of the Misti then used that to eyeball and position the snippets one after the other to stamp the most relevant parts that I wanted - it worked really well and a great way to save even MORE snippets! A photo is shown above of my pre-fussy-cut snippets. Top left it the main image and the other main image ws on spare paper to use a a guide

- fussy cut all the coloured paper snippets for the sky, sun and three layers of green fields and then ran a black Whispers brush pen around the edges to cover any white edges

- used a glue pen to adhere each piece onto the backing image, always adding the glue to the main image. All these years later I always think of that tip from Jules when paper crafting

- then fussy cut around the 'window' image outline, put that central panel aside and basically went off to bed to dream about the next steps i wanted to take!

- I'd stamped the sentiment whilst doing the other pieces so that was waiting

- before then, I ran a sumptuous gold calligraphy pen edgewise right around the main panel and set it to one side

- then hunted right through my dies and couldn't find a die, even with tweaking, to suit the sentiment - drat!

- so, I careful trimmed the stamped sentiment, also from the SU set, but left plenty of spare white card at either end

- a bit of measuring and some pencil marks and then punched the ends of the sentiment using a 1" SU punch to create the 'tails'

- then ran the same gold calligraphy pen around the whole sentiment strip and we were good to go!

- added the main panel to the card front using thin sticky pads

- then added the sentiment strip, at a jaunty angle, using the same brand of thin sticky pad

At first I hated the result as it just wasn't 'me', and the sentiment still doesn't 'do it and just seems a bit odd, or am I too old to understand?'. BUT, the scene is exactly what I wanted. The rolling fields and the shaded sky were all stamped onto and then fussy cut around pieces of Lawn Fawn's 'Watercolor Wishes' pad, utilising the differences in shade both for the fields and most of all for the sky - with no additional shading added! So, technique won over prettiness I suppose!

And now we come to Dudley's week. Fine - apart from me discovering he'd done a sneaky piddle indoors! I spotted the area with my beady eye and, having a 'nose like a bloodhound check' identified it right away! I doubt if Len is doing sly little piddles, so it had to be Dudders and I know the smell of his wee too! No chastising as he wasn't caught in the act. A dog does a little pee and then moves on, IMHO! Oh Dudley, you scamp! Luckily it was easily sorted out and the repellent de-odouriser spray to get rid of any odour after cleaning in case either of them Dudley makes a return visit, is a godsend! 

My Dad used to tell a tale, supposedly from his childhood, about a teacher in a class, constantly finding little puddles in the classroom, where a child had been 'caught short'. Eventually she addressed the whole class and told them that the culprit needed to own up, in secret, and they and the teacher would then work out how to deal with the problem. No punishment and no worries. So all the children dutifully closed their eyes after the teacher said that when their eyes were closed, the culprit for the puddles had to come and wrote their name of the back of the blackboard which sat on an easel, as they did in the olden days! Everyone closed their eyes - silence. Then after a short while a chair was scraped back from a desk and little feet pattered to the front of the classroom. The seemingly endless sound of chalk squeaking on the back side of the blackboard was heard - and then the little feet pattered back to their desk. Teacher said the kids could all open their eyes but she couldn't resist taking the look for the name that had been so laboriously written on the back of the blackboard. Whereupon she skidded in a fresh puddle and landed flat on her back. As she tried to raise herself up she saw the name of the 'culprit' scrawled on the back of the blackboard ........ 'THE PHANTOM PIDDLER STRIKES AGAIN'.  ☺ The end.

Sometimes this blog is a bit like my life history! Sorry if you only came for the 'how I made the card' bit!

Good grief - I almost forgot to tell you - we're back to any kind of snippets in the Snippets Playground, please tell us what you use and post your entry - over on our new challenge HERE! xx


Thursday, 5 May 2022

Summertime 'Gnomies'

A gnome isn't just for Christmas and a little rootle through my basket of NBUS goodies turned up a set of non-Christmas gnome stamps with matching dies .... with Summer gnomes on. 

I wanted to create a scene for the current Allsorts Challenge and a further 'rootle' made me check out the Whimsy 'Enchanted Forest' Slimline paper pack that had never been used (bought ages ago, tut, tut!). 

The gnome stamps are quite small, even if you use more than one on a wide card, then 'PING', a little light bulb suddenly flicked on. Who actually said that the background papers HAD to be used for slimline cards? With some inspired juggling about, I would be able to get a mix of two smallish oval/square backgrounds from each sheet - and that's exactly what I did. Some of the papers now have the other half safely tucked inside the packet(s) for future use, thereby stretching the pack contents, meaning more cards can be made. And this can be applied to other papers in Whimsy's Slimline range  - which I did for one card!

Here's what I  ended up making:

I used

- two 4" x 4" white card blanks, and two 5.5" x 4.25" white card blanks - all are side opening

- stamped, then coloured, all four gnomes (using Polychromos pencils) from the 'Your Next Stamp' 'Happy Gnomies' set

- at the same time I also stamped a selection of sentiments using three different sentiments from the 'Happy Gnomies' set and a single sentiment from MFT's 'Itty Bitty Celebrations' set of stamps ('Doing a Happy Dance' - so cute) - using Memento 'Tuxedo Black' ink

- die cut all of the gnome images using the matching dies - and my Altenew mini die cutting machine. Even though I'm once again fully kitted out and love all of my die cutting capabilities - that sweet little Altenew machine is so handy!

- then die cut the sentiment strips using two of MFT's 'Itty Bitty Strips' dies as well as the 'gnome with balloons' sentiment - using a Frantic Stamper 'Stitched Fishtail Banners' die

- to assemble the cards, I die cut one design of oval background from the 'Enchanted Forest' paper pack, plus one from an (again unused) Whimsy 'Glorious Sky' Slimline Paper Pack - using a die from Presscut's 'Oval Stitch Hole' set

- then cut two different designs of square backgrounds from the 'Enchanted Forest' paper pack - using a die from Lawn Fawn's 'Outside In Stitched Square Stackables'

- the oval card images were mounted, using glue, onto the 5.5" x 4.25" card blanks, which had already been topped white card, embossed using SU's 'Square Lattice' Textured Impressions folder and then trimmed to slightly smaller than the card front

- the square card images were mounted, using glue, onto the 4" x 4" card blanks - having first been backed with a slightly larger square/frame cut from snippets of Altenew's 'Forest Glades' card stock (one of my current favourites)

- then it was just a matter of adding a gnome image and a sentiment to each card front, using a glue pen - finished!

The planning stage took almost as long as making the cards - even though I actually doubled up on each design and made two the same of each one. That's eight cards on standby, for friends and also some of our neighbourhood kids.

I'd like to enter the 'Hello Friend' card into the current Allsorts Challenge Week #674, where the theme is 'Anything Goes, with the option of Scenic'.

And, I'd like to enter the  same card into Darnell's NBUS Challenge #38 for May. My NBUS on this card is the gnome stamp and die set, the Whimsy Slimline 'Enchanted Forest' paper pack plus MFT's 'Itty Bitty Sentiment' die strip.

I had great fun making these cards, it's such a treat to have spare time to make cards 'just because'! Hooray for Sarn jointly running the Snippets Playground!


Wednesday, 9 March 2022

Under The Mistletoe

Before Christmas I bought a few of Lisa Horton's 'own brand' products and finally found time to have a little play with a couple of the items:

How very strange, the card looks as if it's behind gauze - yet the sentiment is clear as day and not out of focus. The green of the mistletoe is brighter and the embossing is much more crisp in real life - bet it's that shining silver that confused the camera!

I used:

- A5 white card blank, side opening (not made an A5 card for ages!)

- first hurdle was the 3D embossing. It took several attempts and the whole lot, including the Cuttlebug, almost went through the window at one point. I used white card for my final try which I sort of bent and fondled to break down the fibres a bit and then gave it a good spray of water on both sides using a mini mister - that gave the most successful result

- the slimline embossing folder is called 'Under The Mistletoe' by Lisa Horton and it also comes with a die to cut one sprig of mistletoe

- once the main panel was embossed, I then die cut the mistletoe twice - once from a snippet of pearlescent green and then from a snippet of pearlescent white card

- then embossed both sprigs by sitting them back into the embossing folder and running them through the Cuttlebug before fussy cutting the white berries and gluing them in place onto the green sprig. When I did that gluing step I sat the sprig on the convex sprig outline on the embossing folder so I could press the berries on without fear of distorting either the sprig or the berries - then kept the assembled sprig and berries for later use

- trimmed the mistletoe white embossed panel and layered it onto a slightly larger backing of silver mirri card

- then added the slimline panel to a piece of silver and white trimmed paper from Chloe's 'Crackle' foiled paper pad - my advice, don't expect to find the actual  colours you see on the cover inside the paper pad. - avoid if you expect them

- glued that full panel to the front of the card and, using a glue pen, added the single green sprig of mistletoe   

- thinking my trials were over, I moved onto another Lisa Horton product for the sentiment. It's a very clever idea but loads of issues. It's called 'Festive Banner Sentiments' and is a stamp and single huge 'multiple banners' die 

- having, after a struggle or three, come up with a die cut sentiment I then stuck it in place using very thin sticky pad pieces where it adhered to the embossed panel and thicker pieces where it adhered to the silver 'crackle' paper - to keep it on the same level

- and being a glutton for punishment, I made two at the same time of course! 

Lisa Horton's really great idea with the multiple sentiments stamp and the multiple banners die has even more worrying issues. The stamps appear to be cheaply made of acrylic (too stretchy to risk removing from the acetate backing sheet and no smell - a sure sign, the better quality photo polymer stamps used by larger companies have quite a pong). I left the stamp on the acetate and used removable tape runner on the back of the acetate to stamp, using the Misti. The widest part of the die for cutting the banners is a smidgen over the 6" width aperture on many smaller cutting machines, including mine and despite alignment marks, it still goes 'off kilter'. Almost impossible to not have one or two sentiments cut slightly adrift.

All in all - it's what is NOT said on these products that I have issues with - no definition of the materials the stamps are made from and also absolutely no mention of the overall dimensions of either the width or length of either the stamp or the die, as well as the mis-alignment. And the mis-represented paper pack cover, when I queried it, was blamed on 'photography limitations'. The normal gold and supposed 'rose gold' paper are almost impossible to tell apart - and the rose gold is depicted as a pale metallic rose pink on the pad cover. I actually thought I'd been sent a 'dud' pad of just normal gold and silver but was told pretty sharply, when I phoned to check, that wasn't the case. From the attitude I met with, I bet I'm by no means the first customer to query the discrepancy. 'Null point' for customer service! Buyer, be careful - I could well be wrong but I do smell the aroma of 'overseas production cost cutting' at work.

I suppose the lesson is to drop companies such as those like a hot potato once you find out their true 'modus operandi'.

This is only my personal opinion, but it was born out of bitter experience. To think that one card design would throw up so many problems.

I did want to enter this card into a few challenges such as NBUS - but am now so sickened by what I discovered during the crafting process, I really was hard pressed to even write this post - mostly as a reminder to self!

BTW, I do like the cards I ended up with - it was the journey to get to that point that gave me grief!


Wednesday, 2 March 2022

Ukraine

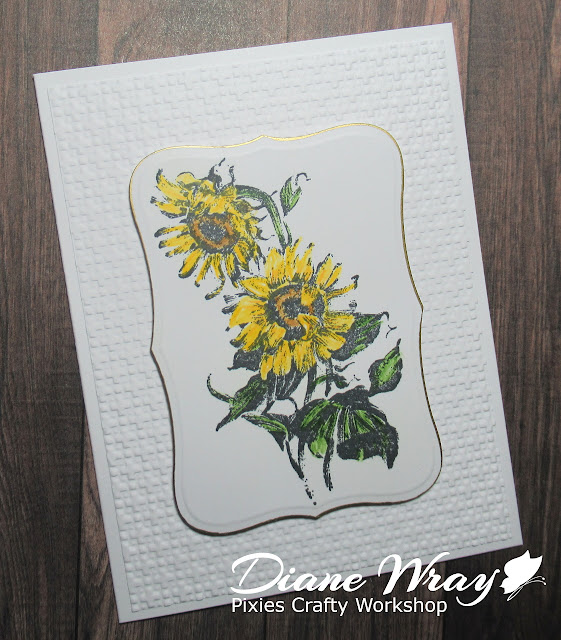
I've been trying enter to Allsorts Challenge more regularly, and originally intended to do some paper piecing for this current challenge. The other option was hand coloring. Then, right in front of where I swivel round to use the laptop there's a set of open shelves and sitting on there, right in line with my eyes, is the very old wood mounted stamp I used and hand coloured today.

Here's the card I made - the sunflower is Ukraine's national flower:

I used:

- 5.5" x 4.25" white card blank, side opening

- piece of the same card stock as the card, embossed using SU's 'Textured Impressions' folder then trimmed to slightly smaller than the card front

- glued the embossed panel onto the card front

- stamped the Penny Black image called 'Hello Sunshine' onto a snippet of white card using Memento 'Tuxedo Black' ink

- coloured the image using Polychromos pencils

- die cut the image using an old but favourite die from the Spellbinders 'Labels Eight' set

- ran a ball-ended tool around the inside of the die cut whilst it was still in the die to create the 'lip'

- removed the die cut from the die and went around the edge of the die cut image using a gold Calligraphy pen. It's a chisel tipped pen and you just use the chisel sideways on - sort of running the edge of the card through the middle of the chisel tip, easier to show than explain!

- added the image panel to the card front, using slightly thicker than usual sticky pads for extra 'lift'

As always, taking a photo of shiny elements on a card is nigh on impossible - the gold edging is just like gold leaf, really pretty and also very shiny!

I'd like to add this card into the current Allsorts Challenge #665.


Friday, 23 October 2020

19th Birthday card

A rare afternoon post from me but I want to let you know about a new challenge run by Gail and Jo ASAP, if you don't already know of course.

It's one of Len's great nephew's Birthdays at the end of October - and he will be 19. How did that happen? It only seems like a handful of years since Ben was just a toddler.

As always, I struggle with male cards - then remembered a great new challenge I wanted to enter and so this was my starting point.

The challenge, called Let's Squash It!', is run by our lovely Gail (from the Playground) and her friend Jo. And the idea is to get us to use our embossing folders - mine have certainly been badly neglected for some while now and this new challenge is just the kick start I needed!

For Challenge #1 the theme is to use An Embossing Folder with a Geometric Pattern AND Metallic Card or Metal Sheets. You have from the 10th of each month to the last day of the month at 23:59 GMT to play along with the challenge. Isn't this a fun logo?!


This is my entry - I hope the design is sufficiently 'geometric' - I think so as the definition of geometric is regular shapes or lines ☺. It was a little tinker to photograph - the top left hand corner isn't crumpled in real life BTW, but taking a photo face on meant you could see me in my pretty pink fleece top reflected!

I used:

- 5.5" x 4.25" white card blank, side opening

- piece of black card, die cut with a Waffle Flower 'A2 Layers Die' and glued to the card front

- piece of silver card which was made using an X-Cut silver foil sheet stuck onto a backing of white card then die cut using a smaller layers die

- then embossed the piece of silver card using Cuttlebug's 'Diamond Plate' embossing folder

- felt that just black, silver and white needed a pop of colour so dug out a snippet of deep red card, trimmed it and then glued it onto the piece of black card so that just the sides of the black background show - mostly as the red piece of card just wasn't wide enough for a full 'frame'!

- then glued the embossed piece of silver card onto the red layer

- stamped the sentiment onto a snippet of white card using Memento 'Tuxedo Black' ink and a sentiment from the Woodware 'Double Birthdays' sentiment set

- backed the sentiment with red and black card to show at the top and bottom - then glued it in place

The Woodware 'Double Birthdays' sentiment is a great way to make a bold statement without too much else needed. 

I did so enjoy using my embossing folders once again and have no idea how many are sitting in upright rows in the long Ikea CD storage box on the bookshelf behind me - suffice it to say it's stuffed to capacity!

Come and join in - Gail and Jo will make you feel very welcome - I have a feeling that their challenge is going to be a very friendly place to play. Happy dance! ☺


Tuesday, 26 May 2020

Rudolph Days Challenge - May 2020

It's Rudolph Days again over at Scrappy Mo's! You have until the 31st of the month to enter, if you haven't done so already.

I made a run of six identical Christmas cards, and the bright sunlight here has certainly washed out the dark blue a bit, as well as almost obliterating the embossing on the background, sigh:
I used:

- 5.5" x 4.25" (A2) white card blank, side opening

- a layer of darkish blue card, from a pack of several toning sheets of blue card, picked up in Hobbycraft before lock down, trimmed to 5.25" x 4" and glued in place with Collall All Purpose glue

- then a panel of white card measuring 5" x 3.75" which had been embossed using a Darice ''Snowflake Background' embossing folder, again glued on the card front

- made up the sweater using the same colour blue card plus a lighter shade of blue for the neckline, welt and cuffs. The die set I used is another NBUS item, made by MFT and called 'Comfy Sweater' - it comes with two sizes of sweater and has been around for about three years or so. I was lucky enough to buy mine from a Facebook Decluttering Group, unopened and never been used - another bargain!

- topped the sweater with a white snowflake, cut using a die from The Works 'Snowflakes' set of dies

- then the hunt for a sentiment began - I finally found one saying 'Enjoy the warmth of the season' and another one saying 'Warm holiday wishes'.  But I wanted mention of Christmas itself, sigh. Having then totally coincidentally received an email from Jane W, in which she mentioned that she frequently generates sentiments on her computer, I followed suit and printed off the words I wanted onto white card in dark blue. Something I'd totally forgotten about, yet years ago did it quite frequently. Thanks Jane for the memory nudge!

- die cut the sentiment using a die from Spellbinders 'Nested Pennant' set

- then added quite a lot of thin sticky pad pieces to the backs of the sweater and the sentiment before adhering them to the front of the card

- final touch, a teeny very flat little diamante gem in the centre of the snowflake, so it will still go at standard letter rate

It took a couple of afternoons to make six cards on a 'production line' - but very therapeutic at the same time.

I'd also like to enter this into Darnell's NBUS Challenge #14 for May as the sweater dies were new and unused.

Hope everyone is staying safe.


Thursday, 26 September 2019

Rudolph Days Challenge - September 2019

Time once again for ScrappyMo's Rudolph Days Challenge. I really thought I'd miss it this time round, with Dudley being unwell, but found some spare time over the weekend after all. And, I'm entering this into Craftyhazelnuts Christmas Challenge too - where it's anything goes .... so long as you don't 'bare yer bum in Fenwicks' shop winder! Explanation below this post :
I used:

- 5.5" x 4.25" white card blank, side opening

- piece of the same brand of white card, which I embossed using Craft-Too's embossing folder called 'Snowflake Banner', then trimmed to one eighth of an inch smaller all round than the card base and glued it to the card front

- stamped the bauble using Taylored Expressions' 'Iconic Wishes - Christmas' stamp and die set and Altenew 'Enchanted Gold' pigment ink pad (luscious, although I still think that Delicata has a slight edge!). Huge thanks to Mo for gifting me this stamp and die set last Summer - it's lovely!

- then die cut the bauble using the die which came with the set (in the UK, we call them baubles rather than ornaments in case you wonder if there's a difference!)

- glued the bauble die cut to the front panel of the card

- die cut a bow using Penny Black's bow from the fabulous 'Whirl Wreath' die set using a snippet of deep red satin mirri card and glued that on top of the bauble

- next, die cut holly leaves and berries using snippets of dark green plain and deep red satin mirri card - and, interestingly, my Poppystamps 'Stitched Holly Leaves and Berries' die was also a gift from sweet Mo!

- and called it done

Believe it or not I made six the same whilst Dudley was resting under my desk. Mostly as I needed to just do something a bit mindless for a couple of hours to relax, if that makes sense. He was quite poorly and it wasn't a happy time for us. Seeing your beloved pooch lying with a hot and dry nose just listless and almost where he's well out of the way is heartbreaking. The little monkey is making up for it now - racing round the house doing 'zoomies' and generally in 'Dudley Plus' mode!

BTW. I got the idea for using the Penny Black bow die cut with the bauble from Laurie's blog - thanks honey!

And now for a proper Dudley update. I certainly think we have our little bundle of mischief back on form! He's eating really well and is even tackling 'Naturo dinners for dogs' with chicken, rice and vegetables. And, his 'output' is nice and solid once again - betcha didn't need to know that really but the nurses at the vet's told us that it would be the last thing to return to normal. So, with fingers and toes crossed, we're living in huge hopes here.

Explanation of the 'bare bum in Fenwick's window'. My roots are North East of England, despite being a nomad all over the World for many years whilst Dad was in the UK Forces. I was born in Newcastle General Hospital eons ago (they're still in recovery, like me). We returned to the North East when my Dad had his final posting, just before I left school in Germany aged 18 - ha, they thought I wouldn't find them 'cos they moved during term time ...... but I did. And I lived, worked and married there until things in life changed so much that I sort of ran away to London and the South of England for a new job - and to escape a lot of hurt and sadness.

A Geordie's humour is raw and can be right to the basics, it took me some time to get used to it I admit - but they're mostly the most wonderful people I know. So, if there was an issue, people who spoke 'broad Geordie' which my Dad would most certainly have not tolerated, but I heard elsewhere and stored in my memory bank, would exclaim, to express disbelief, shock or horror some of the following 'Wey pet, ahl gan to the foot of ower stairs' (goodness knows what that meant! Why would one go to the lowest tread of the stairs and gawp upwards except to ask for help from above I guess?). And another one was 'Ahl bare me bum in Fenwick's shop winder' aka window - so it's pronounced like 'wind - err'. Basically - 'Good grief, I am so surprised I will drop my pants and show my naked rear end to everyone who has the misfortune to be passing the largest department store in Newcastle, based on Northumberland Street which is the poshest shopping area of its time'.

Fenwicks, which has branches throughout the UK, is in fact a Newcastle company family, despite the London and York connection, as well as elsewhere. 'Yer canna keep a Geordie doon pet, when ahl's sayed an' dun'. I'm evil really and, although not really brought up in the North East, I do love to tease my Len now and then with the local vernacular I picked up and saved in the memory banks when living and working up there - such as 'Hey ye ower there, hoy yer 'ammer ower 'ere - and divvent gi' me any sh*te either'. Which loosely translated means 'I say, my good fellow over there. May I borrow your hammer - if so, do please pass it across to me - and don't waste time arguing about it'.

Can you tell I'm a happy and very relieved bunnykins here?! Snigger.


Wednesday, 22 May 2019

Vroom, vroom!

A little (not so little now) neighbour, called Taylor, is ten tomorrow. It's safe to post this card I made for him, as he doesn't know about the blog:
I used:

- 5.5" x 4.25" white card blank, side opening

- a snippet of SU's 'Smoky Slate' card stock, trimmed to slightly smaller than the card front and glued in place

- next layer is a snippet of white card stock - embossed using a Cuttlebug 'Diamond Plate' EF (the closest I had to tyre tracks) and trimmed to a teeny bit smaller than the 'Smoky Slate' layer - then glued in place

- next, out came the Misti and a Stampin' Up set of stamps called 'Rev Up the Fun', and this card is made totally using stamps from that set. Taylor's Dad has a motorbike and he loves to go for a little spin on it all togged up, sitting behind his Dad

- I stamped the bike onto a snippet of white card using Memento 'Danube Blue' - I'm a bit careful/mean and only buy colours like this in the 'Dewdrop' size if I rarely use them. The Misti is so useful to get a totally crisp image

- then, using the Misti again, I stamped the 'exhaust fumes'- checking for position with a snippet of scrap card, and SU's 'Smoky Slate' ink pad before doing the real thing

- whilst at it, still using the Misti, I also stamped a couple of the tyre tracks stamps - again with SU's 'Smoky Slate'

- more stamping - the sentiment onto a white snippet - using SU's 'Real Red'

- with the stamping all done I just used scissors to trim down the 'tyre tracks' and set them aside - I'd usually use the trimmer but scissors worked fine as I had a strong line to follow

- mounted the trimmed image onto a snippet of SU's 'Real Red' card stock, and did the same with the sentiment - only I switched and used SU's 'Smoky Slate' for that element

- added the 'tyre tracks' onto the card front using red line tape

- then added the sentiment and the image panels using thin sticky pads

All done!

Sorry if I haven't visited the Playground entries as promptly as I should - bit busy here but will be there ASAP! 


Wednesday, 8 May 2019

First Holy Communion card - Olivia

Olivia (usually known as Livi), one of our/Len's Grand daughters over in Germany, has just recently taken her first Holy Communion (on Sunday just gone) and I made her this card from Len, myself and her lovely German grand parents:
 I used:

- 5" x 7" white card blank, side opening

- a layer of slightly smaller silver mirri card, glued to the card front

- a piece of Centura White Pearlised card stock, embossed using a Couture Creations 'Compassionate' folder, then trimmed down to a bit smaller than the silver layer and glued in place

- the cross was stamped using a stamp I bought in New Mexico when we met up with Kay a few years ago, made by Paper Inspirations and called 'Small Flourish Cross'. I used a Versamark Embossing pad then heat embossed using Stampendous 'Sterling Silver' EP - onto plain white card

- at the same time embossed the sentiment from 'Stamping All Day' and then heat embossed using Stampendous 'Sterling Silver' EP again

- next came the die cutting, and the sentiment was easiest - using a die from the DoCrafts 'Speech Bubbles' set

- ho hum! Then, it was time to die cut the piece of white card with the embossed cross on - not quite so easy, sigh. I adore the pair of matching MFT dies I wanted to use. But, the basic MFT 'Cherise label die' has a full metal backing to it - so I cut a template and then used that to position the actual die over the cross before doing the 'real' cut

- once that was done - although in the end I snipped off the twirly parts and backed it with the plain white layer that had come out of the template (don't ask me why one cut better than the other one did!) - it was time to face the more decorative top silver layer which frames the piece

- and, to my utter joy, that worked perfectly using a piece of silver mirri card from the same A4 sheet (yup, I do have to cut into fresh sheets of card despite having umpteen 'snippets') - mental note - need more silver mirri ASAP! And, the MFT matching 'Tiffany Frame' die

- all three layers were glued together and that was the main topper finished

- also die cut a further two layers to even up the sentiment, glued them together and ran a silver Calligraphy pen around the edge of the sentiment label just to add a bit of a finish

- used thin sticky pads to adhere the panel with the stamped cross on and the sentiment to the card front - done!

I spotted a blogger I follow using this lovely MFT set of dies and, being me, skipped right off to buy it. But can't remember who it was! So pretty and will also be lovely for Christmas cards - so thank you whoever you are for the inspiration :)

I made a very similar card for Livi's big sister Mia a couple of years ago, using a filigree die cut cross, no fancy oval panels and a slightly different embossing folder for the backing. But, apart from that, the two cards are really similar - kids do make comparisons!

It was all a bit of a last minute rush and I spent a good bit of spare time over Easter working on the card - a little bit at a time - in between taking Dudley for trims, cooking us some nice meals, taking time out in the garden sunshine etc. It needed to be in Germany fairly quickly and when working under pressure I find it best to stop and walk away rather than keep pressing on and end up making mistakes!

Len loved the result and I do hope that Livi did as well! And, amazing postal service, I posted it on a Wednesday and it arrived on the Friday just a couple of days later - still with a week and a couple of days to spare!


Thursday, 18 April 2019

Golden Wedding Wishes - but a bit late!

A really special blogger friend just celebrated 50 years of marriage - well done to both you and your lovely hubby. HUGE congratulations! This lady is often my most truthful and yet funniest critic, we've been lucky enough to meet up and she was absolutely what I would have expected - in the best way possible!

I've kept her name anon. (as she is quite a private person) - otherwise I'd be up there tooting about it from the rooftop! How lovely to share in their special celebrations with this card - photographed slightly from the side to stop the glare:


I used:

- 5.5" x 4.25" off white card blank, side opening

- slightly smaller layer of gold mirri card

- then a smaller again layer of Centura white pearl card (which is off white in fact, hence the card blank not being bright white) embossed using an X-Cuts 'Polka Hearts' embossing folder. To be fair, I trimmed the embossed layer to exactly where I wanted it after doing the embossing, so the hearts lined up and was just so lucky that it was as I wanted so I didn't need to trim the gold layer or the card blank down - which I often do, to make sure things are symmetrical! OCD - or even 'CDO' strikes again!

- then I dug into my precious X-Cut snippets of self adhesive gold paper and die cut two Marianne hearts using the 'LR0129' set of dies - possibly one of the first set of dies I ever bought and so rarely used (bad me as it's gorgeous!)

- next die cut the numbers 5 and 0 from a snippet of the same adhesive paper using a Memory Box 'Classic Numbers' set of dies

- and finally, with yet another snippet of X-Cut self adhesive gold paper, die cut the sentiment 'celebrate' - by Paper Smooches from their 'Birthday Words' set

- then it was just a matter of placing everything where I'd planned it to go. Apart from one minor detail - do NOT use fairly thin adhesive plain foil on an embossed background! But, with the help of careful positioning and also some glue so I didn't need to press down too firmly - we got there in the end! Just please don't pick at it :)

I seem to have a real rush on right now, needing to make special cards. It's good as it focuses the mind immensely!

BUT, Dumbo here got the date totally wrong. The card was made, written and all ready to post when I spotted that I was going to be almost a week late! Instead of Wednesday 17th, the big day was Friday 12th April.   

So it's a belated Happy Anniversary - K & C!! xx And a woof from Dudley :)


Sunday, 9 December 2018

Pixie's Snippets Playground - Challenge #341

The photo of my snippets card for today isn't very good I'm afraid. We had days on end of really dull and overcast weather with rain thrown in for good measure, then I was at the point where I really needed to take a photo before delivering this card to be taken to the wedding from Len and I by a friend of the bride. So what did we get when I rushed to take the photo? Blinding sunshine and bouncing light all over the place! Sigh - these things are sent to try us!

Anyhow, here's my snippets card for today and the inspiration for it came from an Anniversary card made by our Janice HERE. This is my version, which I made as an easel card:

I used:

- 6" square easel card made using white card stock

- snippets of silver mirri card for the heart and sentiment and snippets of sparkly silver card for all the borders. I went for more sparkle as it's an
'almost Christmas' wedding and I know that the bride has chosen Christmas music for the church blessing and no doubt there will be other festive and sparkly touches


- snippets of White Pearlescent card for the embossed layers and the background to the heart and the sentiment

- first of all I cut and folded the easel card pieces but at this point kept it un-assembled

- then cut the two sparkly borders for the front and the flat part of the card and glued them in place

- topped those with a background layer of white pearlescent card which was embossed using XCut's 'Polka Hearts' embossing folder - there had been a fair old bit of measuring up and careful trimming beforehand I can tell you!

- then die cut the heart from Stick-It backed silver mirri card using a gorgeous die from The Works called 'Swirl Heart' - I also die cut the smaller centre heart from white pearlescent card to add into the centre and bring it all the the same level

- adhered the heart to a snippet of white pearlescent card and trimmed it down to size before backing it with a border of sparkly silver card

- then die cut and assembled the sentiment strip (which acts as a 'stop' to hold the card upright) using another lovely die, so kindly given to me earlier this year by a very sweet friend (you know who you are!) - the die is called 'Congratulations' and is made by Creative Expressions

- the next step was to fix the easel card together using red line tape

- and then I added the image panel and the sentiment panel using reasonably thick sticky pads - and popped a pair of linked Wedding rings into the centre of the heart - hooray for peel offs!

- finished, phew!

The card took me almost two days to make, I kept being distracted by little Dudley and made a few mistakes along the way which meant I had to re-do bits. For instance, embossing one piece of pearlescent card on the reverse (shame it wasn't double sided pearl but there you go!) - silly little mistakes as I wasn't really concentrating. In real life the card looks very special though and I'm well pleased with it, I made up a box for it as well. I really dithered about personalising it with the bride and groom's names - but in the end opted for keeping it less cluttered.

The prize, as usual, is totally connected to this week's snippets card:
It's an Xcut 6" x 6" 'Polka Hearts' embossing folder, a The Works 'Swirl Heart' die and a Creative Expressions 'Congratulations' die. I do so love The Works dies - considering they're pretty inexpensive they cut beautifully, come out of the dies with ease and are well made and robust.

A nice bumper bundle and I won't split this prize at all. As I always say, if you win and really don't want everything (although they go together so well) then feel free to give anything away to a fellow crafter at your end.

As always, the Snippets Challenge will run for two weeks and the Playground gates will close at 11am UK time on Saturday 22nd December. The gates will open again at midnight UK time on the same day.

It's a maximum of ONE entry and please say in a comment if you wish to play and be a possible winner of the prize. Please also link back to the Playground in your blog post to be eligible for the draw.

Remember, if you link into the Playground and don't say clearly that you're wanting to be in the draw in a comment on here, then you will be bypassed if your name comes out of Mr Linky. I'm sure you all know I ask for a positive 'yes' on the blog post itself - just in case you're playing only for fun - otherwise I ignore you on my little list.

Mr Linky is below - please let me know if you have any problems linking, it's easy for me to sort out so don't struggle on alone :)

In two weeks time we'll all be in panic mode I expect getting ready for Christmas! But, do try and find time during the following fortnight to make and link a snippets make into the Mr Linky which will publish on 23rd December as most (if not all) days I'll be adding prizes into the pot for the Grand Christmas/New Year Draw! You will need to comment on any post showing the prize for that day if you wish to be added into the draw for that particular prize. One overall comment saying 'all prizes' won't cut it I'm afraid. Neither will racing through all the posts right at the end commenting on all the prizes be very fair - and it will show up on my dashboard. I know we're all going to be busy so I will allow some leeway of course.

I'm finishing this off on Saturday morning (ie. yesterday). It's been a fun week for Dudley and tonight will be a real test as I'm going to the Archery Club Christmas Quiz evening with Len. To be honest I'd rather stay at home but we do need to see if Dudley can cope with an evening in his indoor pen - along with bed, food, water and toys of course. Plus the radio will be left on for him to 'sing' along to! In fact, his sounds vary immensely and he almost yodels at times. I feel so bad that we have to try this but Len has rigged up an indoor CCTV camera so we can monitor him from where we'll be. And who knows, it may go well.


Yesterday (Friday) for example was a case in point. I got myself into a real tizz as Friday got closer and Dudley was being left alone at the groomers. He trotted into the main store quite nicely but was hesitant when we went into the 'grooming parlour' and he positively backed into a corner with his paws firmly dug in when he needed to be handed over to the girls! However, one worrying hour later I returned to collect him and guess what? He'd been an absolute angel throughout - hardly a murmur from him and the girls had fallen in love with him of course. In fact, the little scamp just gave me a glance and carried on licking the girl who brought him to be handed back. So much for a frantic little dog scrabbling to get back to 'Mum'! In loads of ways it's really heartening that he's not as fazed by these things as we thought he might be. And, he looks (and smells) utterly fabulous! He's fast asleep right now and with this evening in mind it isn't fair to disturb him to take a photo. Just think very white and fluffy with a coat that feels like spun silk :)

Hope you all have a lovely week/fortnight. And remember, if it doesn't get done before Christmas, things will still carry on so try not to get into panic mode with preparations. She says - being the world's worst! I actually have a list which lists all my to-do lists here!

Love from Parsnip and myself, and of course a 'woof' from Dudley ☺

Edit: Dudley coped amazingly well! He looked as if he was doing well on camera when we spied on him from the quiz venue. He was 'all of a quiver' when Len went into the house whilst I parked my car  - whether it was excitement at seeing Len or he'd been a bit stressed as the evening wore on we're unsure, but to be honest that little chap is proving to be tougher than we thought. Lots of play time and snuggles and he's absolutely fine!!


Wednesday, 1 August 2018

Rudolph Days - July 2018

I know, it's now August, but Mo has had to delay the July Rudolph Days Challenge - so it should now run from 1st to 7th August.

And it gave me some much needed time to come up with my entry this time around. Tracey of Dies to Die For was at a Copics event with a 'pop-up shop' - so it really would have been very rude not to buy something of course :)

Amongst my (ahem) haul there was a lovely little set of stamps with various sentiments, some Christmas gifts/parcels and three sweet little deer. So, not being one to do things the easy way, I stamped eight of each of the three deer and the same with the little Christmas parcels. I then happily coloured them whenever the mood was right. And then it was time to cut them all out - sheesh, I KNEW I ought to have bought the matching dies. In fairness Tracey didn't have any left so I took a close look at the dies on line as well as some die cut images on cards, which I found as examples on line. Ha, I can do that 'she said'. So far I've cut out all the little (18 that I stamped and 24  coloured)parcels and just ten of the deer as they really are a bit tricky-wool. I still have slight reservations about images which are die cut leaving a white border right round - it's almost the 'norm.' now and all I can think is that it allows for a little bit of 'play' when you're doing the die cutting.

So, I used one design of deer and one design of gift/parcel to make my entry for Mo's challenge - times eight of course, in an attempt to boost my flagging Christmas card target for this year:
I used:

- 5" x 5" white card blanks, side opening

- in fairness, as I said, the little deer and parcel were both already coloured and cut out. I'd used Memento 'Tuxedo Black' ink and a couple of stamps from The Greeting Farm's 'Dashing' stamp set - and the Misti of course! Do be aware that MFT have stamps and matching dies also called 'Dashing' so if you like my little fella be careful to order the right one from the right company!

- I'd then coloured the little deer with Pro markers, as well as the parcel. I also added a few little white dots to his back (using a Signo white pen) just to add some interest as I hadn't done any fancy shading and it broke up the expanse of his back (as well as looking cute of course). Also added clear Wink of Stella to the fur and bobble on his little hat for a little bit of glisten

- so there I was, with a little deer and a Christmas gift/parcel and absolutely no idea what to do next - so I walked away and had a think for a day or two

- ping! Then it just hit me - he needed to be framed (obviously) with some form of background, so this is what I did

- die cut a Lil' Inker 'Instant Camera' frame from white card stock then stamped the sentiment 'Jingle all the way' using the Misti, Memento 'Tuxedo Black' ink and one of the sentiments from the 'Dashing' stamp set

- I backed the aperture in the frame with a snippet of pale blue patterned paper I found tucked in the back of the LOTV 'Frosty Christmas' paper pad. I found six in fact, obviously left from a previous play, and also a further two with snowflakes on (I do prefer the little trees though for this particular card). Backing this frame can be a bit tricky and I find that the very narrow red line tape works a treat if you're careful as it's unforgiving if you make a mistake

- for sturdiness I then backed the area of the aperture behind the paper using the waste fall out from when I die cut the frames (again with red line tape) - an extra step but it certainly makes for a much better finish (IMHO) as you end up with a nice solid little topper for your card

- added the Christmas gift and the little deer onto the blue background using a glue pen

- then cut a square of white card stock just about quarter of an inch smaller all round than the card front, using a die from The Works 'Stitched Squares' set of dies 

- embossed it using a Darice 'Snowflake Background' embossing folder

- glued the embossed panel to the card front

- finally added the little framed scene at a jaunty angle to the card front, using thin sticky pads

And, it's still slim enough to post at our standard letter rate - result!

And now to carry on with the other 16 little deer and 16 parcels - sometimes I start things and really don't think it through just how long it'll take. But, I won't be beaten - even if it's a couple of weeks until I tackle them!


Wednesday, 18 April 2018

We Three Kings

I wanted to boost the number of Christmas cards I have here and chose what I thought would be a quick and easy design. Huh, not really the case but I ended up with six cards all the same and it's always good to have cards depicting the real meaning of Christmas:
I used:

- 5.75" x 4" dark blue card blank

- piece of white card stock, embossed using a free embossing folder that came with a magazine a while ago - then trimmed the embossed panel so it had an even border all round when added to the blue card

- to be honest, the dark blue card started off at 6" tall but I then chopped quarter of an inch from the height so that the white panel would fit evenly. It's a trick I use now and then and a useful one to remember - besides which, I often find that working 'backwards' is easier

- now I had a pile of cards and a pile of white embossed panels to play with, so I put them to one side to concentrate on the die cutting

- OK, about the die set (it's the central image plus a surround which creates the 'frame') . It was a freebie along with the matching embossing folder - but it had a couple of 'dull' spots where the Kings' arms are held in front of their bodies which I thought might mean a rethink or even disaster

- I used XCut self adhesive foil paper in copper for the die cutting and after trial and error (but no wasted foil thankfully!) I found that adding three layers of paper as a shim  over the 'dull' spot ensured a really clean cut

- then peeled the backing paper off and added the image panel to the embossed panel before gluing it to the card front

Hmm, just realised I'm way too late to ask anyone to be Guest Designer this coming Sunday. Looks like I'll be making a snippets card myself :)


Friday, 5 January 2018

Pixie's Snippets Playground Weeks 313 and 314 - Prize H

This is the very last prize in the Christmas/New Year giveaway folks - and I'm almost on my knees here after such a flurry of card making, writing posts, keeping track of comments on prizes, visiting your entries etc. But, with a huge sigh of relief and satisfaction, we made it in the end! Even Parsnip keeps whining when I produce yet another prize to offer! He may well ban me from doing this next year - but the show isn't finished just yet.

I did have a smile about my penguin card of yesterday. They sure do have grey fluffy plumage at first - but they apparently also have dark head markings so I was a bit off-beam. Never thought to look through the Google Glasses of course! I just recall seeing little grey fluffy babies on TV nature programmes .......  shouting for their parents to return to them with FOOD!

So, way off the track on penguins, this is my card for today - in fact I made two identical ones at the same time. When you have all the bits for heat embossing lined up it does make sense to do more than one card - especially as this was fairly easy to make:
I used:

- 5.5" x 4.25" white card blank, tent style

- piece of silver mirri card from the snippets folder, trimmed to leave a white border when afixed to the card front

- snippet of deep navy card stock, cut to slightly smaller than the silver layer so that it would be 'framed' when the card was assembled

-  then I used the navy card in the Misti plus an acetate grid to align the two stamps where I wanted them to go. They're both by Inkylicious, the tree is 'Xmas Tree Swirl Small' and the sentiment is another one from the 'Seasons Greetings set

- once happy with the alignment, I picked the stamps up on the lid of the Misti then removed the navy piece of card, swiped it all over with an anti-static bag and replaced it in the Misti ready for action

- stamped and embossed the tree and sentiment in one go (one benefit of using stamps by the same manufacturer is that they will invariably be the same thickness). I used a Delicata 'Silvery Shimmer' ink pad and Stampendous 'Sterling Silver' embossing powder

- glued the image panel on top of the silver 'frame' and then glued them both to the card front

Prize H is mostly connected to this card:
Exactly the same stamps as I used for my card - Inkylicious 'Xmas Tree Swirl Small' and another (total of four sets this year!) Inkylicious 'Seasons Greetings' set of stamps. I've had the tree stamp since just after last Christmas - patiently waiting in the toy box. And, keeping it company for about the same length of time is this:
I was sent the set of stamps by a lovely friend for the toy box ages ago and it's also part of today's prize. Dee peeks in here but isn't a blogger ........ yet :) It's a really gorgeous Bo Bunny set called 'Father Christmas' - and it's very traditional. Even just the little sprig of holly would be so useful - although I like the whole set, that Santa is just as I imagined him as a kid. Who said 'imagined' - he was here for a mince pie and glass of sherry for sure, as always, just a couple of weeks ago. Parsnip was peeking!

And that, my little friends, is absolutely the very last Christmas item left in the toy box! And of course, I will split the prize if you only wish to play for part of it.

So, the Playground gates close at 11am tomorrow (Saturday 6th January) and commenting for prizes will also be turned off at the same time ready for us to swing into a fresh Mr Linky at midnight. As well as a bright and fresh new year - remember, there's still time to link up a snippets make HERE.

And do make sure you've added your name if you want to play for a particular prize by leaving a comment on the relevant post from this past fortnight.

I hope you enjoyed playing along, it really may be the last Christmas/New Year mahoosive giveaway as I did find it much more tricky for some reason this year. Might be galloping old age or just that I've been juggling so many options. But - it was still good fun!

Love from Parsnip and me


Sunday, 31 December 2017

Pixie's Snippets Playground - Week 311 and 312 - results and Weeks 313/314 Prize E

Yup, those prizes just keep on coming!

As this is a 'Results and Picks' week we'll stick to that aspect but, without a Designer Guest.

I had to make my own snippets card which makes up Prize E. I knew before I set out that this was gonna be a leetle bit 'tricky woo' to work out - so I actually wrote down the steps before setting off. And this is the result, all gold and sparkly in real life - I hate my camera in Winter! It might show up better if you click on the image - otherwise please just take my word for it:
I used:

- 6" x 6" (actually just slightly under) square white card blank

- piece of white card stock, die cut using the largest (5" x 5") die from the Creative Dies 'Wonky Stitches - Nesting Squares' set

- sheesh, I sat and gawped at the task ahead! So, a bit of thinking and scribbling of notes, then off we went - with Parsnip popping up now and then from underneath the desk to offer advice, sigh

- in my mind I could already see the layout, so a first step was to stamp the poinsettia 'head' from the gorgeous Altenew 'Poinsettia Pine' stamps set onto a scrap/snippet of white card in any old black ink then trim around the edges it before setting aside (note, if you're braver than me and want to risk wrecking the actual red poinsettia than be my guest - am sure it would work OK with care as my template came out good as new!)

- used snippets of pearly red and deep green card to stamp and heat emboss the poinsettia head plus three green leaves - using a Delicata 'Golden Glitz' ink pad (these are so juicy!), an anti-static bag of course beforehand, and then Ranger 'Liquid Platinum' embossing powder before spending time carefully fussy cutting the pieces out. I think there are matching dies but, possibly due to the cost if I'm honest, I felt the images were able to be successfully cut out by hand compared to the additional cost of a set of dies

- then I set to with the Misti and used the idea I'd had whilst thinking during the wee small hours in bed about making this card. First of all I swiped the white panel all over with an anti-static bag of course - this step saves so much heartache when using embossing powder, and put it into the Misti ready for action

- my approach was to then add a teeny spot of removable tape runner to the back of the poinsettia card template I'd cut earlier and position it onto the 'Wonky stitches' square white background which was set up in the Misti as I just said

- placed the white poinsettia template onto the bottom left corner of the piece of card and set about positioning the sentiment (bearing in mind the wavy stitched edge) and the pieces of foliage and berries stamps in place. I just thought of an alternative way to do this and will write a few words below. I was able to gently tuck them underneath the poinsettia template and at the same time check that the already stamped and die cut 'green leaves' would sit properly once the piece came together

- when happy with the layout I carefully removed the poinsettia template, leaving the sentiment and foliage stamps in place and then firmly closed the Misti lid to pick them up

- then I stamped and embossed them all in one go using the Delicata Delicata 'Golden Glitz' ink pad and Ranger 'Liquid Platinum' embossing powder - phew, perfect result

- the sentiment is another one from the Inkylicious 'Seasons Greetings' set of four stamps

- next I backed the white panel with a square of very slightly sparkly gold card and added it to the card front

- used a red Ziggy water colour brush pen to colour in the berries

- glued the green leaves and the red poinsettia in place (using a Woodware Fine Line bottle) and then breathed a huge sigh of relief

The closest I came to disaster was when I got a little smudge of the red Ziggy on the white background of the card - thank goodness for the Tombow Sand Eraser!! It came off easily and I'll be doing the draw for those in the next few days by the way.

And using the Misti really helped so much in placing the foliage underneath where the poinsettia and green leaves would be glued. I subsequently thought that just stamping the poinsettia onto a piece of acetate, with the card front in place underneath it, would also allow correct placement of the foliage and sentiment without the need to stamp and cut out a template or tuck the stamps underneath. Then when you pick up the stamps with the lid just remove the piece of acetate and carry on as usual. I use grid marked acetate a lot when placing sentiments as it's about the easiest way to get them straight :)

So, that was a rather long winded explanation - as much for my own benefit when I come to make more of these cards, as I surely will.

And of course, Prize E is very much connected to this card:

I think this bundle is one of the biggest and best in this year's big giveaway and it's the Creative Dies 'Wonky Stitches - Nesting Squares' set, the Altenew 'Poinsettia Pine' set of stamps and another Inkylicious 'Seasons Greetings' set of four stamps.

Quick whip though the fortnight's picks:

Sonia always makes the most delicious cards, and also provides loads of tips and such about making them. So I chose this card pop-up card to share with you. It seems very much like a variation on a 'bridge' card which is also a popular design right now - love it!

Majda worked long and hard on this gorgeous baby album! What a beautiful result - it's sure to be treasured for a lot of years.

I actually still have my own baby album, which was carefully written up by my own dear Mum all those years ago. It's one of those cream leather bound pre-printed ones with gaps to fill in about height, weight, Christening gifts etc.,first words, first steps and so on. What is so very cute is that she even took a little footprint from me as a baby - bless her. Such a tiny foot - and so many steps through life ahead of it :)

And last but not least, I picked this lovely Christmas card made by Lynne in NI for her hubby. Wonderful use of snippets - and also such a clever idea to mask off the PB 'Snowy' snowman and give him a partner! Brilliant!

I could have gone on and on with picks, but there are only so many hours in a day to spend sitting here tapping at the keyboard.

We had 45 entries and no new Playmates - not a bad turnout considering the fact that most of us were flying round doing last minute preparations for Christmas - which I hope you all are recovering from :)

So, now for the winner of the Lil'Inker Designs 'Christmas Words Tree' die - who is:
Well done Greta! I know that I definitely have your latest address, so for speed and ease I'll post the die off to you as soon as I can. And of course this win is entirely separate to the current big giveaway so good luck there as well. It's all the luck of the draw folks!

On that subject, because of an inquiring mind as well as knowledge of how random number generators work from my IT background (man and boy from aged 19 when it was almost steam driven stuff!), I don't have total faith in the one I use - although it's the best publicly available (and free) one around. If you run it often enough, or even just a couple of times - you may get the very same numbers popping up again. I suspect it's due to what they use as a 'root' to trigger the algorithm - perhaps local sound, atmospherics etc. etc. That means I will happily use the first winning number each time during the draw, but for subsequent prizes, then I hope you agree that one prize is great per person and the next one(s) should be spread around.

We still have a further week to run on the big 'Christmas/New Year' giveaway but those prizes won't be posted as quickly as I will need to get all the addresses etc. sorted out. Our local Post Office is likely to be very busy straight after the holidays and queues (lines to our 'Over the pond' friends) will probably be long and tedious. I don't relish that as a thought for sure - plus it's going to take time to package things up etc. Oops, and of course there's also the sand eraser giveaway which ends at midnight today (New Year's Eve).

Crumbs, it's all go here! I feel like I'm juggling plates right now.

So all that remains for this post is to remind you to watch out for a few more prizes, say so in the relevant posts if you want to be in with a chance (whole or part of a prize is fine) and remember to make and link up a snippets make HERE before the Playground gates slam shut at 11am on Saturday 6th January 2018. I'll also be turning off comments on the prize posts around the same time so do make sure you've commented in good time on any prizes you want to play for.

AND, we also wish you all a Happy and Healthy 2018 - with love from Parsnip and of course me.

Oh good grief, I just spotted him scurrying off with the gas lighter we keep for outside candles - he was cackling and muttering 'Fireworks at midnight - heh, heh, heh - stand by with those extinguishers'. Help!