Sunday, 30 July 2017

Pixie's Snippets Playground - Week 289 and 290 - results

Gosh, it's been a bit busy here lately, and of course the kiddies are now on their Summer break in the UK so I expect that many of you will have your hands full :)

Let's go straight in with our Guest Designer:
 Jenny L made this fabulous snippets card - I think it's absolutely dreamy!
Shades of lavender and purple come very close to being my favourite colours (after pink) - and there's even a bit of pink as well! As always, Jenny has made a beautiful card with lots of clever little touches.

I'm sure most of you already visit Jenny's blog - if not then I do urge you to hop over and have a browse! For starters, you'll no doubt find out more about today's snippets card - although to whet your appetite this is what Jenny sent me about how she made the card:
I cut a 6"x6" size card with Couture Enchanted Escape Die for the shape. I used the size that is 4"x5" for the base of the card. I then used a snippet of paper left over from another card cut out an aperture with the smaller die, and glued some more snippets from another die cut left over from yet another project to the inside of the aperture.
Placed this on the card blank with foam tape.
Cut out some little flowers that came with the same die and glued them to the side, and added some gems, and a couple of butterflies that were given to me.
Finally I stamped thinking of you with London Fog Ink for the sentiment.


And I also picked up some background information about Jenny from her blog profile:
My name is Jenny Lawrence and I live in Kent. I am married to Tony, my dear and wonderful hubby. We have been married for 34 years. I lost my first Husband to the big C when I was quite young. I have 3 children and 3 stepchildren. 12 Grandchildren and 3 Little Great Granddaughters and a Great Grandson. I have been card making for about 17years. I have made things all my life as my Mum and Grand Mother taught me lots of hobbies. I have made my own clothes, knitted garments, hand embroidered items of clothing, and crocheted items too. I love to bake my own cakes as well.

So girls, we know who to turn to when it's time for cakes in the tree house! :) Thank you so much for being our Guest Designer this week Jenny, especially as it originally looked as if you were to tied up - I really appreciate it!

Now for my picks from this past fortnight - and as always, picking just three was nigh on impossible - and in the end I had one card that screamed out to be a Gold Star pick:
Valerija just blew yours truly, and all her commenters, away with this adorable Christening dress/card with matching box. It's stunning and a worthy Gold Star winner - please take your badge from the sidebar Valerija - with our love.

Then, for my three picks I had such a long list of possibles. So I looked for something of a theme and came up with 'Summer' to help me with the final choice. And here they are:
 
This is such a fun card, brought to share with us by Sue J after quite an absence. It's always lovely to see folk hopping back in for a go on the swings, no matter how long any of you are away - there's always a welcome waiting for you! Back to the card, every bit of detail has been so well planned - right down to the little porthole and the brilliant backing paper too.

Preeti  made this fabulous card using coloured snippets and (amazingly) a variety of stamps which have nothing to do with fruit! For instance, the pineapple began life as a penguin :) To find out more just hop over to Preeti's blog HERE. Well worth a visit as Preeti is always coming up with clever ideas.

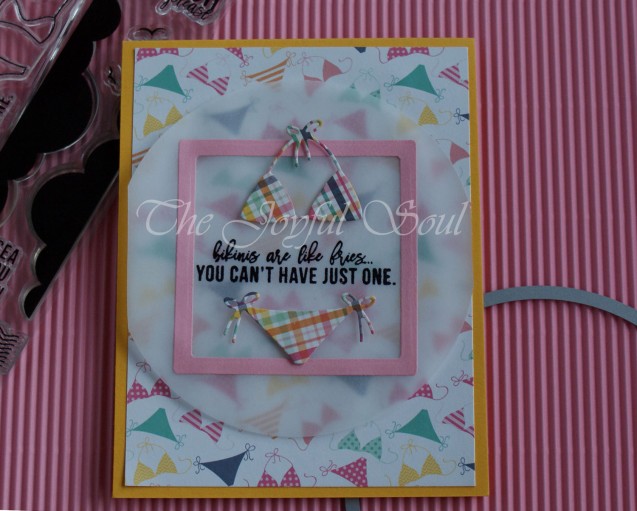
And to round up the Summer theme - Charlotte (Lady Joyful) brought this really super bikini themed card to share with us. I love how the whole card 'flows' so beautifully with the vellum allowing the bikini to stand out . Love that sweet little bikini - which picks up all the different colours in the DP too. And a great sentiment as well!

That's my 'Gold Star' for Valerija, plus a further three picks - I do hope they will inspire you as well girls. Of course we had loads of fabulous ways to use up snippets and I really had to be very firm with myself and not add in at least two more cards from the final short list.  I highly recommend that you grab a cup of coffee and spend some time visiting blogs - the thumbnails with links are always there for you to look back over.

55 of you played along last fortnight and we had one new playmate joining in with us as well:
Linda W
Do hop over to Linda's blog post - it's full of great ideas for using up snippets, and her blog is well worth a good ole nosy around too! Welcome to the Snippets Playground Linda, and I do hope you return to play again soon.

Prize draw time now and our winner of the Concord & 9th 'Heartstrings' die set and a 'Label Maker Sentiments' set of stamps made by MFT is:
Barb (Williams)
 
Well done Barb! Can you please drop me an email with your address and I'll post your prize off as soon as possible. My email address is on the right hand side bar.

Keep those snippets entries coming girls, you still have a week left to play HERE remember! And the prize is the MFT 'Stitched Cover-Up Companion - Diagonal die plus the Clearly Besotted 'Aloha' stamps set. I will split the prize if you only want to play for part of it.

A couple of snippets of news:

- our lovely Playmate Sue (Morris of Zouave Cards) has been on tee vee!! Sue is involved with a fabulous scheme here in the UK where ladies crochet (and I've since learned they can also be knitted!) little octopus toys for premature babies to have with them in their incubators. The idea is that the tentacles can be grasped by the little 'preemie' in lieu of the umbilical cord - which apparently they play with pre-birth whilst still tucked up 'indoors so to speak'. Who knew? I certainly didn't. It's a great idea, the standards for making the toys are set very high (as they should be) and Sue is a co-ordinator who takes along the toys to local hospitals. There I was, sipping my wake-up cup of tea idly watching TV and there was a news item about the scheme - with a face I knew but couldn't quite put a name to! Anyhow, to find out more just hop over to Sue's blog HERE where there's a link to the news item.

Edit: Sue has quite rightly pointed out that although many places do refer to the little octopuses as 'toys' - the correct term is 'calming aids' :)

- and, our Playmate Jane of Jane's Journal is celebrating her 7th 'bloggerversary' with a giveaway, which runs until 9th August. A choice from three prizes for the lucky winner -

Ooopsie, my own 7th 'bloggerversary' slipped past me in March! But, every fortnight is a giveaway/celebration here so maybe it's OK :)

Love from the little white peril - and of course from me too (with a special punch of the air and a 'yaay' for Sarn from Parsnip. Private joke but it's catching!)


Friday, 28 July 2017

More Distress Oxide Ink background stuff

Had an idea about using up one of the Distress Oxide (DOX) ink backgrounds I made recently. It was originally going to be a card for Less is More but I think it's probably a bit too 'busy':
I used:

- 4.25" x 5.5" white card blank, tent style

- piece of white card stock for the front panel, die cut using a MFT 'Diagonal Strip Sentiment Cover Up' die

- next, cut a piece of double sided self adhesive sheet to a teensy bit smaller than the die cut panel and popped it onto a snippet of white card which I then trimmed down to the edges of the adhesive sheet

- peeled off the remaining piece of protective sheet and carefully applied the sticky card to the back of the die cut panel so that the apertures were now backed with sticky. (TIP - keep the piece of waxed protective paper from the sticky sheet to cover up the panel in between working on the next stages). And, medium hold sticky sheet is stronger than Stick-It sheet (ask me how I know .... I had to add some glue here and there!)

- next, took a piece of pre-prepared 'Distress Oxide inked' card and die cut it using the same cover up die and popped all the pieces in place to create the diagonals

- then die cut the daisy and the word 'hi' into the 'banner part' of the striped card background using Penny Black's 'Bashful' die and a die from the MFT 'Hello There' set 

- then using more of the same piece of DOX'ed card I die cut the flower and the word 'hi' using the same dies as before

- popped the pieces in place and ran the whole panel through the Cuttlebug to 'embed' the die cuts properly

- glued the whole panel to the card front 

The panel I used was a reject really, but sliced apart it looks a whole load better. It was an attempt at 'smooshing' with the DOX ink pads. I did use the proper craft mat, dried in between each layer but have a feeling I used too much water - plus I didn't keep on going adding more layers. Thanks for the tips girls! The ink colours used are: Cracked Pistachio', Wilted Violet' and Worn Lipstick' - totally yummy!

Have a lovely weekend - whatever you have planned!


Tuesday, 25 July 2017

Rudolph Days - July 2017

I made these last week and, for once, I'm straight into Scrappy Mo's Rudolph Days Challenge (for July) which runs until the end of the month. In fact, I think I first saw this stamp set over at Mo's?!

Made four exactly the same:
I used:

- 5" x 5" square white card blank

- white card square, already cut to the size I wanted - onto which I stamped the image, using the Misti, Ranger Archival 'Black' ink and Hobby Art's 'Christmas Past' stamp set

- then positioned and stamped the sentiment, from the same stamp set, using SU's 'Real Red' ink

- ha, then I went to use my Zigs and thankfully tried on a piece of scrap card first - oopsie, I hadn't used the right card for the four images lined up ready to be coloured and it was certainly going to 'bobble'

- quick about turn and used Faber Castell Polychromos pencils with Sansodor blending solution instead - phew, close call!!

- ran a gold Calligraphy pen around the edge of the coloured image square

- mounted the image square onto slightly larger dark green card (snippets, yay!) and then onto gold mirri card

- glued the whole panel onto the card front and felt there was just 'something' missing

- out came the Josy Rose hot nail heads and I just covered the three holly berries with red, shiny nail heads - what a difference, and still small letter size!

Cutting the little image squares to size before stamping was helpful - but, I wouldn't like to try it without the aid of the Misti 'Creative Corners' - which 'push' the card away from the very edges of the Misti base. I can thoroughly recommend those and am sure they would work well with (ahem) other similarly designed brands of stamp positioner :)


Sunday, 23 July 2017

Pixie's Snippets Playground - Week 291 and 292

Crumbs, so where did THAT two weeks go to then? It time for a new fortnightly challenge in the Snippets Playground folks! As always, a huge thank you to everyone who came to play this past fortnight.

Let's get straight in - here's my snippets card for the coming fortnight - trying out a couple of new things along the way:
I used:

- white card blank made using Strathmore Mixed Media Vellum surface 300gsm paper (at 300 gsm it's very sturdy card in fact, and I used it as it's 'a very slightly off-white all of its own' - I wanted all the bits of off- white to be from the same shade (OCD once again!)

- a snippet of the Mixed Media card, which I coloured using the fabulous TH Distress Oxides that arrived here the week before last. I used the pads straight onto the card - just some daubs here and there, heat drying in between colours and then added more colour into any bare patches here and there using a sponge applicator - colours used were 'Broken China', 'Faded Jeans' and 'Iced Spruce'

- next, sprayed the inked up piece of card using a Mini Mister, which produced lovely water marks and heat dried again - then did a happy dance :)

- for the top layer of the card I die cut a snippet of the white Mixed Media card using my much loved MFT 'Stitched Cover-Up Companion - Diagonal die, and set it aside

- then I stamped a hibiscus flower and two leaves using stamps from the Clearly Besotted 'Aloha' set. Stamped them using VersaMark and then heat embossed using Ranger 'Liquid Platinum' embossing powder

- next I coloured the leaves and flower using my (a second outing only!) Ziggys and fussy cut round them leaving a narrow white border

- now I could check exactly where the word 'Aloha' from the same set ought to be positioned on the band across the die cut - did this using the Misti and a small piece of acetate on top of the die cut, which is printed with lines/squares for alignment. Held it in place on the Misti with magnets and once the 'Aloha' stamp was stuck to the Misti lid it was just a matter of whipping the acetate away and leaving the die cut panel in place ready for stamping

- again, I stamped using VersaMark and then heat embossed using Ranger 'Liquid Platinum' embossing powder

- finally, it was just a case of assembling all the pieces to make up the card itself. I used red line tape to adhere the Distress Oxide panel to the back of the die cut frame, glued the backed frame onto the card front and used more red line tape to attach the leaves and flower

My original intention was to use a Distress Oxides panel of orange tones I'd already made but it looked much too 'samey'. Thankfully I'd been playing and had a few pieces in different colours - the blue is more like the sea and sky in Hawaii :) So says my in-house critic anyhow!

I'd like to enter this card into the following challenges:

The Flower Challenge #10 - 'Embossing Heat/Dry' - I chose heat embossing and it's the first time I've entered this lovely challenge, one for the future girls! It closes on 25th July - the same day as the latest Rudolph challenge begins over at ScrappyMo's!

Certainly I'm really pleased with the Distress Oxides, such luscious, creamy and rich colours - although I do need much more practice at one of the other techniques which is so popular right now. Inking onto my craft mat, spraying with water and then 'smooshing' - sigh. I have a sneaky suspicion I was too liberal with the water - but am delighted at the 'apply straight to the card and then spray' approach! I need to check out Loll's videos!

Once again, no need to really spell out what this fortnight's prize is made up of, although funds wouldn't run to TH Distress Oxides I'm afraid - but if you live in the UK Joanna Sheen has the original set of 12 selling at £49.99, which is about a £16 saving. So here's the prize:
It's is a MFT 'Stitched Cover-Up Companion - Diagonal die (I first used mine here in May, then ran off and bought one for the toy box - and it can be used either way round depending how much space you want above or below the 'banner strip'), plus the Clearly Besotted 'Aloha' stamps set. I love that the stamps come with three sizes of flower and two sizes of leaves - just perfect for making up a little montage of flowers :) And, when I Googled, I was stunned at how many colours of hibiscus there are in real life - absolutely tons of them! I will split the die and the complete (obviously) set of stamps if you only wish to play for one or the other.

The Snippets Challenge will run for two weeks from now on and the Playground gates will close at 11am UK time on Saturday 5th August. The gates will open again at midnight UK time on the same day.

It's still a maximum of ONE entry and please say in a comment if you wish to play and be a possible winner of the prize. The prize is both items together as a single prize, unless you really do only want to try for a 'split' - in which case I'd do a further draw for the other item. Please also link back to the Playground in your blog post to be eligible for the draw.

Remember, if you link into the Playground and don't say clearly that you're wanting to be in the draw then you will be bypassed if your name comes out of Mr Linky. I'm sure you all know I ask for a positive 'yes' just in case you're playing only for fun. Thanks!

Mr Linky is below - please let me know if you have any problems linking, it's easy for me to sort out so don't struggle on alone :)

Be sure to call back next week to see the winner of last fortnight's prize (Concord & 9th 'Heartstrings' die set and the MFT 'Label Maker Sentiments' set of stamps) plus my picks from the past two weeks - hopefully as well as another lovely guest designer too!

Love from Parsnip and of course from me,


Friday, 21 July 2017

Framed butterfly card

The other day I was playing with my new TH Distress Oxides (DOX for short!) for the first time and made a few background pieces.  One was oranges and off it went down the right path without even planning it - so this is the card I made using some of the background piece:

I used:

- 4.25" x 5.5" white card blank, tent style

- a snippet from a piece of Strathmore Mixed Media Vellum Coated 300 gsm paper (I adore this!!) which had been smeared and daubed using TH Distress Oxides in the following colours: 'Fossilised Amber', 'Spiced Marmalade' and 'Fired Brick' - all part of the first set of 12 to be released

- heat dried between each colour so they didn't end up like a patch of mud ....... and then finally sprayed with plain water using a Mini Mister to add the 'splats and droplets' then given a final dry with the heat gun

- next I die cut two matching sets of frames using Impression Obsession's 'Rectangle 6 in 1 Frames' and white card stock -  then stuck the two matching frames together, one on top of another, for added dimension

- trimmed a piece from the rather precious TH DOX inky piece of card (it's not something you rattle off in five minutes!) and mounted it behind the white frame

- now that the framed piece of orange DOX card was assembled I could work out the positioning and potential 'look' of the sentiment - and after a lot of dithering opted for a die cut gold mirri card sentiment, to match the gold bodies I planned to add to the butterfly's wings later

- die cut the word 'Smile' (from the Penny Black 'Hooray' set of dies) using Stick-It backed gold mirri card and adhered it onto the card front. To really 'set' it in place and also to smooth out some 'cutting plate endowed wrinkles' I ran the whole card-  with the die cut word in place - through the Cuttlebug, using the embossing plates as well as an embossing folder for the right pressure

- time to glue the frame with the orange DOX backing in place, using Collall All Purpose glue - still a huge favourite of mine for 'wriggle room'

- at the same time as working with orange shades, I'd been using a variety of DOX blue shades in a similar way and had a little strip left over from a card I'll be showing on here in The Playground soon. So I die cut two little matching blue butterflies using SU's 'Beautiful Wings' Embosslits die/EF

- then added little gold mirri card bodies to the butterflies, die cut using Frantic Stamper's 'Petite Butterflies' plate die (it comes with loads of little butterflies and bodies, very pretty and in a way I wish I'd used it for the butterfly wings as well). If you love small butterflies then this die plate really is a lovely one to have in your die collection :)

- popped the butterflies in place using snippets of thin sticky pad and there it was - done!

I've said it before but running an added die cut through the embossing machine really does seem to 'embed' it into the card and it ends up looking almost 'foiled' if you use mirri card. Just remember to use an embossing folder for that added pressure, along with your normal embossing plates set up. For some cards I leave the embossing folder layer out, so it's a case of try the gentle approach without an EF first and see it you like it. Just make sure the EF is bigger than the card front for an even pressure and no rogue 'lines'. I tried to take a photo showing the mirri card shine but failed miserably :(

It sounds quite an easy card to make, but at the same time we were also trying to sort out the aftermath of the violent thunder storms we had here on Tuesday night. Both woken up by the bedroom lighting up like a funfair and an immediate enormous crash of thunder at about 2:30 am.

Looking back, it must have been quite an amusing sight - Len was out of bed in one huge hop (Olympic high jump standard) whilst I scrabbled to cower under the bedclothes! I swear that everything in the house rattled! And the next day we discovered that the telephone line was dead as a Dodo. BT are supposedly now on the case but who knows when things may be sorted out - at least we still have internet access, which surprises me, plus our mobiles! At least nothing blew up and we weren't endangered in any way :)

I have a friend who is absolutely terrified of thunder and lightning and has been known to dive under her bed or even into the wardrobe during a thunderstorm! After the other night, I'm on her side and would have been scrapping and fighting her out of the way I promise!

Edit: I just realised that this card is eligible for the brilliant CAS Watercolour challenge for July, run by Loll and Bonnie! The theme is 'Butterfly' - whoop, whoop - it's been far too long since I joined in.


Tuesday, 18 July 2017

Hello Sunshine!

I've had a pair of NBUS 'beach hut' dies for quite a while, waiting for a first outing. We had an overcast day last week so I set to and made this card - in the hopes of enticing the sunshine back:
I used:

- 5" x 7" white card blank, tent style - I left the width of the card blank at 8" until I'd added the 'sky' and the 'sand'

- snippet of 'sky' paper from LOTV's 'Up, Up and Away' paper pad to cover the top two thirds of the card

- snippet of Neenah 'Desert Storm' card, roughly torn along the top for the sand

- glued the sky paper and the sand card in place using a tape runner, butted up to the left hand side and also the top and bottom where appropriate

- only then did I trim the right hand side down by an inch - that ensured a perfect 'edge to edge' fit of the background :)

- before going any further, I added the sentiment using Memento 'Tuxedo Black' ink and a stamp from the really sweet Paper Smooches 'Summer Lovin' set - of course used the Misti as well!

- then I backed mauve, cream, pink, green and peach snippets of coloured card stock with Stick-It Double sided adhesive sheet

- die cut four beach huts using the pair of 'Beach Hut' Signature dies from Joanna Sheen - and carefully kept the little pop out pieces as well

- drew a fine pencil line along the 'sand' and one by one added the beach huts as well as popping the little pop out pieces into opposing colours - fiddly but satisfying

- then added the sun, die cut from peach card using the sun from the Joy! Sun & Moon set

- stamped three seagulls using the same Paper Smooches stamp set as before (tried it out first on a teeny scrap of the patterned paper as sometimes papers may lend themselves to 'bleeding')

- rubbed out the pencil lines on the 'sand'

- asked the in-house critic for his opinion as I had also stamped and fussy cut a pair of flip flops from the same stamp set to add to the sand strip

- he agreed with me that the flip flops didn't look quite right - a bit like Shrek was in town! 'Shame you don't have a crab' he said - result!

- in the very same Paper Smooches stamp set there's the cutest crab, so I stamped him onto a little leftover already Stick-It backed snippet of peach card, added a little bit of shading with a darker Polychromos pencil and fussy cut him out before sticking him to the side of the sentiment

- final touch for more fun, I added a couple of little googly eyes to 'Clarence the Crab' 

I noticed after cropping and linking the image that the green hut needed pressing down a bit more, but didn't bother retaking the photo as it's a bit of a palaver. Should have run it through the Cuttlebug before adding the eyes to Clarence, but it's well pressed down now!

If you're tempted by the beach hut dies, do be aware that they're approx. 2" tall and over 1.5" wide at the widest point. That does mean they're big enough to add your own colouring of course, which adds to the versatility.

And guess what, just as I was clearing stuff away from my desk - out came the sun! 


Sunday, 16 July 2017

Pixie's Snippets Playground - Week 287 and 288 - results

Crumbs, even during the heat at the end of June and beginning of July, it was standing room only at times in the Playground! What fun and so many fabulous entries as well. So, it's time for a peek at the fortnight's picks, the prize draw results and first off - our Guest Designer, Lia:


I'm delighted to say that Lia is our GD this fortnight - such a happy, friendly face and what fabulous snippets offerings she arrived with too! Stand by girls, quite a few pictures and also some fascinating reading as well.


Last thursday was the last school day of our granddaughter Chloë who is 6 years old and she wanted to make something nice for her 2 teachers to say 'Thank you' for everything she has learned! So she asked me if I had a good idea. Well, I have a lot of ideas for kids crafts, because I was a teacher in Kindergarden myself a long time ago and therefore we searched in my ideabook until we found these boats, made from cork, rope and design papers. So we were sitting in my craftroom for a few hours and helped each other to create the boats above. Chloë is a keen crafter and we had a lot of fun!

Note from Di - and here's a photo of the little lady (Chloe) herself - isn't she pretty?:

 
And Lia also sent me some details about herself as well - it's always such fun to learn more about one another I think. I always realised that Lia was very talented but not about the publications side of things! 

A little bit about me:

I am a crafter as long as I can remember and besides making cards I like drawing, crosstitching, making embroideries on cards, scrapbooking, etc.

I worked as a teacher in Kindergarden for a while, but that’s a long time ago, because I had to stop working as I got married. That happened and was normal in those days!

After my 2 daughters were born I starting crafting again and during 15 years I organized workshops in fabric and glass painting, cardmaking, etc.

A neighbour was the editor of some Dutch craftmagazines and he asked me for writing texts for him and so I did.

He asked me to make crafts now and then for publishing and I was happy to do so.

That all happened 20 years ago and I am still a writer and crafter for the magazines, although the magazines are in hands of another editor now.

So you really can say: I am a happy crafter and that will never stop! A day without crafting is not a good one.....

And it is has been a lot of fun to craft with my daughters and now with the grandchildren.

By the way: one of my daughters is a professional crafter too, so it is in our genes.....

Thank you so much Lia for being our Playground Guest Designer this fortnight, along with Chloe of course :)

Now for my picks from this past fortnight - the usual difficulty in cutting a very long list down to three picks of course:
I chose this card, made by Claire,  as a perfect illustration of using up lots of different snippets to form a loose pattern as a background. Love the idea of the stitching with the loose ends of thread just left 'as is'.

And this card, made by Bunny, is another brilliant way to use up little snippets. Wonderful paper piecing and I love how all the colours are all pulled together in the little dress on the right hand end of the washing line :)

And Sharon F did an amazing job with loads and loads of teeny die cut pieces when she made 'O' the Owl. Absolutely gorgeous and I reckon it would have been a huge hit with the recipient (who was having a party based on the theme of 'Daniel Tiger's Neighbourhood - I know, not one I'm familiar with either!).

That's my three picks - I do hope they will inspire you as well girls. Of course we had loads of fabulous ways to use up snippets and I really had to be very firm with myself and not add in at least two more cards from the final short list.  I highly recommend that you grab a cup of coffee and spend some time visiting blogs - the thumbnails with links are always there for you to look back over.

68 of you joined in last fortnight, what a bumper load of entries! And we also had three new playmates joining in with us as well:
Lynne R
Karen K
Melissa - Art Tart (that made me really smile)
Welcome to the Snippets Playground girls, and I do hope you return to play again soon.

Prize draw time now and our winner of the Crafters Companion 'Baby Bamboo' stamp set (kindly donated by Val ), a set of The Works 'Stitched Squares' dies and a Bow-Easy bow maker. Our winner was playing for the whole bundle, although I would have been happy to split it of course. And, here's something I don't normally do but I'd love you to see our winner's snippets entry - so cute:
 
Gloria Lee 
 
I'd really like some of you to hop over and say 'Hello' to Gloria, she only had three comments on her entry and has just 33 followers. Her work is lovely (she's on one of the HLS Design Teams) and really worth taking a look at!

Well done Gloria - can you please drop me an email with your address and I'll post your prize off as soon as possible. My email address is on the right hand side bar.

Keep those snippets entries coming girls, you still have a week left to play HERE remember! And the prize is Concord & 9th 'Heartstrings' die set and a 'Label Maker Sentiments' set of stamps made by MFT. I will split the prize if you only want to play for part of it.

Love from the little white peril - and of course from me too


Friday, 14 July 2017

Playing catch up

Am woefully behind on my 2017 Christmas card target, so I quickly made half a dozen, two lots of three the same:
I used:

- 5" x 5" square white card blanks

- images from the Hunkydory Little Book of 'Sparkling Season' toppers, cut down to squares using a die from The Works 'Stitched Squares' die set. The original images are 4" x 6" in size and it's a bit of a game trying to work out which ones will cut down to about 3.75" square without spoiling the design  

- mounted the images onto pieces of deep red slightly shimmery card, cut just slightly larger than the image

- added a tickle of clear Wink of Stella to the snow on the roof tops - just so it catches the light and adds a touch of extra interest

- next stamped the sentiment using Memento 'London Fog' ink and a stamp from Phill Martin's 'Scribbled Christmas Sentiment Corners'

- finally glued the image panel to the lower right hand side


The Misti came in so handy for working out where to place the corner sentiment - as well as doing a run of six cards of course. And, I used Memento's 'London Fog' to stamp the sentiment as it picks up some of the grey detail in the images. There are two greys made by Memento that I really like - 'London Fog' is a sort of bluish tinged grey and 'Grey Flannel' is a warmer toned grey. Both are obviously softer than using black and do have a place in stamping both images for softer outlines as well as sentiments.

So, that's me up to 84 Christmas cards so far - and I need to make a further 12 by the end of July to get back on target, sigh. I can see it possibly not happening this year.

Have realised I've done three quite similar variations of this card now, using the Phill Martin corner sentiments and also images from the same Christmas pad. Time to go hunting round Pinterest and also some challenges for new ideas I think!


Tuesday, 11 July 2017

Less is More #336 and #337 - OLC coloured Cardbase

The current challenge over at Less is More had me chewing my thumb nail for a while, not the one layer stipulation - but because I very rarely use coloured card as a base these days.

This is what I came up with - not very adventurous but rather pretty in real life (despite being an absolute 'piggy-wiggy' to photograph!):

This photo has slightly picked up the shimmer from the Brilliance ink layers

I used:

- 4" x 5.75" card blank, made using Neenah 'Desert Storm' card stock

- Penny Black stamp called 'dreamy' and the Misti to position the stamp first of all

- tapped all over the stem using VersaMark 'Hint of Pesto' chalk in pad and stamped it a couple of times

- tapped Memento 'Summer Sky' dye ink all over the wispy fronds and stamped

- next added some Brilliance 'Pearlescent Lavender' to the middle part of the wispy fronds and over stamped 

- then added some Brilliance 'Pearlescent Orchid' to the lower section of the wispy fronds and overstamped

- added a sentiment from the Paper Smooches ''Sentiment Sampler' set, using VersaMagic 'Hint of Pesto'

I'm always in a quandry here over Sympathy cards. When you need one you generally need it fast. But if you make one or two in advance to have ready, then it maybe doesn't seem as personal (to me at least). I guess the balance is to keep one or two on standby for those times when you just wouldn't be able to produce one quite quickly.


Sunday, 9 July 2017

Pixie's Snippets Playground - Week 289 and 290

Time for a new fortnightly challenge in the Snippets Playground folks! As always, a huge thank you to everyone who came to play this past fortnight - loads of gorgeous entries.

I was 'missing in action' during some of the challenge - we hopped over to Southern Germany to visit Len's grand daughters and their Mama. Had a wonderful time - as always! Much laughter and a lot of fun was had for sure.

Now, this is my snippets card for the coming fortnight - made as a Birthday card for a very special friend - in real life it shines almost as brightly as she does:
I used:

- 6" x 6" square white card blank

- snippet of black card stock, trimmed to just slightly smaller than the card front and glued in place

- snippet of white card stock, trimmed to just slightly smaller than the black layer which then had a heart shape die cut from it using the fabulous Concord & 9th 'Heartstrings' die set (you can use this set to just cut the 'strings' portion of the heart if you separate the outer die from the inner one - I left them joined for a first play)

- then I backed the heart shaped aperture using a snippet of medium strength double sided adhesive sheet, covered the exposed sticky front with the waxed paper I'd saved when backing the aperture and set the card aside (tip: my next steps were to fiddle about with small die cut pieces of card to fill the aperture so it's always best to have the aperture all prepared just in case the little pieces from the next die cutting stage fall out of the die willy nilly)

- snippet of red card, die cut with the same heartstrings die and inlaid into the sticky aperture on the card front 

- snippet of gold card, again die cut using the same die and this time they were used to inlay in between the 'strings'

- snippet of the same red card to die cut the small heart, using a die from the same set, which was then glued in place

- then I got the Misti set up with a right old selection of words from the MFT 'Label Maker Sentiments' set, inked them using Memento 'Tuxedo Black' ink and stamped them. The stamps are very good but I did love my Misti all the more as restamping really gave such solid black background - so much like the old Dymo label maker I stupidly threw away about 20 years ago!

- then I just snipped the words into rectangles using smallish sharp scissors and played around for ages deciding which ones to use. So much choice I dithered for quite a while before eventually sticking the final selection in place

One finished card, all ready to post off to Darnell a couple of weeks ago! The Heartstrings die set did need a little bit of shimming to get the clean cut right through the quite thick red and gold card I used. It always seems that, the closer together the cuts are, the more pressure is needed for a clean cut on quite thick card.

I stuck to just two quite traditional colours for my heart but can imagine this would look fabulous in a variety of colours - or possibly 'ombre style' going through shades of one colour.

Once again, no need to really spell out what this fortnight's prize is made up of:
The prize is the Concord & 9th 'Heartstrings' die set and the MFT 'Label Maker Sentiments' set of stamps. Loads of words (31 in fact) to combine in this great set. I will split the die set and the stamps if you only wish to play for one or the other.

The Snippets Challenge will run for two weeks from now on and the Playground gates will close at 11am UK time on Saturday 22nd July. The gates will open again at midnight UK time on the same day.

It's still a maximum of ONE entry and please say in a comment if you wish to play and be a possible winner of the prize. The prize is both items together as a single prize, unless you really do only want to try for a 'split' - in which case I'd do a further draw for the other item. Please also link back to the Playground in your blog post to be eligible for the draw.

Remember, if you link into the Playground and don't say clearly that you're wanting to be in the draw then you will be bypassed if your name comes out of Mr Linky. I'm sure you all know I ask for a positive 'yes' just in case you're playing only for fun. Thanks!

Mr Linky is below - please let me know if you have any problems linking, it's easy for me to sort out so don't struggle on alone :)

Be sure to call back next week to see the winner of last fortnight's prize (the Crafter Companion 'Baby Bamboo' stamp set, a set of 'Stitched Square' dies from The Works and a Bow Maker) plus my picks from the past two weeks - hopefully as well as another lovely guest designer too!

Love from Parsnip and of course from me,