Monday 30 May 2022

Rudolph Days Challenge - May 2022

Gosh I'm running a bit close to the wire here with my Rudolph Days entry. It's mainly as I got myself bogged down by starting off a batch of totally different Christmas cards before realising that there was more to them than I thought!

So, I switched horses mid-gallop and made a Penny Black 'Masterpieces Made Simple' card as I had a few ready cut frames handy:

I used:

- 5.5" x 4.25" white linen card, side opening

- snippet of the same card to cut the 'frame' using a die by MFT called 'Stitched Rectangle Scallop Edge Frame' 

- image from the Penny Black 'Masterpieces Made Simple set called 'snowfall serenity'

- stamped the sentiment onto the image using a Memento 'Tuxedo Black' ink pad and a Kirsty Wiseman 'Many Greetings stamp 

- then backed the image with fun foam and set aside

- backed the outline scalloped frame with Tonic 'Majestic Gold' pearlescent card then glued onto the card front

- finally, glued the image into the frame - finished!

I'd like to enter this card into ScrappyMo's Rudolph Days Challenge for May.

And, also into the current Allsorts Challenge #678, where the theme is 'Anything but Birthdays'. 


Sunday 29 May 2022

Getting ready for the Platinum Jubilee

..............and of course had to kick off Sarn's new Snippets Challenge HERE with a card:

I used:

- 5.5" x 4.25" white card blank, side opening

- all patterned papers from an ancient Forever Friends 'Best of British' paper pack - either from the 2020 London Olympics or perhaps the Queen's Diamond Jubilee, which makes it 10 or 12 years old

- die cut the papers, plus a snippet of plain white, using a great new die from Ann Melvins small but so reasonably priced online shop. It's called 'Pin Wheel' - and here's a link to Ann's shop. Stuff sells out quickly but seems to be restocked pretty fast

- then just glued the main dark blue background piece onto the card front and filled in the spaces using the curved pin wheel pieces (love that the insert pieces have stitched edges)0

- stamped 'let's celebrate' using Memento 'Tuxedo Black' ink and a stamp from Lil' Inker's 'Just Sayin' stamp set

- then I added a little Yeoman of the Guard (aka Beefeater) teddy bear 'topper' - which also came in the paper pad - after stamping the word 'hello' using the same set of stamps and ink pad. I should have added a '70' to the rosette but my dies are bigger and would look silly

This was my second go at making the card - basically I hand wrote greetings on the first one and it looked a mess!

As it was a first outing for the pin wheel die, I'd like to enter this into Darnell's NBUS Challenge #38.

So, we're ready and waiting in the Playground - the bunting is now strung around the Playground, Union Jack paper chains adorn the inside of the Playhouse (making those took me back to my childhood), hand held flags for waving are all lined up, the food preparations are organised to within an inch of their lives - and Sarn will be waving bottles around as she makes up various lethal concoctions cocktails for you all to try out! There's also an extra little surprise for you - go and see!

Dudley is beside himself with excitement as he's going to be Sarn's 'barman assistant' (not sure if she knows yet) and he has a sweet little Union Jack bandana to wear as well. He's been practicing his 'tray above the head carrying' skills.  Must take a photo of him which will be posted during the celebrations - if he can still stand up! Apparently, so he tells me, waiters get to lick up the slops as well as eat any food they can scrounge!!

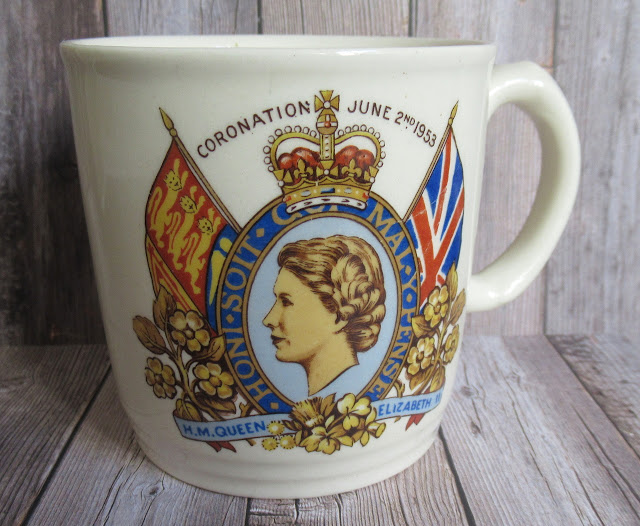
And, although drinking vessels will be provided by Sarn - I'm going to take my own. It has survived many, many house moves around the World (Army child) and is still without a single chip or crack:

Although our Queen has been our Monarch for 70 years, her actual Coronation wasn't until June 1953. We Brits do know how to put on a big show of pomp and pageantry but of course it took many months of planning and preparation. Not to mention the installation of a good few 'new-fangled' black and white televisions in private homes. Of course, I was fast asleep in my pram and missed it all, snigger! History lesson over for today ☺

See you in the Snippets Playground!


Thursday 26 May 2022

Allsorts 13th Birthday Challenge # 677

Huge congratulations to Brenda and her lovely Design Team - 13 years of the Allsorts Challenge - phew! One of my favourite challenges and a great place to find stimulation and ideas.

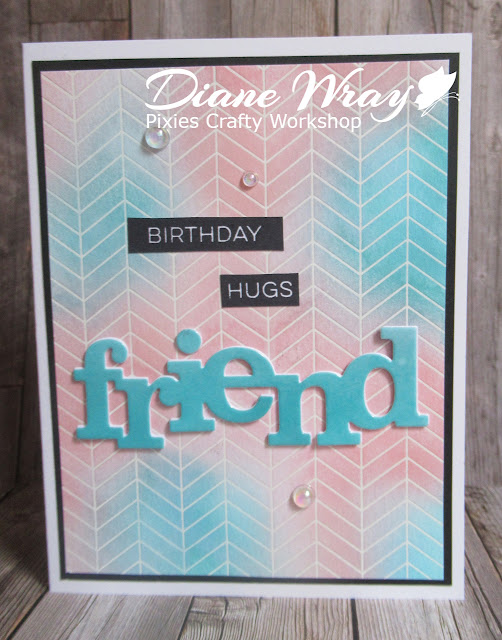
The theme this week is 'Anything for a Birthday' and I sat working until quite late yesterday evening, determined to join in the fun. This is what I made, two cards very similar to one another - just reversed the colour of the big die cut word:


The gorgeous shine on the die cut word

I used:

- 5.5" x 4.25" white card blanks, side opening

- two Concord and 9th 'Everyday Tintables' card fronts, coloured using soft blending brushes with Distress Oxides in 'Peacock Feathers' and the gorgeous 'Saltwater Taffy'

- at the same time I coloured a couple of white card snippets all over using each of the same Distress Oxide colours ........ I had a leetle  plan in mind!

- both of the 'tintables' panels were trimmed down and mounted onto backing 'frames' of black card and glued onto the card fronts

- next, thanks to an idea from Ann Melvin, I laminated both pieces of the plain Distress Oxide colored card - on the front only. So easy to do when you know how - just back the whole area where the card pieces are place in a laminating folder with copy paper or similar. The backs of the coloured pieces of card are then left unlaminated when you cut the laminating pouch open to reveal the contents - simples and also really easy to glue onto your work! Hint from Ann - don't laminate the back and front - your die cutting machine won't cut cleanly through the back layer

- then I die cut the laminated word 'friend' for each card using a die by Winnie and Walter called 'In A Word: Friend Cutaway'- and it comes out looking just as if you'd coated it in Glossy Accents, wahoo!! ☺

- stamped the 'BIRTHDAY HUGS' words onto a snippet of white card using a Versafine Clair 'Nocturne' ink pad and just hand trimmed them - the stamps are by MFT from their 'Label Maker Sentiments' set 

- layered the die cut word 'friend' onto two more white die cuts to add dimension

- then just glued the main and smaller sentiment words in place using a glue pen

- finally, added three 'Bubbles' embellishments to each card - and called them done

The Ann Melvin demo in the link above uses strips of washi tape and I've also seen another version where she laminated plain coloured card. The Glossy Accents effect really is gorgeous in real life. Not seen her laminating Distress Oxide coloured card as I did - but to be honest, any flat paper or card would work fine as far as I can see. And if you want to economise, then place your card pieces to be laminated face down on either side of the pouch with two sheets of paper in between! I promise it will make more sense if you spend five minutes watching Ann's video.

One thing I tried that didn't work was to laminate the MFT words and then fussy cut them. I think it's the action of the scissors on small pieces but they were just going to peel apart from the lamination covering - luckily I'd had my doubts and had also stamped extras! The little dots above the letter 'i' in the laminated word friend came out from the die cutting process perfectly though.

One way round it might have been to run the MFT scissor cut words back through the laminating machine, between a folded piece of copy paper. Another one to try at some point!

I confess that I then moved on to laminate some pretty napkins - using matt folders. Watch this space!

I also love those 'tintables' card fronts and had forgotten I still had them, minus one used ages ago. They are already covered with 'resist' patterns or words, all ready for some blending work. Mind you, I deffo. need to work on my blending skills.

When doing the blending I tried out a new gadget - a Waffle Flower 'Mini Stencil Mat'. Basically it's a soft floppy silicone sheet with a lip around one side and the top - which you keep your work butted up against. It does away with tape and of course, much like the Misti and other stamping platforms, your work goes back into exactly the same spot if you take it away to have a look. Really easy to clean as well. I just bought the Mini Version (about A4 size) but there is also a larger one available. I got mine from HERE.

I'd also like to enter these cards into Darnell's NBUS Challenge #38 HERE. Several new things, both of the Distress Oxides were having a first outing and also the Waffle Flower stencil mat.


Sunday 22 May 2022

A thank you card

I wanted to send a card to a friend and, when I won a prize over in one of her challenges recently, it was perfect timing! It's to say 'Thanks' both for the prize and also for her generosity with prizes for the Snippets Playground toy box.

As often happens - I hit problems along the way - but I do include how I 'fixed' them below:

I wonder if this is familiar? For a long time the recipient, Brenda of 'Floral Fantasies' had dancing poppies as her blog header - and this card was made, using my prize from Allsorts, with that happy image in mind.

I used:

- 5.5" x 4.25" white linen card, side opening

- snippet of the same card to cut the 'frame' using a die from a NBUS set of dies by MFT called 'Stitched Rectangle Scallop Edge Frame' and set it to one side for later

- then, the fun began. My lovely prize from Allsorts was an IndigoBlu stamp called 'Wild Flowers' - which I adore. I stamped it using Memento 'Tuxedo Black' ink onto a carefully selected and very lovely gently coloured rainbow piece of paper from a paper pad by Honey Bee called 'Team Tie Dye'. Sigh, and then I got a smudge of ink just a bit above the image, even using the Misti. Totally my own fault!

- having got that far I plodded on and dug out another co-ordinating piece of paper from the same paper pack, which luckily uses the same shade of yellow, to use for the upper part of the card

- fussy cut around the top of my stamped image then glued it below the upper background piece

- used a red Pro marker to colour in the poppies

- stamped the sentiment using Memento 'Tuxedo Black' and a stamp from the Sweet Dixie set called  'Big Sentiments' 

- cut the image panel to the size I wanted and then glued the image onto the back of the 'frame'

- then just glued the image, already glued within the frame, onto the card front onto the card front (don't that sound easy?!) 

- final touch - some of Lucy's Little Things 'Raindrop' gems 

I'd been hunting for some stitched rectangle frames with the smaller scallops for ages! Talk about doing a full scale search of the internet.

I'd like to enter this card into Darnell's NBUS Challenge #38 for May. A first outing for the frame dies.

Also, at 'We Love Stamping' Challenge for May (For a lady or girl).

And, also over at 'Stamping Sensations' Challenge for May (AG with the option of floral and fauna)

Phew, three challenges once again. The Playground always comes first but it's so good to have the time to play more - thanks to Sarn! 

And, speaking of Sarn - remember to hop over to the Playground to see her post for today, with the picks and also the result of the prize draw - HERE.

Dudley has been pretty well behaved this week. He's very interested in anything that needs to be unpacked or opened. It's a bit like having a doggy quality control inspector in the house!

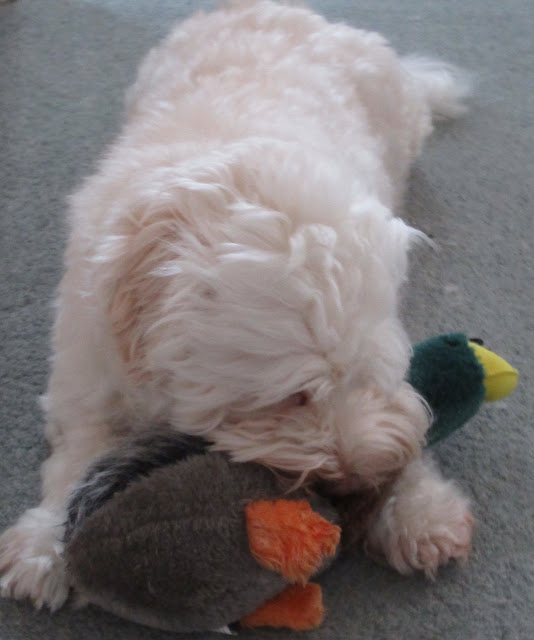
As always, his beloved Honka Duck is never very far away from him:

I was bending down in front of him to take this photo. Dudley was in a world of his own, spreadeagled on the floor with Honka in his mouth. His eyes were half open but even when I asked nicely, he wasn't gonna look up and say 'Hello'. Sorry 'bout that! 

Ha - just wait until he has to pose nicely wearing his Jubilee bandana in a couple of weeks time. I know, ain't gonna happen knowing Dudley Dog!

Other plans are under way and Sarn has already come up with a suggestion for a special cocktail for the occasion - hic!


Wednesday 18 May 2022

Christmas Kickstart #62 - Mini-Slimline

The current challenge for May 2022 over at Christmas Kickstart, HERE, is 'Mini-Slimline'.  Really great theme and I literally just had the very thing to hand ........ raring to go! And, I was homed in on sparkle - right on cue for the current Allsorts Challenge - yay!

A good while ago, I think before Al was so unwell, I won a very 'tricky-woo' looking die over on Rudolph Days Challenge. My Cuttlebug was playing up like it had lumbago and, with everything else that Mo was coping with, I sort of wrote the prize off. However, last week, right out of the blue it arrived here! Thanks again Mo! A lovely surprise!

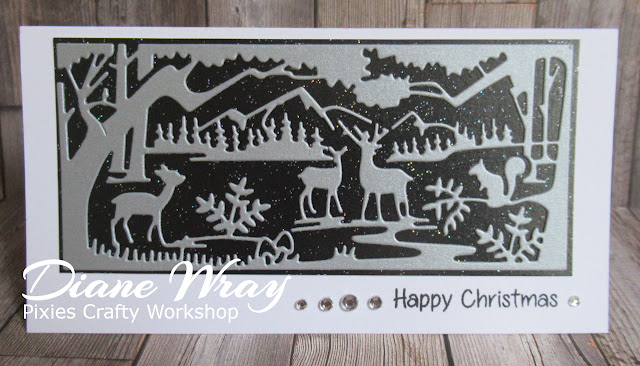
I set to and quickly made this card for my entry:

I used:

- mini slimline white card blank - sized 6.00" x 3.25"

- snippet of silver pearlescent silver card (looks more grey in the photo), backed with 'die cutting double sided adhesive paper' then die cut using the Gemini. Used the new die from Mo, by Nellie Snellon, called 'Forest with deer and squirrel', and then put to one side

- knowing the full size of the die cut, I could then trim down another snippet of card - this time black with tiny little pieces of silver sparkle embedded all over - to just a little bit bigger than the landscape die cut - it was a close call as well, even with extra full sheets of the stuff here!

- peeled off the sticky backing then adhered the die cut to the black semi-sparkly background and put it to one side for now. It's always best to either run the whole assembled panel through your die cutting machine (slight risk of distortion there to be honest) - OR, do as I did and flip it face down onto your glass mat then give it a really good rub with the Stamping Pressure gadgets that so many of us are loving right now. Bingo - adhesive backing stuck perfectly!

- then stamped the sentiment in the bottom right corner of the card, using Memento 'Tuxedo Black' ink and a stamp from the Woodware 'Tall Tree Gnome' set - happened to be available waiting to be stored away and also the size etc., so itt seemed right

- then glued the image panel onto the card front

- finished off with some different sized clear diamante gems to either side of the sentiment, for extra sparkle!

I really adore this new die, how cool would it look with poinsettias or snowflakes at one of the corners huh? It does take patience to cut, then place the die onto the background. I learned some things I probably would do differently along the way. eg. in future - place the die cut and then trim the outer frame to fit. But - really worth the effort and, SO many different colour combinations can be used as well! Len doesn't like black on Christmas cards so this got the thumbs down for colour but he did like the overall design and die cut.

I would like to enter this into Christmas Kickstart #62.

AND, of course into the current Allsorts Challenge # 676 'Add some sparkle'.

And, equally, into Darnell's NBUS #38 HERE.

And there's another one done for the Christmas card box. Fair to say, the die did intimidate me so I only planned on making a single card - but, would be very happy to make a batch now!

Of course, Mini-Slimline envelopes are as rare as hen's teeth here in the UK. All envelopes and suitable envelope dies are out of stock everywhere I've looked (and so expensive too!) - so here goes with my 'envelope maker scoring gizmo'! Always summick!


Sunday 15 May 2022

Decoupage rescue!

The other day, whilst doing a bit of craft room sorting out, I came across some Dufex decoupage pieces - which I'd assembled eons ago and then carefully stored in clear cellophane bags. So my snippets card for this fortnight's Snippets Playground challenge (just started over HERE) was pretty easy to rustle up:

I used:

- 5.5" x 4.25" white linen card blank - tent style

- the Dufex foiled 'honeysuckle' decoupage was assembled ages ago - probably bought as part of an A4 sheet at a craft fayre

- used a Penny Black set of dies called 'zig-zag stackers' to cut a panel from a snippet of white linen card, the same I used for as the main card body

- then stamped the sentiment directly onto the image panel. Used the Misti, Memento 'London Fog' ink and a Woodware 'Deco Sayings' sentiment stamp

- glued the die cut panel onto the card front 

- glued the Dufex topper onto the die cut panel

- added three iridescent gems from a shaker pack called 'Snowdrops' from Lucy's Little Things  range of crystal shaker card fillings - done!

It's hard to capture the beautiful foil of Dufex - every bit of the image is shimmery foil. I'm not totally sure whether they're still in business to be honest. A quick online search has thrown up a few smaller UK places still stocking Dufex decoupage and other images though.

It's been a busy week here for various reasons so apologies for the fact that my snippets card only used some leftover white linen card as my snippet to die cut the layer with the pretty zig-zag edge. But, it was a snippet I promise!

I'm still absolutely loving the Gemini Junior - with the still unbent pale green plates. All these years and I never even thought to have a dedicated space for die cutting stuff. So much easier!

Dudley is still up to his antics and the other day he went missing - again. Len had been in and out of the garage and the door into it from the utility room was propped open. When I peeped round the corner - there was Dudley, up on his hind legs in the garage, having a jolly good try at opening a drawer in a storage unit ...... where he knows his favourite treats are kept! When I wagged my finger at him (whilst trying not to laugh) he then pretended he'd been doing nothing - talk about looking guilty! I think he's likely to be checking out weight lifting courses to improve his upper body strength behind our backs!


Tuesday 10 May 2022

Allsorts Challenge # 675

The current challenge over at Allsorts Challenge# 675 is 'Favourite stamps and/or dies'.

I have loads of stamps and dies that I really love, as am sure we all have. But, there's 'that special one'  - a wood mounted stamp that I return to more than most. It sits on a narrow set of shelves, with some other favourites, right above one side of my curved desk. Straight in my line of vision when I'm swiveled round to work at the laptop. I've had it for more years than I can recall - it's so old it doesn't even have a name and I'm almost sure it was pre-loved when it came to live here! I have loads of other, much more intricately designed, stamps - but this one just sings to me! And this is the, admittedly quick, paper pieced card I rustled up the other day for the current Allsorts Challenge, see link at top of this post:

I used:

- A6 white card blank, side opening

- snippet of plain white card, onto which I stamped the image, using Memento 'Tuxedo Black' ink and an Anita's 'no name' stamp - probably collecting its pension by now! 

- stamped the same image onto a snippet of patterned paper, found in the back of Wild Rose Studio's 'Annabelle's Meadow' paper pack

- used another sheet from the same pack to die cut the patterned darker blue layer, using the Heffy Doodles A6 'Stitched Rectangle - Outside In' set of dies

- die cut the image panel, using a smaller die from the same Heffy Doodles set

- fussy cut the 'gift box' sections out of the image,which I'd stamped onto patterned paper, quick run around the edges with a black Whisper brush pen and then glued them in place, using a glue pen

- glued the patterned paper and then the image panel onto the card front

- finished!

Last week, I spent some time fairly very ruthlessly blitzing my huge stock of patterned paper pads and packs. However, one paper pack, a constant favourite, which escaped 'the cull' - is the one I used today. In fact - I even have a spare paper pack plus a pack of the lovely 'Annabelle's Meadow' co-ordinating toppers. And hooray - vindication for saving the papers at the very least, when I found them to make today's card! 

I'm always dubious about mixing patterned papers - it can work well, but it can also end up looking 'like a dog's dinner' if you don't have the knack of mixing various papers properly. Use them from the same pad/pack is my advice, if you want to have a chance of it working, as the colours will co-ordinate nicely - and the dyes will at least all change similarly in the camera's eye!

Ah, unless of course it's a dedicated snippets project, then the whole idea is to use up those scraps! ☺ Almost a 'home goal' there!


Sunday 8 May 2022

Dudley update and a results post over on Snippets

We have the latest 'picks' and the draw winner results over HERE, in the Snippets Playground, as am sure you all know by now. Go and take a peek! 

Dudley is his usual crazy dog self. Len opened the door into our back garden very late the other evening, for what we hoped would be Dudley's bedtime 'call of nature' - and, whoosh, he was out like a rocket! Not one single woof - but he'd spotted a very sneaky local cat, who hides underneath the arbour waiting for prey at night. Ha, said cat certainly beat the World High Jump Record when leaping over the six foot high fence! Dudley Dog looked most bemused - he only wanted to play or make friends! 

But, speaking of friends - he can and sometimes will make his feelings abundantly clear if you upset his apple-cart in any way. I have written about him previously when he pushed his head into a corner of a sofa with his back firmly turned to Len and quite plainly sulked - whilst we two almost cried (silently) with laughter at his 'Diva performance', but last week deserves another mention. 

At bed time, guess who was already on his back - snoring - sprawled across right across our bed? Yup, Dudley of course - as usual. Len tried to gently move him and it was like a sleepy Tasmanian Devil sprang into life. I stood back with mouth open at one angry white ball of 'floof' before he charged off in a very vocal and grumpy strop. A little while later we peeped out of the bedroom door and there he was, lying spreadeagled on his front at the far end of the landing, Honka in his mouth, AND - very pointedly keeping his back turned to us in a real 'huff'. How can you not crack a smile or even laugh at that sight! He ignored Len totally when he tried to coax him, just 'blanked' him, and in the end we just left him to come out of his 'teenage rage' in his own time - and it worked fine, at least an hour later though, so that pup has stamina! Of course, then he came back with licks and wanted cuddles - what do you do? Don't even ask!

We finally swopped his very first Honka Duck for a new one, before it became a total health hazard. And, to coin a phrase, Dudley took to the new one 'just like a duck to water'! Snort.

Happy Days! 


Thursday 5 May 2022

Summertime 'Gnomies'

A gnome isn't just for Christmas and a little rootle through my basket of NBUS goodies turned up a set of non-Christmas gnome stamps with matching dies .... with Summer gnomes on. 

I wanted to create a scene for the current Allsorts Challenge and a further 'rootle' made me check out the Whimsy 'Enchanted Forest' Slimline paper pack that had never been used (bought ages ago, tut, tut!). 

The gnome stamps are quite small, even if you use more than one on a wide card, then 'PING', a little light bulb suddenly flicked on. Who actually said that the background papers HAD to be used for slimline cards? With some inspired juggling about, I would be able to get a mix of two smallish oval/square backgrounds from each sheet - and that's exactly what I did. Some of the papers now have the other half safely tucked inside the packet(s) for future use, thereby stretching the pack contents, meaning more cards can be made. And this can be applied to other papers in Whimsy's Slimline range  - which I did for one card!

Here's what I  ended up making:

I used

- two 4" x 4" white card blanks, and two 5.5" x 4.25" white card blanks - all are side opening

- stamped, then coloured, all four gnomes (using Polychromos pencils) from the 'Your Next Stamp' 'Happy Gnomies' set

- at the same time I also stamped a selection of sentiments using three different sentiments from the 'Happy Gnomies' set and a single sentiment from MFT's 'Itty Bitty Celebrations' set of stamps ('Doing a Happy Dance' - so cute) - using Memento 'Tuxedo Black' ink

- die cut all of the gnome images using the matching dies - and my Altenew mini die cutting machine. Even though I'm once again fully kitted out and love all of my die cutting capabilities - that sweet little Altenew machine is so handy!

- then die cut the sentiment strips using two of MFT's 'Itty Bitty Strips' dies as well as the 'gnome with balloons' sentiment - using a Frantic Stamper 'Stitched Fishtail Banners' die

- to assemble the cards, I die cut one design of oval background from the 'Enchanted Forest' paper pack, plus one from an (again unused) Whimsy 'Glorious Sky' Slimline Paper Pack - using a die from Presscut's 'Oval Stitch Hole' set

- then cut two different designs of square backgrounds from the 'Enchanted Forest' paper pack - using a die from Lawn Fawn's 'Outside In Stitched Square Stackables'

- the oval card images were mounted, using glue, onto the 5.5" x 4.25" card blanks, which had already been topped white card, embossed using SU's 'Square Lattice' Textured Impressions folder and then trimmed to slightly smaller than the card front

- the square card images were mounted, using glue, onto the 4" x 4" card blanks - having first been backed with a slightly larger square/frame cut from snippets of Altenew's 'Forest Glades' card stock (one of my current favourites)

- then it was just a matter of adding a gnome image and a sentiment to each card front, using a glue pen - finished!

The planning stage took almost as long as making the cards - even though I actually doubled up on each design and made two the same of each one. That's eight cards on standby, for friends and also some of our neighbourhood kids.

I'd like to enter the 'Hello Friend' card into the current Allsorts Challenge Week #674, where the theme is 'Anything Goes, with the option of Scenic'.

And, I'd like to enter the  same card into Darnell's NBUS Challenge #38 for May. My NBUS on this card is the gnome stamp and die set, the Whimsy Slimline 'Enchanted Forest' paper pack plus MFT's 'Itty Bitty Sentiment' die strip.

I had great fun making these cards, it's such a treat to have spare time to make cards 'just because'! Hooray for Sarn jointly running the Snippets Playground!


Sunday 1 May 2022

May Day - hooray!

Really sorry, been sorting out here, and no snippets card from me, just yet. Working very hard on a little batch of cards for fun, in between sorting the 'Craft Cave' out!

But do I have a tale to tell, oh boy! 'We three' heard a whirring and the sound of an engine (turned out only to be a flipping crane!) in the early hours of the other morning. Then I heard little voice, that I've heard before (gulp), shouting 'down a bit, right a bit, left a bit, up a bit - GET out of the way Dudley' and I knew we had trouble! BIG time.

Good grief - there was 'Little Miss Satchel', aka Sarn, who is in charge for this latest challenge in the Snippets Playground, and was only setting up a May Day pole, dear god! I fully expect to be blamed for it of course.

I gave up, shrugged and went back to bed - and lay with my head under the covers - as you do in these situations! 

Dudley went out later to check - and also needed a lie down and sleep after his findings, sigh. His cute and most relaxed 'on back with paws in the air' pose:

Photo edited to hide his 'manly/doggy part', lest anyone might be offended, couldn't do an ivy leaf easily - snigger! Will a pansy do?

At the moment, the Snippets Playground is in the hands of a 'reet trouble maker', as my Grannie used to say. Goodness help us, BUT do hop over to The Snippets Playground to join in the frolics - if you dare of course. To be honest - it's actually great fun and we hope to see you there, dancing around the Maypole in good old traditional English style! And there's bound to be cocktails involved.

Meanwhile, I need a good lie down too!