Wednesday 27 April 2022

I'll be 'gnome' for Christmas

The title of this post is a sentiment in one of the stamp sets I used for these cards:


I used:

- an A6 card blank and a DL card blank - both are white and both are side opening

- stamped the images & additional stars (plus sentiments) onto largish snippets of white card - using Memento 'Tuxedo Black' ink pad with Woodware's 'Christmas Tree Gnome' stamp for the A6 card and Woodware's 'Tall Tree Gnome' for the DL card

- coloured both image panels using Pro markers - such fun images to colour as well!

- for the A6 card just trimmed it to suit and added a narrow backing of Tonic pearlescent 'Red Velvet' card (snippet!) before then gluing it onto the card front

- for the DL card I die cut it to size, using a die by Creative Craft Products from their Slimline and DL Nestabilities range, called 'DL Stitched Straight Edge' die set - I used the second largest die in the set

- added a narrow backing of the same red card as for the A6 card (I had taken time to match the card and a red Pro marker for colouring the image). Then glued it to the card front

- all that was left to do were the sentiments that I'd already stamped along with the images, so I trimmed those right down, ran a black marker around the edges then stuck them in place using thin sticky pads

I do wish the camera hadn't turned the lovely bright golden yellow of the stars into a mustard shade, as well as 'fading' a perfectly stamped sentiment where the light was streaming onto the card, sigh.

I would like to enter my A6 card (hard choice, as I do quite like both of them, more so in real life) into the following challenges:

Rudolph Days Challenge for April 2022

Christmas Kickstart Challenge #61, where the theme is 'From My Gnome to Yours'

NBUS Challenge #37 - the Woodware set of Gnome stamps were having their first outing

Thanks for calling by! x


Sunday 24 April 2022

Birthday card for someone special

A lovely friend recently had a Birthday, and this is the card I made for her:

I used:

- 5.5" x 4.25" white card blank, tent style

- a layer of the same white card for the front panel, die cut using a Lil' Inkers 'Stitched Rectangle' die and set to one side

- used a sheet of patterned paper from a Honey Bee 'Team Tie Die' paper pad and die cut the bottom edge using a die from the Simon Says Stamp 'Flower Swag' set of dies - more of this below!

- then die cut the floral piece using a snippet of white card and the other die from the SSS 'Flower Swag' set

- glued the floral layer onto the edge of the patterned paper - using a glue pen - before gluing it onto the white stitched edge layer

- glued the whole panel onto the card front

- die cut the sentiment from another snippet of white card, using a Presscut die called 'Happy Birthday' and glued it in place

- added some clear amber 'dew drops' into the flower centres etc.

I had three attempts at getting the patterned layer as right as possible with the die cut edge at the bottom. Almost lost the will to live and, having watched a YouTube video I now know exactly how to do it of course! I just wasn't thinking properly on the day and the more I tried the more of a flap I got into. It's a stark reminder to look for a video when fiddling round with something where I'm unsure about measurements. The result is passable but not as wide as I wanted - still, said friend is a crafter - which always means that even if your best attempt goes a bit awry - they do understand!

Final say on the die cutting machine adventures. The two Gemini pale green 'double sided dies' cutting plates are brilliant! You use them as the middle part of the cutting sandwich which then only has the two clear matching plates on the outsides. No magnetic shim or thin plastic shim needed. Yes, the plates do score, as one would expect, but nothing like the clear plates score - and absolutely no bending occurs to any of the plates in the sandwich! It's early days but so far I rate it one of Jennifer McGuire's best ideas!

I'd like to enter this into Darnell's NBUS Challenge #37 HERE

Thanks to a prompt from Pauline on the Allsorts DT, I'm also linking this into the current Allsorts Challenge Week 673. The theme is 'Something beginning with B' and so I'm using 'Birthday and Background' for my take on 'B'.

Do remember, today you can find the results of Challenge #425 over in the Snippets Playground HERE

Also, from Monday 25th April to the end of the month it's ScrappyMo's Rudolph Days Challenge.

No real news about Dudley this week, although we did give our local sorting office a giggle apparently. We had something to return via Click and Collect and the online form asks you to declare if you have any dogs on the property. So I typed in 'One small dog, with big bark'. As it happens it was Steve, our regular postman who collected the package and with a huge grin he wagged his finger at Dudley and said 'You're famous now boy'!


Thursday 21 April 2022

Penny Black Stickeroo Christmas card - simple style

Some days I want to have a quick play making a card without using loads of tools. For this Christmas card I just used my Tonic trimmer (and some glue):

I used:

- DL white card blank, tent style

- Penny Black Stickeroo from the 'Berry Delight' sheet of stickers

- backing card layers are Tonic pearlescent 'Majestic Gold'  card and Altenew 'Forest Glades' - trimmed to size and glued in place

- no sentiment added as I think the image speaks for itself

Made in a jiffy! These days, I tend to pop all the stickers from a Stickeroo sheet straight onto toning backing card for future use, then roughly trim them so I can just flick through the pile. I leave plenty of surrounding card per sticker so that they can then be trimmed straight or die cut to suit. 

Oh, and I write on the back of each image which sheet they came from for when I write a blog post, often months later! 

On the subject of tools, I managed to 'win' a Cuttlebug machine on eBay last weekend. Opened it the other day to have a play and was quite stunned. I reckon it had just the one freebie die run through it, once only from the single score mark on a cutting plate! The machine and plates are otherwise pristine and shiny new - even the free embossing folder was unopened in the original box. It cuts like a dream, as Cuttlebugs always do in their 'youth'. Talk about falling into the river and coming up with a salmon in each pocket! For once I really did hit lucky!


Sunday 17 April 2022

Penny Black Masterpieces Made Simple - Thank You card

There's a new challenge over in the Snippets Playground - below is my snippets card and how I made it.

We have so many generous and kind Playmates - I received a package here last week and this card is being sent to a very generous lady who sent me a package stuffed with brand new prize goodies very recently (the toy box is stuffed to the brim and looking super healthy!):

I used:

- 5.5" x 4.25" white linen card blank - side opening

- the really pretty image is from the Penny Black 'vintage beauty' Masterpieces Made Simple set of images (no apologies for using these lovely images such a lot lately)

- left the image at full size and used a Penny Black set of dies called 'zig-zag stackers' to cut a panel from a snippet of white linen card, the same I used for as the main card body

- then stamped the sentiment directly onto the image panel. Used the Misti, Memento 'Tuxedo Black' ink and the Clearly Besotted 'Say what?' set of stamps for the 'Thank You greeting

- mounted it onto a very slightly larger snippet of Olive Green card - just to give a narrow and simple border

- then added it onto the card front before gluing a couple of 'Raindrop' gems in place - finished!

- ha, took the photo before the glue was fully dried so the raindrop gems look a bit milky 

Dudley's coat is growing back nicely - he had a bath this week and is still a fighter. Possibly it's getting to be easier as at least he didn't run and hide beforehand! 

His beloved Honka Duck goes almost everywhere with him. The other morning he was hunting for Honka and nosed open my craft room door, which I'd pulled too the evening before without realising that Honka was in there. Dudley slipped in and whisked Honka from under my desk and (you have to imagine this bit) there was Dudley with the almost life sized Honka Duck, crossways in his mouth, stood at the partly open door with his eyes almost rolling in puzzlement. He couldn't get through the space in the doorway as it opens inwards and of course didn't think to drop the duck!

Then, a sweet friend popped round with an Easter egg for us and whilst I was talking to her, Aslan rolled up. Aslan is the most beautiful Persian cat and super cool and laid back. He doesn't deign to use our gardens as his toilet so he's always very welcome. He decided to take a stroll round the downstairs of our house - a thorough inspection was carried out. Fortunately, Len had Dudley upstairs and I reckon there would have been mayhem had he realised that Aslan had come to visit. Purely interest on Dudley's part as he loves cats - but it could have been fun and games. Thankfully, Aslan doffed his cap, bade me farewell and moseyed off out of the front door again! 


Thursday 14 April 2022

CASE-ing Linby

Our lovely Playmate Linby (real name Lynn - and one of my greatest enablers, in the book world, as well as crafting) was one of my picks from Challenge #424 - and I couldn't get her gorgeous cards out of my head. To see Linby's cards - please hop over HERE. So worth a look.  

It's such a super way to use up snippets and I already had one of the shadow frame dies to hand. Almost got rid of it the other week as I couldn't see beyond using the fairly repetitive and rather ordinary little decorative dies which it came with - what a numpty!

Plus, a while ago I was whining on here about being sent the wrong Christmas 'Snowflakes range' paper pad by Amazon, made by Crafters Companion. Basically it had the incorrect bar coded label on the back so someone, somewhere, dropped a clanger. Instead of being nicely patterned all over, the designs have lots of 'scenes' featuring woodland animals and Christmas images in the corners - plus loads of matching die cuts. I kept it, as we were still pretty much locked down at the time, and the other day, musing over Lynn's cards, I realised that my shadow box frame die does have huge potential after all!

Take a peek - cute and such fun to make:


I used:

- 5.5" x  4.25" white card blank, tent style using 300gsm white card stock from Hobbycraft

- more of the same card stock to die cut a shadow box frame - using the Creative Expressions 'Christmas Shadow Box' die set

- then decided how to fill the apertures, using papers from the 'wrong' pad (which is actually called 'Watercolour Christmas'), I used one single 6 x 6" sheet and picked out then die cut the pieces I wanted, using the separate straight edged shapes you have to use to cut out the apertures in the main frame (very handy!)

- glued the frame onto the card front

- glued the chosen images and pieces from the paper in place

- didn't add a sentiment - and called it done!

It sounds quicker than it was, but having done it twice over (yup, I made two the same whilst at it, gotta keep the Christmas card numbers growing) next time will be even easier, and faster, I hope. Now want to make even more and still have the dies and paper pad beside me here! I found that using the 'shadow box die itself was the really tricky part - holding all those pieces to also cut the straight edges in place with removable tape to do the die cutting, sheesh!

It was a real joy to use my Gemini and it cuts like a knife through butter - really effortlessly. I've read loads of hints and tips and can really recommend that you do check out Jennifer McGuire if you have issues with cutting plates. Be it be on any machine really, but she has delved deeply into the Gemini and come up with some great solutions. Watch here and be impressed, I am! The video covers avoiding as well as fixing warped plates for all machines and then at the end, a great idea for an unconventional 'cutting sandwich' for Gemini machine owners. I'm already onboard!

Plus, I snapped up a Cuttlebug on eBay the other day - for my thick Sizzix dies and as a back up. Bargain!

Cheers all round on the die cutting front!


Thursday 7 April 2022

Floral Penny Black Masterpieces for Easter

Finally, finally, finally - I've done some moving around of stuff here and have found the perfect home for my much neglected Gemini Junior die cutting machine. 'Hooray' it shouted, with a sigh of relief! Shame on me - it's taken over six months for me to have it properly and permanently located beside my curved L-shaped desk. It's quite a heavy wee beastie when you have to watch your back - did it all alone without shouting for help once, and am a very happy bunny right now.

To put the machine properly through its paces I decided to use a set of dies that I very much doubt my almost defunct Cuttlebug would have touched. Along with using some new Penny Black 'Masterpieces Made Simple' card toppers - floral images this time, nice too.

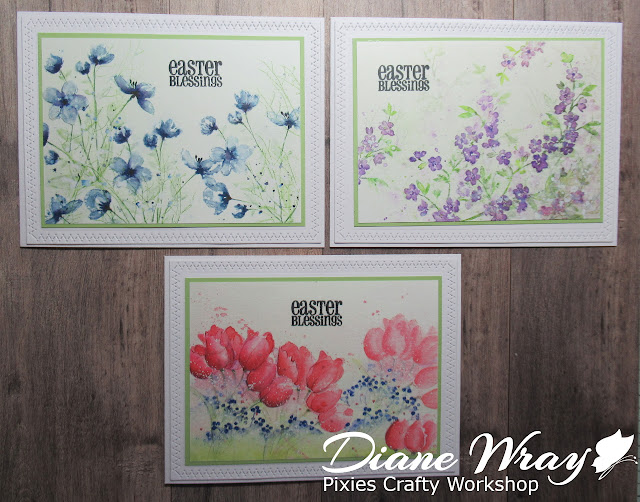
And here are three Easter cards, for a couple of my besties from schooldays plus grand daughters and their Mum in Germany - we only send three Easter cards each year nowadays:


I used:

- three 5.5" x 4.25" white linen card blanks - all horizontal and side opening

- the images are from (top row) the 'vintage beauty' set and the one below with the lovely tulips is from the 'bright bouquets' set of images

- left all the images at full size and used a 'new to me' Penny Black set of dies called 'zig-zag stackers' to cut panels from white linen card, the same I used for as the main card body

- then stamped the sentiments directly onto the image panels. I used the Misti, the pressure tool which I love, Memento 'Tuxedo Black' ink and the Clearly Besotted 'Say what?' set of stamps for the Easter greeting and, as always, the greeting stamped perfectly onto the linen. In fairness, I did test run the stamping alignment, using grid lined acetate!

- mounted them onto very slightly larger snippets of  SU 'Certainly Celery' card, which matched so well - just to give them narrow and simple borders

- then added them onto the card fronts - finished!

I'd like to add these cards into Darnell's NBUS Challenge #37 for April. NBUS goodies were obviously the fabulous Penny Black 'zig-zag stitches' die set. The Penny Black Masterpieces sets are also new but that may be cheating a little.


Sunday 3 April 2022

New challenge over at the Snippets playground

Hooray - there's a new challenge (#425) over at the Snippets Playground HERE - and it's my great pal and our Head Prefect/Chief Mischief Maker Sarn who is your hostess for this fortnight.


I'm really delighted to welcome Sarn in sharing with me the fun and games of running the Snippets Playground. 

Dudley and I discussed this the other day and we both have a strong feeling that Sarn's mischief will continue, if anything it might get worse. But, we agreed that it's a small price to pay - no doubt Dudley will be hoping for extra treats and cuddles from Sarn ☺

I've seen from the many comments on here, Sarn's blog and also the  Snippets Playground that you're genuinely as pleased as I am to have Sarn partnering me. Thank you everyone from, both of us, for your kind words!

'Pupdate' on Dudley: already Dudley's pale peach coloured ears are growing a bit longer and it's so lovely to be able to stroke the silkiness again. He doesn't seem to notice any difference since being so shorn, although in some ways he's a bit like a Spring lamb chasing round the garden in leaps and bounds doing his 'zoomies'. 

He's very keen on certain raw vegetables so we keep a dish of freshly chopped carrots and chopped baby red, orange, yellow bell peppers beside his water for him to 'snack' at during the day. The other day, Len added part of a green bell pepper and there's obviously a subtle difference in taste. Dudley very carefully sorted through the whole dish and removed each piece of green pepper, lining them up like soldiers beside his bowl. The look of disapproval on his little face was priceless!

A little heads up about a giveaway. Our Playmate Sue, of Zouave Cards is busy doing a craft room blitz and she is giving away two lovely bundles of Little Claire stamps. If you live in the UK, all you have to do is leave a comment on her blog post here.

OK - this coming fortnight, let's see if as many of you as possible can make something using your snippets and play along to make Sarn's first turn at being hostess 'go with a swing'! Being the Playground, that pun was totally intentional!

Happy dance here!