Hello again! It's halfway through the fortnightly challenge in the Snippets Playground and time for some 'picks' and the prize draw.
We also have another brilliant Guest Designer with a snippets card to share this - it's our
wonderful and very talented Loll:
What a beautiful card this is - it just shows how you can achieve maximum impact with a few snippets. AND a lot of talent I should add! Loll let me have the following details about how she
made the card, but I do think it would be lovely if you could hop over
to
her blog and leave a comment there.
"Everything used on my card is a snippet except for the card base. :)
The hexagons on my card are die-cut from a snippet of smooshed
watercolour paper. This is the third card I've made from two background
pieces I made a few months ago. I die-cut the hexagons from white foam
as well, gluing them to the watercolour hexagons to add dimension to my
card. The foam was cut from snippets too!! :) And I always have small
snippets of black and white ready and waiting to use for die-cuts and
sentiments."
And here's the lovely lady herself, I think Loll has such a friendly face - like so many of you I'm sure she's someone you'd immediately feel at ease with in real life:

As most of you will know, Loll makes amazing cards and has a really unique way of creating stylish and elegant makes which are 'clean and simple' but generally with a fabulous technique incorporated/to share as well. She also runs a couple of brilliant challenges along with our lovely Bonnie - so do check those out as well when you pay a visit. I wanted to learn more about Loll's blogging journey for myself and can't recommend enough that you make a hot drink and settle down for a couple of hours browsing. It all begins in February 2011 when Loll first started her blog - and way back then you can see the CAS style evolving as that year unfolds, fascinating to see. Loll is another blogger who cooks, and there's some yummy recipes on her top bar. And, loads of tutorials - both written and also video ones. Better make that a flask of something to keep you going eh? :) Loll readily shares her tips and techniques in her normal blog posts as well and I've learned loads from this very generous lady. And, she's an amazing blog designer as well - I'm so grateful for my own fabulous blog makeover! Oh, and I always wondered where the name Loll came from - now I know, it stems from her given name of Laura, a lovely name for a lovely friend!
Remember girls, you can always let me know if you would like to be a Guest Designer - I have a list and would be very happy to add your name.
So, let's move onto my picks from this past fortnight:
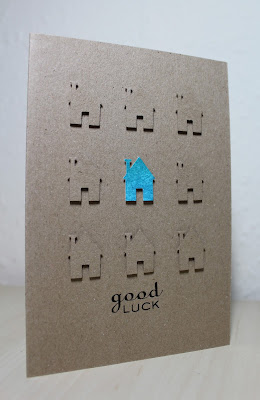
This was made by
my dear friend Sarn, who freely admits she got the basic idea from Pinterest - but she certainly has put the 'Sarn Spin' on it! Such a clever new home card and one which we can all 'have a go' at
making (with or without the fence if you don't have a punch or die to
suit - but I do think it's a brilliant finishing touch!).
This adorable card was made by
Jane W, our Guest Designer from last week! And Jane used a prize she won in the Snippets Playground a little while ago - they are actually robins but I just love this ingenious way of transforming them! Paper piecing is one of the very best ways to use up little snippets and Jane's card shows what impact can be achieved with just a few different of them, very cleverly used!
We've had variations on 'patchwork' in the past I know, but I think this card
made by Heidi, really deserved to be a pick. All the papers are from one paper pad, little leftovers that co-ordinate so well. Heidi used a square die to cut the pieces, and I do think that's the most accurate way of cutting squares for this sort of design (or a punch of course). And Heidi's tip about sticking the little squares onto a toning shade of card to help lessen any gaps you might still have is well worth following! Ask me how/why I learned this trick a while ago :)
There was some discussion on Heidi's post about the problem of leftover snippets falling out of pads if you choose to store them that way.
Here's a post about my own solution which might be of use. Warning, it's a long post but even flicking through the photos will give you the gist of how I store my patterned snippets inside paper pads. The system has been in use here for three years now and it still works brilliantly for me.
That's my three picks - as always a very hard choice, and I ended up using a pin to stick into my initial list of 10 entries! Once again I focused very much on ingenious ways to use
snippets which might inspire you.
You might wonder why there's no Gold Star every fortnight. That's because I want them to be really sought after - ha, and because I couldn't decide which entry was most deserving this time round, spoiled for choice :)
We had 62 Playmates
joining in this past fortnight - with two new little friends joining
us:
Welcome girls! Hope you came back and play with us again :)
Prize draw time now and our winner of
the LOTV 'All our Dreams' rubber stamp (from me) and lots of lovely pastel/baby coloured goodies by Papermania from the
Spots and Stripes Pastel range -
kindly donated by Donna is:
Well done Jenny!
Can you please drop me an email with your address in and I'll post
your prize off as soon as possible! My email address is on the
right
hand side bar.
Our local Post Office is currently closed due to the village shop it's part of being extended and refurbished. I think it's only closed for a further week but it may cause a delay in me posting your prize Jen, goodness knows how folk who really rely on that Post Office are coping as there was no upfront warning!
Keep those snippets entries coming girls, you still have a week left to play
HERE remember!
AND, please remember that it's also
Rudolph Days over at Scrappy Mo's! February is a short month and the challenge (anything goes for Christmas) closes on Tuesday of course. There's the choice of a great Memory Box die or a really cute Avery Elle stamp set as a prize too. I know you'll all want to join me in sending our love to Mo, her Mum passed away very recently and a few extra hugs would be very welcome I'm sure.
See you on the swings!
Love from the little white peril and me