Sunday 27 February 2022

Rudolph Days - February 2022

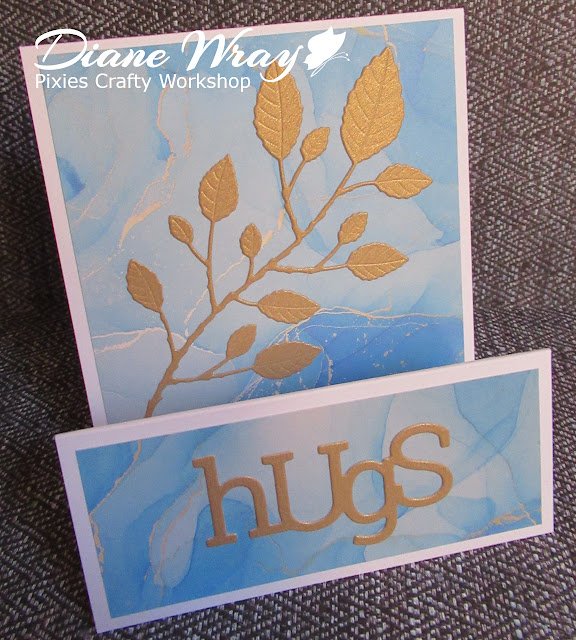
I made a batch bake of eight cards  with Mo's February Rudolph Days Challenge in mind - and this one of them:

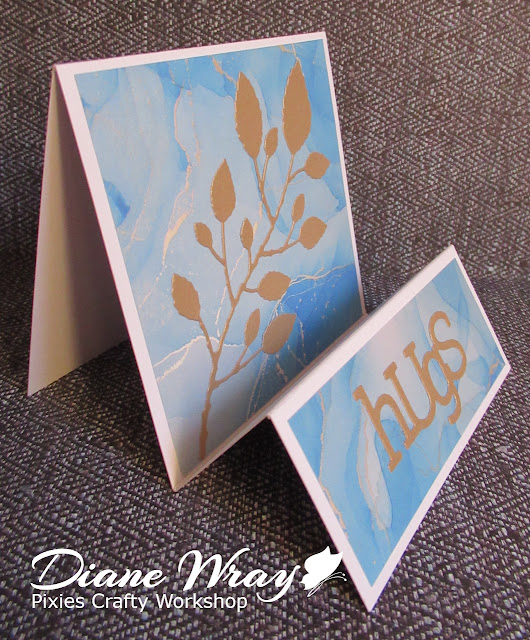
And these are some of the others: 

I made eight cards in total - in four differing shades of the fabulous glittering ombre card - more of which further down this post. Quite a few of the sheets have shades of green in them, perfect for trees! Although I did make a couple of the cards using the ombre pink - needless to say!

I used:

- 5.5" x 4.25" white card blank, side opening

- piece of white card the same size as the card front and also using the same card stock

- die cut the tree shape into the separate panel of card, using a Reverse Confetti die - simply called 'Tree'

- then added the stitched effect around the edge of the panel using the largest die in the Lil'Inkers 'Side Stitch Rectangles Outline' set of dies

- backed the die cut tree shape with a piece of 'Craft Artists 'Ombre Glitter Card - Pastels' - just slightly smaller than the panel, using red line tape. To get the best out of the ombre A4 card you really need to use the centre portion where the main shades flow into one another (you can get two panels easily by doing this) and of course, then you get to keep the tops and bottoms of the sheets to play with later on!

- then added the panel to the card front, again using red line tape

- die cut the sentiment using leftover snippets of the same white card and some very subtly sparkly black card - using a two part die set also by Reverse Confetti called 'Layered Peace', glued together using a glue pen

- again, used red line tape to adhere the sentiment

- then added some little gems from a packet of shaker elements by Lucy's Little Things called 'Crystal Collection - Snowdrop'- and thought it was finished!

However, Len saw the card and immediately played a corker by saying that the tree was just a pyramid and what had it to do with Christmas. So, I scrabbled through my Christmas dies and found a star shaped die from the 'Creative Expressions 'Silent Night' set of dies and used a snippet of silver card from the ombre I'd been using - cut a star and stuck that where the sun don't shine on top of the tree. I should have known really, next comment was that it looked like a pyramid with a star stuck on the top! Men - no imagination, and stubborn with it!

I'd also like to join in with the following challenges:

Darnell's NBUS Challenge #35 for February - it was the first outing for both the pyramid tree die and the sentiment dies

Craftyhazelnut's Christmas Challenge # 583  - Anything Goes with the option of using some green - three of each set of four cards have green in the ombre effect. 

Christmas Kickstart Challenge #59 - The Sentiment Takes Centre Stage- I think the 'peace sentiment' stands out enough to qualify ☺

AND, don't forget that the results of Challenge #421 are now published, over at the Snippets Playground!


Wednesday 23 February 2022

Zigzag card

I've been the lucky recipient of some of Sarn's wonderful 'zigzag' cards in recent months and finally had a go at making one the other day - winging it slightly. By the way. the pinkish hue is from a glorious sunset when I took the photos in late afternoon natural light:

And a sideways peek, where you can possibly see the card folds a little better:

I used:

- 11.5" x 4" piece of white card stock

- scored across in one direction at 4", 8" and 9.75"

- folded the zigzag shape along the crease lines - using a Teflon bone folder to get sharp creases * see note below

- picked out a piece of patterned paper from Craft Consortium's Craft Paper from their 'Ink Drops' collection - called 'Ocean'. More about the papers below ** - they are luscious!

- cut a patterned piece for the main panel of the card measuring 3.75" x 3.75", plus one for the smaller front panel measuring 3.75" x 1.5"

- glued the patterned papers in place, using Collall All Purpose glue

- then die cut the sentiment using a snippet of Tonic Studios 'Craft Perfect' pearlescent card in 'Majestic Gold' and a Poppystamps 'Playful Hugs' die and glued it onto the front panel using a glue pen

- die cut the spray of leaves using another snippet of the same pearlescent gold card and a Memory Box die called 'Botanical Stem' (first spotted over at our Darnell's blog I think - such a lovely delicate die with embossed veins, I love it!) and glued it in place using a glue pen

I do have Yupo, a wide variety of acrylic colours as well as gold and silver metallic mediums to try and emulate some of the fabulous Yupo work done by Loll - but these papers called to me very loudly! I like quick and easy if I'm honest.

This card was fun to make and very quick - if you ignore the ditched card base that I totally ruined when I messed up the score lines. That situation is being resolved with a better large score board - more pennies.

* Used 300gsm white card for the base card and did have some serious issues making it fold with a sharp enough crease - even using the bone folder with threat and intent! My instinct is that 250 gsm weight, which I have loads of, would be more 'malleable', although for normal 'rigid' cards, 300gsm is my choice of weight normally. I made my card 4" square to fit in a bought envelope but you can vary the width as you wish. On hindsight I would possibly have made my final card with smaller measurements for the 'prop up' part of the card. But at that stage I was still guessing really - until Sarn kindly sent me a couple of sets of measurements for my next try!

* The papers used are made by 'Craft Consortium' and they are absolutely stunning! They're a UK brand, and they make loads of gorgeous papers - however, I think these are amongst their top ones, for now. The designs are based on the effect of alcohol inks on Yupo - with some 'faux' gold streaks. It's the faux gold (albeit not truly shiny so don't let the sales talk on websites fool you - I didn't and already knew what to expect) that really makes a lot of these double sided papers stand out from the crowd, I ended up buying three different pads - greedy little monkey! The papers come in pads of 6" square (and apparently even 12" square in some of the colours!). They will be great for 'camouflage sentiments' I can see.

The original idea was to still use shiny gold mirri card for the die cuts but in fact I realised that the Tonic pearlescent gold card is truly a more subtle and better look/match with the slightly muted faux gold streaks on the particular background paper I chose to use.

By the way, I just discovered that Top Topper Shop is a really good place to buy these papers in the UK and they do the papers in packs of just 10 sheets for £1.25 if you would like to have a play with a little selection of their packs but don't want to buy a full pad of 40 sheets! Clever idea. I ordered something else from them on Sunday and it was dispatched the following day.

I make no apology that I do overshare at times, which may help you if you spot something of interest to you. It's not a secret so why hide it? Also, this blog is still very much my own record for 'future reference and re-makes' as well. 

So happy to be able to share this in the current weekly Allsorts Challenge #664. I was so determined to join in with one of my favourite weekly challenges but haven't always managed (usually need a week to decide and a week to make!) The challenge theme is 'I love ....'. What a totally brilliant theme - and of course I love die cutting (my collection of dies is HUGE, yet there's always that additional new one that I NEED, sigh). Plus, I adore patterned papers. To be fair I have far too many. In my ongoing sort out in here, there will be a serious culling and dumping of old patterned A4 papers and many of the paper pads which only contain those 'meh' and rather dated looking papers that I bet we all have. Styles have changed so much and ...... it's a bit like updating your wardrobe! ☺

Am also nipping over to join in with Darnell's NBUS Challenge #35. Am so determined to use all my NBUS stuff, at least once in this lifetime, that I now first reach for the NBUS basket - before even beginning to seriously think about making a card!


Sunday 20 February 2022

New challenge over at the Snippets Playground #422

We have a new challenge, and a special Guest Designer, over at the Snippets Playground today.

I'd been sorting out more stuff in the craft room and came across a load of fairly recently bought sheets of Penny Black Stickeroos  so I fished out a supply of toning snippets of card and stuck a lot of the Stickeroos onto backing snippets of card, ready to properly trim down when there was just a little bit of time in which to play.

I found some spare time the other day, in between the two storms - one named Dudley - what a cheek! I know he races round like a little tornado at times but that doesn't give the weather people permission to name a storm after him!

Anyhow, this is the first Stickeroo card I've made for ages and it's also a snippets card:

I used:

- DL white card blank, side opening

- white card, die cut using a new set of dies made by Creative Craft Products from their Slimline and DL Nestabilities range, called 'DL Stitched Straight Edge' die set - I used the largest die in the set

- decided which image I wanted to use from a Penny Black Stickeroos set called 'Gentle Blooms' - it was already stuck onto a snippet of 'Certainly Celery' card so I just trimmed it down to leave very narrow borders of card showing

- then I could choose a suitably sized sentiment which I stamped onto the stitched layer using Memento 'Rich Cocoa' ink and of course the Misti. The sentiment is by Penny Black from their ''special thoughts' set of stamps

- then glued the stitched panel onto the card front and added the image panel - both using Collall All Purpose glue which allows some 'wiggle room'

- finally, added a single 'raindrop' gem as dew to the left hand flower - you need to look closely but it's there alright! I adore these beautiful raindrops from 'Lucy's Little Things' and just love the finishing touch they add to the right cards

I'd like to add this card into Darnell's NBUS Challenge #35 - the set of DL dies was having a first outing.

And of course, you can find the new Snippets Playground and our Guest Designer (more fun and games I bet!) by clicking on the box below to be redirected.


Wednesday 16 February 2022

Holly ring

I spotted someone using the gorgeous Poppystamps 'Holly Ring' die around Christmas time and absolutely fell in love with it. It's been waiting in my NBUS basket for a first outing and this is what I came up with:

And a closer look at the gorgeous sparkle. I can't recommend X-cut's Xmas A5 Adhesive glitter sheets enough! Not cheap but so good for die cutting smaller elements for cards.

I used:

- 5.75" x 5.75" square white card blank, side opening

- piece of patterned paper from Whimsy's 'Blurry Flurries' paper pad, trimmed to 5.5" x 5.5" and glued onto the card front

- snippet of white card, die cut using Poppystamps' 'Holly Ring' die and glued onto the layer of paper on the card front, using a glue pen

- snippets of deep red and lime green Xcut Xmas A5 Adhesive Glitter sheets - from the 'Darks' pack

- die cut berries and foliage from the glitter snippets and added them into the spaces on either side of the ring

- sentiment stamp and die is made by Poppystamps from their 'Gilded Christmas Wishes' stamps and co-ordinating dies set

- stamped the sentiment in white onto a snippet of black card using a Hero Arts 'Unicorn' ink pad and then embossing using Rubber Stampede 'Clear embossing powder' - I quite like that by clear embossing, the white isn't too 'sharp' against the black

- die cut the sentiment using the matching die from the Poppystamps set and adhered it to the centre of the ring using thin sticky pads

- then added three clear 'raindrop' gems (a current fad of mine!) to finish off, using Cosmic Shimmer glue

It's so enjoyable to have some time to relax a bit and do a bit of crafting. Made three cards all the same as there were a few different techniques and a lot of stuff to get out and then tidy away again afterwards. It always seems to make sense to do a couple of extras, particularly when it's Christmas cards.

Of course, this card is heading over to Darnell's NBUS Challenge #35 for February.

I'm also joining in with the Christmas Kickstart Challenge #59, where the theme is 'The Sentiment Takes Centre Stage'.


Tuesday 8 February 2022

Out of this world

Luke, the son of a neighbour, has a Birthday coming up next week - and for once I managed to make a card for him in good time, rather than the usual last minute panic:

I used:

- 5.5" x 4.25" white card blank, tent style

- background paper came from a Crafters Delight book of scrapbooking papers called 'Watercolor Galaxy'

- trimmed the paper to leave half an inch of white card blank at the bottom of the card and to overhang the sides by about quarter of an inch on each side

- glued the paper in place and, once the glue had dried, trimmed off the excess from each side (from the back) with scissors

- then stamped a selection of images using Memento 'Tuxedo Black' ink and MFT's 'Out of This World'  set of stamps onto snippets of white card

- stamped the sentiment at the bottom of the card - same ink pad and same set of stamps

- coloured the images using Polychromos pencils

- die cut most of the images using the matching set of dies. However, the ordinary circular dies were joined so tightly together there was no room to get my wire snippers in between the dies - help!

- began to fussy cut them leaving a white outer edge the same as on the die cuts but soon realised that any imperfections would be glaringly obvious against the dark background so I opted to cut all the circular images right on the outer line - same for the flames from the rocket, which oddly enough didn't even come with a matching die

- then just glued all the elements in place using Cosmic Shimmer glue

I even coloured the little astronaut's hair pale blonde just like Luke's own hair. ☺

I freely admit that I have lots of scenic background papers and many night sky ones as well. They're lifesavers for fast cards! I also have some different 'space themed' stamped and die cut images still to use - sent to me by a lovely friend.

This card it so very much like a Lawn Fawn website sample card that it would be cheating to enter it into any challenges - but it was fun to make!


Sunday 6 February 2022

New challenge open over at the new Snippets Playground!

This is my snippets card:

I used:

- 6" x 6" square kraft card blank

- snippet of approx. 5.25" x 5.25" white card onto which I stamped the image, using stamps from Uniko's 'Floral Vines' stamp and Memento 'Tuxedo Black' ink

- added the sentiment, from the same stamp set

- coloured the image using Faber-Castell Polychromos pencils, using later Summer to Autumn colours to tone in with the kraft card

- die cut four identical pieces to make the 'frame' using white snippets and a die from a brilliant set of dies by Clearly Besotted called 'Frame It Die Collection'

- glued the background image onto the card front 

- then glued the frame pieces in place - see note below

- added three clear 'raindrops' from Lucy's Little Things - using Cosmic Shimmer glue - I recently decided to try the glue again after early failures and found it perfect for attaching little 'doo-dads', as Darnell would say. I should have persevered with the first bottle I had quite a few years ago - and that was SaRn I think who recommended it! Basically I think I snipped too much from the applicator back than - now I just have a bead topped pin stick in the very teeny, tiny hole in the new bottle to keep it airtight

- finished!

The stamping took a fair bit of measuring and lining up with the aid of the Misti as the set comes with just the one floral image which you need to flip the other way round and stamp twice for my chosen design - but when it worked perfectly (with the aid of a grid lined piece of acrylic) I sure was a happy bunny! The real secret is to line up the ends of the lines underneath the 'Floral Vine' stamp - not the centre flower as I was tempted to do.

The frame dies are such a great idea - no doubt I spotted one of you Playmates using them at some point last year - I've had mine for a few months waiting to be used. The set comes with six different lengths of the corner ended dies, certainly in two, perhaps three, different widths/thicknesses but I don't want to unearth my own set again and cut more die cuts to prove it. So, you can make square frames or mix two different lengths of dies to make rectangular frames. Very clever, although it already seems to be discontinued over at Clearly Besotted, sigh. Whisper, other companies also sell similar sets - including Ali Express.

I did have to juggle around a bit with the frame pieces, purely because if anyone can attach stuff on the 'wonk' it's me. So, I flipped the pieces over and attached a narrow strip of sellotape across each corner before adding some glue and then 'going for it'! That allowed me some 'wiggle room'. ☺ And another tip - do check that your chosen frame will work with the size of image you want to use. I almost slipped up on that one early on in the process!

Do hop over to the Snippets Playground and see what this fortnight's prize is if you like this card. And you can also enter just for the fun of it as well!

I'd like to enter my card into Darnell's NBUS February Challenge #35 - HERE.

Player's Badge