Showing posts with label up cycling. Show all posts

Sunday, 21 August 2022

A cosy penguin Christmas card

I'm still plodding on, making up the batch of die cuts (I cut them a while ago) into up cycled Christmas cards. I find that when other things become too hot or whatever, it's good therapy not to start off totally afresh. Just take what might have been thrown out with the garbage - and up cycle it, ready to 'ride out again'. The other day I fished out (already culled and popped away) a bunch of shop bought cards fronts saved from previous Christmases - and found plenty more to be going on with after i use the ones already die cut from 2021............. including five or so robin images! What is it with friends and family sending us robin cards? 

Anyhow, today's snippets card (just one snippet of silver mirri card used for two card elements I confess) was in the original batch of dies cuts I've been using lately - and this is the result:

I used: 

- 5.5" x 4.25" white card blank, side opening

- a piece of patterned paper from the Crafters Companion 'Frosty and Bright' paper pad - some luscious papers in this pad in shades of pink and turquoise mostly - trimmed to one eighth of an inch smaller all round than the card front

- used the 'inward curved corner' on my small X-cut corner punch on all four corners of the paper and then glued it in place on the card front

- the paper was carefully chosen to go with the penguin's sweater on the saved image - which I'd die cut using a Lil'Inkers 'Side Stitch Rectangle' die

- mounted the penguin panel onto a narrow background border of silver mirri card and set him to one side 'for later' - as our beloved Queen said about her marmalade sandwich!

- then used the rest of the silver mirri card snippet to die cut the greeting using - once again my current favourite - Tonic Studios 'Mini Moments Merry Christmas' die, only one layer this time 

- glued the image panel and the sentiment onto the card front and went away for a think

- it needed something in the line of snowflakes or 'summick - but I don't have the strength to use small snowflake dies on thick card (hoped to use a frosted piece saved from the original card front but it was too tough and I didn't have a small enough die)

- in the end I found some small snowflake self-adhesive gems in a very neglected box of Christmas embellishments, so I added two of those and it really did lift the image panel!

And, I did push the snowflake pieces closer to the centres once I saw the photo enlarged above. It's a sweet idea to use different sizes of gems to make up a little embellishment but sometimes the manufacturing accuracy is a little 'off'. So there we have it, one more Christmas card to add to the box for 2022. Photo looks a bit blurred to me, but it was the best of the bunch!

Now, most importantly, do please hop over to the Snippets Playground HERE, where Sarn has kicked off a fresh challenge. Numbers were much lower than usual for the challenge which just closed, but the weather was hot, it's Summer Break time for many etc. etc. so we 'roll with the punches' as they say. Many thanks to those of you who did play along - much appreciated.

Dudley pup date. Hmm, a mixed week with him as he had total 'HH - ie. Havanese Hysterics' when he was in my car to do the 'drop Len's car for service' - bring him home and then do it in reverse about five hours later. Of course he (Dudley!) did the screaming hyena act almost all the time.We've said it's potentially due to us not taking him out for a drive very often - for that read that 'we usually go out singly and leave him at home with the other one of us'. He's only been left 'Home Alone' once and we watched him via CCTV most of the evening! 

We hope that before the Summer is over we'll make the effort to take Dudley out with us for a mid-week pub lunch - with a drive thrown in - to show him that drives can be for fun reasons and not just 'business stuff', the vet or grooming. 

I have a lovely place in mind, in a local village with typical Hampshire thatched roofs, and the pub, which is a converted watermill, welcomes dogs. Yay! On a nice day we could sit outside and also show Dudley the river which flows past the lawns as well as the lake with the ducks and swans. It's a huge sadness sad that the pandemic, which broke when he was still a pup, and our own caution, have curtailed such opportunities. Let's see if we can broaden his horizons - as well as our own! I noticed that Len was happy to not wear a mask when he was at the car dealer's, and he's been to a local supermarket a couple of times now (spending soon to be obsolete old £20 notes) and has done the same. For those of you currently throwing caution to the wind - I envy you, although we're a bit slow catching up! 


Sunday, 14 August 2022

Final up cycled robins - for now!

I've come to the end of my pile of robin die cuts, made from the fronts of shop bought cards, sent to us in 2021:

I used:

- 5.5" x 4.25" white card blank, tent style

- a sheet of paper from First Edition's 'Gilded Wonder' paper pad, trimmed to just a little less then the card front and glued in place

- hunted high and low for some sort of card, any card, to die cut a sentiment to go with the robin or even the beautifully flittered gold panel on the sheet of paper - zilch!

- in the end I die cut three layers from the same snippet of white card that I cut the card blank from, using my current favourite Tonic Studios 'Mini Moments Merry Christmas' die 

- glued the sentiment layers together then added them to the card front - using a glue pen. Top left to make the most of the flittered gold design on the paper

- then added the die cut robin using sticky pads (the robin was die cut a while ago using a die from The Works 'Stitched Circles' set

- hmm, not quite right as there was a blank taupe space top right looking very lonely and out of balance, so I walked away and left it - whilst we bathed Dudley on Monday afternoon in fact

- whilst fighting the 'Dudley tidal wave', I remembered some NBUS self adhesive Memory Box Open Studio 'Christmas Fairy Crystals' sitting in the front of a basket waiting for their first outing. And sure enough, one of the orangey red shades works perfectly with the robin's red breast - so I stuck three onto the top right hand corner

Finished! A super fast card to make - but hunting for the backing paper etc. probably took several times as long as actually making the card.

Fighting Dudley was a slight exaggeration really - I brushed, combed and snipped some bits before his shower/bath. Bless his heart, when I sit at the table in Len's room to groom Dudley, he (Dudley!) snuggles his muzzle with a resigned sigh into my cleavage for comfort! As if to say, 'you win'. And he didn't fight too hard this time during his shower. He was then wrapped up like a wet white burrito on my lap - where we patted him as dry as possible before the manic 'zoomies' began!  

The little Fairy Crystals were having their first outing so I'd like to enter this into Darnell's NBUS#41 Challenge.

Also, entering the current Christmas Kickstart Challenge#65 - 'Never in a Nativity'. My second robin card for this fun challenge! 

And, for the time being, we have a lovely white and very fluffy Havanese called Dudley here! He's working hard on trying to remain chilled, hunting out cool spots on tiled floors around the house etc. Yesterday, Len went round to a neighbours' with some wrongly delivered mail. Whilst there, he played with their - much friendlier than Teddy the Terror - little girlie Shih Tzu. She's adorable, they both are, but Tinkerbelle (named by their little girl, what else) is the more friendly. When Len came home. Dudley went ballistic - 'Sniff, sniff - how DARE you play with another pooch'! I was waving his calcium bone treat at the time - but did he care, as he would usually launch into the real need for his midday treat - NOPE?! Just shows that the smell of a lady dog will beat a treat hands down!

It's so very hot here though and in the UK we aren't geared up for it with air con. and such so we're all struggling.

Anyhow, the results of our previous 'Christmas in July' Snippets Challenge, run by Sarn, can be found HERE.  

Numbers are low on my/our current Snippets Challenge - I can't blame you with the heat that so many of us are trying to cope with! It's a nice prize, so do come and play!

Love from Di and Dudley - no more 'Phantom Piddler' puddles from him, thankfully!


Wednesday, 10 August 2022

Up cycled 'Santa flying high'

I still have a few due cut images from shop bought cards we were sent for Christmas 2021. The one I used for today's card was from a sizeable 'gently sparkled' card with a sentiment printed on the lower part of the card - mini slimline was my instant thought when deciding how to use the image:

I used:

- 6.25" x 3.25" mini slimline sized white card blank, tent style

- a snippet of silver mirri card, no particular brand, trimmed down to just under the size of the card front and glued in place

- the image had already been die cut couple of weeks or more ago, using a Lawn Fawn stitched border 'Mini Slim Stackables' die - so I glued that on top of the silver backing, leaving just a narrow silver border showing as a 'frame'

- then die cut the sentiment from another snippet of the same silver mirri card using a Tonic Studios 'Mini Moments Merry Christmas' die and my ever so useful Altenew mini die cutting machine (for those of you who die cut small pieces whilst watching TV or being with the family in an evening - I can't recommend this sweet little machine enough)

- finally, glued the sentiment onto the card front using a glue pen

Finished, in next to no time at all. And of course the gentle sparkle has to be seen in real life - cameras do try to have it all their own way.

I thought it was a risk chopping so much of the card away and losing most of the 'forest' - but then I might as well have just stuck the card front as a whole onto a card blank!

I'd like to add this card into the Christmas Kickstart Challenge #65. The theme is 'Never in a Nativity'. Somehow, I don't think Santa and his reindeer would have rocked up at the stable bearing gifts. ☺ 


Wednesday, 3 August 2022

Another up cycled robin

Yours truly die cut four, possibly more, robin images from the batch of shop bought cards we'd received from family and friends last Christmas - for some reason robins were a popular choice! This is another card I whipped up the other day:

I used:

- white DL card, side opening

- a die cut robin image from one of last year's cards sent to us. The die I used is a Presscut 'Oval Stitch Hole' die then it was set aside

- snippet of Tonic mirror card 'Fire Stone Red', cut to totally fit the front of the card perfectly - had to be - due to the width of the robin oval image to be honest

- piece of DSP from the 12" x 12" pack of Lawn Fawn's 'All the Dots' paper pack bought as a mistake, (remember that 12 x 12 papers images are often much larger than their smaller 6 x 6 friends!), trimmed to just a bit smaller than the red mirror card layer and then the corners given an inward curve using an X-Cut small corner 'double' curve punch

- at that point, I used a snippet of leftover 'dots' paper and flipped it over to the opposite side pattern and then cut a strip for the sentiment - straight across although the pattern itself is very lovely and also diagonal

- glued the striped strip onto the dotted strip and let it dry

- meanwhile I die cut the sentiment using a teeny snippet of 'Fire Stone Red' mirror card and a Tonic Studios 'Mini Moments Merry Christmas' die (one of my favourites for small places!)

- then snipped the now dry striped band to the width of the dots paper (from the back as always) and added that panel to the red mirror card card front - using a glue pen

- next just glued the oval 'robin' panel in place and then the die cut sentiment onto the striped strip - using a fine glue pen

It's remarkably easy to order a 12" paper pack by mistake .... if you're in a bit of a hurry - just one wrong click and momentary loss of concentration is all is takes. Sigh. Once the order arrived I realised my stooopid mistake and then rashly ordered the 6" square pack as the pattern on the 12" is certainly a lot larger. My idea was and still is to make some matching envelopes to use up the 12" paper. But it worked well for this DL card IMHO.

Len fell in love with this card, despite my worries that it's perhaps a bit 'over fussy'. The dots from the backing paper being echoed in the image background really caught his eye and he immediately picked up on that point of detail. So my idea worked eh?! 

And hooray, I can enter this card into one of my favourite challenges over at Christmas Kickstart Challenge #65. The theme is 'Never in a Nativity'. So it's snowmen, gnomes, penguins - in fact anything that you wouldn't find in a Nativity scene. You have all of August to go and play! See you there as I want to go back and add more. Robins fall into the 'Never in a Nativity' category - yet there is a touching story about the robin and how it got its red breast.

'The story goes that the Robin felt Christ's agony during the Crucifixion, and went to pull a thorn from His brow. One version says that some of Christ's blood fell upon the birds breast, while another version says that the bird was wounded; both versions agree that the Robin was blessed for the act of heroism'. From the internet.

A very sweet story. We have a resident robin in our back garden - he tolerates a mate during the nesting season but they're generally very territorial and, I've said previously, will fight ferociously to protect 'their patch'. 


Sunday, 31 July 2022

A touch of tartan - up cycling for Christmas

One of the Christmas card fronts I die cut last week ready to up cycle has a 'touch of the tartan' in the pile of wrapped gifts - and that was my starting point for this card:


I used:

- 5.5" x 4.25" white card blank, side opening

- the up cycled image from a shop bought kraft card sent by a friend last Christmas, die cut using a Presscut 'Oval Stitch Hole' die

- a panel of green tartan paper, which was a snippet already cut to almost the right size and tucked inside the back of the paper pad 'envelope pouch'. The paper pad is one of my very favourite LOTV pads called  'Classic Christmas' - and there's not much of it left in the pad!

- then a further poke around the same 'Classic Christmas' snippets pouch pad turned up a strip of red tartan paper - a fairly good match (IMHO) to the tartan wrapped gift in the image panel to pull it all together 

- glued the strip of red tartan across the green tartan , snipped the really small overhang off, then glued it to the card front

- final step, after spending ages dithering over a possible sentiment and deciding against it, was to glue the oval image panel in place

A little hunt through my crafting downloads in the middle of writing this post turned up LOTV's 'Classic Christmas' papers in digital form - hooray! I bought them back in 2017, forward planning there! ☺ 

I've posted the results of our 'Christmas in July' themed Challenge #432 over on the Snippets Playground HERE.

Dudley Pupdate - a quiet week really. Dudley is certainly happier that the scorching temperatures have dropped somewhat. So are we! Having written that the other day, they seem to be climbing again!


Wednesday, 27 July 2022

Rudolph Days Challenge July 2022 - up cycling

The other day, I grabbed a handful of shop bought (great source) Christmas card fronts, saved from Christmas 2021 that we'd been sent, and had a little session using the Gemini, die cutting the elements I wanted to 'up cycle'. It's a good way to do it by having a 'session' as I did. I wrote which die I'd used on the back of each die cut and also kept a few snippets of the same card fronts to potentially use for sentiments, on some cards, not all.

A day or so later I rustled up a very quick recycled card from the batch, in readiness for the current Rudolph Days Challenge over at ScrappyMo's HERE:

I used:

- 5.75" x 5.75" square white card blank, side opening

- the gorgeous gold embossed edged front panel of a card which originally had a lovely embossed Christmas tree die cut on it - it's kept kept to one side to be played with another time. We've had the same 'tree' card (probably from the same friend who feels that hand made ought to be repaid with a special card) which I up cycled last year I think/know!

- the centre of the panel had the very slight and thin remnants of the glue from sticky pads on but, I knew that would be covered by the image I wanted to add

- trimmed the front square panel to the same size as the card blank and glued it in place 

- then pulled out a die cut really adorable robin image, from the front of another card, which I'd previously cut using a 4.5" diameter 'Stitched Circles' die by The Works

- glued the image onto the card front

- I always add printed or stamped inserts with Christmas greetings into our cards, so didn't spoil the front of the card by trying to add a sentiment

Very simple I know, but if the up cycled elements are pleasing, then try to work the card around them and let them shine and have a second outing. Better than being swamped with too much unnecessary 'stuff'. IMHO only of course!


Tuesday, 30 June 2020

Rudolph Days Challenge - June 2020

I started making a batch of cards well in time for ScrappyMo's Rudolph Days Challenge - and then got sidetracked. If I just make the one card then I won't feel the urge to finish off the other nine in the batch - so that little project is on hold for now. Maybe by the end of July they'll be done ☺

But, I never miss joining in this fun monthly challenge and suddenly had the idea of looking through a box of received Christmas cards which I like to try and up cycle. And this is the result - very quick and easy, but at least I get to play along:
I used:

- an off white card blank, trimmed to 5.5" x 4.25"

- a shop bought Christmas card, from which I die cut the part of the woodland scene I wanted to use, with a Lil' Inkers 'Stitched Rectangles' die

- added a piece of X-Cut red self-adhesive glittery paper to a snippet of white card and trimmed it to just slightly bigger than the image panel

- glued the image panel to the red glitter panel and then glued it onto the card front

- the card had a couple of red dots printed on it, so twinkled those up with red Stickles, and added a third one to follow the 'rule of threes'

- and the deer didn't have an eye so I added one using black Stickles

- I always add Stickles using a really fine paint brush, kept just for the purpose. Less chance of overdoing it I find!

The reason I chose a red 'frame' is because all the sparkly gold card and paper I have wasn't the right shade - plus I knew I could twinkle up the red dots to pull it together. Who knew there could be so many variations of gold sparkly paper?!

In real life this card sparkles beautifully, but as is often the case, the camera doesn't want to pick that up as well as I'd like.


Sunday, 28 January 2018

Pixie's Snippets Playground - Weeks 315 and 316 - results

Well, things are on a much more even keel now and, apart from no Guest Designer (purely down to me being too busy to sort one out), we're back into the swing of our fortnightly Snippets Results Sunday post.

However, I couldn't let the post go without showing a snippets card to start off with, so I made one :) At the beginning of January I rummaged through the shop bought Christmas cards we'd been sent and then kept some aside for potential 'up cycling'. So I used part of one of them for my snippets card.

It's also for Scrappy Mo's Rudolph Days Challenge, which runs from 25th to the end of each month:
I used:

- 6" x 6" creamy white card blank

- snippet of Christmas red card stock as the 'frame', trimmed a bit and then glued in place

- piece of patterned paper from the 'All is Bright' paper pad made by My Minds Eye, trimmed to smaller than the red layer and glued on top

- the Christmas card that I 'cannibalised or up cycled' had a sparkled snow globe shaped topper, stuck on the front of the card with sticky pads. One useful tip about removing toppers like these is to sneak up on them from behind! In other word, place the card front face down and then carefully prise the card away from the topper - much less likely to damage or crease the topper if you're holding it down firmly on a flat surface (ask me how I know - from years ago when I wrecked a few promising 'toppers')

- then I picked off the residue of the sticky pads from the back of the globe topper and replaced them with fresh ones

- measured from the centre of the patterned paper layer using a ruler and lightly drew guidelines to help when placing the topper

- carefully added the topper to the card front and then finished off each corner with a shiny red Josy Rose hot fix nail head

Showed it to Len and he said 'Wow, that looks just like one you would buy in a shop' - my snort of laughter and then his closer look at the topper gave the game away a bit :) Waste not, want not I always say!

Time now for the fortnightly picks and, as always, so difficult to choose:
Lia brought this really beautiful card to share with us - look closely and you'll see the centre panel is actually cross stitch! So pretty and the way the rest of her card has been designed to perfectly echo the stitched panel is utterly gorgeous - love it!

I wonder just how many of us began our card making journey by making little cross stitch panels into cards - I know I did, but my panels were just very plain as all the work and enthusiasm had gone into the stitching :)

This is a super card, made by Sharon F over at Higgledy-Piggledy ( I love that blog name and it's much like my craft room right now, which is well overdue for a really good blitz and clean). The scalloped doily effect lends itself perfectly to our 'English tea time' and the idea of the hearts being poured from the teapot is just so clever! Great split sentiment as well :)

And last but by no means least is our lovely Kathleen with a brilliant idea for a card for a football loving boy (or man for that matter). Love the cupcake idea and the paper piecing goes perfectly. Kath used stickers for the boots and footballs (boots and balls just didn't sound polite!) but I bet you could find suitable stamps or even images on line to play around with. One to remember!

We had three new Playmates this fortnight - the most we've had for a while:
Katrina (aka CornishKat)
Nonni
Pam Sebring
Welcome to the Playground girls - it's always fun to see some new faces playing along with us. I hope you came back again soon and also that our Playmates will hop over the say 'Hello' and perhaps add themselves as followers. We're a happy little bunch as I'm sure you'll soon find out.

We had a total of 59 entries including our three new little Playmates! So, we've taken a bit of an upwards turn - yay!

Prize draw time now and our winners of the Lawn Fawn 'Shammies' (two were on offer) are:
Lynne's 'yes please' comment did make me giggle - she finished off by admitting 'I'm a dirty beast who never cleans her stamps'' :) No excuse now girls!

I still need your addresses, with full name at the top of your address so I can copy and paste please. I know that some of you do wonder why I always ask for your address when you're a winner and you may think 'But she already knows my address anyhow').

Answer - it's confirmation that I've got the right person, that you still want the prize and also that your address is the same. I will keep on asking, even if it's a bit of a nuisance - plus it makes life easier for me as I don't need to hunt in a few places for your address (a small price to pay for a prize I hope?). I don't want to make more work for any of us but have had a few near misses with unexpected address changes, as well as a couple of changes of mind about the prize even.

Please put Playground Winner or similar in the subject line of your email in case it drops into my junk mail - much of it won't, but you never know. Email address is on RH sidebar as always. If I hear quick enough I'll pop these in the post when I'm out tomorrow or Tuesday.

Keep those snippets entries coming, you still have a week left to play HERE for weeks 317/318 remember! The prize is MFT's 'Sushi Date' stamp set, kindly donated by Tara of Seven Hills Crafts.

One last thought, as this is your Playground, I need opinions and I can't emphasise that enough! For a long time I did weekly challenges numbered as such.

Now it's fortnightly with two weeks (eg. 315 and 316). Is this confusing you at all? If so then I can flip back to when we switched to fortnightly and from that point calculate (still fortnightly) future challenges numbered as a single challenge spread over two weeks. eg. this coming week (really a fortnight) would be Challenge #319 rather than 319/320. And the following challenge would be Challenge #320 then the next one, two weeks later, would be Challenge #321. Hope that makes sense? We would lose track of the weeks I've been running the Playground - but that's not the main issue. It has to be what you would like :) Let me know please.

Love from the little white peril Parsnip - and of course me,


Tuesday, 27 June 2017

Rudolph Days - June 2017

Here's my Christmas card for the June Rudolph Days challenge over at ScrappyMo's - phew, managing to join in part way through rather than a last minute sprint.

For various reasons, crafting time wasn't on my side so I resorted to a scrabble through our box of received Christmas cards for one to 'up cycle' - and this was the end result:
I used:

- 5" x 5" square white card blank

- image from a card received a couple of years ago, chopped down quite radically to fit the card front as well as leave space for a sentiment below

- used a Woodware 'Fancy Corner' punch to add interest to the image

- mounted the image onto a slightly larger piece of deep red card stock, using Collall glue

- stamped the sentiment straight onto the card blank using the Misti for alignment and to ensure a good clear stamping - plus Memento 'Gray Flannel' ink and a sentiment from the Inkylicious 'Seasons Greetings' set

- then glued the image panel in place and stepped away

The image is beautifully 'flittered' in real life (that's how it came) - but as per usual, impossible to pick up in a photo - sigh. Ha, and it looks as if the camera can't even take a straight photo either :)


Friday, 23 June 2017

Merry Monday #253 - Bears

Such a cute theme over at 'Merry Monday' this week - 'Bears'! As I used the image from an up cycled Christmas card we were sent a couple of years ago, this is a 'one off'. Meaning my monthly target for 12 Christmas cards per month beginning in December has really slipped for June - but in the current heatwave, even I'm finding it hard to feel Christmassy! And that's quite an admission from one who can normally howl Christmas carols at the drop of a hat :)

Anyhow, this is what I came up with:
I used:

- 4.25" x 5.5" white card blank, side opening

- piece of apricot Core-dinations card stock (chosen to pick out the apricot ribbon on the little bear's parcel) - which was die cut using the MFT 'JOY photo card frame' 

- then I placed the frame how I wanted it to be over the image and popped the piece of waste from the centre in place. Holding it down firmly I then carefully removed the die cut frame and used low tack tape to hold the waste panel over the image (you could just pop a little bit of low tack sticky runner on the back of the waste panel before dropping it in place of course)

- then carefully cut around the image, just about three sixteenths of an inch away from the piece of die cut waste which was covering it, and took the piece of waste away

- that gave me enough room to add very narrow red line tape around the back of the die cut frame and then carefully pop it over the image panel

- glued the framed panel in place and left it at that

Of course, another way would have been to just lightly run a pencil line around the frame inner as a guide - but OCD was lurking here!

The card came with the gold stars already glittered, extra bonus. The colours are really non-traditional and, the white card blank I used is actually very slightly 'off-white'. I love really crisp, very white cards but I bought these on line and was quite disappointed when they arrived a while ago. But, they do have a use as a lot of commercially produced Christmas cards are printed on slightly off-white card - which makes for a good match when up cycling!

Still think it's hard to beat Hobbycraft if you want to buy bright white card blanks - and their 'own brand' 300gsm own card stock is also great for making your own blanks too. Of course, my favourite Samuel Taylor also do brilliant white card stock in various weights as well - it's usually best to buy at craft shows for good deals though.


Wednesday, 28 September 2016

Upcycling - times three

About a week ago I was idly flicking through the box of received/shop bought Christmas cards that I always hang onto after each Christmas. Am quite selective though and if I truly can't see any way a card could be up cycled then it goes off to one of the supermarket collecting points in January for The Woodland Trust. I always hang onto hand made/crafted cards and absolutely love looking through them - those I won't ever part with, or re-use, needless to say!

Back to my 'idle flicking' - this is the glossy 'shop bought card' that caught my attention:
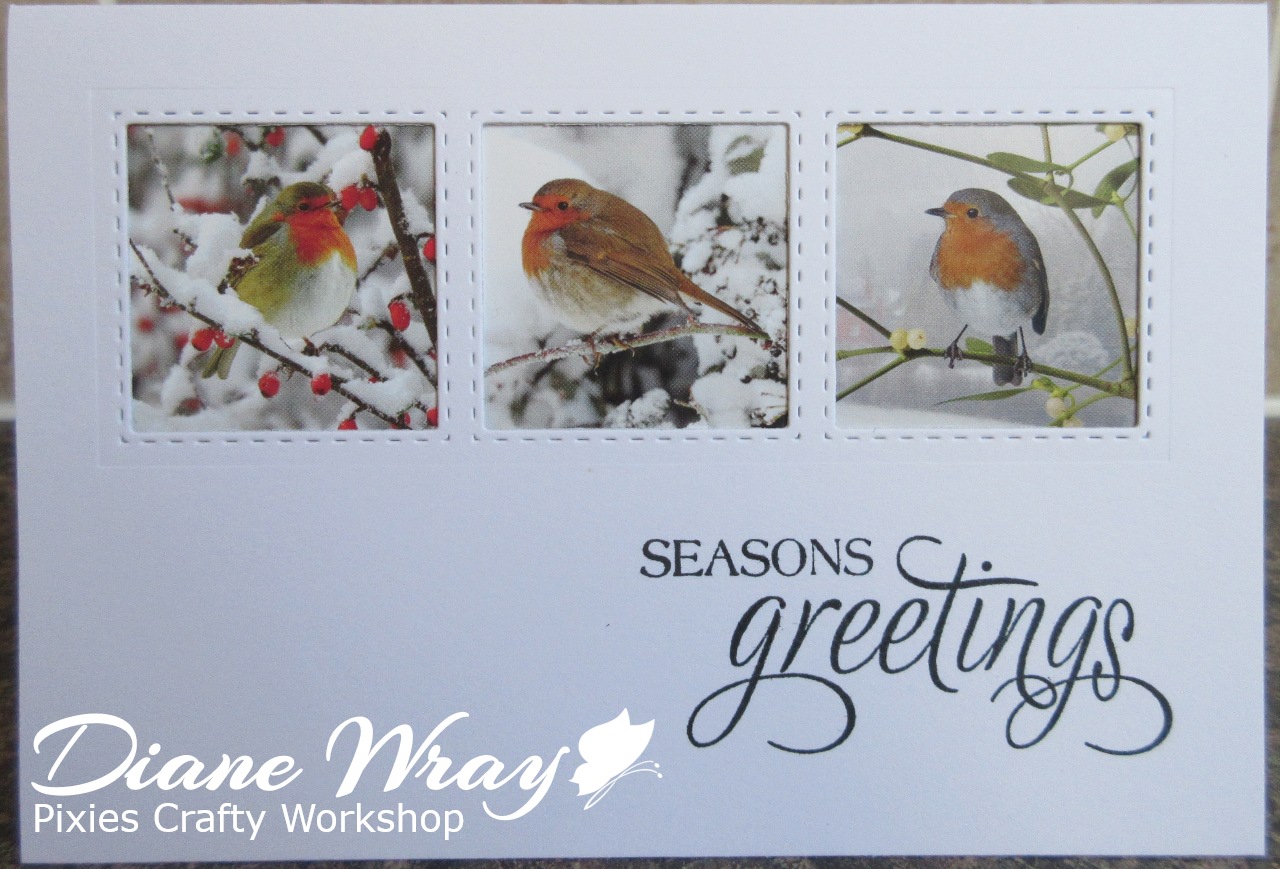
I love robins and it's such a pretty card just as it is really. But, nine on one card seemed much too tempting not to have a play with.  The images are quite small, about 1.5" square each and no sentiment, but a die set that I bought not too long ago came to mind.

I must confess that I'm quietly delighted with how the three cards I made out of that one card turned out - here they all are:
And here's a single one on its own, for a better view:
I used:

- 4" x 6" white card blank, tent style

- one triple window die from the Just Rite Frame Set 'Three in a Row' to die cut the apertures. I did have to trim a teensy bit off one side of the card before positioning the die, just to be sure it would fit through the Cuttlebug in a single layer. The secret is to line up the die so you have it at equal distance from the top of the card as well as on either side - if you're aiming to make a similar card

- so now there was a card with three stitched apertures i on the front - cool :)

- next I double checked the robin images and sadly each one would need to be positioned separately - it was a gnats whisker but too risky to try and adhere strips of three at a time, sigh just my luck :(

- backed each aperture with red line tape and trimmed the images so there was a good overlap before adding them behind the apertures. One tip, I added all the red line tape around the apertures for each single square before starting to add the images from behind (by eyeballing from the front of course)  and then just peeled off as much backing as was needed as I went. Reason? Too much of a chance of accidentally sticking bits where not needed - remember am still recovering from 'turquoise-gate' here!

- now the images were in place behind each aperture - and of course this was the point at which I fretted about wrecking the whole venture, getting ready to stamp the sentiment

- backed the inside of each front of the cards with a slightly smaller piece of white card stock using red line tape, so I could work without any stray 'sticky bits'

- then, using the Misti I aligned a stamp from the triple stamp Inkyylicious 'Seasons Greetings' sentiments set and inked it up using Memento 'Tuxedo Black' ink and stamped it in place - phew, always a risk but it worked just fine! Should have done that earlier really but I just couldn't visualise which of the sentiments in the triple set would look best.

The die set also comes with an outline die to cut those frames in a row, 'free-standing', as an 'add-on die to a card top - if that makes sense And there are also three dies to cut smaller 'stitched' square inserts or cutouts. Really versatile!

They also do a two by two die (ie, four squares) and I so wish I could recall just who perked my interest to go hunting! Apologies but I do look at so many blogs each week, sigh. Bad  for the purse!

Card(s) all done, and I had three almost the same - apart from the slightly different images and the in-house critic gave them a double thumbs up - yay!

This card is for Craftyhazelnut's Christmas Challenge #300 -'Use a sentiment' of course.

 As well as Hazel's other Christmas challenge blog, which is Craftyhazelnut's Christmas Challenge Extra for September.


Wednesday, 22 April 2015

F is for........................

Over at Craftyhazelnut's Christmas Card Challenge the current theme is 'Something beginning with F'.

So, folks, I present to you - Flying Father Christmas and Fearless Furry Fido with Fairy lights in a Flurry of Frosty snow with a Foiled sentiment - snigger :)
I used:

- 5" x 7" white card blank, tent style

- a layer of SU's 'Real Red' card stock from the snippets folder

- a snippet of white card stock, embossed using Darice's 'Snowflake Background' embossing folder

- the front of a 2014 Christmas card from the up cycling box. The card was circular with a straight piece at the spine and a very narrow straight piece along the bottom edge. It was just a case of finding the right sized circular die in the Tonic Studios 'Circle Layering' die set. I totally love this set of dies, there are 14 in total ranging from the largest at 14cm in diameter down to the smallest at 2.5cm in diameter - plus they come in a durable plastic package with their own magnetic sheet as well

- final touch was just a red, foiled with gold, sentiment topper - which I'm sure dates back to when Lakeland Limited sold a few craft supplies!

And this card is also for Craftyhazelnut's Christmas Card Challenge Extra for April, where it's always 'Anything goes'.

And I just realised that it's right in line with the current challenge over at Merry Monday #125 - Use a cat or a dog. Wahoo, three challenges with one card!

Di
x