Showing posts with label boys cards. Show all posts

Sunday, 1 January 2023

Happy New Year!

Many of us will be glad to see the back of 2022 - the year in which we lost our beloved Queen Elizabeth, I lost two close friends and also my guardian (from when my parents returned to the UK and left me at school in Germany) - and several of you suffered much, much closer family bereavements. A year of losses for many of us - but I do try to always remember that 'heartache is the price we pay for love'.

Onto brighter things though - we're into a brand new year, and one in which I so hope that Sarn, myself, Dudley and you, will continue to thrive in the Snippets Playground Challenge. There are so many ways to use up snippets - it's almost endless - sigh, as are the ever-expanding storage holders we keep our snippets in!

Our current Christmas/New Year Challenge is a change from the intensive and massive load of running a Grand Draw. This year, we've gone for one 'Winner Takes All' prize of a 'Your Chosen Favourite Craft Store Gift Voucher' to the value of £50 - or the equivalent value voucher wherever you live. Check out the Snippets Playground if you haven't done so already.

The current challenge has a theme - not something we often do but this is Holiday Season after all! It's - 'Anything BUT Christmas'. As well as using snippets of course and this is what I made. I CASE'd it from my own card, made several years ago - which was in turn had been CASE'd from a SU Demonstrator. And here it is:

The 'snippets' before being attacked. My crafting OCD means I don't like to store snippets of any size with undulating edges if possible!

I used:

- 5.75" x 4" black card blank

- a layer of slightly smaller white card stock, quarter of an inch on each of the four sides

- a layer of smaller again black card stock for the board - I ran it through the Cuttlebug, using Cuttlebug's 'Swiss Dots' folder and then trimmed it to 5.125" (five and an eighth in old money!) x 3.25" - then glued it onto the piece of white card stock

- snippets of red, blue, yellow and green card - punched using SU's 1" square punch and SU's Itty Bitty round punch

- double layered the 'dots' and glued them onto the pieces and used a white Prismacolor pencil to add curves to give the impression of even more dimension 

- added the Lego pieces using thin sticky pads then

- 'happy birthday' sentiment was stamped using a stamp from the 'Happy Messages' set by Stampendous, and a Memento 'Tuxedo Black' ink pad onto a piece/snippet of the same white card as before - sized at 3.125" x 1.625" (the detailed measurements are for my own reference really)

- added the sentiment using thin sticky pads onto the card front - and called it a wrap!

Made for a little neighbour, aged six (Jack).

Dudley Pupdate: Oh what a little scamp he is right now! We think that being rather spoiled over Christmas is reaping its own rewards! The other night, he claimed my space on the bed, and despite spending so much of his time cosied up to me during the day, he let me know with a Grinch-like growl that I wasn't very welcome to disturb his slumber! Len gave him a semi-stern ticking off so he moved - I then woke up in the early hours of the morning to find him (Dudley) snuggled back, right up against me, head back sharing the pillow and snoring gently! And looking so angelic of course!


Sorry the above images are so small and also a bit blurred. I clipped them from a couple of CCTV shots - taken when Dudley went out onto our front drive to give his 'Bestie' Arnie a big hug on Thursday! When they meet they go into 'hug mode' and dance round and round like a couple on the dance floor! So far we haven't managed to catch them on our phones or a standard camera for better definition  - but at least this proves I wasn't fibbing when I mentioned it a while ago!

As I type this we're hoping that the usual mayhem of New Year's Eve fireworks here won't trouble Dudley. So far, so good, although he did jump late on Boxing Day when a barrage went off nearby. He'd been asleep so that was probably what startled him. Our best bet is to have the TV on with the sound up and the London Celebrations streaming - as a distraction from what's going on in the neighbourhood.

Welcome 2023 - we need you to bring happiness and peace into our lives for sure.

Love from Dudley and myself,


Tuesday, 8 February 2022

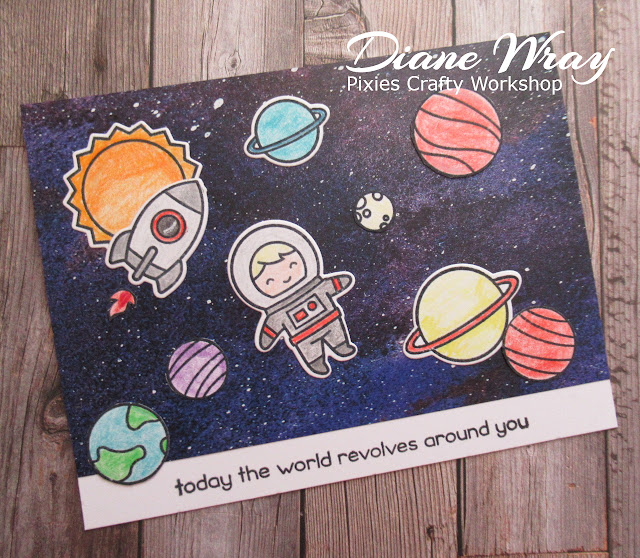
Out of this world

Luke, the son of a neighbour, has a Birthday coming up next week - and for once I managed to make a card for him in good time, rather than the usual last minute panic:

I used:

- 5.5" x 4.25" white card blank, tent style

- background paper came from a Crafters Delight book of scrapbooking papers called 'Watercolor Galaxy'

- trimmed the paper to leave half an inch of white card blank at the bottom of the card and to overhang the sides by about quarter of an inch on each side

- glued the paper in place and, once the glue had dried, trimmed off the excess from each side (from the back) with scissors

- then stamped a selection of images using Memento 'Tuxedo Black' ink and MFT's 'Out of This World'  set of stamps onto snippets of white card

- stamped the sentiment at the bottom of the card - same ink pad and same set of stamps

- coloured the images using Polychromos pencils

- die cut most of the images using the matching set of dies. However, the ordinary circular dies were joined so tightly together there was no room to get my wire snippers in between the dies - help!

- began to fussy cut them leaving a white outer edge the same as on the die cuts but soon realised that any imperfections would be glaringly obvious against the dark background so I opted to cut all the circular images right on the outer line - same for the flames from the rocket, which oddly enough didn't even come with a matching die

- then just glued all the elements in place using Cosmic Shimmer glue

I even coloured the little astronaut's hair pale blonde just like Luke's own hair. ☺

I freely admit that I have lots of scenic background papers and many night sky ones as well. They're lifesavers for fast cards! I also have some different 'space themed' stamped and die cut images still to use - sent to me by a lovely friend.

This card it so very much like a Lawn Fawn website sample card that it would be cheating to enter it into any challenges - but it was fun to make!


Wednesday, 18 November 2020

Card for Josh aged 12

We have a young neighbour who celebrated his 12th Birthday a while back on Bonfire Night (5th November). Len immediately came up with the idea of a dog for his card as Josh became the proud owner of a lovely black Labrador puppy during the Summer. She is 'growing rapidly into her paws' - lots of puppies seem to have oversized feet which I believe generally  indicates that they'll be quite big dogs when fully grown. She's a lovely pup and is Josh's pride and joy - he begged for a dog for years and finally his wish came true, thanks to lock down.

This is the card I made for Josh, using Len's idea:

I used:

- 5.5" x 4.25" white card blank, side opening

- snippets of plain grey card (SU Smoky Slate) and red and white spotty paper from a 'Summer Goodness' paper pad - free with Quick Cards Made Easy magazine a good while ago. I still miss that magazine

- die cut the grey card and red spotty card to size using a Waffle Flower 'A2 Layer Dies' set

- I found the free Clipart image of the pooch etc. online and resized it in GIMP before printing it onto white card and then cutting it to size using one of the Waffle Flower layering dies 

- next, I die cut the word 'celebrate' using another snippet of the grey card and an Impression Obsession's die from a set called 'Birthday top edgers'

- glued the sentiment onto the image layer using a Zip glue pen and snipped the excess from either side

- then it was just a case of glueing all the layers in place 

This card design is almost the same as the card I recently made for Livi's Birthday - as I had all the layer dies selected and out to hand, it seemed silly not to move straight on from making her card to making this one for Josh. 

Some of you have said that you're considering whether or not to invest in the Waffle Flower layering dies. For me they really have been a game changer in terms of accuracy as well as the fact that you can also use them to 'gut' paper or card thereby making a single piece go much further. As yet, I've not used the in-between sized set so I can't say whether that will get much use or not. I would just buy the main A2 set and take ir from there if you're unsure.t

And how about this - just supposing you've already assembled and glued together your card and then decide to add a sentiment banner right across the top layer. We all know how easy it is to be just a gnats whisker out when using a trimmer - but you would just cut your banner to the height you want it to be and then you can use the same die you used for the top layer to position the sentiment centrally (which I struggle with unless I measure and do some calculations with pencil and ruler) to die cut it toexacrly  the same width. For me it's a bit of a no brainer really. I bought mine from Bumbleberry Crafts HERE - but right now they're out of stock. Perhaps some of you have already sneaked in?!

Speaking of 'gutting' paper - ie. cutting the middle out to make it go further, there's another style of card that I've made a few times in the past - like this one., known as 'Triple Layer':

They're great fun to make and can be subtle, or pack quite a punch like this one I made in January 2014, which uses some tropical/very bright papers.

To make this card I measured and cut it all by hand - in the process using three sheets of the 6" x 6" patterned paper to get the continuous alignment effect as well as a similar amount of the plain card. The idea is that the end result looks like the patterned sheet with the pattern just broken up by the plain frames. Using the A2 layers die set(s) I can now get everything I want from a single 5.5" x 4.25" sheet of patterned paper and also from the same sized piece of plain card. 

I have yet to prove it, but the optimist in me says 'of course it's possible!' ☺ Once I'm fully ready for battle again - getting there thankfully!


Thursday, 13 February 2020

Boy's Birthday card - out of this world

I made this card for Luke, a neighbour son who will be eight years old next week. Am posting it on here, mostly for my own records as it's just made from a kit:
I used:

- 7" x 5" white card blank, short side opening

- backing card and toppers by Hunkydory, in a 'free' kit given out at a show up in Coventry a few years ago

- selected the piece of the backing card I wanted to use, trimmed it and glued it in place

- popped out the pre-cut 'toppers', snipped of the little white bits at the edges and then glued them in place 

Has to be the fastest card ever!

It wasn't until Tuesday evening that we saw signs of Dudley's old spirit returning - five whole days after his experience at the so-called 'groomer's' - he played a game of 'zoomies' around the lounge and it was a delight to see his eyes sparkling once again. He's still very wary about having his collar put on, which he needs as well as his harness when he goes out so it can't be avoided. Time and patience with a load of love should help - we hope. Our next step is for me to take him out for a car ride in his doggie booster box for a little excursion - the last time he was in that, he returned home curled up into a very sad and shaking little ball. Perhaps I'll take his beloved 'Stinky Monkey' Mark 4 along for the ride to keep him company :)

Thank you all for your support - the Playground Pup sends woofs!


Wednesday, 12 June 2019

Male Birthday card for 20th Birthday

It was Len's great-nephew's 20th Birthday recently, and I went through the usual gnashing of teeth trying to think of what sort of card to make. His Facebook page didn't give much away so I resorted to opening up a few Really Useful Boxes and peering hopefully inside them. And then, I spotted a load of 'Scrabble' pieces - produced especially for crafting. And that's what kicked it all off - here's the result:
I used:

- 6" x 6" square Kraft card blank, side opening

- a sheet of paper from the Paper Cellar 'Mens' paper pad, just slightly trimmed to leave a little border. I like the open topped cars in the pattern

- 'Scrabble' letters to spell out Brad's name. They're make of thin (balsa?) wood and I found them in Hobbycraft, under their own label, a good while ago

- the letters came with some double sided sticky circles on the back but I carefully removed those and used Collall All Purpose glue to glue the pieces in position

- finished off by adding a 'Craftwork Cards' sentiment, again bought ages ago. As often happened with these sentiments the circle had been cut just slightly 'off' leaving a fine white border in places, so I carefully trimmed right round to even things up

- then ran a black marker around the edge before adding the sentiment to the card using thin sticky pads

For being totally without inspiration at first, I'm glad this worked out as it did - and it got a thumbs up from my 'in-house critic' too!


Wednesday, 22 May 2019

Vroom, vroom!

A little (not so little now) neighbour, called Taylor, is ten tomorrow. It's safe to post this card I made for him, as he doesn't know about the blog:
I used:

- 5.5" x 4.25" white card blank, side opening

- a snippet of SU's 'Smoky Slate' card stock, trimmed to slightly smaller than the card front and glued in place

- next layer is a snippet of white card stock - embossed using a Cuttlebug 'Diamond Plate' EF (the closest I had to tyre tracks) and trimmed to a teeny bit smaller than the 'Smoky Slate' layer - then glued in place

- next, out came the Misti and a Stampin' Up set of stamps called 'Rev Up the Fun', and this card is made totally using stamps from that set. Taylor's Dad has a motorbike and he loves to go for a little spin on it all togged up, sitting behind his Dad

- I stamped the bike onto a snippet of white card using Memento 'Danube Blue' - I'm a bit careful/mean and only buy colours like this in the 'Dewdrop' size if I rarely use them. The Misti is so useful to get a totally crisp image

- then, using the Misti again, I stamped the 'exhaust fumes'- checking for position with a snippet of scrap card, and SU's 'Smoky Slate' ink pad before doing the real thing

- whilst at it, still using the Misti, I also stamped a couple of the tyre tracks stamps - again with SU's 'Smoky Slate'

- more stamping - the sentiment onto a white snippet - using SU's 'Real Red'

- with the stamping all done I just used scissors to trim down the 'tyre tracks' and set them aside - I'd usually use the trimmer but scissors worked fine as I had a strong line to follow

- mounted the trimmed image onto a snippet of SU's 'Real Red' card stock, and did the same with the sentiment - only I switched and used SU's 'Smoky Slate' for that element

- added the 'tyre tracks' onto the card front using red line tape

- then added the sentiment and the image panels using thin sticky pads

All done!

Sorry if I haven't visited the Playground entries as promptly as I should - bit busy here but will be there ASAP! 


Wednesday, 9 January 2019

Birthday card for three year old Jack

This is as much for my records as anything as it was so simple to make and (shock, horror) I used a kit! I needed it right at the end of the Grand Draw marathon and was so happy to find I had this kit to hand:
Not much to tell about how I made it - the A5 kit card is (I think) Hunkydory from a Craft event I went to a little while ago. It comes with the design printed back and front plus a nicely co-ordinating insert - and of course the topper with (how lucky) three soldiers on.

Then all I did was to hand cut the banner strip from a snippet of black card and glue it in place. Finally added Jack's name using die cut red letters and popped the number 3 (gold peel off) onto the busby of the middle one of the three soldiers!

Sorry to be a bit slow on commenting on both this latest challenge and also the previous Grand Draw one!

I'm still here, but running around trying to make up for lost time. Took Dudley to the Vet today for more of his prescription monthly worming pills ........... plus a three-monthly flea/tick tablet as he's nearing six months old. He now weighs 5.5kg ☺

I have no problems with the worming tablets - he's been on them for a couple of months now, loves them and they don't cause a reaction either! But am not happy with the flea/tick tablet he has been prescribed. We both feel so uneasy with supposed (possible but devastating) side effects of this particular tablet that we may well not give it to him but look at some less aggressive treatments. Dudley is 'flea free' but we thought it best to prevent rather than have to cure. Anyone here heard of or used 'Bravecto' - that's what he's been prescribed? Come on my doggie friends - help me!!

Love from us all and a woof from Dudley(who looked great for his outing after little Parsnip spent ages bustling around grooming him beforehand - bless my little white bear, who is proving to be a very good 'nanny'),


Friday, 25 May 2018

One for my records, for Taylor

I always keep a post of cards that Len designs, and then I make up, for our little neighbours.

This one is for a young chap who still has his heart set on being a policeman when he grows up:
Not much work on my part, although the star shaped badge was printed separately and had to be fussy cut then added to the card front.


Friday, 2 March 2018

Card for Luke


This is just a reminder for me - for the record. Len, as he often does now, helped me out by pulling together the image and wording:
He figured that most little boys will still be keen on Super Heroes so he designed this, using free Clip Art, in the space of about 15 minutes at the very most.

All I had to do was to resize it a bit in GIMP, trim it to suit, round the corners, add the blue backing layer and then glue it to a 5" x 7" card blank.

Quick and easy, especially when cards for chaps of any age are always such a struggle for yours truly!

Hope everyone is keeping safe and warm in the extreme weather conditions we're having in the UK just now!


Wednesday, 17 January 2018

Birthday card for a 2 year old

One of our little neighbours (Jack) just celebrated his 2nd Birthday. As I was up to my eyes with the Snippets Giveaway, Len came to the rescue and pulled together a picture for me to use - and this is the end result:
I used:

- 6" x 6" square white card blank

- slightly smaller square of yellow card, from the snippets folder, glued onto the card front

- then the trimmed image panel, glued on top of the yellow layer

- finishing touch - a thick coating of Glossy Accents on the cherry

Thank you Len! Saved my bacon once again.

All the Snippets Playground prizes (apart from one) have now been posted. Am still waiting to hear from one winner - 'Hello, anyone there Maxine?!'. 


Wednesday, 15 November 2017

Little guitar player

Stuck for ideas for a Birthday card for a neighbour's little boy, I asked my in-house critic and his immediate response surprised me. Apparently, he'd noticed Josh, with his little spindly legs, trotting to and from school with a guitar slung over his back now and then!

That was a good enough starting point and this is what I ended up with:
I used:

- 6" square white card

- a second card the same, sliced in half across the spine

- scored the main folded card right across the centre and folded it to act as the 'prop' for the easel

- two identical pieces of designer papers from the Studio Calico 'Snippets Collection' paper pad (how appropriate is that then?), trimmed down, backed with deep blue card and glued onto the inside of the easel, as well as onto what would be the 'standing up front piece of card' 
 
- then stuck the easel front onto the folded section of the base card using red line tape 

- I downloaded the digital image from LOTV - it's called 'Playing Guitar' and die cut it using a die from the Lil'Inkers 'Stitched Rectangles' set  

- backed the image panel using a snippet of deep blue (SU's 'Midnight Muse' btw) card stock and glued it in place on the card front

- then die cut the letters for Josh's name and age from more of the deep blue card which was backed with Stick It adhesive sheet and glued them in place - using my usual trusty sets of dies 

- used the Misti to stamp the sentiment onto a snippet of white card, using Memento 'Danube Blue' ink and a stamp from the Penny Black 'Special Thoughts' sentiment set

- then die cut the sentiment using another die from the Lil'Inkers 'Stitched Rectangles' set of dies and backed it with a frame cut from a further little piece of deep blue card

- fixed the sentiment panel in place using thick sticky pads to act as a 'prop'

One finished card - and it was made well ahead of time for a change as well!


Tuesday, 19 September 2017

Rushed card for a chap!

Good grief - I suddenly realised it was one of Len's great nephew's Birthdays coming up and made this on Sunday in one heck of a hurry I can tell you:
I used:

- 4.25" x 5.5" red card blank, tent style

- snippet of black card as a frame

- snippet of white card, die cut using a die from the Lil' Inkers 'Stitched Rectangles' set 

- stamps from a pre-loved SU set called 'Sky is the Limit', stamped using Memento 'Tuxedo Black' ink

- glued the layers together and popped them onto the card front

- ack! Noticed a faint black smudge at one wing tip but had no time to make another card so I die cut Joe's name using Tattered Lace 'Alphabet' dies and glued the letters over the smudge!

A case of 'more haste, less speed' as my Mum used to say but at least it will arrive in time :)

Entering this into the current Less is More challenge #346 'Take Flight', even though it's not really imaginative enough. 


Friday, 11 August 2017

Max and Charlie are six and four

The dear little boys who live next door to us have Birthdays just a month apart. This post is really as much for my own records so I can look back and try not to repeat the same cards from one year to the other.

Having said that, my in house critic did the image panels for me on his computer and all I had to do was to print them out, cut and glue some card backing as 'frames'. Such a huge help - thanks Len!

Max and Charlie are still very much into playing at being builders and they spend hours happily moving stones and soil around their garden. It's so lovely to see children actually playing and using their imaginations - what cracks me up is the 'Beep, beep, beep' sound piping over the fence whenever one of them is reversing one of their many builder's vehicles!

Both cards are 5" x 7", tent style:
Apart from using the guillotine, the only cutting I did was the little 'age' rosettes, which had even been thoughtfully duplicated by Len underneath the image so I could pop one on top of the finished card with a little piece of thin sticky pad :)

And, MANY thanks to those of you who jumped straight in and offered to be a Playground Guest Designer. It's times like this you realise just what a great bunch our Playmates all are! I wonder, would Len take a turn perhaps? :)


Tuesday, 23 May 2017

Designer Len strikes again!

This post is mostly for my own use, to remind me of what we did for Taylor's 8th Birthday card. Yup, it sure was we,  as Len totally pulled all the elements together  to make up this little scene:
I used:

- 4.5" x 7" white card blank, tent style

- the image panel created by Len from free sources on the internet (didn't dare mention that the cop is wearing a USA uniform though), just printed onto white card stock and trimmed down

- piece of red card stock to form a narrow frame around the image, then glued image onto it before adding the whole panel to the card front

Right now, Taylor (a neighbour's little boy) is mad about anything to do with the police. Len has given him some bits and bobs from his time working with our UK Metropolitan Police up in London. And he even bought him a proper police whistle not so long ago - not sure how happy Taylor's Daddy was with that bright idea I must admit :)


Tuesday, 14 February 2017

Skateboarding Ninja


One of our little neighbours is five years old later on  this week and Len came to the rescue again, when I was fretting over what on earth I should do for his card. He found a great little image on line (Luke is into his scooter, does try to skateboard and also likes Ninjas) - and this is what I made:
I used:

- 5" x 7" white card blank

- piece of red card stock from the snippets folder, with the top edge die cut using the super-useful Memory Box 'Grand Happy Birthday' die

- trimmed the red panel to size and glued it to the card front

- filled in the white parts of the sentiment by die cutting more letters with the Memory Box die plus white card backed with Stick-It then inlaying them, it just gives a slightly more professional look (IMHO)

- added the '5th' using a Memory Box 'Classic Numbers' die and Tattered Lace 'Alphabet' dies

- glued the image panel in place to suit the vertical space I had

- last touch was to add the name 'Luke', die cut using Tattered Lace 'Alphabet' dies

And that was it - done. Only took me about three hours, and I'm not kidding!


Friday, 6 January 2017

1st Birthday card for Jack

One of our little neighbours just celebrated his 1st Birthday. After all the Christmas cards I made for the Playground Celebrations, I just sat and stared into space for ages with no idea what to make for him - in the end I came up with this:
I used:

- 5" x 7" white card blank

- piece of pale blue pearlescent card just slightly smaller than the card front, glued in place

- patterned paper from the LOTV 'Bear Necessities' paper pad, trimmed a bit smaller than the blue backing card and glued in place

- the image is from the LOTV 'Babies' Art Pad, die cut with a Tonic Studio's circular die and then layered onto a scalloped circle of pale blue pearlescent card

- then I backed snippets of chocolate brown and pale blue pearlescent card with Stick-It adhesive sheet

- from the brown card I die cut the sentiment and the '1st' using a Presscut 'Happy Birthday' die and numbers and letters from the Memory Box 'Classic Numbers' and the Tattered Lace 'Alphabet - Anniversary Classic' dies

- and from the pale blue pearlescent card I die cut the letters to spell out Jack's name

- positioned the letters and numbers where I thought they looked best and then stuck them in place - burnishing to make sure they say put

- finally I glued the assembled image topper in place and called it done!

Some of you might have picked up that I was struggling with my much loved pink Cuttlebug here in the weeks leading up to Christmas. Thankfully, Santa brought me a new one (I'll get used to the retro shape and bright green in time - although the folding handle is a revelation, great idea!). I used the new CB for this card and was astonished at just how easy die cutting can be - I'd obviously forgotten as my old CB became old and cranky (sounds like me!) with much less pressure, meaning I had to fiddle around adding shims for a decent cut!

Wahoo, happy dance here! And Santa did consult me beforehand - rather than waste the little stock of cutting plates I have as spares I decided to stick with a Cuttlebug. Takes up less space than some of the other models as well - but one day I'll have a bigger one as well, maybe :) Just need to clear some space and move a few things around.

Many thanks to the prize winners for sending me your addresses so promptly! All prizes apart from Kitty's were posted off yesterday - I think Kitty is having computer problems so will just have to wait until I hear from her. I have a slight feeling she did move house so am not going to risk sending her prize to the wrong address :) 


Tuesday, 13 September 2016

Missing in action!

I do have a card to share today but wanted to make my apologies for being missing in action for a couple of days. On Sunday a lovely friend arrived unannounced bearing a card and gifts - it was such a delight to spend time catching up and putting the World to rights, and it kept me away from the laptop. Then yesterday was my Birthday and I have to first of all say a HUGE thank you for all the cards, gifts and many, many Facebook wishes.

I will get back to each and every one of you I promise - I was quite humbled by the numbers, and glad I'd dusted the lounge and made space (albeit unwittingly) for an avalanche of beautiful cards. Len took me out for lunch yesterday (Monday) and after that he insisted that I should just play for a while and then cosy up in front of the TV - so I obeyed him for once!

That means I haven't been commenting on the Snippets Playground since the gates opened this week - but I'll be back down to Earth shortly and normal service will be resumed. xx

Another one of our little neighbours recently celebrated his third Birthday. He's called Charlies and is Max's little brother and those kids spend hours and hours playing together in the back garden, digging in a spare piece of border soil that's been left for them as a 'construction site'. Moving the soil from A to B in lorries and dumper trucks features large in their activities :) I've never known two children so happy in their own little world and it's a real delight to hear their little voices chattering about the logistics of soil and grass clippings transportation :)

The other day Len was pottering in the garden sorting out the nightly chaos those messy hedgehogs leave behind, a little someone over the tall fence could obviously hear the occasional clatter too. Then this little voice piped up 'Hello Len' :) I heard it indoors and had to laugh at Max and Len having a little conversation - totally invisible to one another! 

Charlie's card had to reflect what he likes and gets up to of course - this is what I came up with - playing in dirt:
I used: 

- 300 gsm white card stock, die cut using my Presscut 'Step Card Cutting' die set, then the embossed lines were scored again with a scoring tool and the card folded into shape

- the image (so like little Charlie playing!) is a free Clipart one from the Internet (details at the end of this post) which was already coloured so I just went over the whole background with some light blue chalk and added a white die cut cloud (used MFT's 'Cloud Trio' die set) before setting it aside

- the Polaroid frame was pretty easy - first I printed the right sized sentiment onto white card and then used a Lil' Inker 'Instant Camera' die to cut around it (easiest way to do this as it's a solid die is to first cut a template and use the aperture to find the right position before inserting the die into the aperture, taping it lightly in place and then die cutting)

- trimmed the image and glued it behind the aperture

- the spotted background pieces were cut from one piece of 6" x 6" Dovecraft Back to Basics 'Bright Spark' paper, using another sheet I cut a matching liner for the inside of the card - then they were glued in place

- glued the image and frame to the card front

- added the number 3 - die cut from a little snippet of deep burgundy card using a Memory Box 'Classic Numbers' die - finally added a plain white panel inside on top of the spotty paper liner - die cut using a Lil'Inkers 'Stitched Rectangles' die

Here's the link to My Cute Graphics where I found the image. There are tons of images there and I do recommend a visit! 


Wednesday, 25 May 2016

Happy Birthday Super Hero

A couple of weeks ago I realised that a little neighbour's 7th Birthday wasn't too far off, so my in-house critic asked his Dad what his favourite 'things of the moment' were. Last year it was Spiderman, which was a challenge in itself - this year it's the Avengers film! Talk about a challenge and a half - one of those times you wish you never asked a question :(

Anyhow, I poodled around the internet looking for free downloads and, after truly spending almost a full day on it, this is the card I ended up with. The image governed the card from the word go and there was an awful lot of compromising along the way. Not least as the in-house critic kept on throwing in suggestions:
I used:

- 5" x 7" white card blank, tent style

- backing layer of silver card stock, trimmed to just slightly less than the size of the card front and glued in place

- then a slightly smaller layer of SU's 'Raspberry Ripple' card, trimmed to slightly smaller than the silver layer and glued in place

- the image was trimmed and mounted onto a backing of silver card - then kept to one side as I fiddle-faddled around with the rest of the card

- using snippets of silver card, backed with Stick-It adhesive sheet I cut the letters for the 'Taylor' panel using the Tattered Lace 'Anniversary - Classic' set of dies

- then the words were constructed onto a snippet of 'Raspberry Ripple' card and backed with a snippet of silver card. Tip for positioning letters when you don't want to risk using faint pencil lines, especially when the card itself is dark anyhow - use a strip of removable tape as a guide. I use the almost clear stuff but it's good enough to still see where you're going - and I've learnt the hard way over time to always press it onto whatever trousers or top I'm wearing first, just to get rid of any excess sticky - even removable tape can rip some card stock :(

- die cut the 'Happy Birthday' from silver card, again backed with Stick-It, using a new die by Paper Smooches called 'Birthday Words'

- then cut a number seven using a left over snippet of sticky backed silver card

- glued everything in place and just felt there were some gaps to fill so out came the box of confetti and sequins and I just added three silver stars to finish off

Almost went into total meltdown when I realised that the two stars on the 'Taylor' panel were just slightly out of alignment with one another and I'd stuck them in place using Glossy Accents so absolutely no hope of re-positioning them :( Isn't it always the way, if you're gonna do a boo-boo then you'll do it right at the last knockings! I know it's just a fraction, but it might as well have been a mile at that point in what had been a looooooooooong day!

The Paper Smooches 'Birthday Words' die set was 'enabled' by Jules when she used it on a card the other week. She used it 'inlaid' - which I actually think is more effective but I'm not unhappy with the way I used it. It comes with the Happy Birthday words plus two other celebratory words - and of course when I nipped off to buy one set, a second one fell into the basket for the Playground toy box so watch this space at some point in the future :)

Jane W made a really interesting point recently. With dies becoming more and more intricate we're almost creating our own peel offs when we back card with adhesive sheet and then cut fiddly dies. It look like Little Claire have twigged this and apparently they've got some really great peel offs in stock - who knows, perhaps peel offs are due to return into favour. Hop over to Jane's to see what I mean - HERE.

As it's another very important 7th Birthday this week, I'd like to enter this into the current 7th Birthday celebratory challenge over at Allsorts. Well done to Brenda and the team for all your hard work and wonderful inspiration!

And - I'm pleased to report that little Taylor was delighted with his card! He must have wonky eyes like me :)

Di 
x

Friday, 6 November 2015

Football fan's card

Phew, this is a last of a little run of male cards I'm pleased to say - I always struggle and am much happier making pretty things :)

This card was for a little neighbour's 7th Birthday, yesterday. He's mad about football (aka soccer elsewhere) and follows his Daddy in being an Arsenal supporter:
I used:

- 7" x 5" white card blank, tent style

- slightly smaller black border panel

- made the football by using SU's 'Honeycomb' embossing folder and white card as well as some black card. Snipped a few hexagons from the embossed black card and added them onto the white embossed card before running it through the Cuttlebug with a circular die (one from the Tonic Studio's set I keep banging on about)

- then I cut a couple of strips of Kanban 'Green Grass' patterned card and snipped the top edges to look a bit like blades of grass

- cut a panel of Kanban's 'Blue Sky' patterned card just a bit smaller than the black panel

- stuck one layer of the grass strip about 1" from the bottom of the sky panel, added the football and then added the other grass strip over the bottom part of the football so it went right to the bottom of the sky panel. I know, I possibly wasted some sky precious patterned card but it made the whole thing much more robust

- as usual, I'd left a bit of an overhang when adding the grass strips so trimmed each layer as I went, back to the edge of the sky backing card

- next added the black panel behind the sky, grass and football panel then stuck it onto the card blank front

- all that was left was to add the wording using peel off stickers for ease - some are silver ones coloured with a yellow Peel Off marker pen

- almost came unstuck next, I wanted to add Arsenal's current badge/logo. Found and resized an image and then the printer kept screaming it had a paper jam when I was doing a test print. Called the in-house support team who was also stumped, poking here there and everywhere in the printer with no sign of a paper jam. And, for some reason as we were giving up and ready to try it on another printer I just idly lifted the entire printer up to peek underneath - and there was the jammed piece of paper. Just think, if we'd given up and ordered a new printer - the asses ears would have been waving high here when we discovered the jam as the printer was moved to make way for a new one! Moral of the story? Leave no stone (or printer) unturned :)

- having resolved the printer issue (and having had help from in-house support team to bring the logo to a more true red as by this time I was almost running round the walls here), printed it on matt photo card and trimmed round the shield. That left the white cut edges of the card which I just ran a gold calligraphy pen round before adding said shield to the card with a thin sticky pad - phew

Making that last bit took longer than the rest of the card! And I did giggle - when he first saw the card almost finished Len remarked 'Like it. You're really on the ball kiddo with that one'. Then there was silence before we both cackled at the unintentional pun! Nut case.................who also sends his huge thanks for all your lovely Birthday wishes the other week!

By the way, I did spot this idea for the ball in a few places on line. Another use for that SU embossing folder!

Di
x

Tuesday, 22 September 2015

Minions Birthday card

I've wanted to make a 'Minions' Birthday card for ages now, using the Stampin' Up Owl punch. Recently I got the chance to make one for one of Len's little relatives - and they really are such fun to make, if a little fiddly!

This is so NOT my idea by any means, there are loads of Minions cards out there and we've had some fun ones in the Playground for sure. THIS is where I found some clear and easy to follow instructions using the SU owl punch (which was my mission!), along with photos of the stages. And this was the resulting card 'wot I made' - with huge thanks to Trisha for the really clear instructions:
I used:

- A6 white card blank

- a snippet of dark blue paper as a frame

- a panel of white card

- snippet of yellow card, die cut using a Memory Box 'Grand Happy Birthday' die then backed the lower part with a snippet of dark blue paper

- only at that point did I stick the yellow sentiment layer, with lower part backed with the dark blue paper, to the panel of white card and trim it down to sit on top of the dark blue frame leaving a narrow border right round

- the cheeky little Minions were made by following the instructions here (as mentioned earlier) and using snippets of yellow, black and dark blue card - plus some large googly eyes

- die cut the letters for Joe's name using a snippet of dark blue card and a Tattered Lace 'Anniversary - Classic Alphabet' die

- then just popped the little Minions in place using thin sticky pads

I used some words I'd seen whilst looking for the Minions tutorial, just printed them on the insert .................. 'Sending you Minions of Birthday Wishes'.

Snigger :)

Di
x