Sunday 28 May 2023

Sunday Snippets and Rudolph Days challenge

I made my snippets card yesterday - talk about cutting things fine! It's for the current Rudolph Days Challenge HERE, as well as for my Sunday Snippets post:

And here are the snippets I started off with:


I used:

- 5.5" x 4.25" white card blank, tent style

- snippet of Tonic 'Luna Silver' pearlescent card, die cut using a Penny Black 'zig-zag stackers' die

- snippet of Tonic 'Navy Dazzle' pearlescent card, die cut using a Positively Papercraft die called 'Starry Night Background' (the crescent moon is part of the die cut - I reckon that if you didn't want the moon you could make a 4" square card and chop that part off - or even flip it top to bottom and cover it with a sentiment or perhaps a snowy hillside!)

- snippet of white card, stamped using a Penny Black 'Hedgy Joy' stamp and a VersaFine Clair 'Nocturne' ink pad

- coloured the hedgy using Faber Castell Polychromos pencils plus a touch of blending solution, just on his hat where the coloured pencil lines were noticeable

- die cut the hedgy using the matching die (I love that Penny Black now have more dies for their lovely stamps) then set him to one side

- next glued the 'snowy hill' to the bottom of the starry panel - the 'hill' was die cut using a die from the Spellbinders 'A2 Curved Borders One'  set of dies

- then glued the starry panel onto the die cut silver layer before gluing them onto the card front

- added a double layered 'crescent moon' into the die using a glue pen - the moon was cut from a snippet of Tonic's ' Majestic Gold' pearlescent card

- added a double layered 'Be Merry' sentiment, using an additional die which comes with the 'Hedgy Joy' outline die and a couple of snippets of Tonic 'Red Velvet' pearlescent card

- finally, I popped the dear little hedgy onto his 'hillside' using thin sticky pads and called it done  

I'd like to add this card into Darnell's NBUS Challenge #50 HERE. The 'Starry Night Background' die and the 'Hedgy Joy' stamp and dies were having their first outing.

We have a new Challenge over in the Snippets Playground HERE - with a lovely prize. Sarn is organising skipping or hopscotch - given our current warm weather, she could be skipping solo!

Dudley Pupdate: Just in time for temperatures being 'on the rise' - Len did give Dudley a really good scalping trim as planned. Good grief - we do forget that there's such a small pooch hiding under that beautiful coat! I haven't had the chance to take a photo of him, in any case he's currently wearing a paper bag over his head for fear of being recognised by any of his doggie pals!


Not quite the right coloured fur as Dudley is pure white - but this isn't TOO far off his paper bag disguise!

He looks just like a puppy again and it's evident that he's actually delighted to be in his 'Summer shorts and T-shirt'! Not quite shorts and T-shirt, but you get the drift. Instead of hunting for cool tiled floors he's decided that snuggling up between us during the night is a good place to be. Thank goodness he's not a St. Bernard or similar!

Hope you all have a lovely week. Today, Saturday, is beautiful here. It's sunny and warm, with more forecast for the coming week. It's the local childrens' half-term holiday, as well as another Bank Holiday here in the UK - and believe me, it's unusual to have nice weather for holiday times so let's hope the forecasters got it right!

Love from Dudley - and of course me,  


Sunday 21 May 2023

Sunday Snippets - Brushstroke Butterflies

Here's my Sunday Snippets card:

And here are my snippets of coloured card, all ready to play: 


I used:

- 5.75" x 5.75" square white card blank, side opening

- white card stock- in fact it's a white card blank chopped in two so that the white is exactly the same shade for the embossed panel

- used X-Cut's 'Wicker' embossing folder and then trimmed the panel down to 5.5" x 5.5"

- adhered thin white foam sheet behind the embossed panel then glued it to the card front

- then, one at a time I die cut the butterflies from coloured snippets and assembled them - using the Sizzix Tim Holtz 'Brushstroke Butterflies' set of dies

- assembling them was a bit of a puzzle, I'd seen Chrissie Stokes saying they were a bit awkward in one of her videos - which is why I took just one butterfly at a time. And even then, I did almost glue one of the top dark green layers on upside down!

- then rootled around in a little pot of ready cut/made sentiments before finding just the thing so that I could work out the layout

- added the three butterflies to the card front using small pieces of thin sticky pads (with glue stick rubbed over to allow some 'wiggle room') - they really seemed to come alive with the extra 'lift' behind them

- finally, backed the sentiment strip with a couple of layers of leftover black snippets of card and added it to the card front - using red line tape, also with a swipe of glue stick for some wiggle room

- curiously, the best layout I found, whilst playing with the butterflies before adhering them to the card front, is practically the same as on the packaging of the die set! And the colours are practically the same too (that was deliberate on my part but not the actual layout - which was a fluke). Just shows,  sometimes it doesn't pay to change what designers will have possibly agonised over for days - especially when time isn't on your side!

I'd like to enter this into Darnell's NBUS Challenge #50 HERE. The 'Brushstroke Butterflies' set of dies  was out for a first play!

Also, it's Allsorts' 14th Birthday right now - so I wanna join in the party where it's 'Anything Goes' - especially if there's some cake! Well done Brenda and your lovely DT.

Sarn has posted the results of Challenge #453 over in the Snippets Playground HERE. As always, we had some really great entries - and a fantastic number of you came to play too! 

Dudley Pupdate: He's feeling the warmer weather a bit and Len plans to give him a trim over this weekend. Ha, he's blissfully unaware as I type this! Now that the weather is improving it's lovely to spend time outside in the garden with him. It's endlessly fascinating to try and tune into his thought process. 'Oh look, a pretty pebble I pinched from the border - what shall I do with it? I know - I'll put it on the grass and roll and wriggle over it on my back - even though it won't be terribly comfortable'.  Ha - THAT particular game doesn't last very long. 

It's Mo's Rudolph Days Challenge beginning on Thursday 25th remember! And there's still one week of the current Snippets Challenge to go. See you in the Playground.


Sunday 14 May 2023

Sunday Snippets and a new technique

This is my snippets card to kick off challenge #454 over in the Snippets Playground. Go HERE to join in the fun!

I used:

- 5.75" x 5.75" square cream hammered card blank - side opening

- panel of the same cream hammered card for the top panel and a slightly larger one for the gold 'frame' - Tonic Mirror card 'Inca Gold'  - that gold was a sizeable snippet, but still a snippet!

- dug out another fair sized snippet of 'vintage rose' patterned card then added double sided adhesive paper to the back 

- die cut the strips of rose patterned card, using two dies from a Lil' Inkers 'Slim Stripes' set of dies - taking care to keep them in the right order ready for 're-assembly'

- then, one by one, I stuck the strips on as neatly as possible onto a further snippet of Tonic Mirror 'Inca Gold' card - leaving narrow gaps of the gold mirri to show

- next die cut the sentiment from two layers of white snippet card and one layer of 'Inca Gold' mirri card and glued them together using a glue pen - this would help me with the final positioning of the main elements

- then die cut three circles, using Tonic dies, from the 'strips panel' - one large and two rather smaller than the main circle

- next, die cut two crescent/semi-circles into the largest circle, using the two smaller dies

- added all three circles to the card itself using thin sticky pads - making sure that the upright alignment of the strips of gold mirri was absolutely vertical (I hope!). NB, the mirri strips don't need to be in lines corresponding to the main circle - even I, with borderline OCD would draw the line at that!

- then added the sentiment die cut to the bottom left of the card

- final touch - two leftover strips of the rose patterned card were added to the inside of the card, to echo the outside

For a video explaining it - as well as showing the steps - visit Ann Melvin on YouTube HERE.

I'd like to enter this card into the following challenge:

Darnell's NBUS Challenge #50 HERE.

Dudley Pupdate -  oh he's a wily little chap and no mistake. It's often a bit of a battle to get him to 'ahem, perform his toilet routine' properly and at regular times. So, we always take turns to watch him when he's out in the back garden. Today Len discovered that he has a 'secret poop place' ..... behind our fairly recently installed log cabin! Had to laugh, all the ongoing encouragement from us 'hoomans' and there he was, secretly smiling, as he'd already left a 💩 or two - hidden out of sight! Dogs do pull you down to their basic level I must admit!

Yesterday afternoon it was sunny here and I was busy at a bedroom window when I spotted Len and Dudley down in the back garden. Dudley was doing absolutely crazy zoomies of pure doggie delight around the garden - an absolute joy to watch!

Love from both of us, Dudley Dog ('The Secret Pooper') and of course me


Sunday 7 May 2023

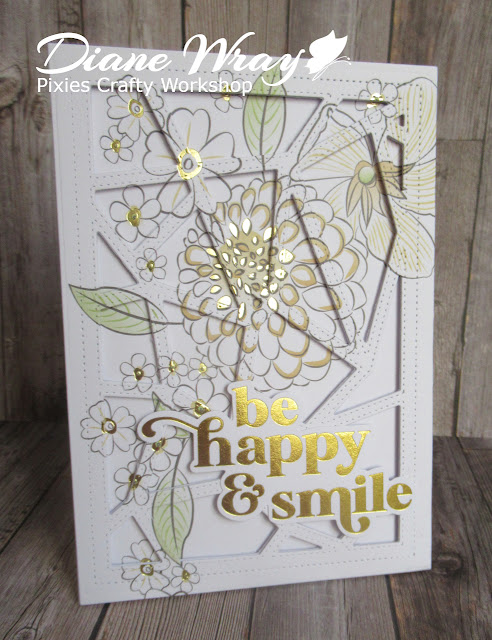
Sunday Snippets and a new Lattice card idea

I really like the very clever crafter Ann Melvin's YouTube channel and often watch her to pick up new ideas. This is the link to Ann's actual YouTube video showing the technique HERE - she has her own online store called 'Positively Papercraft'  HERE - well worth a visit if you're in the UK. 

And this is what I made:

I used:

- card blank measuring approx. 6" (just under 6" in fact) x 4.25" - cut later to the same size as the finished card front panel

- two absolutely identical pieces of paper from the DCWV 12" paper pad called 'Quince & Blossom'  - I cut the two layers at once to be sure they were lined up and identical - they are foiled and so very pretty

- then 'outline' die cut the pieces together, only  using the outer frame from Ann's 'Positively Papercraft 'Cracked Glass' pair of dies

- then die cut just one of the resulting background pieces again, using the inner lattice part of the 'Cracked Glass' pair of dies

- suddenly realised that the paper would be too floppy for the top layer, so I die cut just the inner part of the panel from a snippet of white card, trimmed it down then added it behind the patterned layer using a glue pen. I had to do it that way as it would have been almost impossible to die cut exactly the same panel using both the dies, the alignment needed to be perfect with no over-hang

- and at that point I pushed it to one side as I'd done four similar panels from the same paper pad and felt they would all 'sag', despite the additional strengthening die cut lattice card layer

- went back to them and layered the other lattice layers onto the backgrounds using narrow foam tape, with glue stick on top for some slide - then pushed them to one side, yet again

- still convinced they would sag - even with the additional thickness of the white card snippet underneath the lattice panel - I fairly gently added a Pink Fresh pre-foiled die cut sentiment to the lower right corner of the card using a glue pen right around the back of the sentiment and being careful not to totally press it down onto the very back layer of patterned paper

- AND, it worked! No sagging to be worried about really

Well, knock me down with a feather - what a really lovely surprise! Love the sentiment itself - so positive. And good for a teen wearing braces on their teeth!

My snippet is well hidden, I used a left over piece of white card to back the lattice layer for added strength.

So, now I need to just make up the other three panels into cards - with a load more confidence than I had! Yay! I'd like to add this card into Darnell's NBUS Challenge #50 HERE. The Positively Papercraft ' Cracked Glass' die set was having its first outing.

The results of Challenge #452 are over on the Snippets Blog for you.

Dudley Pupdate: A good friend was here the other day and Dudley fell in love with her and wanted to go home with her when she left the house, but we all know he would he would have been squealing before she left our road. He absolutely flung himself at me this morning in affection - then I realised that he thought there might be a second 'morning treat' hidden about my person! Little monkey. Mind you, on reflection, he's the same with both of us where treats are concerned - albeit with just a tad more respect for his 'Dad'!

We watched quite a bit of the Coronation - history in the making. And it rained. 

Hope you all have a lovely week. 

Much love from Di and Dudley Dog