Wednesday 29 November 2017

Pre-loved stamps

I recently sold quite lot of my Stampin' Up stamps on Facebook - but (sigh) along the way I did give into temptation and buy some pre-loved ones. I did give each one serious thought and a lot more left the building than arrived here.

One of the stamp sets (I think it's about four years ago it came out?) just screamed to be used for a lovely blogging friend's Birthday a couple of weeks ago:
I used:

- A6 card blank, using SU's 'Pear Pizzazz' card stock

- the white layer was made using a piece of Strathmore Mixed MediaVellum surface 300gsm paper, with a rectangular aperture mask taped over the front. I used a Lil' Inkers Stitched Rectangle die to cut the aperture piece from a snippet of white card - and kept the stitched centre for future use as I was only using the outer part for now

- once the mask was taped in place, I just swiped and gently rubbed in two Tim Holtz Distress Oxide colours (Peeled Paint and Worn Lipstick') using a rounded cone/pear shaped makeup sponge

- removed the mask and then stamped the flower in place using a stamp from the SU 'Simply Sketched' set and Ranger 'Archival Black' ink

- at the same time I used another stamp from the same set to stamp the sentiment with the same black ink

- used an Olive Green Whispers marker for the stems as it has a really fine tip at one end

- then coloured the flower and bud using Ziggies and a waterbrush

- glued the panel to the card front and ran off to the Post Office - just in time!

One point, the set was unused, but wood mounted. So my SU Stamp-a-ma-jig was a real 'must' when positioning the flower and sentiment - never get rid of things like that even when there are Misti's to be had. Certainly not if you have lots of wood mounted stamps as I do - and I ain't about to even think about removing them from the wooden blocks.

I've done similar things with die cut apertures as a mask before and really should knuckle down and get more practice as it's such fun.


Sunday 26 November 2017

Pixie's Snippets Playground - Weeks 309 and 310

Oh good grief, one month today Christmas Day will have been and gone. Mind you, I love the days following Christmas when there are plenty of leftovers to nibble at, repeats galore on TV (not so exciting) and finally we can relax.

Remember, from yesterday it's 'Rudolph Days' challenge over at ScrappyMo's, so this is my entry for November. You have until the end of the month to join in - loads of us from the Playground play over there so you'll find quite a few familiar friends.

My card today was such fun to make and used up lots of little LOTV snippets:
I used:

- A6 white card blank, tent style

- a piece of plain 'Kraft' paper from the LOTV paper pad called 'Krafty Christmas' as a backing for the white layer, cut slightly smaller than the card front and glued in place. Then set the card aside whilst I worked on the image layer

- piece of white card for the image and sentiment, cut slightly smaller than the Kraft layer

- using the Misti I stamped the image using Memento 'Tuxedo Black' ink and the main stamp from Woodware's 'Huge Santa' stamp set

- I left the Santa stamp in place and stamped once again, onto plain white paper this time and I'll explain why in the next step

- now I had the stamp still sitting on the lid as well as a stamped image held in place in the base of the Misti. This meant I could position my little snippets for the individual letters easily, one at a time and making sure that each letter in turn on that piece of white paper I just stamped on was completely covered 

- at this point I stamped the sentiment 'Ho Ho Ho' using the Misti again. It's always good to do as much stamping as possible before adding a lot of work (paper piecing in this case) to a card that might be ruined if you have a 'mis-stamp'

- btw I stamped the 'Ho Ho Ho' sentiment onto the image panel using the same ink pad and an unbranded stamp bought from eBay (more about the lovely seller below folks!). The sentiment comes with twirls at either end but I masked them off so the 'Ho's' would fit

- now I had the five letters ready to fussy cut - they all came from the LOTV 'Krafty Christmas' pad (stored in the back of the pad in an envelope 'pocket'). The hat was from a little snippet of red paper tucked away in the back of LOTV's 'Merry and Bright' paper pad and the fur trim and pom pom were stamped onto white card

- fussy cut all the pieces and have two little tips. I used a small SU round punch to punch out the white pom pom and also used the same punch to cut the pom pom away from the bottom of the hat on the snippet of red paper so the curves would match up

- the other tip is something I learned a good while ago through trial and error. See the centre of those 'a's'? It's so much easier to use a small hole punch (1/8th") to punch out the centre and then cut the rest away - in fact I also did that where the letter 'a's' curled over. Much easier for access and certainly less likely to fail than using a poky tool to start it off

- then ran a black Whispers brush ended marker round all the fussy cut letters - it adds definition, hides the white edges of the paper ......... and also disguises where you may have trimmed too much off 😉

- glued all the letters in place followed by the hat and trimmings - using a Zig glue pen and (as always) putting the glue onto the stamped letters on the white card - not onto the fussy cut letters (a really handy tip I picked up from Jules)

- lastly, added a coating of clear Wink of Stella for a little bit of sparkle to the hat trimming and pom pom

One final tip about these Woodware huge letter stamps is, if you're paper piecing them (although coloured markers would be fun, as well as easier), lay the papers you want to use side by side and shuffle them round to get as best a balance as possible. And if you forget how the letters are 'stacked' then either check back here or Google for an image - they're placed in the following order on my card: S,first a, t, n and the last a - then the hat finished off with the trim and pom pom.

And here's some low-down on the 'Ho Ho Ho' set of stamps. All my 'Ho' stamps were quite small (in fact the Woodware stamp set comes with a little 'triple Ho' which I've used separately elsewhere). But - I wanted a 'triple Ho' as more of a statement and after Googling I found a lovely set of stamps on eBay. The seller (a lady called Liz who is here in the UK) is a delight to deal with, super fast service and she has a lovely selection of goodies in her eBay shop - which is HERE

Let's move onto this fortnight's prize:
Yup, it's a Woodware 'Huge Santa' stamp set as well as an unbranded 'Ho Ho Ho' stamp set (I was so pleased with the sentiment being bolder and bigger than others I've seen that I had to run back and buy a set for the Playground).

As always, the Snippets Challenge will run for two weeks and the Playground gates will close at 11am UK time on Saturday 9th December. The gates will open again at midnight UK time on the same day.

It's a maximum of ONE entry and please say in a comment if you wish to play and be a possible winner of the prize. As I already said, the prize is as above and I will happily split the stamps sets, in which case I'd do further draws for the other item. Please also link back to the Playground in your blog post to be eligible for the draw.

Remember, if you link into the Playground and don't say clearly that you're wanting to be in the draw then you will be bypassed if your name comes out of Mr Linky. I'm sure you all know I ask for a positive 'yes' just in case you're playing only for fun. Thanks!

Mr Linky is below - please let me know if you have any problems linking, it's easy for me to sort out so don't struggle on alone :)

Be sure to call back next week to see the winner of last fortnight's prize which is a Sugar Peas 'Nativity-Scape' die and a Paper Smooches 'Christmas Sampler' set of sentiment stamps, another lovely Guest Designer and my picks from the past two weeks.

Love from Parsnip and of course from me,

Wednesday 22 November 2017

Making Spirits Bright

Panic truly was setting in a couple of weeks ago when we hit November and my Christmas card count was lagging behind. So, I set to and made seven cards in one 'batch bake', each one the same.

Shame on me, in the couple of years since I bought this fun stamp set (pre-loved), I've only ever used it the once:
I used:

- 5.5" x 4.25" white card blank, tent style

- stamped the festive cocktail onto Strathmore white 'Mixed media' card using Ranger 'Archival Black' ink. The image already has the sentiment alongside the glass stamp and is from SU's 'Making Spirits Bright' set

- coloured the image using Tim Holtz Distress markers and a couple of Ziggys - plus a gold gel pen for the ribbon bow then set it aside

- die cut an aperture in a piece of Christmas red card stock using MFT 'Rectangle Peek-a-boo Window' die

- then die cut the whole red panel using a die from the Lil' Inkers 'Stitched Rectangles' set of dies

- die cut the images (with a further little bit of extra trimming from the top afterwards) using a square Spellbinders die about quarter of an inch wider then the aperture. This saved fiddling around with measurements as I wanted a neat rectangle of card behind the aperture just in case it could be felt - as it was it can't but worth taking extra care over

- then added very narrow red line tape around the back of the aperture itself and carefully placed it over the trimmed image. Safest way to do this isn't to just plonk it in place but just remove the protective backing from the bottom edge to line that up, stick it down when happy and then (using pointy tweezers) peel off the backing from the other sides one at a time - finishing with the top edge. Perfect placement every time without the risk of that super sticky red line tape ruining a card - I didn't use glue as it can be prone to oozing or not being close enough the the edge of the frame

- cut a piece of shiny gold mirri card just slighty smaller than the card front and glued the image panel to it (using Collall All Purpose glue)

- glued the gold framed panel to the front of the card - finished

Hmmm, it's better in real life but the peek-a-boo stitched die is definitely best cut using white card - it stands out much more clearly.

So that brought me within sight of the annual Christmas card target - wahoo! To be honest, this year has been a struggle due to Mr Mojo going off on walkabout as well as me trying to reduce the time spent at the desk - which certainly is a big trigger for this wretched back. I might have to rethink things for this coming year and ease off a bit on the 12 per month Christmas card target - I've done it for five whole years (2013 onwards) and got quite a shock when I worked that one out! Looks like some folk (such as non-crafters) will be getting shop bought cards in future - I could never stop making Christmas cards but the pressure of producing so many is getting too much.


Sunday 19 November 2017

Pixie's Snippets Playground - Week 305 and 306 - results

Well folks, we're galloping towards Christmas now - at  rate of knots! I managed to hit my Christmas card target and now any cards I do make will be much less pressured. Of course, the task of writing them all is no mean feat either, but if a hand made card makes someone happy then it has to be a good thing.

Let's get straight on with our Guest Designer for this fortnight who has some lovely tags to share - perfect for using up little snippets:
 
I just love these adorable tags! You can use the die cuts  left from negative dies to get more value from your snippets - brown or plain red wrapping paper, string and away you go! Parcel wrapping all sorted out :)

And it was Alison of Cranberry and Eggplant who made these and is our 'dancing in the spotlight' guest for this fortnight:
Another happy smiling face too!
This is what Alison said about the super tags and herself:

'Like many of you I have been crafting in one way or another for as long as I can remember. I'm also a bit of a hoarder, I have to hide my scraps from myself and keep them under my bed so no-one knows how much I have, not even me.

I'm always looking for ways to use up plain snippets and tags are a great way to use those thin strips which are always left after cutting a card base from A4.
I confess this idea is not original but it's from an online retailer rather than a blogger so I don't feel any guilt in copying. I saw the tags with the snowflake shaped hole, which I though were very pretty. Then I was left with the cut out snowflakes so I made another set with those. These are my design but not as clever!


Thanks to Di for having me as a GD, running The Playground and showcasing all the wonderful creations which get more amazing each week.' 


Thank you so much Alison for your lovely words and also for sharing a great idea. I have a loads of strips left over from cutting card bases so this is an idea I'll be pinching :)

Time now for the fortnightly picks and, as always, so difficult to choose:

And my first pick absolutely jumped out as a Gold Star card, made by Val of 'Aquarius Blog' it's just gorgeous!
To find out how Val made this wonderful card and the glorious satin-looking bird - do hop over to her blog where she explains it all. Well done Val and please feel free to take the Gold Star badge from my sidebar.

I had a lot of difficulty whittling down the rest of the picks and I chose the final three because I wanted you to see what can be achieved with minimal snippets on generally very CAS cards:
Charlotte (Lady Joyful) has given a perfect explanation of how she made this camouflage  technique card, giving the word 'thanks' much more definition by layering it onto multiple layers of pink die cut words. There's also a little tip as well on how to build up the word layers that's a really neat idea. Shaz in Oz has done a layered sentiment in the current challenge and used a similar technique. Always learning from you girls!

Steffi shared this brilliant Christmas card with us - what impact from the clever placement of three circular snippets and a sentiment! Those of you who might be in a panic trying to made a few Christmas cards in a limited amount of time might like to try this one? Granted you need a good eye for design to place those circles just right but I'm sure that Steffi would be happy for you to use her idea.

Right at the very end of the fortnight, Alison nipped into the Playground waving this really great card and it's another very clever idea. The Christmas tree is brilliant, and would stand on it's own if you're really pressed for time - although I do love how Alison matched the backing paper to the tree, pulling it all together. And, there are instructions to be found via a link in Alison's blog HERE. I made a few of these Christmas trees some years ago - they are such fun and certainly pack a lot of impact!

We had a total of 45 entries and no new Playmates. Numbers of entries seem to be falling - even compared to March, when we had this new format, we were up in the 70's. It could be that with Christmas approaching folk are extra busy I guess. Having said that, it does seem that many challenges are also finding a drop in entries. Who knows, perhaps those who predict that blogging will eventually run out of steam have a point?

Anyhow, let's stay positive and move onto the prize draw. Our winners of the 6" x 6" Studio Calico 'Snippets' paper pads and Woodware 'Numbers' stamp sets are as follows:
Both of you were playing for a complete prize of paper pad and stamp set - well done (and how weird to have two consecutive numbers popping straight out, but that's the whole thing about random numbers I guess)!

Can you please drop me an email with your addresses girls (it's also double confirmation that you were playing for the prize) and then I'll post your prizes off to you as soon as possible. My email address is on the right hand side bar.

Keep those snippets entries coming, you still have a week left to play HERE for weeks 307/308 remember! The prize is a Sugar Pea 'Nativity-Scape' die and a Paper Smooches set of sentiments called 'Christmas Sampler'. I will split the prize if you only want to play for part of it.

Love from the little white peril Parsnip - and of course me,


Wednesday 15 November 2017

Little guitar player

Stuck for ideas for a Birthday card for a neighbour's little boy, I asked my in-house critic and his immediate response surprised me. Apparently, he'd noticed Josh, with his little spindly legs, trotting to and from school with a guitar slung over his back now and then!

That was a good enough starting point and this is what I ended up with:
I used:

- 6" square white card

- a second card the same, sliced in half across the spine

- scored the main folded card right across the centre and folded it to act as the 'prop' for the easel

- two identical pieces of designer papers from the Studio Calico 'Snippets Collection' paper pad (how appropriate is that then?), trimmed down, backed with deep blue card and glued onto the inside of the easel, as well as onto what would be the 'standing up front piece of card' 
 
- then stuck the easel front onto the folded section of the base card using red line tape 

- I downloaded the digital image from LOTV - it's called 'Playing Guitar' and die cut it using a die from the Lil'Inkers 'Stitched Rectangles' set  

- backed the image panel using a snippet of deep blue (SU's 'Midnight Muse' btw) card stock and glued it in place on the card front

- then die cut the letters for Josh's name and age from more of the deep blue card which was backed with Stick It adhesive sheet and glued them in place - using my usual trusty sets of dies 

- used the Misti to stamp the sentiment onto a snippet of white card, using Memento 'Danube Blue' ink and a stamp from the Penny Black 'Special Thoughts' sentiment set

- then die cut the sentiment using another die from the Lil'Inkers 'Stitched Rectangles' set of dies and backed it with a frame cut from a further little piece of deep blue card

- fixed the sentiment panel in place using thick sticky pads to act as a 'prop'

One finished card - and it was made well ahead of time for a change as well!


Sunday 12 November 2017

Pixie's Snippets Playground - Weeks 307 and 308

What a change in the temperature here - certainly a bit of a nip in the air and surely more people have to be thinking about Christmas by now? It's a bit hard to avoid really, given the TV adverts and supermarkets displays. Len was in a local supermarket the other morning and they were playing Christmas carols already - wonder what the staff will feel in six weeks time?!!

So, here's the thing. As the snippets challenge is only fortnightly nowadays it's made life a lot easier and this year I won't be doing the 'extra snippets card and prize per day' that I've run a few times over the festive season. I might pop something extra in but haven't decided as yet.

Needless to say, there are already a few Christmas themed prizes in the Playground toy box (bought during the year before I made this decision) and I propose to start offering those in the challenges running up to Christmas. Just to get you in the mood :)

So, here's my Christmas snippets make for this fortnight - and what a time I had taking the photo. That blue mirri card literally does act like a mirror to the extent you could see loads of detail - including the whites of my eyes at one point! In the end the best I could do, whilst almost swinging by my toes from the ceiling light fitting in the craft room, still has dark shadow behind the die cut, sigh. Trust me, it's all a lovely rich shiny blue with no dark areas at all in real life:
I used:

- A6 white card blank, tent fold

- snippet of silver mirri card stock, cut just smaller than the card front and glued onto the card front then set aside 

- snippet of glossy dark blue mirri card with little silver stars dotted here and there (wish I could remember where I got this as it's such a lovely design), trimmed smaller than the silver mirri layer and set aside  (NB, do not glue to card front yet)

- snippet of white card stock trimmed to around 2" in height and a bit wider than the dark blue 'stars' layer

- then stamped the sentiment, using Memento 'Mediterranean Blue' Brilliance ink and a stamp from the Paper Smooches 'Christmas Sampler' set onto the white strip of card. I fathomed out it needed to be done at this stage for easier alignment in the Misti :)

- made sure the sentiment stamping was fully dry and added Stick-It to the back of the white card strip before die cutting the Nativity scene,  using the really lovely Sugar Peas Designs 'Nativity-Scape' die

- they really thought this die through and above the cutting for the scene itself, a Star of Bethlehem is also included - so it cuts in one pass. Plus, despite the intricate design, it cuts like a hot knife through butter

- once the scene was die cut, forethought made sure it didn't need any further trimming at the bottom edge, it was lined up with the ready trimmed piece of dark blue starry card and gently pressed into place

- flipped the layer over and trimmed of the excess from the die cut on either side (that's why I didn't glue the blue layer to the silver one - so I could trim the die cut down with sharp scissors)

- added the Star of Bethlehem and then popped one small, clear crystal, sparkly gem in the centre - finished! And, it still goes as normal letter rate too.

I really enjoyed making this card but the secret is to plan each step ahead a bit like an engineering project. Also measure very carefully to get the right balance between the sentiment, the scene and the sky before you begin to even think about die cutting the Nativity-Scape itself. One tip is to be prepared to use tweezers to remove any little scraps of backing paper if you do decide to use Stick-It self adhesive sheet - those little palm trees have the narrowest trunk and in every case the backing paper tore at that point. But gosh, what a stunning die!

Also, although I went for a night sky, I've seen some fabulous makes on line where the backing was coloured with Distress inks like a vivid evening sky and the die was then cut from black card. Lots of potential and genuinely one of the most beautiful Nativity scenes I've ever come across.

Which, of course, leads us into this fortnight's prize:

Yup, it's a Sugar Peas 'Nativity-Scape' die and (once again, even though we've had this as a prize previously, 'cos it's such a lovely set) the Paper Smooches 'Christmas Sampler' set of sentiment stamps.

As always, the Snippets Challenge will run for two weeks and the Playground gates will close at 11am UK time on Saturday 25th November. The gates will open again at midnight UK time on the same day.

It's a maximum of ONE entry and please say in a comment if you wish to play and be a possible winner of the prize. As I already said, the prize is as above and I will happily split the die and the stamps set, in which case I'd do further draws for the other item. Please also link back to the Playground in your blog post to be eligible for the draw.

Remember, if you link into the Playground and don't say clearly that you're wanting to be in the draw then you will be bypassed if your name comes out of Mr Linky. I'm sure you all know I ask for a positive 'yes' just in case you're playing only for fun. Thanks!

Mr Linky is below - please let me know if you have any problems linking, it's easy for me to sort out so don't struggle on alone :)

Speaking of Mr Linky, he seems to have slammed the Playground gates at 10am rather than 11am yesterday - I think it's to do with the clocks changing after I'd set the link widget up. Sorry if you got caught out.

Be sure to call back next week to see the winner of last fortnight's prize which is two 6" x 6" Studio Calico 'Snippets' paper pads along with two Woodware 'Numbers' stamp sets, another lovely Guest Designer and my picks from the past two weeks.

Love from Parsnip and of course from me,


Wednesday 8 November 2017

Rejoice!

Last week, panic began to set in about achieving my Christmas card making target in time. I may still fall back on a few shop bought cards but whilst rootling through a box of ancient Christmas toppers etc. - I came across some mulberry paper poinsettia flowers in a little packet. They needed to be layered up though, so were put aside as a 'possible'.

And then, rootling a bit further in the same box, I came across some gold 'curled hunting horn' die cuts - literally dating back to many years ago! This was long before I had a die cutting machine, in fact back then I'm not sure if I'd even heard of being able to cut your own dies!

They were sold by Kirsty Wiseman when she owned 'Dies to Die For' before Tracey took over - and at the time I bought quite a variety of ready cut dies from Kirsty (the 'Three Wise Men' silhouettes were fabulous). And so, this card, along with four other ones exactly the same, was born:
I used:

- 4" x 4" square white card blank

- then die cut a smaller square of white card, using a die from The Works 'Stitched Squares' die set 

- cut a square piece of dark green card, just a little bigger than the die cut white square

- assembled the flowers with the green leaves behind using Collall All Purpose glue and the last of a Papermania's 'petal pouch' called 'A Silent Night'. Looking at the small print on the packet. the green leaves are meant to be holly leaves - hey, ho (or should that be 'tally ho? - snigger)

- now I could work out the placement of the sentiment before sticking everything down, using the Misti, Memento 'Tuxedo Black' ink and a stamp from the Paper Smooches 'Christmas Sampler' set

- glued the green layer to the back of the white 'stitched layer' and popped them onto the card front

- added the gold die cut hunting horn (it even came with some stitched detail - all those years ago) using Collall glue in a Woodware fine tipped applicator

- topped the horn with the flower and leaves

- finished off by adding three gold satin finish Josy Rose nail heads to the centre of the flower

I spent ages looking online to see which way up a hunting horn would be displayed (as opposed to held when giving a good old 'toot'). Looked like it doesn't matter so I went with how I thought suited adding the sentiment and the flower.


Sunday 5 November 2017

Pixie's Snippets Playground - Week 303 and 304 - results

Oh whizz, bang and sparkle - here in the UK it's Guy Fawkes Day! Our local community centre had their fireworks display last night - we stayed warm and cosy at home :)

'Trick or Treat' on Tuesday was fun as usual - we had lots of youngsters trotting up to the front door and I spent the whole evening bobbing up and down from a sensible chair placed within easy reach of the door. It's the little ones that crack me up - sadly many of them are growing up now but at least even those older ones that turned up had made a good effort! Parsnip was in the lounge, peeking from his vantage point and calling to me when it was time to adjust my teensy witches hat (on a headband) and hop up again to answer the doorbell.

Let's get straight on with our Guest Designer for this fortnight:
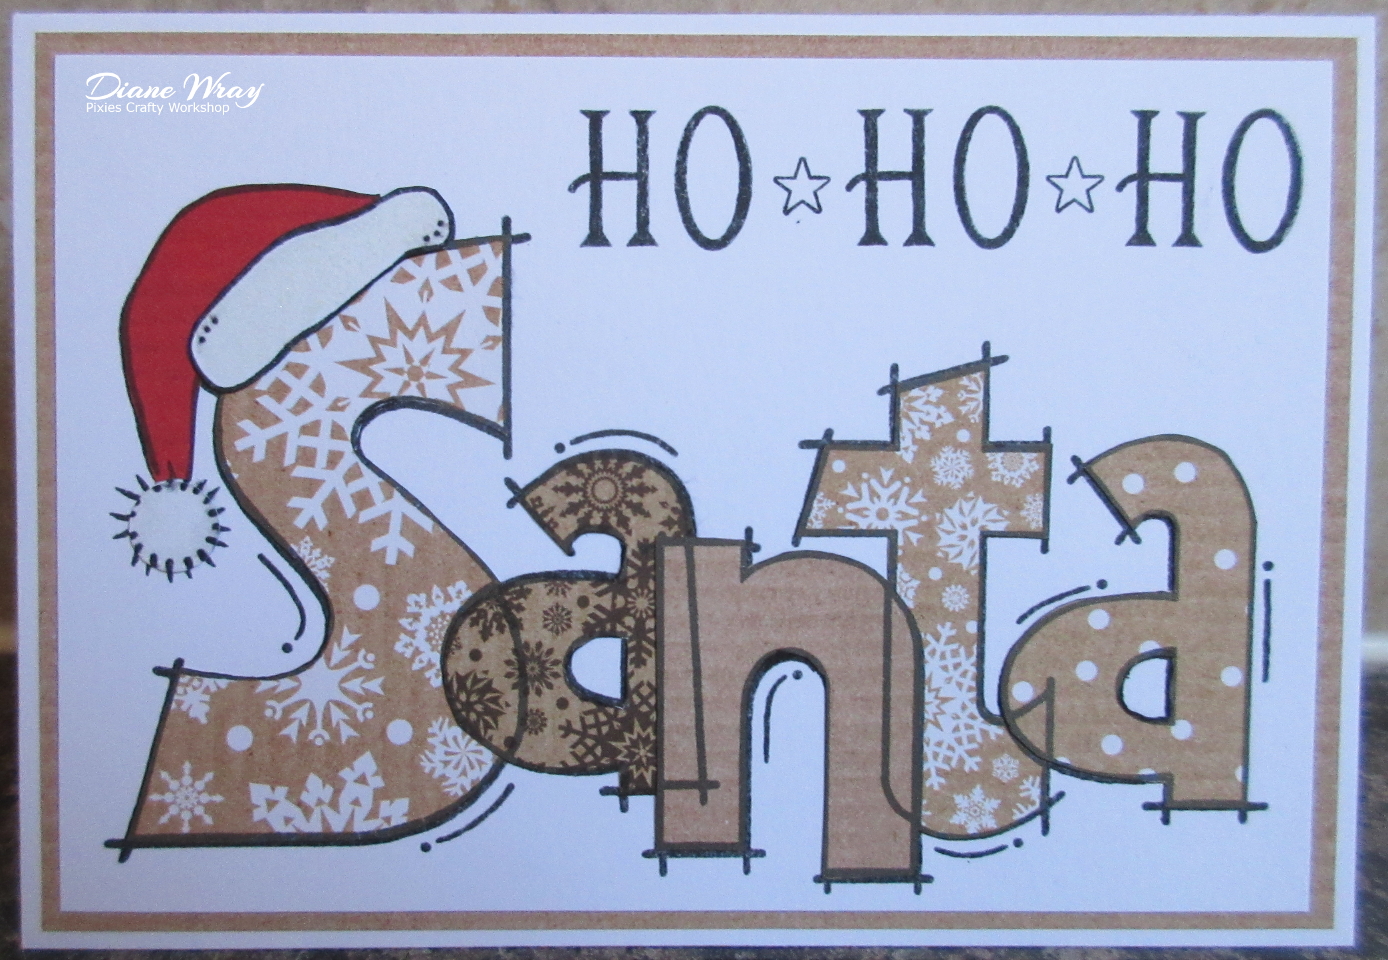
If this fabulous card hadn't been posted by our Guest Designer it would have been a fortnightly pick for sure! I just love the 'bargello' effect of the background snippets, such a great technique - and the LOTV paper pad is one of my favourites! And such luscious colours as well.

Have you guessed who made this lovely card? It's our Kath of 'Handmade by Kath' - one of our very loyal Playmates and often one of my picks as well! To find out how Kath made this lovely card, do hop over to her blog HERE. There's a neat trick to making these 'bargello backgrounds' which I'm sure she'll share with you :)

And we have a really great photo of the lady herself:
What a lovely photo - you 'girlies' always look so happy!

This is what Kath said about herself:

I've always enjoyed crafting and started knitting and sewing clothes for my dolls when I was young.  Since then I've also done crewel and cross stitch embroidery, woodwork, flower arranging, cake decorating and sugarcraft, and tried a few other things along the way.  I now enjoy cardmaking and love making cards for family and friends as well as entering card making challenges, especially Di's Snippets Challenge.  I love this challenge as it's a way of trying to keep my snippets mountain under control.  Amongst my many snippets I always seem to have a lot of thin strips so have used some of these for the bargello background on my card.  When I'm not cardmaking I enjoy walking and going away in our campervan - my photo shows me sitting on the step after a long walk in North Devon a few weeks ago!

Thank you so much Kath for being our Guest Designer and for sharing your card plus letting us know a little more about you. And also for your very kind words about the Snippets Challenge of course :)

Drum roll now - it's time for the fortnightly picks and, as always, so difficult to choose:

And, a Gold Star to start with:

I absolutely love this tag, made by Donna from lots of snippets left over from some other work she'd been doing. It really is gorgeous and I do encourage you to hop over to Donna's blog HERE and see the close-up photos of this beautiful piece of art. Please feel free to take your Gold Star from the RH sidebar Donna!

So, we started of with 'not a card' and, in order to whittle my choices, down I stuck with that theme so here we have some snippets makes for you: 

What and also a great wall hanging. I just HAD to pick this, made by Sue T. Fabulous use of lots of snippets as well. 

I really love this bag, made by Pen from scraps! Loads of piccies on her blog and it is a reminder that absolute ANYTHING can be a snippet!

And last, but not least - this really caught my eye:
How cute is this for a piece of Birthday cake? LOVE it Majda - gosh, even the layers are there in the stripes! It's worthy of a place in the Great British Bake Off (TV series here in the UK which ended the other evening). And the pink Unicorn is absolutely darling of course.

Please don't be despondent if your entry didn't make the 'picks. It really is just fun after all and who am I to choose at the end of the day? I try to find ideas and things to amuse and inspire you. AND, don't feel the need to second-guess a theme. I usually have no idea until I'm writing this post, earliest would be as I go through during the fortnight and something just 'clicks' as a way to help me to prune the list of picks down. Some fortnights there may not be any theme that comes into my head.

We had a total of 54 entries and one new Playmate joining in the fun:
Bonnie Lynn

A huge welcome Bonnie Lynn, and hope to see you playing along with us regularly!

Prize draw time now and our winner of Avery Elle's 'Ribbit Ribbit' stamp set
I almost did a happy dance here for Chris when her name popped straight out! She's been having a rough time with her health lately, rougher than usual, and deserved something to cheer her up! Sometimes Mr Random really does kinda spook me!

But, Chris was only playing for the stamps so that still leaves the aperture die and this is who Mr Random came up with:
Now that was a stroke of luck as well, 'cos Alison was only playing for the die! So we have two totally happy Playmates this time round.

Can you please drop me an email with your addresses girls (it's also double confirmation that you were playing for the prize!) and then I'll post your prizes off to you as soon as possible. My email address is on the right hand side bar.

Keep those snippets entries coming, you still have a week left to play HERE for weeks 305/306 remember! The prize is TWO 6" x 6" Studio Calico 'Snippets' paper pads along with two Woodware 'Numbers' stamp sets. I will split the prize(s) if you only want to play for part of it.

Love from the little white peril Parsnip - and of course me,