Sunday 29 October 2017

Pixie's Snippets Playground - Week 305 and 306

Well, here comes Winter and the long dark nights. We changed the clocks here in the UK (well, at 2am on Sunday if we're being pedantic). So, it's time to snuggle up and start thinking about Christmas really. Almost into November folks!

But, we have a few Birthdays amongst friends as well as family before then so my snippets card this week is one I made for Len's great-nephew's 16th Birthday, which is on Tuesday of this coming week.

I will hold my hands up straight away and confess that this is very similar to a great card that Kath (Handmade by Kath) linked into the Playground back in May of this year - here's the link. I'd run straight off to buy the stamp set and then when I came to use it last week, without realising, I came up with almost the same design as Kath - except that I only used one of the two sentiment stamps from the set. To be honest, due to it's design, I suspect there are a limited number of ways that it can be used - certainly a DL card is a perfect companion!

Anyhow, this is what I'm rabbiting on about:
I used:

- white DL card

- two long snippets of paper from the 12" Studio Calico 'Snippets' paper pad (best to at least cut these before doing any stamping in order to get the positioning right). Yup, there IS a lovely contemporary paper pad design called 'Snippets' - which a lovely blogging friend surprised me with as a gift a while ago!

- then I stamped the numbers part of the Woodware 'Numbers' stamp set along with 'many happy returns' using Memento 'Gray Flannel' ink

- next I flipped the rest of the striped snippet over and used the matching yellow back of it to re-stamp the '16'

- fussy cut the yellow coloured 1 and the 6 and used a glue pen to adhere them to the card front on top of the relevant numbers

- then added the previously cut two strips of patterned paper to the top and bottom of the card (I was feeling brave and used a tape runner to do this)

A quick and easy card to make (perfect for a male or female if you use appropriate colours) - although another time I think I'd just use a Pro marker or similar to colour the numbers rather than spending ages carefully fussy cutting them out. I like this idea as it does make the recipient stop for a second - and it's brilliant for male cards too of course.

Which, as is generally the case, leads us into this fortnight's prizes - note the plural there:
Just for the fun of it, I added a 6" x 6" Studio Calico 'Snippets' paper pad to the Woodware 'Numbers' stamp set as it's one of the best contemporary pads I've seen.

They took a bit of tracking down but were half price which was a bonus. However, the postage was outrageous just for a single pad, so I ordered two for the same postage all in - subsequently discovered they're sent from Spain so the postage is (almost) forgiven (bless though, they did include a little flat heart shaped lollipop in the package as a little thank you)!

And I also bought a second 'Numbers' stamp set - which means there are two prizes the same this time round - stamp set plus paper pad. The paper pad is actually only 6" x 6" but it could still be used with this stamp (which is about 7.5" long) - I'm sure you'd find ways! Mind you, it would have a ton of other uses as well. And of course the prize can be split - I will post the prizes to anywhere by the way.

The Snippets Challenge will run for two weeks and the Playground gates will close at 11am UK time on Saturday 11th November. The gates will open again at midnight UK time on the same day.

It's a maximum of ONE entry and please say in a comment if you wish to play and be a possible winner of the prize. As I already said, the prize is as above and I will happily split the stamp sets and paper pads, in which case I'd do further draws for the other items. Please also link back to the Playground in your blog post to be eligible for the draw.

Remember, if you link into the Playground and don't say clearly that you're wanting to be in the draw then you will be bypassed if your name comes out of Mr Linky. I'm sure you all know I ask for a positive 'yes' just in case you're playing only for fun. Thanks!

Mr Linky is below - please let me know if you have any problems linking, it's easy for me to sort out so don't struggle on alone :)

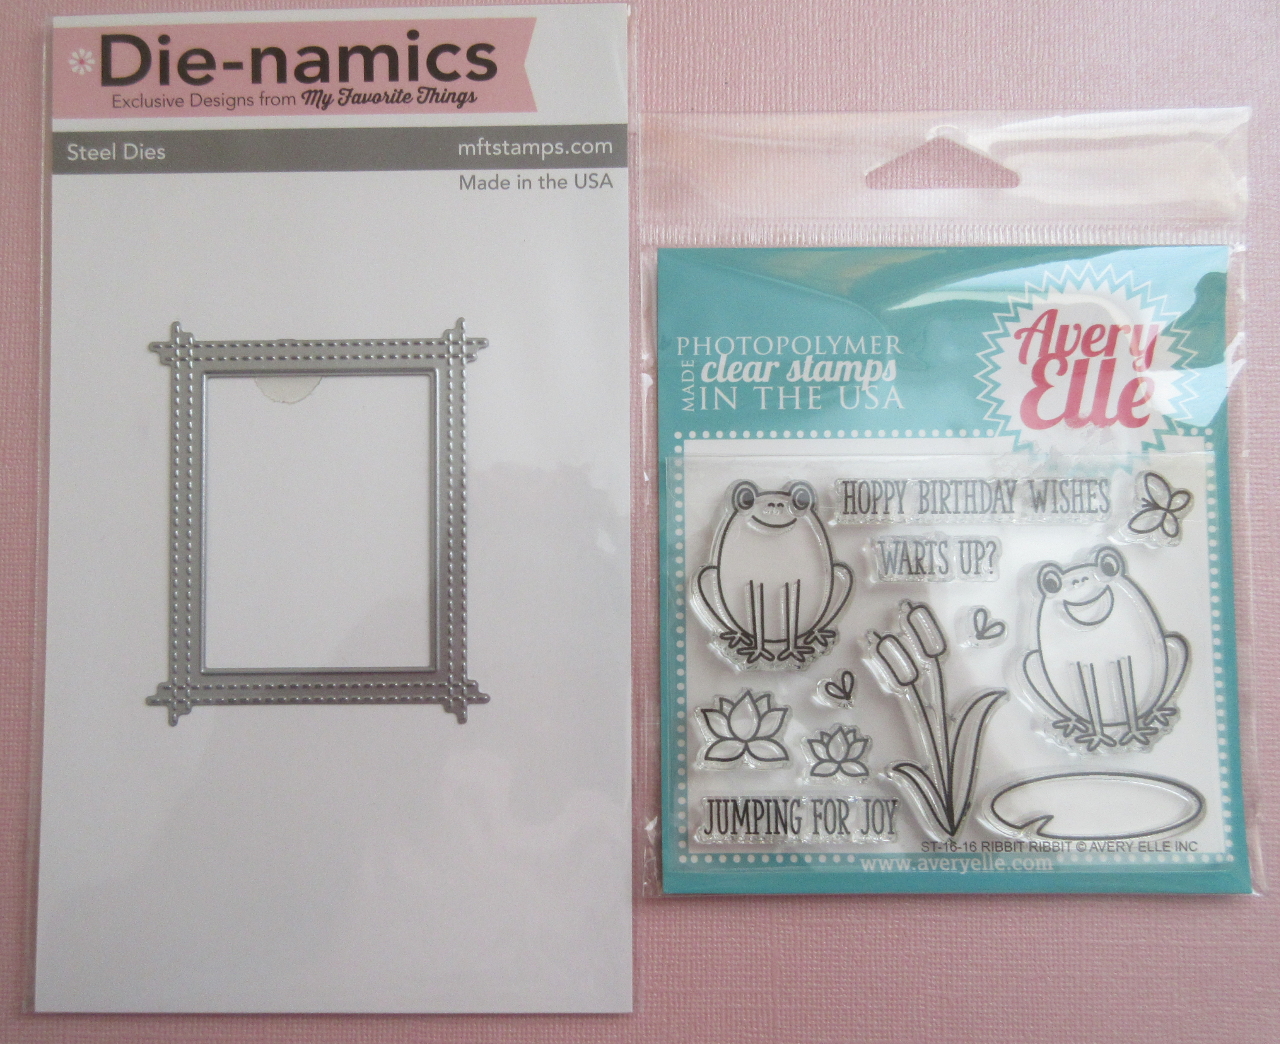
Be sure to call back next week to see the winner of last fortnight's prize which is Avery Elle's 'Ribbit Ribbit' stamp set and MFT's 'Rectangle Peek-a-Boo Window' die, another lovely Guest Designer and my picks from the past two weeks.

Love from Parsnip and of course from me,

Thursday 26 October 2017

I finally lost the plot!

I indulged in one single unbranded die from eBay a little while ago- I have no idea if it's a copy (I hope not) but it sure gives value for money! It has lots of little individual pieces in total on a square plate - and looked like it would be fun to play with.

Good grief, it really did test my patience - and to make things even sillier, Dumbo set out to make six cards all the same. In a lot of ways it was a good move (given all the different pieces and little snippets of card used) to run six off in one go - but it took almost forever! Plus, I almost ended up with 'crankers elbow' from using the Cuttlebug to die cut six times 17 little die cut pieces per Santa!

Anyhow, here's the result:
I used:

- A6 white card blank

- really ancient backing paper (dated 2008!) made by Craft Creations Ltd called 'Snowflakes On Dark Blue' - trimmed slightly smaller and glued onto the card front

- the unbranded die (called 'Santa') and lots of Stick It backed snippets of card in red, flesh, light grey, black, yellow gold, blue and shimmery white

- as I die cut the pieces I was careful to store them in plastic dishes before then assembling the Santas onto rectangles of white card

- then die cut the images using a die from the Spellbinders Labels Eighteen set and added the edging by running a ball ended embossing tool around the die cut piece while it was in the die

- glued the image panels in place

- used scraps from the image panel die cutting to stamp the 'Ho Ho Ho' using Memento 'Tuxedo Black' ink and a stamp from Woodware's 'Huge Santa' stamp set

- punched the sentiment out using SU's 'Word Window' and then layered it onto a red backing which was punched out using SU's 'Modern Label' punch

- glued the sentiment in place then went and had a long lie down to recover!

I had to give Santa a grey beard and moustache 'cos of using the white background - he would have blended in too much otherwise I think. So, this is a Santa who uses Grecian 2000! Remember that stuff that men used to use when they spotted a few grey hairs appearing? You could spot it a mile off!

Santa's little eyes were sooooo fiddly but I didn't trust myself to draw them freehand :)

Much as I loved using the die set, I have a feeling it's gonna be quite a while before it comes out to play again!

EDIT: Good grief, I almost forgot that this is for October's Rudolph Days Challenge - run by the lovely Mo. 


Sunday 22 October 2017

Pixie's Snippets Playground - Week 301 and 302 - results

Well! Not sure about you but what a week for weird weather down here in Hampshire, UK. Dry and sunny one minute and blowing a very wet storm the next. We're 'hunkered down indoors' as much as possible!

Let's get straight on with our Guest Designer for this fortnight:
No prizes for guessing - who else in our fabulous group alway pops up with a hamster cradled in her hand? Love this card made by our much loved Darnell!

And I also held the 'real' Hammy in my hand when he came to the UK for a visit last year! He's sweet, very soft but also alert at the same time - Darnell in a nut shell (and I mean it about the nut!) And this is the link to Darnell's post. And here's the happy lady herself:

This is what Darnell wrote - which is a quick summary of her blog:

A site for my handmade cards, accompanied by my photos and written meanderings which are occasionally witty, often tongue-in-cheek, and, rarely, profound. Beginning in June 2013, you'll also see lots of NBUS, which is an acronym I coined for Never-Before-Used Schtuff. Feel free to join in, use the acronym, and use up your NBUS, too! Thanks for coming by! Have a beverage and enjoy!

Do hop over to one of the funniest blogs going as well find out more about the cute snippets card of course!

Huge thanks to my lovely friend Darnell for being our ever-popular and well-loved GD this fortnight and also for being such a loyal Playmate over a good few years now.

Who knew that when we picked up on one another's blogs there would be such a friendship formed - I will never forget the fabby few days in Southampton on the first leg of your UK journey with you and so many other utterly wonderful ladies (what a magical day when we all congregated!) who are too many to name lest I miss one out.

Drum roll now - it's time for the fortnightly picks and, as always, so difficult to choose:

First of all, we have another Gold Star winner! This exploding box is absolutely stunning:

CraftDee Donna made this amazing creation - to see more views and also read just how it was made - do hop over to Donna's blog HERE. Well done Donna and do feel free to take a Gold Star badge from the right hand side bar. Well deserved!

For my three picks I settled on a bit of a theme when I looked through which entries I'd listed as possible picks - I chose shaped cards:
A double 'wow' when I saw this amazing card, made by Jane W. Again. super use of snippets and what a fabulous shape as well. I've never seen this style of 'Step Panel' card before, and thought I'd seen most of them - it's on my 'to do list' for sure! That's also one of the beauties about having the Playground picks - they make a great point of reference when I'm looking for inspiration - often ages down the line!

I just LOVE this bottle shaped card, made by Valerija! What a stunning card (which, if my Google translator can be trusted might be to say Happy 50th Birthday) - and the grape vines are such a clever addition as well!  Love this so much!

I know we recently had a really super retro style caravan/trailer as a pick - but here's another one for you - made by Mo. It's utterly fabulous and is for one of her daughters this coming Christmas. The round shape is perfect with the rounded shape of the caravan and so much lovely detail as well. Brilliant!

We had two new Playmates joining in the fun:

Kathy A
Hannah K
It's lovely to see new faces popping into the Playground, even after almost six years of running the challenge it still makes me happy to see 'newbies' - along with all our previous Playmates of course :)

Prize draw time now and our winner of MFT's 'Bold Stripes' Cover-up die plus MFT's 'Essential Sentiments' set of stamps is:
I know that Heather did once share in a prize and is very often in my fortnightly picks (also has two Gold Stars!), so it's high time she had another win! Can you please drop me an email with your address Heather - then I'll post your prize off to you as soon as possible. If you're quick off the mark I plan to go to our Post Office on Monday and will be able to post your prize staight away. My email address is on the right hand side bar.

It was quite interesting, I had to run Mr Random a few times as the first three names out of the hat were just playing for fun! But, I do think it worked out beautifully in the end.

Keep those snippets entries coming girls, you still have a week left to play HERE for weeks 303/304 remember! The prize is Avery Elle's 'Ribbit Ribbit' stamp set and MFT's 'Rectangle Peek-a-Boo Window' die. I will split the prize if you only want to play for part of it.

Love from the little white peril Parsnip. He came with me to the supermarket this week (riding high in the shopping trolley kiddie seat, so embarrassing - and he also insisted on the harness being buckled up to comply with UK H & S requirements needless to say). His aim was to choose choklits and such for Halloween. I shuddered at the chocolate 'eyeballs' that he wants to thrust into little kiddies unsuspecting hands when they come Trick or Treating. He's a bit of a naughty tinker really - but we still bought them, ha, ha!


Wednesday 18 October 2017

Mia is ten!

How ever did that happen? Len's eldest grand daughter was ten years old yesterday and, like a lot of little girls, she's very much into horse riding as well as ballet. I made her a 'horsey' card last year so it was an 'easel style ballet' theme this year:
I used:

- 6" square white scalloped edged card, by Craftwork Cards

- a second card the same, sliced in half across the spine

- scored the main folded card right across the centre and folded it to act as the 'prop' for the easel

- two identical pieces of designer papers from the Wild Rose Studio 'Vintage Rose' paper pack, trimmed down and glued onto the inside of the easel, as well as onto what would be the 'standing up front piece of card' (there must be a technical term for this surely?!

- then stuck the easel front onto the folded section of the base card using red line tape - I did have to fiddle a little with cutting a smidgeon off to line up the scallops

- die cut the ballet shoes and ribbon using a Joanna Sheen Signature Die called 'Ballet Shoes - SD207' and a little snippet of pale pink card

- then die cut it again using a snippet of white card, backed with Stick-It, for the ribbons

- snipped the white ribbons (they did need some careful trimming, I will not lie!)  and fixed them in place onto the shoes

- despite using the embossing plates and rubber mat for the pink shoes themselves, I didn't feel there was still enough 'definition' and they looked just like a clump of pink, so I deepened the embossing using a ball ended tool and a soft mat behind the die cut

- then glued the shoes onto a square of deeper pink card (yet another snippet) which had been die cut using one of the dies from The Works 'Stitched Squares' set - and glued that onto the easel card front

- die cut the letters and age and glued them in place - using my usual trusty sets of dies

- then die cut an oblong using a die from the Lil'Inkers 'Stitched Rectangles' set of dies and a last little piece of pale pink card

- used the Misti and the matching 'Creative Corners' to stamp the sentiment using Versafine 'Vintage Sepia' ink and a stamp from the Penny Black 'Special Thoughts' sentiment set

- fixed the sentiment panel in place using thick sticky pads to act as a 'prop'

Adding the white ribbons with some careful trimming worked wonders - but, truth be told, I found this to be a hard die to work with. It cuts brilliantly but one really shouldn't need to do all the eyeball trimming and tweaking I resorted to. Bit of a thumbs down for one of my favourite range of dies there I'm afraid, sigh.

After taking the photo I did add some clear Wink of Stella to the white ribbons to give them a bit of a satin sparkle :) It probably wouldn't have shown up on the photo in any case.

Next Birthday coming up is Mia's younger sister Olivia. That's going to be so different - think football, horses, scuffed knees, dragons and such, then you'll be on the right track! I might need to shout for help from Len!

What peculiar weather we're having - it's impossible to really plan full open air days so for now our trip to Portsmouth Historic Dockyard is on ice. Ha, the following week is half term when we usually avoid being swept along in hoards of kiddywinks. We'll see - decent weather is the most important thing. I can always take a little pitchfork to move the little perishers out of the way!

Wasn't that yellow/orange sky amazing on Monday!? 

As I type this am a little bit behind on Playground commenting - never fear, Parsnip and I are watching what's going on and I'll be hopping about your blogs ASAP. He really is a school sneak if he thinks there's any rattling of bottles behind the bike shed!


Sunday 15 October 2017

Pixie's Snippets Playground - Week 303 and 304

Happy Birthday for today, Len! Here's hoping you have a great day and that the weather is kind for things we have planned - even if we have to wait until later in the week due to high winds forecast.

My snippets card today is also Len's Birthday card - besides hedgies in the garden, we have a few resident frogs. No pool or pond to speak of, apart from a ground level tray with water in for birds when they're too lazy to use the 'upper pool' - but those little frogs manage to survive. So here's what I made:
I used:

- 4.25" x 5.5" white card blank

- snippet of white card stock, Strathmore's Mixed Media, onto white I stamped the images and sentiment using Black Archival ink and stamps from the so sweet Avery Elle 'Ribbit Ribbit' set

- then I chose a rust and beige patterned snippet which was tucked in the back of LOTV's 'Country Gent' paper pad, to match the colouring I wanted to do and backed it with white card just to make it more sturdy

- also found a green snippet for the backing layer - then I coloured the stamped images using Ziggies (which are pretty unforgiving in photos I see - in real life the blending looks quite good, sigh)

- fussy cut round the images leaving a narrow white border and set them aside 

- die cut the sentiment using a die from the MFT 'Stitched Fish tail STAX' set of dies and set it aside 

- using MFT's 'Rectangle Peek-a-boo Window' die, I die cut an aperture in the patterned paper layer and backed it with a snippet of white card

- ready to assemble the card now, so first of all I added the sentiment banner where I wanted it to go and snipped away the excess overhanging the left hand side of the patterned layer

- glued the patterned layer to the green snippet and then glued both to the card front

- assembled the little montage of images onto and into the aperture area using Collall All Purpose glue and also teeny pieces of thin sticky pad to add dimension

- then added googly eyes to the frog and clear Wink of Stella to the butterfly, bulrushes, lily and lily pad

- final touch was two shiny green Josy Rose nail heads to the left hand end of the sentiment banner, ages since I used those little cuties!

This is such a cheeky set of Avery Elle stamps, with some very 'froggy' sentiments. I now know there are matching dies (duh) but to be honest the images in this set are very easy to cut out freehand. And they're great for those difficult male cards too. I also used 'that' MFT stitched aperture die yet again (one of my very favourites needless to say!), and realised that the stitching doesn't show up too well on heavily patterned paper. But, it was a bit too late when I realised - plus of course I was planning around this fortnight's prize(s)!

And that leads nicely into our prize(s) this coming fortnight, which of course are:

Avery Elle's 'Ribbit Ribbit' stamp set and MFT's 'Rectangle Peek-a-Boo Window' die. I know, we've had the stitched rectangle die as a prize at least once or twice previously - but it's always so popular I thought there would still be people who would like it - and of course the prize can be split.

The Snippets Challenge will run for two weeks and the Playground gates will close at 11am UK time on Saturday 28th October. The gates will open again at midnight UK time on the same day.

It's a maximum of ONE entry and please say in a comment if you wish to play and be a possible winner of the prize. As I already said, the prize is as above and I will happily split the die and the stamp set, in which case I'd do a further draw for the other item. Please also link back to the Playground in your blog post to be eligible for the draw.

Remember, if you link into the Playground and don't say clearly that you're wanting to be in the draw then you will be bypassed if your name comes out of Mr Linky. I'm sure you all know I ask for a positive 'yes' just in case you're playing only for fun. Thanks!

Mr Linky is below - please let me know if you have any problems linking, it's easy for me to sort out so don't struggle on alone :)

Be sure to call back next week to see the winner of last fortnight's prize which is a MFT's 'Bold Stripes' Cover-up die plus MFT's 'Essential Sentiments' set of stamps, another lovely Guest Designer and my picks from the past two weeks.

Love from Parsnip and of course from me,


Tuesday 10 October 2017

Another four Christmas cards - yay!

Happy dance here as my Christmas card making target total is up to date - for now and I did sort of enjoy making these four cards after such a loss of mojo. I'd been told to take it easy for a couple of days last week - so I spent the time quietly crafting ................. and left the ironing leering at me from the laundry basket.

I made four of the same design but changed the backing paper as I was using up small LOTV snippets - so there are two of each exactly the same:


I used:

- 4.25" x 5.5" white card blank, tent style
 
- a piece of white card stock, die cut using the MFT 'Stitched Cover-up Companion - Diagonal' die

- then I backed the white panels with snippets of LOTV patterned paper - holly print and tartan/plaid from the (sadly discontinued) 'Classic Christmas' paper pad

- added a layer of fun foam, cut just slightly smaller than the panel to the back

- die cut holly leaves and berries, using snippets of plain paper from the LOTV pad (best way to get a good match for the red and green). The dies I used were holly leaves from the Dees Distinctively 'Wreath Builder' set and the berries are from the Poppy Stamps 'Stitched Holly Leaves and Berries set'. The only reason I mixed the two sets was because I wanted very slightly larger holly leaves 

- used the holly leaves and berries as a guide to position the sentiment in place, using the Misti of course. The sentiment is from the Inkylicious 'Seasons Greetings' sentiment set and I used Memento 'Tuxedo Black ink

- glued the foam backed panel onto the card front then added the holly leaves and a berry - using Collall All Purpose glue in a Woodware ultra fine glue applicator

It was interesting stamping the sentiment onto the card panel which was already backed with fun foam - I left the black pad in the Misti - but the magnets held well and the stamping came out crisp.

One really useful tip when using the Misti - when you've positioned your stamp and it's attached to the lid it's a real help to pop a full pad of Post-Its underneath the opened out lid (underneath the stamp is a good place of course) before you begin to ink your stamp up. The thickness of the Post-It pad supports the flipped back lid and also helps with an even covering of ink. Goodness know where I spotted that idea but I've always done it and find it works really well. I think I'd cry if those hinges ever snapped!

Of course, adding the fun foam to the card panel gives it a good 'lift' from the card base which looks better in some ways. Sigh, it also takes the card up into Large Letter size. I have a postal gauge here and it's such a help checking card sizes. I hesitating for a nano second - then decided to still use the foam anyhow. Threw caution to the wind as they say :)

Just added this - GUESS WHAT! LOTV now have some Christmas background papers to download and print for yourself. Three of my very favourite sets are in the collection so far - including the papers I used for this card which are my favourite set of all time!  I only found them when searching for some images I wanted - result - woo, hoo!! Happy dance here :)

To be honest, I'm NOT a printer of papers but was delighted to find what I though were some a long lost designs :)


Sunday 8 October 2017

Pixie's Snippets Playground - Week 299 and 300 - results

It's been a funny old week, more stuff went to the charity shop on Monday - hooray! I caught up with September's Christmas card target - double hooray. Discovered that buying A6 cello bags from Amazon (including postage) is half the price of buying from Hobbycraft - triple hooray but a bit of a black mark for Hobbycraft. Recovered nicely from having a wisdom tooth removed - quadruple hooray!!

Let's get straight on with our Guest Designer for this fortnight:
I adore this card, such a great way to use up snippets with such impact. And, it was lovely to see that Greta used a Playground prize as well! The colours and patterns work so well together.

This is what Greta said about her card:
Most of my snippets are white card stock, as I seldom cut into my huge collection of patterned paper.  However, I have made some cards with the beautiful papers in DCWV Harvest House & want to use every bit of them.  My Playground prize of Spellbinders A2 Curved Borders One dies was exactly what I needed.  No stamping on this card as the paper stack includes a page of sentiments.  Heidi Swapp glitter tape was used for a mat & a simple twine bow finishes off my card.  Thanks for having me, Di & I look forward to seeing everyone's cards in the gallery.

And here's a lovely photo of Greta and a few words about her:
Hello playmates!  I'm happy to be Guest Designing in The Playground all the way from the beautiful Pacific Northwest.  I'm a newly retired Registered Nurse who loves to make cards.  Fortunately, my hubby of 38 years doesn't mind that my crafting took over the dining room table years ago.  I'm a doggy momma to Fritz, our 4 year old Standard Schnauzer who helps me get exercise with frequent walks.  I love elegant, uncluttered designs, but also like to try a variety of techniques & styles.  I began my blog, http://www.ggnursecreations.blogspot.com/, 6 years ago & am blessed with friendships all over the world.

Huge thanks to Greta for being our GD this fortnight and also for being such a loyal Playmate over a good few years now.

Drum roll - it's time for the fortnightly picks and, as always, I nearly wept at making any decision as ALL your entries are so brilliant:
Carol L made this amazing card - such a perfect way to use up snippets as banners. One to keep as inspiration for sure! Which is so appropriate as Carols's blog is called 'Our Little Inspirations' - I'd never made that link before now, perfect!

There are lots of new and really interesting folds appearing in Blogland right now - and I just love this card in such pretty colours, made by Maxine showing a 'Quatro Fold' card. There's more detail about the card plus a link to a really clear tutorial over at Maxine's blog! Another one on my 'must try' list and a great way to use up snippets!

And, my final pick is this really lovely card, made by Sandy J! I've spotted a few 'vintage shaped' caravan stamps and dies being used in Blogland and they always look great for New Home cards or in fact any event! Wonderful use of little snippets and great paper piecing too. Oh, and some little banners as well - banners are really 'in' right now - as shown on Carol's Christmas card.

Prize draw time now and our winner of the set of stamps with matching dies by Lawn Fawn called 'Hang in there' - as well as a set of The Works 'Stitched Circles' dies is:
Well done Janis! The fact that the envelope on my lovely Birthday card from you had our Postie rolling round laughing when he delivered it has absolutely nothing to do with this! I did a double take when your number popped out to be honest - the sun shines on the righteous - or even the naughty! :) Can you please drop me an email with your address - then I'll post your prize off to you as soon as possible. My email address is on the right hand side bar.

Keep those snippets entries coming girls, you still have a week left to play HERE remember! The prize is a MFT's 'Bold Stripes' Cover-up die plus MFT's 'Essential Sentiments' set of stamps. I will split the prize if you only want to play for part of it.

Love from the little white peril Parsnip, who has been surprisingly well behaved this past week. I suspect he's aware that Guy Fawkes night is approaching and he never really got over the suggestion a few years back in the Playground that he should be tied to a rocket and launched into space. I did notice that an old goldfish bowl shaped glass vase destined for the charity shop went missing - so perhaps he's building his own little spacesuit just in case!

Friday 6 October 2017

Little update

Image result for cartoon image of moug th full of teeth

Thank you all so much for your lovely comments and messages re. the wisdom tooth removal. Am doing fine so far - fingers crossed.

Back on Sunday with Playground results, another lovely Guest Designer and of course the winner of the sloth stamp plus dies - as well as The Works 'Circular Stitched' dies.

See you then! x


Tuesday 3 October 2017

Post early for Christmas

Well, perhaps not this early though! I had a pre-loved Penny Black Christmas stamp lying on my desk witing to be used, recently bought from a very sweet blogging friend (and if you're reading this, I haven't forgotten my promise either!). Am sure it still counts as NBUS for Darnell's latest challenge 'cos I've never used it before. I made a batch of six cards all the same, just like this one:
I used:

- 5" x 5" square white card blank

- slightly smaller piece of white card, embossed using Darice's 'Snowflake Background' embossing folder and glued onto the card front. Over time I've learned that if possible it's best to trim your card to size before embossing it. Sometimes, if you guillotine it afterwards, you find the card fibres have been broken down a bit and your cut line won't be as sharp

- the images were stamped onto white card using Ranger Black Archival ink and such a cute Penny Black stamp called 'Royal Mail'

- then coloured the images using  my Zig brush pens and added some shading using Faber-Castell Polychromos pencils

- die cut the image using one of The Works 'Stitched Squares dies'

- added the sentiment, using Ranger Black Archival ink and a stamp from the Hobby Art 'Christmas Post' set

- mounted the image panel onto SU 'Real Red' card as a frame

- backed the panel with white fun foam and glued it onto the card front

- final touch, clear Wink of Stella to add some subtle sparkle to the snow

I almost did a big boo-boo with these cards - although I used the right waterproof stamping ink for Ziggies, I forgot to use water colouring card instead of my usual stamping card, which is fine for Pro markers and coloured pencils - but 'pills' at any sign of water if you try to do some blending! Too late I realised, fortunately when working out colour combinations on a scrap of the same card. I'd already done practically all of the colouring using 'neat' Ziggies with no problems (yup, on six images!) and just wanted to add some additional depth to the scarf and envelope, as well as the hedgie's cheek and skin. Tried the Polychromos pencils and they saved the day! One to remember, don't be afraid to try mixing different colouring mediums - although I did test the theory out on some scrap card first! :) Me not totally stooopid!!

I was going to delay this post due to the very sad events in Las Vegas. However, I'm having a wisdom tooth out today and truly don't know how I'll feel afterwards. The extraction itself isn't worrying me but I don't always react well to such things so thought I'd best post this and link up to Darnell's NBUS whilst am still in charge of my faculties, sigh.

And a bigger sigh over Las Vegas - makes our day to day worries seem minuscule in comparison.


Sunday 1 October 2017

Pixie's Snippets Playground - Week 301 and 302

What a peculiar week for weather here - ranging from a real Autumn nip in the air to warm and sunny - with rain thrown in for good measure in between times of course! Hedgies are still feeding with no sign of slowing down - same with the local bird population.

My snippets card today was a little bit fiddly but not exactly challenging as the die and the stamps did most of the work - once I'd had a couple of false starts on how to do all the sticking down! I'm sure there are many options for sticking, but I ended up doing what I felt most comfortable with in the end:
I used:

- 4.25" x 5.5" white card blank, tent style

- snippets of green, pink and blue SU card stock plus a snippet of white for the sentiment stamping

- using the green snippet I first backed it with medium weight adhesive sheet and then die cut it using MFT's 'Bold Stripes' Cover-up die

- then carefully added it to the card front - easiest way with die cuts like this, and even uncut layers of card with adhesive backing, is always to gently line up one side first before peeling off the protective backing very slowly as you smooth the die cut in place across the card

- then I was left with seven stripes to fill. My initial idea had been to back the whole die cut with self adhesive sheet before adding it to the card front but the very marrow margins gave me the heebie-jeebies. So, I whipped out my 6mm wide reel of red line tape and stuck a strip right across each cut out area

- then die cut the pink and blue strips and popped those in place, using the red line tape to hold them down firmly

- hunted high and low for my MFT 'Essential Sentiments' set of stamps - they were hiding! Stamped three sentiments onto a piece of white card using Memento 'Tuxedo Black' ink

- then die cut each sentiment strip - the beauty of these is that all the strips are the same size which makes it easier :)

- stuck the sentiments in place and called it done

There are so, so many ways to use this die, along with - or even without - the really varied sentiments. For a start, there are seven cut out strips, same as the number of colours in a rainbow! How cool would that look? Black and gold, topped with a flower or a die cut word would look gorgeous. Patterned papers, DI Oxide backgrounds, pastel colours for a new baby, dark colours for a chap, don't fill in all the spaces with a contrast (use some of the main background cutouts)  - the list goes on ........... and on! Just Google the name of the die and there are loads of ideas, I really didn't do it justice, sigh.

However, I chose to keep it very simple to just show the die plus some sentiment stamps (brilliant for snippets!!) and am sure you already know why, which leads nicely into our prize(s) this coming fortnight, which of course are:
MFT's 'Bold Stripes' Cover-up die plus MFT's 'Essential Sentiments' set of stamps.

The Snippets Challenge will run for two weeks and the Playground gates will close at 11am UK time on Saturday 14th October. The gates will open again at midnight UK time on the same day.

It's a maximum of ONE entry and please say in a comment if you wish to play and be a possible winner of the prize. As I already said, the prize is as above and I will split the die and the sentiments in which case I'd do a further draw for the other item(s). Please also link back to the Playground in your blog post to be eligible for the draw.

Remember, if you link into the Playground and don't say clearly that you're wanting to be in the draw then you will be bypassed if your name comes out of Mr Linky. I'm sure you all know I ask for a positive 'yes' just in case you're playing only for fun. Thanks!

Mr Linky is below - please let me know if you have any problems linking, it's easy for me to sort out so don't struggle on alone :)

Be sure to call back next week to see the winner of last fortnight's prize (that really cute set of stamps with the sloth plus dies by Lawn Fawn called 'Hang in there' - as well as a set of The Works 'Stitched Circles' dies.), another Guest Designer and my picks from the past two weeks.

No further photos of our Leeds Castle 'sojourn' as yet. Although I used my camera, Len used his phone for photos and (just 'between us') they turned out brilliantly so am waiting for him to upload them for me.

Love from Parsnip and of course from me,