.....one of my very favourite sentiments and just right for this card, made for someone special:
I used:
- 5.5" x 4.25" white card blank, made by opening a slightly larger card out and using the largest Lil-inkers 'Stitched Rectangle' die on the front (it only cuts the stitched outline and not the whole piece of card, so you retain the spine) and then trimming the 'open edges' down to size
- a snippet of white card, die cut using the next size down in the Lil'inkers 'Stitched Rectangle' set
- a Penny Black NBUS die called 'Bashful', used to cut out the flower shaped aperture from the snippet of card I'd just die cut in the above step
- then I die cut another 'Bashful' flower from a white snippet and coloured both of the flowers using Pro markers
- popped one of the coloured flowers into the aperture I'd die cut - to make it easy I backed the die cut aperture with a piece of double sided sticky film before popping the flower in place
- at that point I stamped the sentiment using Memento 'London Fog' ink and a stamp from the Hero Arts set called 'Live life'
- I then snipped the head from the second flower I'd coloured, added little strips of narrow red line DST to the back of the petals and head and carefully stuck it on top of the flower head that was already in place - just offsetting it slightly
- added a tickle of Tim Holtz 'Antique Linen' Stickles to the flower head
- final touch, five sparkly sequins
The die is a real beauty (reminds me of a coneflower) and would also be great used for stencilling - loads of possibilities!
Almost forgot, this is my first entry into Darnell's current NBUS (Never-Been-Used-Schtuff) challenge #5 - loads of prizes to be won, and most of all it encourages you to play with your new goodies that could be feeling a bit neglected.
Di
x
Friday, 11 September 2015
Wednesday, 9 September 2015
Crafty Hazelnut's Christmas Challenge 245
I try to play along with Hazel each week and this week's challenge is 'twas the Night Before Christmas'. Quick rootle through the box of received and saved shop-bought Christmas cards turned up a fairly large square card with three Christmas stockings lined up a staircase. I couldn't just slap the card front onto a card blank and call it a day - so I chopped it down to include the sentiment and just one of the stockings:
I used:
- A6 white card blank, the front (only) of which which I scored at approx. three quarters of an inch in from the spine - on the inside of the card - to create a flat spine
- then added a strip of saddle stitched red ribbon down the 'flat spine' using red line double sided tape, folded the ends over to the inside of the card and stuck the spine together with the back part of the card
- layered the cut down upcycled image onto snippets of SU 'Real Red' and also matt gold card and stuck it onto the front of the card
A super fast card which came about from a great idea that Jane brought to the Playground last week. I hadn't seen cards using this 'flat spine' idea before (apart from shop bought cards) and it's a really great way of adding a strip of ribbon or perhaps washi tape to a card and then enclosing it in the spine so that the 'behind the scenes work' is nicely hidden.
This is the card propped slightly open - thanks Jane for a great idea!
I'd also like to enter this card into Craftyhazelnut's Christmas Challenge Extra for September.
Di
x
Labels:
challenge,
Christmas cards,
snippets,
techniques,
upcycling
Tuesday, 8 September 2015
Less is More Week 240 - Green and gold
The current challenge of 'Green and gold' over at Less is More immediately brought Christmas to mind and also a pair of Memory Box dies that I really love:
I used:
- 5" x 5" square white card blank
- slightly smaller piece of gold linen mirri card, glued onto the card front
- slightly smaller again square of white card with the corners punched using a Woodware 'Squared Corner' punch then glued on top of the gold layer
- next I fished out a SU 'Mossy Meadow' snippet and a gold linen mirri card snippet and backed them with 'Stick-It' double sided adhesive
- out came the pair of Memory Box dies and I cut the solid trees from the green card using 'Pine Border Background' and the outline from gold linen mirri card using 'Pine Border Outline'
- added both die cuts to the already assembled card front and popped a gold peel off star above the tallest tree
- lastly, getting a bit daring and for sure it'll backfire soon, I stamped the sentiment directly onto the assembled card using SU's 'Mossy Meadow' ink and a sentiment from the Personal Impressions set called 'Many Greetings'. I particularly chose this sentiment 'cos the letters go up and down a bit like the trees do :)
And, of course I made another card exactly the same whilst at it!
Di
x
Sunday, 6 September 2015
Pixie's Snippets Playground - Week 193
Hi again! And another week flew past in the Snippets Playground - whoosh, one blink and there it was gone!
And this next week we have another little prefect in the Playground helping me out, just as Eve did about a month ago, it's Sarn of Stamping for Pleasure!
I'm sure most of you know Sarn, she's a long term blogger and is tremendously talented - her work ranges from beautiful crisp and cleanly designed card making and associated card crafts through fabulous journaling and Sarntangling (her very own version of Zentangling) - not to mention recent forays into mixed media, with great results! Basically, if it can be tried, Sarn will have a go. She has Sarntangle digis for sale over on her blog and also designed and sold her own limited edition 'Sarntangle' stamps set - sorry though, they sold out like hot cakes!
Not only that, she's fun, funny, very supportive, wise when it's needed, crazy if that's what you need at the time and also fiercely loyal. Basically, an all round 'good egg' and I'm delighted to have her as a friend.
OK Sarn, send me the cheque now please :)
This is the lovely snippets card that Sarn made for us this week:
Here's a list of the 'ingredients':
Just as Eve did a few weeks ago, Sarn will be commenting on your entries this week and will also list her picks of the week for me. I'll still be peeking to see what's going on but it's a busy week for me so my time will be limited and Sarn's offer couldn't have come at a better time.
If any of you fancy being prefect for a week, it entails making a snippets card (you don't have to provide a prize though as the toy box is pretty full here), commenting on all the week's entries - and making up a list of your picks of the week. The rest is down to me still.
Of course I'll be watching for any new playmates and sorting out any linking issues this coming week - and will do the usual Sunday post with my snippets card etc. etc. for the following week.
And onto this week's picks:
I picked Aurora recently on her first trip into the Playground - and have picked her again for two reasons. First of all, aren't these super pen holders!? And I do think you'll be astonished if you hop over to see the video of her singing - bear in mind this is a nine year old girl. Amazing voice, I really got the shivers listening to and watching her singing!
And here's someone else who featured with a pick last week - our Sarn! There was no way this stunning pop up box could be left out of the weekly picks this time round, just fabulous!!
Kath came up with a really terrific arch for her entry - and used plenty of snippets in the process too. Gorgeous card!
I know, I know! Isn't this absolutely fantastic?! An amazing apple card for 'back to school' time. I totally love this card - made by Diane H.
Jenni J is a fairly recent addition to our happy little band of playmates - and just look at this amazing card she brought to show us. I think it's just so clever how the little scene is popped up on the feathers - a lovely CAS card with that wow factor!
I'm sorry to cut this weeks picks short there, still struggling with the back and sitting still typing for too long isn't helping. Every single entry deserved being a weekly pick and I do so hope you'll peek at last week's thumbnails and perhaps hop over to check a few entries out. We get some terrific ideas in the Playground for sure!
And we do have one new playmate joining us this week:
Tiziana brought this beautiful Birthday card to show - it's absolutely gorgeous and a real delight. If I made a card anywhere near as intricate as this I'd be lying down in a darkened room for a week afterwards! Hmm, not such a bad idea anyhow :)
Time to choose the winner of the Molly Bloom 'Herb Box' stamp and the Inkylicious Butterflies (Flutters 2) stamp set. - and the winner is:
Well done Ike (Suzy)! I don't have your address so can you please drop me an email (di_wray@hotmail.com) and I'll pop the stamps in the post to you ASAP.
The prize for this coming week has been chosen and donated by the lovely Sarn - and it's the fabulous Woodware Clear Magic 'Delicate Daisies' stamp set - which comes with its own sentiment:
The Snippets Challenge will run for one week and the Playground gates will close at 11am UK time on Saturday 12th September. The gates will open again at midnight UK time on the same day.
Maximum of three entries and please say in a comment if you wish to play and be a possible winner of the prize. Do remember that you should also link back to the Playground in your blog post to be eligible for the draw.
Mr Linky is below - please let me know if you have any problems linking, it's easy for me to sort out so don't struggle on alone :)
Edit: I had wondered if our playmate Cornelia was away on holiday as she usually comes to play each week - turns out she has an eye problem (retinal tear) and is having to take it very easy right now. Do please join me in sending her our love and get well wishes - hope you're back with us soon Cornelia!
Di and of course, Parsnip!
x
And this next week we have another little prefect in the Playground helping me out, just as Eve did about a month ago, it's Sarn of Stamping for Pleasure!
I'm sure most of you know Sarn, she's a long term blogger and is tremendously talented - her work ranges from beautiful crisp and cleanly designed card making and associated card crafts through fabulous journaling and Sarntangling (her very own version of Zentangling) - not to mention recent forays into mixed media, with great results! Basically, if it can be tried, Sarn will have a go. She has Sarntangle digis for sale over on her blog and also designed and sold her own limited edition 'Sarntangle' stamps set - sorry though, they sold out like hot cakes!
Not only that, she's fun, funny, very supportive, wise when it's needed, crazy if that's what you need at the time and also fiercely loyal. Basically, an all round 'good egg' and I'm delighted to have her as a friend.
OK Sarn, send me the cheque now please :)
This is the lovely snippets card that Sarn made for us this week:
Here's a list of the 'ingredients':
- Memento ink in Tuxedo Black for flower image.
- SU Certainly Celery for zigzag lines.
- Promarkers in Tulip Yellow; Gold; Spice; Apple and Oatmeal.
- I coloured the edge of the mat in Gold to match the coloured image.
- Stamps: Woodware Clear Magic "Delicate Daisies" & zigzags from SU's "Work of Art".
- Foam pads to pop each flower head up.
Just as Eve did a few weeks ago, Sarn will be commenting on your entries this week and will also list her picks of the week for me. I'll still be peeking to see what's going on but it's a busy week for me so my time will be limited and Sarn's offer couldn't have come at a better time.
If any of you fancy being prefect for a week, it entails making a snippets card (you don't have to provide a prize though as the toy box is pretty full here), commenting on all the week's entries - and making up a list of your picks of the week. The rest is down to me still.
Of course I'll be watching for any new playmates and sorting out any linking issues this coming week - and will do the usual Sunday post with my snippets card etc. etc. for the following week.
And onto this week's picks:

I'm sorry to cut this weeks picks short there, still struggling with the back and sitting still typing for too long isn't helping. Every single entry deserved being a weekly pick and I do so hope you'll peek at last week's thumbnails and perhaps hop over to check a few entries out. We get some terrific ideas in the Playground for sure!
And we do have one new playmate joining us this week:
Time to choose the winner of the Molly Bloom 'Herb Box' stamp and the Inkylicious Butterflies (Flutters 2) stamp set. - and the winner is:
The prize for this coming week has been chosen and donated by the lovely Sarn - and it's the fabulous Woodware Clear Magic 'Delicate Daisies' stamp set - which comes with its own sentiment:
The Snippets Challenge will run for one week and the Playground gates will close at 11am UK time on Saturday 12th September. The gates will open again at midnight UK time on the same day.
Maximum of three entries and please say in a comment if you wish to play and be a possible winner of the prize. Do remember that you should also link back to the Playground in your blog post to be eligible for the draw.
Mr Linky is below - please let me know if you have any problems linking, it's easy for me to sort out so don't struggle on alone :)
Edit: I had wondered if our playmate Cornelia was away on holiday as she usually comes to play each week - turns out she has an eye problem (retinal tear) and is having to take it very easy right now. Do please join me in sending her our love and get well wishes - hope you're back with us soon Cornelia!
Di and of course, Parsnip!
x
Friday, 4 September 2015
Craftyhazelnut's Christmas Challenge #244 - 'Use some silver'
The current challenge over at Craftyhazelnut's Christmas Challenge blog is to 'Use some silver' - and this card is also for Craftyhazelnut's Christmas Challenge Extra for September, which is always 'Anything goes'.
I love silver and white on Christmas cards and I've previously used this large snowflake die in a similar fashion - but this time I added an additional die cut snowflake on top :)
I used:
- 6" x 6" white square card blank
- a square of white card quarter of an inch smaller all round than the card blank. Then die cut the centre using a Memory Box die called 'Dazzling Snowflake'. Before doing the die cutting I adhered a piece of 'Stick-It adhesive sheet for intricate die cuts' on the reverse side of the white piece of card. After die cutting it was stuck onto a larger piece of silver holographic card (approx. quarter to half an inch bigger all round)
- then I trimmed the edges of the double layer so that the holographic card acted as a border around the white layer of card (this allowed me to even up any off centre sticking down 'cos the adhesive sheet is quite determined once it touches a piece of card)
- then bravely stamped the sentiment without the aid of a safety net, using a silver ink pad and a sentiment from the Personal Impressions 'Many Greetings' set
- then die cut a smaller snowflake from a leftover piece of the holographic card, using a lovely snowflake die by Jennifer Ellory which came free with Quick Cards Made Easy magazine last year. Glued it in the centre of the large snowflake, leaving the outer edges free for dimension
- final touch, an aurora borealis gem in the centre of the layered snowflake
I like this Memory Box die just as it is, but it was fun to see it prettied up a bit more :) Needless to say, I made two the same whilst the place was in uproar!
Di
x
Wednesday, 2 September 2015
A very odd archway
This stamped image almost makes me cross-eyed! Shame as it's lovely otherwise:
I used:
- 4.25" x 5.5" white card blank
- white card stock, stamped using Memento 'Tuxedo Black' ink and a stamp I've had for ages made by Inca, called 'Church Window'. I've inked it up before but always discarded the results - tell you just why after I finish listing what I used
- coloured the image using Faber-Castell Polychromos pencils and Sansodor blending solution
- stamped the sentiment using Memento 'Tuxedo Black' ink and a stamp from SU's 'Sheltering Tree' set
- die cut the image panel using a Lil'Inkers Stitched Rectangle die then layered it onto a snippet of pale blue card stock
- die cut a teeny butterfly using SU's Embosslits 'Beautiful Wings', added it to the card, tickled with clear Wink of Stella and then added a single little pearl
It's always hard to make sympathy/thinking of you cards so it's good to have one on standby.
Now, why d'you think that image makes my teeth itch so much? It might be me, but am sure the whole perspective of the archway is 'off'. It appears to be leaning to one side a bit for starters (that's 'cos it narrows in on the left hand side) but it's the right hand side that bugs me most - almost as if the stone arch switches from being an outer to an inner without reason. It's always struck me as somewhat 'odd' anyhow - and not a stamp I'll be using again in a hurry :(
Di
x
Labels:
challenge,
Die cutting,
Polychromos,
snippets,
SU,
sympathy card
Tuesday, 1 September 2015
Cuttlebug Mania Challenge - Anything Goes
All you have to do is to use a manual die cutting/embossing machine (it doesn't need to be a Cuttlebug but it must be manual). Then make your entry, link into the challenge, link to the challenge in your own blog post and and make sure that you also say what products you used for any die cutting/embossing. We're a nosey lot and do like to know just what you've used :)
The sponsor for this challenge is Craftie Charlie:
Here's my offering:
I used:
- 7" x 5" white card blank, tent style
- a layer of SU's 'So Saffron' card stock, embossed across the centre using a Quickutz folder called 'Flowers' - one of the very first ones I ever bought
- then I topped and tailed the panel with snippets of SU's 'Wisteria Wonder' topped with snippet strips of Pink Petticoat 'Wild Blossoms' paper. Using the folder cross ways was a good way to leave some nice flat space at the top and bottom ready to cover with the patterned panels
- the images are all from Stephanie Barnard's The Stamps of Life set called 'Cookie', and I stamped them using Memento 'Gray Flannel' ink
- coloured the images using Faber Castell Polychromos pencils and Sansodor blending solution - the wee doggie is based on Stephanie's own little Maltese dog named Cookie, but it's also very much like a Bichon Frise with a 'puppy cut' :) I deepened his nost and eyes using a black fine line marker and the stamp image actually has a darling bow on its head - which I covered with the party hat this time round
- next I die cut Cookie and the party hat using dies from the matching set - for some reason you don't get a die to cut out the parcel, but in fairness it's less intricate and was easy to fussy cut
- the sentiment, which is also included in the stamp set, was die cut using a die from the XCut 'Speech Bubbles' set
- the die cut elements were then all popped onto the embossed panel using thin sticky pads. So that the hat lies level I used sticky pads for the top part but used narrow red line sticky tape along the bottom edge where it overlapped Cookie's head
- final touch, added some clear Wink of Stella to parts of the hat and also the bow/ribbon on the parcel
Here's a little tip you might already know about - to do with die cutting stamped images using the matching dies. There are more and more of these sets about right now, I dithered for ages before buying this particular set due to the white margins - but am so glad I did 'cos Cookie was whimpering to be bought!).
Let's say you've stamped and coloured your image, and now you want to line up the matching die properly. This is how I do it:
I took all four dies from the set and cut a card template from each one (used snippets of course!) then discarded the inner part and kept the outer part. I only did all four shapes to save time in the future.
Here you can see that I've got the hat template on the right, awaiting it's turn to be used. On the left is the doggie template, positioned as I want it over the stamped image (see the darling little bow on Cookie's head that I mentioned earlier?) and held in place with Scotch clear removable tape.
Next, I slotted the actual die into the 'slot' of the template - and also taped it in place. If you wiggle the die into place it will let you know when it's positioned properly :) Then you just die cut as normal, both the image, the template and the die will run through your machine fine.
I kept all four templates and just popped them into the packet with the dies - which are also stored along with the stamp set. Normally I store dies on magnetic sheets but find it's best to keep matching dies and stamps together.
And my Scotch tape does look a bit grubby - that's because I'm a bit mean and re-use the pieces until they're past their sell-by date :) A good place to store them is either partially and lightly stuck to a plastic filing tray as I do - or even on the handle or side of your die cutting machine.
So that's my DT card for this fortnight's Cuttlebug Mania challenge - it would be lovely if you come and play, it's also an ideal opportunity to combine your entry with a Snippets Playground entry - two for the price of one! I do spot quite a few Playmates now joining in with Cuttlebug Mania :)
Di
x
Labels:
challenge,
Cuttlebug Mania,
Die cutting,
embossing,
hints and tips,
Polychromos,
snippets
Sunday, 30 August 2015
Pixie's Snippets Playground - Week 192 - PLUS free Ally Pally tickets!!
Edit - Sally over at Crafty Salutations has two one-day tickets for Ally Pally (19th/20th September) to offer to one of her followers. You can go with a friend for one day or on your own for both days - it's up to you. All Sally wants is for them to go to a good home. My name is in the hat for sure - why not hop over and add yourself into the draw by 3rd September if you'd like to be innit to win it?! You just need to be a follower and leave a comment - plus Sally's blog is a fun place (she's a great card maker, especially backgrounds and scenes - swoon!).
Back to the weekly blog post about Playground antics now - so what happened there then?! 92 entries this week - wahoo!! I couldn't believe it, as fast as I managed to clear the commenting, more of you arrived - what a wonderful turnout - and also what a headache doing the picks!!
But before the picks, my snippets card this week was made using a lovely stamp that Elizabeth sent to me - the image was an absolute joy to colour:
I used:
- 6" x 6" square white card blank
- a large snippet of SU's 'Wisteria Wonder' card stock
- a sheet of diagonally patterned DP from Wild Rose Studio's 'Wintry Christmas' paper pack, plus a long straight spotted snippet from the same pack - adhered down the centre just to break up the expanse of diagonal stripes
- the image was stamped onto a snippet of white card stock using Memento 'Tuxedo Black' ink and the charming Molly Blooms cling rubber stamp, sent by Elizabeth, called 'Herb Box', then coloured using Faber Castell Polychromos pencils and Sansodor blending fluid
- then I die cut the image using a die from the Spellbinders 'Floral Ovals' set and added it to the card front - all done using Collall All Purpose glue
- instead of adding a little sentiment, I added a little butterfly from the Inkylicious 'Flutters 2' clear stamp set. Stamped using Memento Tuxedo Black' ink, coloured and blended as per the main image then tickled with clear Wink of Stella before being fussy cut and popped onto the image with a little piece of thin foam pad. It shimmers so prettily in real life
Let's hop straight into the weekly picks now. I've managed to 'twang' my back, happens on a regular basis, purely by twisting awkwardly. So, I'll type for as long as possible doing picks but might have to cut it a bit short:

I'm so pleased that I managed to include a card from Karen (Ladd) at long last. For ages I've wanted to, but didn't think I could as Karen uses Flickr. The other day, when I saw this great scene, I sat and worked out that I could download it, then save it to my own hard drive and then upload it from there! Wahoo! It takes a bit longer than just the copy and paste I can do from blogs - but really happy that you get to see this great card!

Little toot of my trumpet here - I was utterly delighted to be showcased over at Less is More on Friday with this card:
So there you have the weekly picks - and I hung on in there and managed to do 10!!
And we have a two new little playmates this week:
I totally love this card, so soft and gentle. Wonderful pale, softly sheened mistletoe and I truly thought at first that the sentiment had been stamped - in fact it's a wonderfully intricate Tattered Lace die cut!
Onto the draw for the Cheery Lynn 'Choo Choo' train die and the Memory Box 'Modern Landscape Border' die now - and our winner is:
This coming week's prize is probably quite easy to guess - first of all it's a beautiful Molly Blooms cling 'Herb Box' stamp the same as I used today (Elizabeth sent one for me and one for the toy box - thank you Elizabeth - so, so much!). I think this stamp would be brilliant for any gardener, of either sex, plus I've added in an Inkylicious 'Flutters 2' clear stamp set the same as I also used today, 'cos it was knocking on the toy box lid demanding to be added in :)
The Snippets Challenge will run for one week and the Playground gates will close at 11am UK time on Saturday 5th September. The gates will open again at midnight UK time on the same day.
Maximum of three entries and please say in a comment if you wish to play and be a possible winner of the prize. Also, if you already have one of them or aren't really interested in winning both of the packets of stamps but still would like to play for just the one - please say so and if your number is picked as the winner then I'll do a second draw for the other one.
However, the prize IS for both items unless I'm told otherwise in a comment. Do remember that you should also link back to the Playground in your blog post to be eligible for the draw.
Mr Linky is below - please let me know if you have any problems linking, it's easy for me to sort out so don't struggle on alone :)
Di and of course, Parsnip!
x
Friday, 28 August 2015
Fly away with me
I've had a new set of stamps sitting on my desk for a good while now, I won them over at Uniko (thanks again Bev!). Had a little play the other day and this is what I came up with:
I used:
- a white card blank, tent style, cut to 5.75" high x 4.25" wide (to suit the blue mat!)
- a snippet of white card stock, stamped using balloon stamps and accessories from Uniko's 'Balloon Bash' set. Ink pads used were Memento 'Tuxedo Black', 'Paris Dusk' and 'Rhubarb Stalk' - with Brilliance 'Moonlight White' for the stars and 'shaping' on the balloons
- stamped the sentiment using Memento 'Rhubarb Stalk' ink again and a sentiment from Lawn Fawn's 'Hello Sunshine' set
- die cut the image panel using a die from Lil' Inkers 'Stitched Rectangles' set
- a snippet of dark blue card stock, which I know from my swatch is SU's 'Night of Navy', embossed using the largest die from Lil' Inkers 'Stitched Rectangles' set and then trimmed to suit
- then I just layered it all up using Collall All Purpose glue
The Uniko stamp set comes with both straight and curly 'lengths of string' stamps - I obviously used the curly one but flipped it the opposite way round for one balloon - and also made sure it looks as if the two strings are looped round one another.
Di
x
Labels:
challenge,
Die cutting,
general card,
snippets,
SU,
Uniko
Wednesday, 26 August 2015
Less is More - Week 238 - Sketch
Oh I do love this sketch over at this week's Less is More challenge:
It's crisp and clean - and you can flip or rotate it. BUT, dozy mare that I am, I didn't spot the fact there's a sentiment in the bottom right corner until the point at which I'd finished my card(s) and was writing this blog post, sigh :( Then again, quite a few entries haven't followed the sentiment placement and a few of the DT cards haven't followed that either - phew - so maybe it's just optional? Whatever, I'm still hopping over to play as I hate to miss LIM and I totally love this sketch!
This is what I initially made (two the same):
I used:
- 5" x 7" white card blank, tent style
- a slightly smaller white panel
- a cut down to size piece of BoBunny paper from the 'Blitzen' pad. Great to find a use for those papers with an image down in one corner, I can see this sketch being used again with similar paper designs
- a little strip of orange core-dinations card just to break up the junction between patterned and plain
- then stamped the sentiment using SU's 'Tangelo Twist' and a sentiment stamp from Woodware's Clear Magic stamp set -
'Christmas Bubble Tree'
And then whilst everything was out I flipped the sketch and made two more using a different paper from the same pad:
So that's four more for the box, yay!
Di
x
Tuesday, 25 August 2015
Batch baking Christmas cards
I realised that my target of 12 Christmas cards per month might not be hit in August, so had a little bit of a batch baking session. I made six cards, three of each colourway:
I used:
- 4" x 5.5" white card blanks
- pearlescent white 'Centura' card, deep red satin mirri card and gold mirri card for the candles and entwining ribbon - die cut using a Memory Box 'Tall Taper Candle' die (having backed the card with Stick-It adhesive sheet
- plain white card onto which I layered and pieced the candle and entwining ribbon
- deep red satin mirri card and gold mirri card to back the image layer
- layered everything up using Collall All Purpose glue
- to finish off I added a gold peel off sentiment, at that point after what seemed like hours of work, no way was I gonna risk stamping and embossing in gold!
After uploading the photo I noticed that although the 'entwined ribbon' on the left card is gold all the way, the reddish hue in the bottom part of the gold mirri is the reflection of the top I was wearing when I took the photo! Apart from setting up the camera, running out of the room and taking photos remotely it's just something I have to live with I suspect - unless anyone has any easy solutions? Anyone suggesting 'Don't use shiny mirri card' will be immediately sent to stand on the naughty step!! ;)
And, although I do love this die, so much so that I gave one away as a Playground prize back in August last year, there's definitely a knack to using it if you want to fill in the candle and ribbon with die cut pieces. I think it looks really elegant with just the outline, but this time round wanted to experiment a bit.
I've found the same problem it with some other dies too - if you're not careful when assembling the die outline and 'filling in' pieces, the outline could be slightly distorted which ends up causing problems with unwanted overlapping or even gaps.
My way round this was to cut all the pieces I wanted to use, sort out what was what and line them up in little rows. Then, I carefully peeled off about a third of the protective backing from the adhesive which was on the die cut outline, starting from the bottom - and stuck that bottom third onto the card panel I was using. That gave me something of a starting point for the bottom half of the candle and two of the ribbon twists. Then it was just a case of carefully working up the length of the outline, peeling off about a third of the backing again, gently applying the outline and adding in the inserts - and the same for the top third.
By doing the process in stages (OK, so it takes a little bit longer but so worth it!) you're applying the framework of the image bit by bit rather than in one fell swoop where there's much more chance of distortion. Ask me how I know this :)
I just KNEW I'd read thoughts about using this die elsewhere, and just found it over at Cathy's blog. Her solution would work wonderfully well too - especially if you're gluing the pieces in place rather than using the sticky adhesive backing.
I'd like to enter these cards into Rudolph Day for August over at ScrappyMo's, where it's always 'anything goes'.
And of course, I deliberately used gold on the cards so I could play along over at Craftyhazelnut's Christmas Challenge this week (use some gold) - and I'm also entering into Craftyhazelnut's Christmas Challenge Extra for August, where it's also always 'anything goes'.
Di
x
Labels:
challenge,
Christmas cards,
Memory Box,
peel offs,
Rudolph Day
Sunday, 23 August 2015
Pixie's Snippets Playground - Week 191
Another little neighbour had his 2nd birthday during this past week - it's Max's little brother Charlie this time. I'd asked his Mum what Charlie liked, having made the excavator card the other week for Max, and amongst Charlie's favourites things are trains - so a train it was! And this is my snippets card for the week, every single scrap of card came from the snippets folder too:
I used:
- 6" x 6" square white card blank
- a (large) snippet of SU's 'Real Red' card stock
- snippet of 'cloudy sky' backing card, made by Kanban and bought ages ago, stuck over the 'Real Red' layer
- snippet of SU 'Mossy Meadow' card stock, die cut using a Memory Box 'Landscape Border' die, trimmed down to fit and then stuck over the 'cloudy sky' backing card
- snippet of SU 'Certainly Celery' card stock, die cut using a Spellbinders 'A2 Curved Borders One' die, trimmed down to fit and then stuck over the 'Mossy Meadow' layer
- snippets of red and blue card stock and Memory Box 'Tiny Village' die set, which was a present from ScrappyMo, added these to the hillsides
- a snippets strip of dark brown card stock to sit the train on
- snippet of SU 'Real Red', die cut using a Cheery Lynn 'Choo Choo' train die - which was then stuck along the top edge of the brown strip. I was quite concerned that the die cut might not be too easy to remove from the die itself - but it worked like a dream without any need for waxed paper and all the little windows etc. popped out beautifully
- also die cut more of the 'Landscape Border' just to fill in here and there on the 'Certainly Celery' Layer, along with a further little house
- printed 'Happy Birthday Charlie' onto white card stock and just drew and then fussy cut a 'puff of steam' around it
- drew and fussy cut another 'puff of steam' and topped it with a '2' which was die cut from a snippet of SU 'Real Red' card stock using a Memory Box 'Classic Numbers' die
- drew and fussy cut one more small puff of steam - then stuck all three onto the card using thin pieces of sticky pads
And moving swiftly onto this week's picks:
This was immediately going to be a pick of the week, brought to the Playground by Lynn (Jimlynn). A brilliant card, such a cleverly made scene (get the crab's eyes!) - and I love how the darling bear (possibly Parsnip with a suntan!) 'planted' his surf board in the sand :)
But, even just as important is that fact that our much loved Playmate Lynn found the time to make and blog this card. I posted here a little while back that Jim (Lynn's husband) had a stroke and I know that so many of you pitched in to send cards, keep Jim and Lynn in your thoughts and prayers. Well folks, Jim is coming along nicely - certainly out of hospital and I think also home from rehab. Your positive thoughts are still needed please - and even though Lynn is obviously shorter on free time right now to blog hop and comment in return - I bet she'd appreciate a little hello from you. AND, if you do hop over - please peek at this card too - I loved it straight away, but then rolled round laughing at the irony of the sentiment combined with the 'little blue bird of happiness' - I've never seen such a perturbed/disturbed expression on a bird! :) Lynn's sense of humour is still the tops!
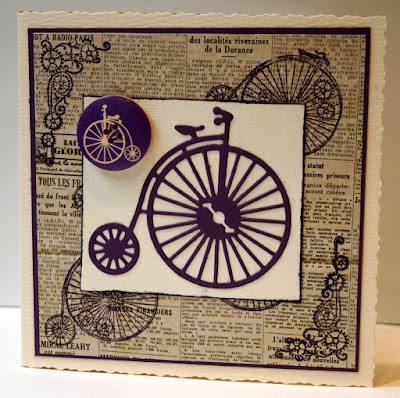
Isn't this a fabulously rich and beautiful card? Made by Greta and I just think it's gorgeous - wonderful gold stamping on the brayered background. Perfection - there's just something so luxurious about it!
Sue J hopped into the Playground three times this week, each time with a potential pick of the week - but I stuck to my original choice in the end. Plenty of snippets and little details such as the 'poinsettias' being made from the alternate background papers really added to this already lovely card - and of course that LOTV image is one of my all-time favourites. I always giggle over the wee angel's dingly, dangly socks hanging from her feet :) Sue is someone else who's been in the wars, now almost recovered from what sounds like spectacular acrobatics over Woody, one of her pooches :(
The next couple of cards were brought to us by Playmates who are regular picks of the week - but there's absolutely no way I want you to miss these makes!
Laurie blew me away with this card, everything about it is just so 'right'. See how the backing paper goes so well with the snippets tree? It's in the Merry Monday challenge link ups too and must be a winner for sure!
Pat is another one of our regular picks, and there was just no way this fantastic Golden Wedding Anniversary card wasn't going to be shown here.The front of the card is acetate, a super idea - and Pat carefully backed the heart etc. so that it looked perfect from the inside as well!
Minions really are taking the World by storm right now - and Mary Anne brought us this really great little chap to show - so clever! I keep thinking I should knuckle down and make a Minions card - there are lots of tutorials out there to follow :)
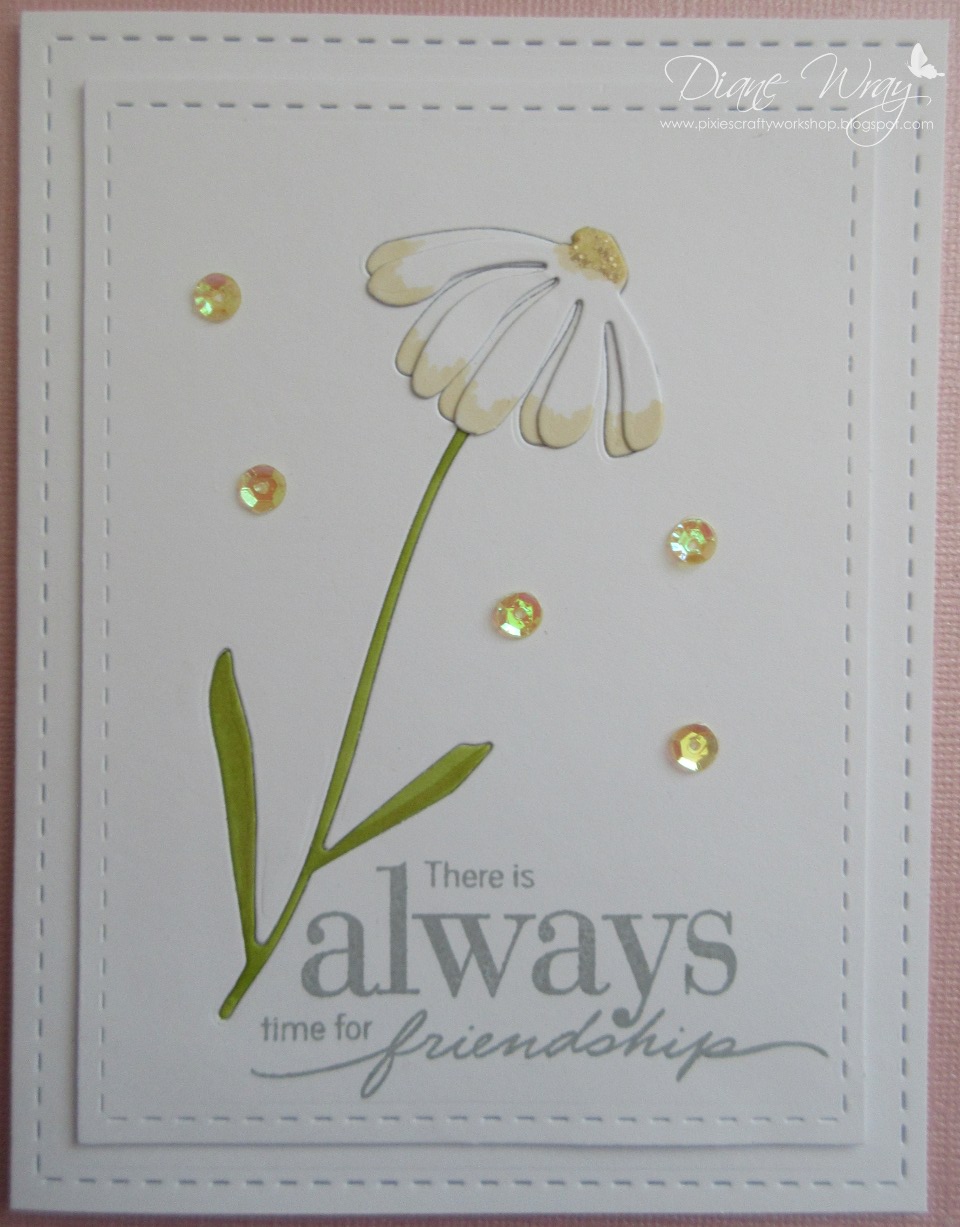
This is such a pretty card, made by April. I love the colours and also the jaunty placement of the top layer. I did grin, April apparently 'pinched' some snippets from a friend for the flowers - I've offered to post her a box full of mine if she likes :)
I just love this card, made by Jean! So wonderful how the colours of the background ribbon and the orange layer are perfectly matched to the colouring of the image and that gorgeous butterfly. Which, has some clever touches added by Jean - nip over and read about the antennae!
Time is zipping by (writing this on Saturday morning), a very generous neighbour who goes fishing called by with some fish for us and I ended up standing chatting to him for quite a while! My fish pie is on the menu this week now - if I remember I'll jot down the way I make it, take a photo and post it on here sometime soon. It's ages since I posted a recipe on the blog! Too busy cooking up a storm with snippets I suspect :)
Best press on with our three new Playmates now, and two of them are the grand children of our Playmates - start 'em young:
These really cute cards were made by ScrAPamondo's nine year old niece - aren't they just adorable? I love the patchwork look to those owls :) And I found out that the little crafter is called Aurora - what a beautiful name!
Nate, who is the grand son of Karen (Hasheck) made this terrific Minion card (told you they're popular!) for his - as yet unborn - new cousin. So talented of Nate to make the card in such a clever shape too! I think, but am not 100% sure, that it's also Karen's first trip into the Playground - hope to see you again soon Karen!
Jenni hopped in waving this totally stunning card - another entry which literally brought me up with a start this week! It's just perfection isn't it?! And you truly have to hop over to Jenni's and read her funny comment after her hubby asked what sort of person would she send a card to with the lifesaver sentiment on. I giggled for ages over it! And, whilst there, do check out her cards - some wonderful inspiration to be found - so we hope you'll be back to play with us regularly Jenni!
Now for the prize draw, the Woodware 'Jigsaw' and 'House' punches if you remember, and I do so wish I had loads of them to give away as many of you thought they would be such fun to win. But, with only one winner, this is who popped out of the Randon Number Generator:
And it just shows how random Mr Random is - Helen only began playing with us at the beginning of August (although she did play when Jules was running the snippets challenge) so a nice quick win there kid! Can you please drop me an email with your address and I'll post the punches off to you this week (di_wray@hotmail.com).
And this coming week's prize is:
Yup, it's linked to my snippets card (as is the case when I can manage it) and this time it's a couple of dies the same as I used for little Charlie's card, a Cheery Lynn 'Choo Choo' train die and also a Memory Box 'Modern Landscape' die (which is so, so useful for many cards - fabulous for Christmas backgrounds of course!).
The Snippets Challenge will run for one week and the Playground gates will close at 11am UK time on Saturday 29th August. The gates will open again at midnight UK time on the same day.
Maximum of three entries and please say in a comment if you wish to play and be a possible winner of the prize. Also, if you already have one of the dies or aren't really interested in winning both of them but still would like to play for just the one - please say so and if your number is picked as the winner then I'll do a second draw for the other die.
However, the prize IS for both items unless I'm told otherwise in a comment. Do remember that you should also link back to the Playground in your blog post to be eligible for the draw.
Mr Linky is below - please let me know if you have any problems linking, it's easy for me to sort out so don't struggle on alone :)
And do remember, it's Rudolph Day this week - starts on Tuesday 25th and runs to the end of the month - over at ScrappyMo's, and there's a lovely Memory Box 'Stitched Holly Leaves' die as a prize. I'll be playing as usual - why not combine a snippets card with a Christmas card for Rudolph Day (whisper, after this one there's only three more until the real thing!).
Di and of course, Parsnip!
x
I used:
- 6" x 6" square white card blank
- a (large) snippet of SU's 'Real Red' card stock
- snippet of 'cloudy sky' backing card, made by Kanban and bought ages ago, stuck over the 'Real Red' layer
- snippet of SU 'Mossy Meadow' card stock, die cut using a Memory Box 'Landscape Border' die, trimmed down to fit and then stuck over the 'cloudy sky' backing card
- snippet of SU 'Certainly Celery' card stock, die cut using a Spellbinders 'A2 Curved Borders One' die, trimmed down to fit and then stuck over the 'Mossy Meadow' layer
- snippets of red and blue card stock and Memory Box 'Tiny Village' die set, which was a present from ScrappyMo, added these to the hillsides
- a snippets strip of dark brown card stock to sit the train on
- snippet of SU 'Real Red', die cut using a Cheery Lynn 'Choo Choo' train die - which was then stuck along the top edge of the brown strip. I was quite concerned that the die cut might not be too easy to remove from the die itself - but it worked like a dream without any need for waxed paper and all the little windows etc. popped out beautifully
- also die cut more of the 'Landscape Border' just to fill in here and there on the 'Certainly Celery' Layer, along with a further little house
- printed 'Happy Birthday Charlie' onto white card stock and just drew and then fussy cut a 'puff of steam' around it
- drew and fussy cut another 'puff of steam' and topped it with a '2' which was die cut from a snippet of SU 'Real Red' card stock using a Memory Box 'Classic Numbers' die
- drew and fussy cut one more small puff of steam - then stuck all three onto the card using thin pieces of sticky pads
And moving swiftly onto this week's picks:
But, even just as important is that fact that our much loved Playmate Lynn found the time to make and blog this card. I posted here a little while back that Jim (Lynn's husband) had a stroke and I know that so many of you pitched in to send cards, keep Jim and Lynn in your thoughts and prayers. Well folks, Jim is coming along nicely - certainly out of hospital and I think also home from rehab. Your positive thoughts are still needed please - and even though Lynn is obviously shorter on free time right now to blog hop and comment in return - I bet she'd appreciate a little hello from you. AND, if you do hop over - please peek at this card too - I loved it straight away, but then rolled round laughing at the irony of the sentiment combined with the 'little blue bird of happiness' - I've never seen such a perturbed/disturbed expression on a bird! :) Lynn's sense of humour is still the tops!


The next couple of cards were brought to us by Playmates who are regular picks of the week - but there's absolutely no way I want you to miss these makes!

Time is zipping by (writing this on Saturday morning), a very generous neighbour who goes fishing called by with some fish for us and I ended up standing chatting to him for quite a while! My fish pie is on the menu this week now - if I remember I'll jot down the way I make it, take a photo and post it on here sometime soon. It's ages since I posted a recipe on the blog! Too busy cooking up a storm with snippets I suspect :)
Best press on with our three new Playmates now, and two of them are the grand children of our Playmates - start 'em young:
Now for the prize draw, the Woodware 'Jigsaw' and 'House' punches if you remember, and I do so wish I had loads of them to give away as many of you thought they would be such fun to win. But, with only one winner, this is who popped out of the Randon Number Generator:
And this coming week's prize is:
Yup, it's linked to my snippets card (as is the case when I can manage it) and this time it's a couple of dies the same as I used for little Charlie's card, a Cheery Lynn 'Choo Choo' train die and also a Memory Box 'Modern Landscape' die (which is so, so useful for many cards - fabulous for Christmas backgrounds of course!).
The Snippets Challenge will run for one week and the Playground gates will close at 11am UK time on Saturday 29th August. The gates will open again at midnight UK time on the same day.
Maximum of three entries and please say in a comment if you wish to play and be a possible winner of the prize. Also, if you already have one of the dies or aren't really interested in winning both of them but still would like to play for just the one - please say so and if your number is picked as the winner then I'll do a second draw for the other die.
However, the prize IS for both items unless I'm told otherwise in a comment. Do remember that you should also link back to the Playground in your blog post to be eligible for the draw.
Mr Linky is below - please let me know if you have any problems linking, it's easy for me to sort out so don't struggle on alone :)
And do remember, it's Rudolph Day this week - starts on Tuesday 25th and runs to the end of the month - over at ScrappyMo's, and there's a lovely Memory Box 'Stitched Holly Leaves' die as a prize. I'll be playing as usual - why not combine a snippets card with a Christmas card for Rudolph Day (whisper, after this one there's only three more until the real thing!).
Di and of course, Parsnip!
x
Subscribe to:
Posts (Atom)
