Friday, 10 June 2016

Horace and Doris

We have two regular little visitors to the hedgehog feeding station, a 'dinner date' every single night :)

The other week, Len managed to catch them with this photo:
I just LOVE that one of them is peering right at Len, apparently it was very curious and not in the least bit shy. So sweet how it has its paw up on the raised paving stone as if to say 'Where's the knife and fork then?'. And, if you look closely, you can see the very tip of its little pink tongue as well. That's what I CALL cute :)

I'd like to play over at Annie's 'Friday Smiles' - why not come along?

Psst, we've been away as said, but it was a lovely break in Germany - and no real outside camping involved. More on Sunday's Snippets :)

Di
x

Wednesday, 8 June 2016

Male Birthday card panic!

Last minute I realised I need a card for a Birthday to post before we headed off on our 'camping trip'/my 'teacher training'. I lost the plot, muse, mojo will to live! And ended up making a really simple card, I'm not proud of it but it did save the day!
I used:

- 4" x 5.75" off white card blank

- piece of SU's 'Night of Navy' card stock as a backing layer, just a smidgen smaller than the card front

- a pre-stamped image I found in my 'bits box', it's SU's 'Sail Away' boat, and a real favourite of mine. Not sure which ink pad was used to stamp the image, but I die cut it using a die from the Tonic Studio's 'Circle Layering' dies set. Then ran a ball tipped tool around the edge before removing it from the die to add definition

- glued the image in place

- added a silver sentiment banner bought eons ago from Lakeland Ltd

Ran out to post box and then breathed a HUGE sigh of relief!

Di
x

Tuesday, 7 June 2016

Cuttlebug Mania Challenge - 'Wedding'

It's time again for a new fortnightly challenge over at Cuttlebug Mania - and the theme is 'Wedding', just make sure you include die cutting and/or dry embossing.

You do have to use a manual die cutting/embossing machine for Cuttlebug Mania entries (it doesn't need to be a Cuttlebug but it must be manual, not electronic). And, you can't mix the two, it must be all manual please. Then make your entry, link into the challenge, link to the challenge in your own blog post and and make sure that you also say what products you used for any die cutting/embossing.

Details of our sponsor can be found over on the Cuttlebug Challenge blog.

I had an unused Clearly Besotted stamp set and co-ordinating die waiting patiently to have a first outing. I also wanted to try out white embossing and then colouring onto kraft or Neenah card. Time to play ............... and this is the card I made, a bit different to the traditional white background:
I used:

- 4.25" x 5.5" card blank, cut from Neenah 'Desert Storm' card stock with the opening on the short side as a change from tent style 

- next I used the largest die in Lil' Inkers 'Stitched Rectangles' set to cut the stitched border on the card front itself 

- the stamp and set I used for the whole of this card is by Clearly Besotted, called 'Fairytale Ending' . It comes with the flower spray (plus a matching die is available) as well as the words 'Mr & Mrs' as well as the 'And they lived happily ever after' sentiment I used on my card. The Mr & Mrs stamps are three little ones, separate to one another so I guess you could make cards for same sex marriage celebrations - and of course the flower spray would be lovely for loads of other occasions

- stamped the sentiment onto another piece of Neenah card using VersaMark and then heat embossed it using Stamp n Stuff 'Detail white' embossing powder

- die cut it using the next size down in the 'stitched rectangles' die set and glued it in place on the card front

- stamped and embossed the flower spray onto another piece of Neenah 'Desert Storm' card stock and then coloured it using Faber Castell Polychromos pencils. I always do a try out before using Sansodor blending solution, to check how it reacts with the colours and also the card stock. Sho' nuff - it worked beautifully on the greens but would have turned the pinks 'muddy' so I left the flowers and buds as they were

- then die cut the flower spray using the co-ordinating die - it lined up beautifully without having to die cut a template - and stuck the spray onto the card front using slivers of thin sticky pads

- then just tickled the leaves and flowers with clear Wink of Stella, which does give a lovely soft shimmer in real life

- final touch, three iridescent white sequins, glued in place using Glossy Accents

I knew there was every chance I'd stamp the sentiment 'on the wonk' even using the Misti - so I stamped it first onto a slightly larger piece of Neenah card before die cutting the layer using a stitched rectangle die.

Edit: As always, I'd first spotted this wonderful stamp set and matching die over on a Playmate's blog - it was 'our Janice' - over here!
 
We'd love to see you over at Cuttlebug Mania, it's a great theme with plenty of scope. The challenge runs for two weeks and it's June, the traditional month for a lot of Weddings.

I'd like to enter this card into the CAS Mix Up June Card Challenge (my first time playing over at this fun challenge). The theme this month is 'stamping + die-cuts + my own choice of heat embossing'. Happy dance here as I've wanted to join in right from the beginning back in March :)

Di
x

Sunday, 5 June 2016

Pixie's Snippets Playground - Week 232

This is a scheduled post with my snippets card, a new Mr Linky for the coming week - and a new prize for the coming week as well.

As already said last week, I'm at 'teacher training' right now and will be doing a grand 'peek at the picks' round-up of last week (and this coming week) next Sunday, 12th June. At the same time, I'll also do the prize draws for last week and this coming week, so next week will be a bit of a bumper post!

I'll be around well before then but thought it best to keep to the routine of publishing the Playground results on a Sunday. Please note though, there's a new Mr Linky today and also a fresh prize to be won - so I hope you will find time to come and play on the swings. Parsnip is in charge and for a token fee is prepared to give you a push as well as turn a blind eye to any hooch etc. As Lynn (Linby) rightly said the other week - he really is a mercenary little bear! Which reminds me, I caught a few minutes of Lynn on Hochanda TV on Thursday and she's a blinkin' natural! Well done Lynn :)

So, here's my snippets card:
I used:

- 5.75" x 5.75" square white card blank, tent style

- patterned backing paper from LOTV's 'Up,Up and Away' paper pad, I cut into a fresh sheet for that layer - whimper! Trimmed it to just a smidgen smaller than the card front but didn't glue it in place just yet

- next I used a snippet strip of bright pink card to make a slightly wider band for across the centre of the main patterned sheet and punched one edge using a Martha Stewart 'Cherish' punch before gluing a snippet strip of gingham patterned paper across the band

- then I glued the band in place across the patterned paper and trimmed it flush at either side once dry, just using scissors and cutting from the back to ensure a straight edge. Only then did I glue the whole panel onto the card front

- next I die cut the 'Love' word using a snippet of bright pink card and an Impressions Obsession's 'Love' die

- that gave me a guide for whereabouts on the snippet of the clouds backing paper I needed to stamp the image - which I stamped using Ranger 'Archival Black' ink and an Impression Obsession stamp called 'Girl Swinging'. That cloud paper is so precious now that LOTV no longer produce paper pads, I wasn't gonna take any chances!

- then trimmed the cloud/image layer and stuck the 'Love' die cut along the top and the left hand side

- stuck the image layer onto a backing of bright pink card and added it to the card front using thin sticky pads. Probably stating the obvious here but when doing this, if you have a thicker layer such as the punched band I have across the card, make sure you don't add sticky pads where they will sit on the slightly raised layer, otherwise your image could look a bit 'bulged'

- added three round black Josy Rose nail heads to the image panel and bright pink round and heart shaped Josy Rose nail heads at opposite corners of the card front

I really love this stamp, it sums up the Playground perfectly and is very likely to feature on some of the little cards I enclose with prizes. Best to whisper that really as Parsnip is likely to be a touch sensitive if he feels he's been supplanted in any way!

And the 'Love' die is likely to be a favourite here too, I really do love it! I've seen the girl swinging stamp used with trees and branches but (partly as I wanted this week's prize to have two items in it) I thought the little girl swinging underneath the heart shaped letter 'O' would fit nicely - as if she's swinging from it :)

Quelle surprise! This week's prize is, as usual, linked to my snippets make - it's an Impression Obsession 'Girl Swinging' wood mounted stamp and an Impression Obsession 'Love' die - just like I used above:

The Snippets Challenge will run for one week as usual and the Playground gates will close at 11am UK time on Saturday 11th June. The gates will open again at midnight UK time on the same day.

A maximum of ONE entry and please say in a comment if you wish to play and be a possible winner of the prize. If you're only interested in either the stamp or the die then please feel free to say so and if you win I'd do a further draw for whichever item you don't want. Please also link back to the Playground in your blog post to be eligible for the draw.

Mr Linky is below - please let me know if you have any problems linking, it's easy for me to sort out so don't struggle on alone :)

Wishing you all a lovely week, I hope you haven't run too wild and I'll be around to see your entries very soon!

Di and, of course, Parsnip the 'Super Hero', guarding things for me - as well as selling Linby's autograph on the sly!!

x

Friday, 3 June 2016

Take your carrot medicine!

The other week a neighbour was whipped into hospital, with what turned out to be appendicitis. Once she was back home to recuperate from surgery, we gave her this card:
I used:

- 4.25" x 5.5" white card blank

- more of the same white card for a slightly smaller layer on the card front, embossed using Cuttlebug's 'Swiss Dots' folder

- the image is a pre-coloured LOTV one, bought ages ago. Die cut using a Spellbinders Nesties square die with each corner rounded using a Woodware rounder punch

- then I found the perfectly matching colour card to the light purple bunch of grapes in the snippets folder and die cut a scalloped square using a Spellbinders Nestie from the 'Lacey Square' set and glued the image to it

- next I used a stamp from the Paper Smooches 'Sentiment Sampler' set to stamp onto white card using a Memento 'Elderberry' dye ink pad

- die cut a purple frame using Impression Obsession's 'Rectangle 6-in-1' frame die (I'd already established that the sentiment and frame would fit one another of course), trimmed the sentiment and glued it behind the frame

- then it was just a case of making sure I positioned the topper and the sentiment correctly onto the card front, using thin sticky pads. Having the lines of embossed dots as a guide was a huge help :)

- and I gave the grapes and the spoon a very light tickle of clear Wink of Stella

When the in-house critic saw this he really liked it a lot, then said - 'but why is the letter 't' upside down?'. Try explaining 'funky fonts' to a non-crafting fella! Of course, it then started to bother me as well :)

Isn't it the way. I'd just given a box of 90 assorted cards to a local care home for the residents to use - and had almost cleaned myself out of finished cards here. Bit of a scramble to make this one - that'll larn me!

Di
x

Wednesday, 1 June 2016

Tell your story

Back to the Crazy Birds here, keeping my promise to use them as they're already coloured, die cut and ready to go. This is the card I made:
I used:

- 6" x 6" cream card blank

- black card as the first layer, then topped that with a trimmed down piece of DP from MME's 'Blush' paper pad with the caged bird as part of the design - using Collall All Purpose glue

- stamped the sentiments using a Memento 'Tuxedo Black' ink pad and the Tim Holtz 'Simple Sayings' set, snipped them apart and ran a black Whispers marker round the edges. I picked the words 'cos I think the Crazy Bird is looking longingly at the birdie in the cage with a view to adding a new friend to his circle :)

- fiddled around working out where things should go before then gluing them in place using Collall glue

- I added Glossy Accents to the eye after this photo was taken but saw little point in retaking another shot :)

I wonder if the caged birdie will 'sing like a canary' and spill the beans! 

Di
x

Tuesday, 31 May 2016

Aperture and apricot card

Apricot card stock is rare as hens' teeth here but I found a paper pad with apricot/peach papers in so went with those, and came up with this (it was such a sunny day when I took the photo that the colours look paler than they are in real life):

I used:

- 6" x 6" square cream card blank

- covered the front of the card with a slightly trimmed sheet from Wild Rose Studio's 'Peach Blossom' paper pack and then die cut the centre aperture using a Spellbinders round Nestie

- using the same sized round die plus a compatible scalloped round Nestie die cut the pale green scrolled patterned frame to go around the aperture and glued it in place

- added a script patterned sheet of paper from the same paper pad to the inside of the card

- then stamped the sentiment onto a scrolled patterned sheet of paper from the same paper pack using a VersaFine ink pad and an Inkylicious stamp called 'Thank You Calligraphy'

-  die cut the sentiment panel using the same plain round die as before and glued it in place behind the aperture. Easiest way to do this is to close the card front then apply the circle through the die cut hole to ensure it sits perfectly behind the aperture

- cut another pale green scrolled patterned frame to go around the circle and glued it in place, to echo the front of the card

- die cut a plain cream butterfly using a solid Memory Box butterfly die called 'Isabella', then topped it with a lacy cream matching butterfly which was cut using Memory Box's 'Pippi' die (using snippet backed with Stick It adhesive sheet)

- then die cut two 'Pippi' butterflies from snippets of Stick It backed leftover apricot and green paper and then inlaid pieces into the butterfly  (that was my moment of crafting madness as it took ages, I really should have listened to what Lindsey said about her using the same technique on a card I featured in the Playground the other week). You live and learn :)

- layered the butterfly's body twice to add dimension and then stuck that in place before adding the butterfly to the edge of the aperture

For what I thought would be a quick card, this took much longer than I thought - but it was good fun to make!

Di 
x

Sunday, 29 May 2016

Pixie's Snippets Playground - Week 231

So, here we are once again - all ready to play! The sun is shining and maybe, just maybe Summer is peeking round the corner at us.

Here's my snippets card for this week:
I used:

- 4.25" x 5.5" cream card blank

- patterned backing paper from a Kaisercraft 'Sweet Pea' paper collection, which was free with Quick Cards Made Easy magazine a couple of years ago. Cut to just an eighth of an inch smaller all round than the card blank and then glued in place

- snippets of deep peach and cream card stock, backed with Stick It adhesive sheet then die cut using a Frantic Stamper 'Good Friends Daisy Frame' die set

- stuck all the pieces in place then added Tim Holtz Stickles in 'Peeled Paint' to the centre of the daisy just to pick up the green in the patterned paper

Needless to say, the card isn't quite so pale looking in real life.

I love this die set and next time will use the inlay technique as am sure it would look really great. Plus, the frame could be used alone with a sentiment stamped inside - and of course the words, either 'Good Friends' or just 'Friends' could be used without the frame. Very versatile!

Time for this week's 'peek at the picks':
Two reasons for showing you this gorgeous card, made by Lynn (Linby). First of all - what a super way to use the left over pieces from die cutting. Shame on me for usually just sweeping mine into the waste bin :( A lovely design and perfectly topped off by the gorgeous flowers.

The second reason for showing you is really exciting. This coming  Thursday (at 11am and 3pm), Lynn will be on our TV screens, doing demos for Ooh la la Creations on Hochanda. It's a UK craft channel (for our overseas playmates who might not know). You can read more about it HERE on Lynn's blog. Wishing you all the luck in the world Lynn! Parsnip will be available everyone, selling Lynn's autographs behind the bicycle shed now that we've evicted Sarn!

As some of you might already know, due to a prolonged 'frozen shoulder', our Sarn is stepping back a bit from blogging and won't even be playing with us in the Playground :( We'll miss you loads Sarn and hope so much that things improve rapidly for you - these wretched computers have a lot to answer for!

I defy you not to giggle at this glorious card, made by Carol L. If you look really closely, that little chap has been partying a bit too much and even has bloodshot eyeballs! Isn't the card sunny - and such a great way to use up snippets too!

And another animal card, this time made by Jacky (Paddington Fan). It's hilarious I think - and the funky font sentiment and little music notes are just perfect touches! As for the puddy tat - I can see him ending up with a boot lobbed at him out of a bedroom window if he tries that one during the night!

I totally love this golfing card, made by Janice! Such a clever scene and beautifully made. Every little bit of detail is just perfection don't you think. And, to whet your appetite, before too long we have this very same die set up as a prize in the Playground - just as soon as I find time to make my own snippets card using it. It won't be a patch on Janice's card - but there's such a useful link over at Janice's blog showing exactly how she made this card. Lots of tips to be found there!

Wowser, what a stunning card this is, made by Sally. Such a wonderful scene (Sally is amongst the very best with her brayer!) and for me the real icing on the cake are the white pen highlights on the elephants and tree. It's often the little details that make such a difference! And using the black snippet to define the top and bottom of the image - so clever.

Sandra (Sandma) hopped in with this fabulous 94th Birthday card, made for an Aunt. It's just stunning, so pretty and very personal as well. It's plain to see that a lot of love and care went into this beauty!

I love this card, made by Sandra H! Such a lovely image and a really dramatic monochrome look too. Happy dance here as this is the first time for a long while since Sandra linked in as she's been taking a break from blogging since her beloved husband Dennis passed away last year. Welcome back Sandra - we missed you loads and it's wonderful to see you dipping your toe back in the water again. Huge hugs from all of us!

And I'm afraid I have to stop there for this week, as always I could add loads more picks but (a bit like Sarn) sitting at a keyboard isn't the best of things to do when you're trying to avoid aches and pains. And, the previous thumbnails are always there for you to hop back and check out at your leisure of course.

Now for the prize draw, for the Little Claire's dogs and cats sets of stamps plus the fabulous Anna Griffin set of stamps so kindly donated by Mary Anne. And the winner is:
 
Pen started playing with us in mid-February and this is her first win. Delighted for you Pen and hope you feel the same. I don't have your snail mail address so could you please drop me an email (my address is on the right-hand sidebar) and I'll post your prize off to you this week. The sooner I can post it the better so I hope you see this blog post with you as the winner soon!

I thought this might be the week the prize was split, but it wasn't to be - have to say that the comments were in favour of 'winner takes all', but you all had the same odds of winning one or more of the stamps of course!

This coming week's prize is your very own Frantic Stamper 'Good Friends Daisy Frame' die set, just like the one I used for my snippets card of course. Also, I'm adding in a Woodware 'adhesive eraser'. I have one of these and find it's really good at picking up any stray bits of glue or tape adhesive. It doesn't work on Glossy Accents unfortunately :) I added it into a recent craft purchase so I didn't have to pay postage and thought I'd pop it into the pot for this week as part of the prize:

The Snippets Challenge will run for one week and the Playground gates will close at 11am UK time on Saturday 4th June. The gates will open again at midnight UK time on the same day.

Here's a little 'heads up' and take notice girls. I have a long weekend off for 'teacher's training' planned so you may well notice that my comments will drop off from the end of this week. I plan to be learning how to put up and also fold down  a pop-up tent without rolling on the ground laughing and trying not to wet myself in the process! That means that I'll be embroiled in said tent when I really should be doing the weekly picks and also the draw for the week.

In view of our lovely and very supportive pal Sarn's need to rest (thankfully it also means less empties to gather up!), I can't be in two places at once.

So this is the drill, the week will run as usual and let me know if you hit problems linking although some of the time I will be out of touch (bum in the air and trying to light the camping stove no doubt!). The Playground will close as usual on Saturday at 11am - by then I expect to be frying bacon and eggs over the camping stove - having eaten leftover sandwiches the night before whilst reading the camping stove instructions by torchlight until I sort of 'got a grip'.

It also means as I said, there will be a scheduled 'new week' with my snippets card, a new Mr Linky and of course prize(s) to be won from Sunday 5th June - but, I won't be publishing the weekly picks and prize draw until the following Sunday (12th June). 

A maximum of ONE entry and please say in a comment if you wish to play and be a possible winner of the prize. If you only wish to try for the die set or the adhesive eraser, just say so in a comment and if you win then I'll do a second draw for whatever it is you don't want. Please also link back to the Playground in your blog post to be eligible for the draw.

Mr Linky is below - please let me know if you have any problems linking, it's easy for me to sort out so don't struggle on alone :)

Wishing you all a lovely week, with more sunshine, and I hope to see you in the Playground.

Psssst: Some of you seem to think I'll really be going camping. Not a chance with my back, I like my home comforts too much!

Di and, of course, Parsnip
x

Friday, 27 May 2016

Rudolph Days - May 2016

Time for Rudolph Days over at ScrappyMo's - it runs until the end of the month remember!

I needed to play catch up with my Christmas card numbers so opted for ultra-CAS this month:
I used:

- 4.25" x 4.75" white card blank, tent style - made to measure around the red mat and topper :)

- a red mat just slightly smaller than the card front, cut from SU's 'Real Red' card stock, glued onto the card front

- I found the snowmen panel already embossed, languishing in a box of Christmas bits and bobs here. I know the embossing folder used was Crafts-Too's 'Snowmen' and it was just a case of trimming off the excess surround

- rootled around to find a suitable sentiment of a size to fit in between the embossed stars and also using a quite funky font. Success! I stamped 'Be jolly' using Memento 'Tuxedo Black' ink and a stamp from Paper Smooches 'Christmas Sampler' sentiments set

- then it was just a matter of gluing the embossed panel in place and resisting the urge to add any colour or sparkle to the snowmen lest I ruin it!

I found four of these ready-embossed snowmen panels, which was a stroke of luck, so I made four identical cards of course. I think I embossed the little chaps when on a Cuttlebug play day at Art of Crafts, years ago! I certainly don't have the embossing folder here so either took the opportunity to use the shop's own goodies which were out for us to play with, or subsequently gave the folder away.

I'd like to enter this card into Craftyhazelnut's Christmas Challenge (Anything Goes or Cute this week), and also Craftyhazelnut's Christmas Challenge Extra for May (always Anything Goes).

Di
x

Wednesday, 25 May 2016

Happy Birthday Super Hero

A couple of weeks ago I realised that a little neighbour's 7th Birthday wasn't too far off, so my in-house critic asked his Dad what his favourite 'things of the moment' were. Last year it was Spiderman, which was a challenge in itself - this year it's the Avengers film! Talk about a challenge and a half - one of those times you wish you never asked a question :(

Anyhow, I poodled around the internet looking for free downloads and, after truly spending almost a full day on it, this is the card I ended up with. The image governed the card from the word go and there was an awful lot of compromising along the way. Not least as the in-house critic kept on throwing in suggestions:
I used:

- 5" x 7" white card blank, tent style

- backing layer of silver card stock, trimmed to just slightly less than the size of the card front and glued in place

- then a slightly smaller layer of SU's 'Raspberry Ripple' card, trimmed to slightly smaller than the silver layer and glued in place

- the image was trimmed and mounted onto a backing of silver card - then kept to one side as I fiddle-faddled around with the rest of the card

- using snippets of silver card, backed with Stick-It adhesive sheet I cut the letters for the 'Taylor' panel using the Tattered Lace 'Anniversary - Classic' set of dies

- then the words were constructed onto a snippet of 'Raspberry Ripple' card and backed with a snippet of silver card. Tip for positioning letters when you don't want to risk using faint pencil lines, especially when the card itself is dark anyhow - use a strip of removable tape as a guide. I use the almost clear stuff but it's good enough to still see where you're going - and I've learnt the hard way over time to always press it onto whatever trousers or top I'm wearing first, just to get rid of any excess sticky - even removable tape can rip some card stock :(

- die cut the 'Happy Birthday' from silver card, again backed with Stick-It, using a new die by Paper Smooches called 'Birthday Words'

- then cut a number seven using a left over snippet of sticky backed silver card

- glued everything in place and just felt there were some gaps to fill so out came the box of confetti and sequins and I just added three silver stars to finish off

Almost went into total meltdown when I realised that the two stars on the 'Taylor' panel were just slightly out of alignment with one another and I'd stuck them in place using Glossy Accents so absolutely no hope of re-positioning them :( Isn't it always the way, if you're gonna do a boo-boo then you'll do it right at the last knockings! I know it's just a fraction, but it might as well have been a mile at that point in what had been a looooooooooong day!

The Paper Smooches 'Birthday Words' die set was 'enabled' by Jules when she used it on a card the other week. She used it 'inlaid' - which I actually think is more effective but I'm not unhappy with the way I used it. It comes with the Happy Birthday words plus two other celebratory words - and of course when I nipped off to buy one set, a second one fell into the basket for the Playground toy box so watch this space at some point in the future :)

Jane W made a really interesting point recently. With dies becoming more and more intricate we're almost creating our own peel offs when we back card with adhesive sheet and then cut fiddly dies. It look like Little Claire have twigged this and apparently they've got some really great peel offs in stock - who knows, perhaps peel offs are due to return into favour. Hop over to Jane's to see what I mean - HERE.

As it's another very important 7th Birthday this week, I'd like to enter this into the current 7th Birthday celebratory challenge over at Allsorts. Well done to Brenda and the team for all your hard work and wonderful inspiration!

And - I'm pleased to report that little Taylor was delighted with his card! He must have wonky eyes like me :)

Di 
x

Tuesday, 24 May 2016

Cuttlebug Mania Challenge - 'Embossing'

Time for another fortnightly challenge over at Cuttlebug Mania - and this time the theme is 'Embossing' - either using an embossing folder or embossing using a die.

You do have to use a manual die cutting/embossing machine for Cuttlebug Mania entries (it doesn't need to be a Cuttlebug but it must be manual, not electronic). And, you can't mix the two, it must be all manual please. Then make your entry, link into the challenge, link to the challenge in your own blog post and and make sure that you also say what products you used for any die cutting/embossing.

Details of our sponsor can be found over on the Cuttlebug Challenge blog and this is the card I made:
I used:

- 4.25" x 6" white card blank 

- piece of white card, embossed using Sizzix folder called 'Corner, flower vine' and trimmed to about an eighth of an inch smaller all round than the card front 

- the next step was to add the sentiment, using the MFT 'You were meant to sparkle' set and SU's 'Smoky Slate' ink pad, having worked out the placement of the flamingo.

- glued the embossed panel to the card front

- out came the snippets folder and I used two shades of pink, grey and black card stock snippets - all backed with Stick-It adhesive sheet - to die cut the flamingo using MFT's 'Flamingos' die set

- then the flamingo was assembled straight onto the card front

- final touch, five sparkly sequins, glued in place using Glossy Accents

We'd love to see you over at Cuttlebug Mania, it's a great theme with plenty of scope. The challenge runs for two weeks so you have plenty of time to have a think, make something and then come and play :)

Di
x

Sunday, 22 May 2016

Pixie's Snippets Playground - Week 230

We've had some lovely weather this week and the Playground is full of activity with birdies nesting and Spike visiting each night to play football with his feeding bowl :) Having said that, today (Saturday as I write this) is just a tad wet!

Let's go straight to my snippets cards for today - note the use of plural! First card:
I used:

- 6" x 6" square white card blank

- snippets of patterned paper from LOTV's 'Country Gent' paper pad, die cut using a square Spellbinders die (approx. one and three eights of an inch across) - four squares from each snippet

- then they were glued in place onto the front of the card blank. By a stroke of luck my calculations were right and they fitted perfectly but the contingency plan was that I started gluing the squares in the top left corner and worked across and down towards open edges. That way, if the spacing ended up with too much white at the right hand side or along the bottom, I could give the card blank a swift trim

- next I stamped the image using a Memento 'Tuxedo Black' ink pad and a Little Claire stamp called 'We Six Dogs'. Coloured the image using Faber Castell Polychromos pencils and Sansodor blending fluid - I chose the papers first deliberately so I could try to match the pooches up :)

- die cut the image using a Lil'Inkers 'Stitched Rectangle' die and popped it onto a plain brown snippet from the same LOTV paper pad then glued it onto the card front

I'd like to enter this card into the current challenge over at Cardz 4 Guyz #120 where the current theme is 'Man's Best Friend'.

My second snippets card is for cat lovers:
I used:
- 4.25" x 5.5" white card blank

- snippet of white card, embossed using SU's 'Square Lattice' embossing folder, trimmed to slightly smaller than the card front and glued in place with Collall all purpose glue

- the image was stamped using a Memento 'Tuxedo Black' ink pad and a Little Claire stamp called 'Hello Cats'. Coloured the image using Faber Castell Polychromos pencils and Sansodor blending fluid then just trimmed it all round

- popped the image onto a snippet of light turquoise card (same colour as the balloons) then glued it onto the card front

Time for this week's 'peek at the picks':
Alice made this absolutely fabulous vintage styled 'jar' which will hold a packet of chocolates - using so many wonderful elements, including what I picked up as a tumble dryer sheet for the rose leaves! I can see from the comments left since I first popped this on my list of picks that many of you also love it - what a clever crafter!

Mo hopped over with this really sunny card - it's so pretty and I love it. Really great idea to wrap the organza ribbon across the image. And I also picked up that the plain yellow mat behind the white stamped image layer provided all the yellow flowers and the scalloped circle behind the sentiment. Impressive way to get the most out of one piece of card where the gaps would be hidden anyhow!

Do remember that it's Rudolph Days over at Mo's, starting on Wednesday until the end of the month!

This is such a sweet baby card, and another example of loads of pretty elements being perfectly added to compliment the really cute and beautifully coloured image - made by Karen P.

Brenda always makes such fabulous cards, and this is no exception is it? It really is like looking into fairyland :) 

Gosh, I totally adore this card, made by Heather. Lots of tips and hints over at Heather's blog about the making of this beauty as well! I did get the 'wibble-wobbles' when I read that Heather used her craft knife to cut out the centre of the frame - lil' ole me and knives don't get on, let alone super sharp craft knives!

Just had to include this terrific card, made by Sue S! It's such a great design and the 'pièce de résistance' is the fabulous 'pleated skirt fold'. As Sue says, there are plenty of tutorials to be found on line and I'm certainly gonna have a go!

This is my last pick of the week, made by Meena. It's a mixed media canvas and the detail is just stunning! So many techniques and different layers - the dress alone is an absolute work of art, constructed totally with 'bits and bobs'. It's all the more impressive as Meena is unable to sit at a regular desk and craft, yet she produces amazing work! I wonder in my comment how long it took her - four days was the reply. To be honest, I'd take more like four weeks and am so aware of all the love and effort that went into this canvas. Meena, you get a big gold star this week!

Guess what, we had no new Playmates this week - although 56 of you came to play, which is pretty amazing! I love that you return to play and also that you are so kind and supportive to one another as well.

Now for the prize draw, for the really popular 'Eline's Elephant' die set and the 'New Baby' word dies. And the winner is:
 
Well done Lesley! It's almost six months since your last win so this was about due I think! I still have your snail mail address and will post the dies off to you this coming week :)

This coming week's prize is made up of a little selection of stamps - it's the Little Claire's Designs 'We Six Dogs' and 'Hello Cats' stamps, the same as I used for my snippets card:

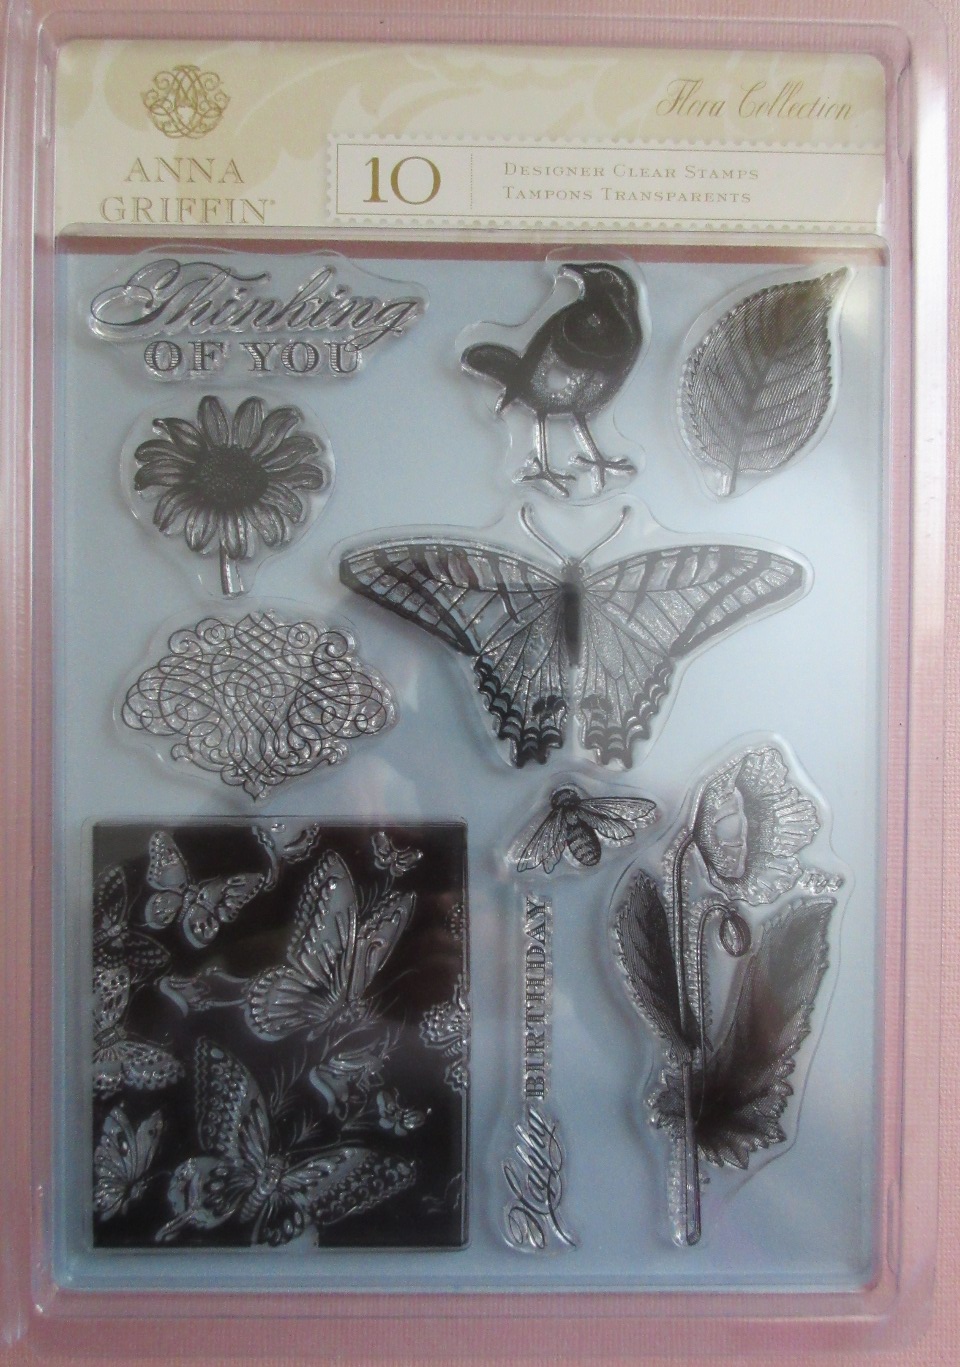
Plus, an absolutely gorgeous Anna Griffin 'Flora Collection' stamp set, kindly donated by Mary Anne - thank you again! The set even has a beautiful poppy in it :)

Now, those of you who use Little Claire's Designs stamps will know that they don't go overboard on fancy packaging, but the stamps really are excellent quality. And interestingly, I could be wrong, but having bought these some while ago for the toy box they are larger than the 'dinkie' size they now produce. I think they reduced the stamp sizes in December 2015 and these cuties have been here longer than that :)  Anyhow, as I didn't have my own Anna Griffin set to use for my snippets make this week, I thought I'd add the Little Claire's 'critters' in as well. You are very welcome to play for all three stamp sets as one prize if your number is drawn - the choice is yours.
  
The Snippets Challenge will run for one week and the Playground gates will close at 11am UK time on Saturday 28th May. The gates will open again at midnight UK time on the same day.

A maximum of ONE entry and please say in a comment if you wish to play and be a possible winner of the prize. If you only want to play for one or two of the stamp sets, just say so in your comment and if you win then I'll do a further draw for the other item(s). Please also link back to the Playground in your blog post to be eligible for the draw.
Mr Linky is below - please let me know if you have any problems linking, it's easy for me to sort out so don't struggle on alone :)

Wishing you all a lovely week, with more sunshine, and I hope to see you in the Playground. I read on line earlier today (Saturday) that the UK is due to have a three month long heatwave from June to August. Hotter than the scorcher of 1976 apparently - I was peeping out of my pram back then and thought it was a bit on the warm side, wink. But, IF the weather folk are right (which I doubt anyhow) - can you imagine how we'll fare over here? We are so not geared up for extreme temperatures! I'd better break the news to Heath Robinson and see what mad cooling systems/schemes he can dream up :) 

Di and, of course, Parsnip
x

Friday, 20 May 2016

Happy birthday- one of a kind

Shame on me, just over four months ago I coloured and die cut a load of Tim Holtz 'Bird Crazy' critters with matching accessories. Used one set for a card, popped the remaining sets into individual cellophane bags and promptly forgot all about them until I was searching for something else the other day.

This is a card I made as the result of my 'find':
I used:

- 4" x 6" white card blank, tent style

- black card from the snippets folder as the first layer, then topped that with a trimmed down piece of DP from MME's 'Sunshine' paper pad - using Collall All Purpose glue

- stamped the sentiments using a Memento 'Tuxedo Black' ink pad and the NBUS Tim Holtz 'Simple Sayings' set, snipped them apart and ran a black Whispers marker round the edges. I like this set a lot, tons of useful everyday sentiments in a typewriter font that you can mix and match

- to add the hat to the bird I just snipped from the bottom of the hat up to the front edge of the brim and then trimmed away enough from the back and the brim so that the hat would sit nicely over the Crazy Bird's head. Poor thing, I had to snip his little crest from the top of his head :)

- fiddled around working out where things should go before then gluing them in place using Collall glue

- then added Glossy Accents to the bird's eyes 

Job done! The still to be used birdies are staying within my line of sight now :)

Di
x

Wednesday, 18 May 2016

Less is More Week #276 - At Sea

The current one layer challenge over at Less is More 'At Sea' had me pondering for a while as lots of my thoughts had already been channelled into some brilliant entries. Then I thought of a set of stamps here which always makes me smile - and as a result made this card:
I used:

- 5" x 5" square white card blank

- image and sentiment stamp from an Acid Drops & Whatnots set (magazine freebie a while ago), stamped using Memento 'Tuxedo Black' ink

- coloured the image using Faber Castell Polychromos pencil and Sansodor blending solution

- added two little drops of water underneath the sentiment and coloured them in - really just to link the water together more so the sentiment wasn't just like an add-on

- finally rounded off the top right hand corner using We R Memory Keepers corner chomper


Di
x