I do have a card to share today but wanted to make my apologies for being missing in action for a couple of days. On Sunday a lovely friend arrived unannounced bearing a card and gifts - it was such a delight to spend time catching up and putting the World to rights, and it kept me away from the laptop. Then yesterday was my Birthday and I have to first of all say a HUGE thank you for all the cards, gifts and many, many Facebook wishes.
I will get back to each and every one of you I promise - I was quite humbled by the numbers, and glad I'd dusted the lounge and made space (albeit unwittingly) for an avalanche of beautiful cards. Len took me out for lunch yesterday (Monday) and after that he insisted that I should just play for a while and then cosy up in front of the TV - so I obeyed him for once!
That means I haven't been commenting on the Snippets Playground since the gates opened this week - but I'll be back down to Earth shortly and normal service will be resumed. xx
Another one of our little neighbours recently celebrated his third Birthday. He's called Charlies and is Max's little brother and those kids spend hours and hours playing together in the back garden, digging in a spare piece of border soil that's been left for them as a 'construction site'. Moving the soil from A to B in lorries and dumper trucks features large in their activities :) I've never known two children so happy in their own little world and it's a real delight to hear their little voices chattering about the logistics of soil and grass clippings transportation :)
The other day Len was pottering in the garden sorting out the nightly chaos those messy hedgehogs leave behind, a little someone over the tall fence could obviously hear the occasional clatter too. Then this little voice piped up 'Hello Len' :) I heard it indoors and had to laugh at Max and Len having a little conversation - totally invisible to one another!
Charlie's card had to reflect what he likes and gets up to of course - this is what I came up with - playing in dirt:
I used:
- 300 gsm white card stock, die cut using my Presscut 'Step Card Cutting' die set, then the embossed lines were scored again with a scoring tool and the card folded into shape
- the image (so like little Charlie playing!) is a free Clipart one from the Internet (details at the end of this post) which was already coloured so I just went over the whole background with some light blue chalk and added a white die cut cloud (used MFT's 'Cloud Trio' die set) before setting it aside
- the Polaroid frame was pretty easy - first I printed the right sized sentiment onto white card and then used a Lil' Inker 'Instant Camera' die to cut around it (easiest way to do this as it's a solid die is to first cut a template and use the aperture to find the right position before inserting the die into the aperture, taping it lightly in place and then die cutting)
- trimmed the image and glued it behind the aperture
- the spotted background pieces were cut from one piece of 6" x 6" Dovecraft Back to Basics 'Bright Spark' paper, using another sheet I cut a matching liner for the inside of the card - then they were glued in place
- glued the image and frame to the card front
- added the number 3 - die cut from a little snippet of deep burgundy card using a Memory Box 'Classic Numbers' die - finally added a plain white panel inside on top of the spotty paper liner - die cut using a Lil'Inkers 'Stitched Rectangles' die
Here's the link to My Cute Graphics where I found the image. There are tons of images there and I do recommend a visit!
Tuesday, 13 September 2016
Sunday, 11 September 2016
Pixie's Snippets Playground - Week 246
It's tipping it down with rain here as I type this on Saturday morning. In fact Len just arrived back home early from archery - where rain most definitely stopped play! We're certainly on the cusp of Autumn, with a few hot days thrown in here and there just to confuse things. I guess a few of you have noticed how HUGE the spiders are in the UK this year? One shot across the craft room the other evening and I truly didn't know whether to saddle it up and go for a ride or just run and hide. I did neither in fact, but am sure it's still lurking under the desk somewhere watching with its big beady eyes - shudder.
Earlier in the week I finally found a little bit of time to do some colouring for today's snippets card, and I bet if I hunted round in the Playground enough I just might find a little mouse doing exactly this:
I used:
- 4.25" x 5.5" white card blank, tent style
- a snippet of white card stock onto which I stamped the little House Mouse image using Memento 'Tuxedo Black' ink and a House Mouse cling stamp called 'Rain Flower'
- coloured the image using Faber Castell Polychromos pencils and set it aside
- used a snippet of yellow card to die cut the stitch lines and then trimmed the piece of card to the same size as the card front
- then selected two circular dies from the Tonic Studio's 'Circle Layering' set and used the smaller one of the two to die cut an aperture into the piece of yellow card
- then die cut the image using the larger of the two circle dies
- next, die cut the green ring to go around the aperture using both of the circle dies, one inside the other
- glued the green circular band onto the aperture and then glued the image in place behind the aperture
- glued the whole piece of yellow card, now backed with the image, onto the card front
- stamped the sentiment using Memento 'Tuxedo Black' ink and a stamp from the Kaisercraft 'True Friendship' set of stamps
- punched out the sentiment using SU's 'Decorative Label' punch and glued it below the image- final touch, added touches of Glossy Accents to the raindrops
The set of sentiments stamps is advertised as having four sentiments - it took me a couple of minutes to realise that, during production, two of them hadn't been separated. A quick chop with the scissors soon sorted that one out though :)
The yellow card is a beautiful daffodil yellow, but it looks a bit washed out due to the bright sunlight when I took the photo, sigh. And it's too dull today to try for a better photo.
I'd like to enter this into the September/current Penny Black and More challenge, where the theme is 'Use a sentiment' - and your image must be stamped (unless it's a PB Stickeroo) - although you can use stamps other than Penny Black. Happy dance here as Mr Random picked my number from the August entries as one of the winners! Thanks Brenda and Co. - it's tickled me to win a prize all for me :)
I'd also like to enter this into the current challenge over at House Mouse and Friends #225 'Make a Splash' - anything with water is fine BTW!
Time for a peek at this week's picks:
As soon as I read Jules' post I knew we had our first pick of the week. First of all, as always, it's a fabulous snippets card - and secondly, and very importantly, Jules has shared her paper piecing secrets with a step by step tutorial! Over time I've picked up Jules' paper piecing tricks, often in a very kind response to one of my comments, and I really do encourage you to pop over and be enlightened!
I always emphasise that snippets really can be leftovers of anything crafty - and Lynn (Linby) took us to new heights this week with some amazing fused glass snippets on this beautiful necklace! You really should nip over for a read of her post - there's other fabulous work there too.
We have crafters on here who do hide their lights under a bushel. This gorgeous card was brought to share with us by Pat and her colouring is amazing! The background was 'smooshed' and those glorious poppies were coloured using Lyra Aqua Markers. Absolutely lovely Pat!
And here's another example of really perfect colouring, this was made by Wanda using a digi stamp. And loads of snippets too - I love it! I usually just plonk a single charm onto a card, perhaps dangling from a bow or such. I do like the lovely little selection of embellishments Wanda used here to add such interest.
And this beauty is Meena's very first try at colouring using Polychromos pencils. I think she's a natural for sure! Love the colours and the shading is just perfection! I love my Polychromos pencils, used them on today's snippets card in fact, but shading like this totally eludes me!
I chose this card, made by Heather, as a great example of another way to use up a real variety of snippets in a very clever way. Heather has given us the measurements for those scraps, based on an American A2 sized card (4.25" x 5.5"). The squares of pretty paper had their opposite corners rounded to add that extra interest - neat trick!
And for my final 'peek at the picks' - here's a really lovely card using a clever technique, brought to us by April. It's a fun way to produce stunning cards - as April says it's great for snippet zapping as you just need a double sided piece of patterned paper measuring 10" x 5". April has kindly added the link back to where she found a card made using this technique - and there's a link in that linked post to a great video tutorial! I certainly want to try this idea ASAP :)
So those are mysix seven picks for this week girls. I was thrilled this week to find a couple of entries using 'That Folder' which was a recent Playground prize and I do encourage you to have a little hop about if you find the time. As ever, not an easy job choosing the picks - I tried to point you to some inspiring talent, some techniques and tips - and of course some great ways to use up snippets!
We had one new Playmate last week:
Lavina arrived with a fabulous card to share - just look at those exploding flowers! I've made a couple of cards using a Hunkydory kit to create this same effect and have to admit I almost lost the will to live. These are lovely and I suspect have been created right from scratch as well, sheesh!
Welcome Lavina - hope to see you playing along again really soon :)
And it's prize draw time, for the Spellbinders 'Pop-Up' 'Happy Days' set of dies. Sadly, there could only be one winner and it's:
Well done Meg, I think you'll be really pleased with the set and look forward to seeing what you make with it! It was actually third try lucky here as the first two numbers that came up belonged to Playmates who were just playing for fun this week. Can you please drop me an email with your address in and I'll post
your prize off as soon as possible! My email address is on the right
hand side bar.
Here's this coming week's prize:
It's stamps this time, the same as the ones I used on my snippets card - House Mouse cling 'Rain Flower' and the Kaisercraft 'True Friendship' set of four sentiments.
The Snippets Challenge will run for one week and the Playground gates will close at 11am UK time on Saturday 17th September. The gates will open again at
midnight UK time on the same day.
A maximum of ONE entry and please say in a comment if you wish to play and be a possible winner of the prize. You can opt for either the House Mouse stamp or the sentiments stamps if you wish, just say so in a comment and if you win then I'll do a further draw for the other part of the prize. But, both are up as one prize if that's what you would like! Please also link back to the Playground in your blog post to be eligible for the draw.
Mr Linky is below - please let me know if you have any problems linking, it's easy for me to sort out so don't struggle on alone :)
And here's another celebration heads up for you, our Playmate Carole, of Craftylicious Creations is celebrating her 100th post with a super giveaway:
- 4.25" x 5.5" white card blank, tent style
- a snippet of white card stock onto which I stamped the little House Mouse image using Memento 'Tuxedo Black' ink and a House Mouse cling stamp called 'Rain Flower'
- coloured the image using Faber Castell Polychromos pencils and set it aside
- used a snippet of yellow card to die cut the stitch lines and then trimmed the piece of card to the same size as the card front
- then selected two circular dies from the Tonic Studio's 'Circle Layering' set and used the smaller one of the two to die cut an aperture into the piece of yellow card
- then die cut the image using the larger of the two circle dies
- next, die cut the green ring to go around the aperture using both of the circle dies, one inside the other
- glued the green circular band onto the aperture and then glued the image in place behind the aperture
- glued the whole piece of yellow card, now backed with the image, onto the card front
- stamped the sentiment using Memento 'Tuxedo Black' ink and a stamp from the Kaisercraft 'True Friendship' set of stamps
- punched out the sentiment using SU's 'Decorative Label' punch and glued it below the image- final touch, added touches of Glossy Accents to the raindrops
The set of sentiments stamps is advertised as having four sentiments - it took me a couple of minutes to realise that, during production, two of them hadn't been separated. A quick chop with the scissors soon sorted that one out though :)
The yellow card is a beautiful daffodil yellow, but it looks a bit washed out due to the bright sunlight when I took the photo, sigh. And it's too dull today to try for a better photo.
I'd like to enter this into the September/current Penny Black and More challenge, where the theme is 'Use a sentiment' - and your image must be stamped (unless it's a PB Stickeroo) - although you can use stamps other than Penny Black. Happy dance here as Mr Random picked my number from the August entries as one of the winners! Thanks Brenda and Co. - it's tickled me to win a prize all for me :)
I'd also like to enter this into the current challenge over at House Mouse and Friends #225 'Make a Splash' - anything with water is fine BTW!
Time for a peek at this week's picks:


So those are my
We had one new Playmate last week:

Welcome Lavina - hope to see you playing along again really soon :)
And it's prize draw time, for the Spellbinders 'Pop-Up' 'Happy Days' set of dies. Sadly, there could only be one winner and it's:
A maximum of ONE entry and please say in a comment if you wish to play and be a possible winner of the prize. You can opt for either the House Mouse stamp or the sentiments stamps if you wish, just say so in a comment and if you win then I'll do a further draw for the other part of the prize. But, both are up as one prize if that's what you would like! Please also link back to the Playground in your blog post to be eligible for the draw.
Mr Linky is below - please let me know if you have any problems linking, it's easy for me to sort out so don't struggle on alone :)
And here's another celebration heads up for you, our Playmate Carole, of Craftylicious Creations is celebrating her 100th post with a super giveaway:
To help Carole celebrate, and also be in with a chance to win, hop on over to her blog and see what you have to do to play along. Please note, these are Carole's prize over on her blog - the Playground prize this week are the stamps, like I used on my snippets card today.
Have a lovely week - big hug from Parsnip and of course me!
Friday, 9 September 2016
Merry Monday #212 - Gold, white and black
Merry Monday is back after their Summer break - whoop, whoop! And what a great theme they chose for this week's challenge too - 'Gold, white and black'.
I knew right away what I wanted to make as my entry - and here it is:
I used:
- A6 white card blank, tent style
- piece of gold mirri card, trimmed to just slightly smaller than the card front and glued in place
- piece of white card stock, trimmed to an eight of an inch all round smaller than the gold layer
- then die cut the centre of the white card panel using a NBUS Britannia Dies 'Bethlehem Scene' die
- at that point I used the Misti to stamp the sentiment, using Memento 'Tuxedo Black' ink and a sentiment from the Paper Smooches 'Christmas Sampler' stamp set
- backed the aperture behind the die cut with a snippet of black card and then glued the whole panel in place on top of the gold layer on the card front
- die cut a star using one of the many sized star dies which comes with the Creative Expressions Festive Collection 'Silent Night' die set (by Sue Wilson)
- glued the star in place and popped a little gold gem in the centre. The little gold gems are so lovely, sadly no name to them though. Bought ages ago at a Craft Fayre and they shine like real gold, not the orangey amber of (say) Kanban gems
I made three of these cards, all the same, and they didn't really take all that long either. If I'm upcycling a Christmas card then it's a one-off of course, but when there's a few things assembled such as dies, stamps etc. to make a Christmas card it makes sense (to me!) to make more than one for the Christmas card box. I've learned that three is a nice number to go for.
I'd also like to join in with the following challenges:
Craftyhazelnut's Christmas Challenge #297 - 'Vintage or Anything Goes'
Craftyhazelnut's Christmas Challenge Extra for September - always 'Anything Goes'
I knew right away what I wanted to make as my entry - and here it is:
I used:
- A6 white card blank, tent style
- piece of gold mirri card, trimmed to just slightly smaller than the card front and glued in place
- piece of white card stock, trimmed to an eight of an inch all round smaller than the gold layer
- then die cut the centre of the white card panel using a NBUS Britannia Dies 'Bethlehem Scene' die
- at that point I used the Misti to stamp the sentiment, using Memento 'Tuxedo Black' ink and a sentiment from the Paper Smooches 'Christmas Sampler' stamp set
- backed the aperture behind the die cut with a snippet of black card and then glued the whole panel in place on top of the gold layer on the card front
- die cut a star using one of the many sized star dies which comes with the Creative Expressions Festive Collection 'Silent Night' die set (by Sue Wilson)
- glued the star in place and popped a little gold gem in the centre. The little gold gems are so lovely, sadly no name to them though. Bought ages ago at a Craft Fayre and they shine like real gold, not the orangey amber of (say) Kanban gems
I made three of these cards, all the same, and they didn't really take all that long either. If I'm upcycling a Christmas card then it's a one-off of course, but when there's a few things assembled such as dies, stamps etc. to make a Christmas card it makes sense (to me!) to make more than one for the Christmas card box. I've learned that three is a nice number to go for.
I'd also like to join in with the following challenges:
Craftyhazelnut's Christmas Challenge #297 - 'Vintage or Anything Goes'
Craftyhazelnut's Christmas Challenge Extra for September - always 'Anything Goes'
Wednesday, 7 September 2016
Less is More - Week 292 - Colour Challenge
A lovely colour theme this time over at Less is More, to use the colours shown in a peacock's feather!
You certainly don't have to focus on a peacock per se, just the colours will do fine. But, I have a few peacock images and also some peacock feather ones too that I could have stamped and coloured using Twinkling H2Os and almost went down that route.
However, there was a new die lying here on the desk right in front of me just begging to be used. Then, in the snippets folder I found a glorious piece of iridescent turquoise, violet and blue piece of paper. So many times recently I almost crumpled that snippet up and threw it away - so glad I didn't 'cos this was the resulting card:
I used:
- 4.25" x 5.5" white card blank, tent style
- piece of white card stock, embossed using Cuttlebug's 'Pinking Stitch' embossing folder and trimmed to exactly fit the front of the card
- using the peacock die I worked out just where I wanted the peacock to perch on the sentiment then, using Memento 'Tuxedo Black' ink, a sentiment from the free peacock embossing folder and stamp kit (Simply Homemade 66) and the Misti I stamped the words
- then glued the embossed and stamped panel to the card front
- covered the back of the iridescent paper with Stick-It and then die cut the peacock using the die which came free with Simply Cards and Papercraft Issue 147
- stuck the peacock in place and added a tiny litle gun metal coloured pearl for the eye
Interesting fact, I thought the sentiment was wrong and that it should be feathers - plural. But I checked on line and the most prolific use is singular - who knew? I didn't!
You certainly don't have to focus on a peacock per se, just the colours will do fine. But, I have a few peacock images and also some peacock feather ones too that I could have stamped and coloured using Twinkling H2Os and almost went down that route.
However, there was a new die lying here on the desk right in front of me just begging to be used. Then, in the snippets folder I found a glorious piece of iridescent turquoise, violet and blue piece of paper. So many times recently I almost crumpled that snippet up and threw it away - so glad I didn't 'cos this was the resulting card:
I used:
- 4.25" x 5.5" white card blank, tent style
- piece of white card stock, embossed using Cuttlebug's 'Pinking Stitch' embossing folder and trimmed to exactly fit the front of the card
- using the peacock die I worked out just where I wanted the peacock to perch on the sentiment then, using Memento 'Tuxedo Black' ink, a sentiment from the free peacock embossing folder and stamp kit (Simply Homemade 66) and the Misti I stamped the words
- then glued the embossed and stamped panel to the card front
- covered the back of the iridescent paper with Stick-It and then die cut the peacock using the die which came free with Simply Cards and Papercraft Issue 147
- stuck the peacock in place and added a tiny litle gun metal coloured pearl for the eye
Interesting fact, I thought the sentiment was wrong and that it should be feathers - plural. But I checked on line and the most prolific use is singular - who knew? I didn't!
Tuesday, 6 September 2016
Cuttlebug Mania Challenge - 'Anything Goes - with die cuts'
Yay! The Cuttlebug Mania Challenge is back, after our Summer break. The theme this time is a nice easy one, to get you back into the swing of things - 'Anything goes - with die cuts'. You can use just one or several dies, it's up to you - and after that you can do pretty much anything!
You do have to use a manual die cutting/embossing machine for Cuttlebug Mania entries (it doesn't need to be a Cuttlebug but it must be manual, not electronic). And, you can't mix the two, it must be all manual please. Then make your entry, link into the challenge, link to the challenge in your own blog post and and make sure that you also say what products you used for any die cutting/embossing.
Details of our sponsor can be found over on the Cuttlebug Mania Challenge blog.
This is my DT card:
I used:
- 5" x 7" white card blank, tent style
- a piece of black card stock, trimmed slightly smaller than the card front and glued in place
- a piece of SU's 'Smokey Slate' card stock, trimmed slightly smaller than the black layer and glued in place
- snippets of pale pink and black card stock for all the die cutting
- the corners as well as the separate roses were die cut using two die sets by Poppy Stamps. One is the corner solid background shape with three solid rose backgrounds and three matching open cut roses called 'Art Deco Rose Blooms'. The other set is called 'Art Deco Roses' - that set comes with the open cut corner die plus a couple of open cut roses
- the panel for the sentiment was die cut using one of the very first dies I ever owned (could be a Sizzix one) but I don't have a note of the name. I die cut the centre pink layer and also a black frame using the same die
- the sentiment was die cut using a Joanna Sheen die called 'Retro Happy Birthday' and a snippet of black card backed with Stick-It double sided adhesive sheet, then popped onto the pink panel
- the sentiment panel and frame were than glued onto the card front
- added a selection of the Art Deco roses here and there
- final touch, some iridescent sequins, glued in place using Glossy Accents in a Woodware fine Line applicator
My bestie from the age of 13, when we started boarding school together, like me is a fan of Charles Rennie Mackintosh. I bought the Poppy Stamps dies ages ago - specifically with her in mind :)
Happy Birthday for yesterday Moira, hope you had a lovely day!
We'd love to see you over at Cuttlebug Mania, it's a really open theme this time with plenty of scope and the challenge runs for two weeks.
You do have to use a manual die cutting/embossing machine for Cuttlebug Mania entries (it doesn't need to be a Cuttlebug but it must be manual, not electronic). And, you can't mix the two, it must be all manual please. Then make your entry, link into the challenge, link to the challenge in your own blog post and and make sure that you also say what products you used for any die cutting/embossing.
Details of our sponsor can be found over on the Cuttlebug Mania Challenge blog.
This is my DT card:
I used:
- 5" x 7" white card blank, tent style
- a piece of black card stock, trimmed slightly smaller than the card front and glued in place
- a piece of SU's 'Smokey Slate' card stock, trimmed slightly smaller than the black layer and glued in place
- snippets of pale pink and black card stock for all the die cutting
- the corners as well as the separate roses were die cut using two die sets by Poppy Stamps. One is the corner solid background shape with three solid rose backgrounds and three matching open cut roses called 'Art Deco Rose Blooms'. The other set is called 'Art Deco Roses' - that set comes with the open cut corner die plus a couple of open cut roses
- the panel for the sentiment was die cut using one of the very first dies I ever owned (could be a Sizzix one) but I don't have a note of the name. I die cut the centre pink layer and also a black frame using the same die
- the sentiment was die cut using a Joanna Sheen die called 'Retro Happy Birthday' and a snippet of black card backed with Stick-It double sided adhesive sheet, then popped onto the pink panel
- the sentiment panel and frame were than glued onto the card front
- added a selection of the Art Deco roses here and there
- final touch, some iridescent sequins, glued in place using Glossy Accents in a Woodware fine Line applicator
My bestie from the age of 13, when we started boarding school together, like me is a fan of Charles Rennie Mackintosh. I bought the Poppy Stamps dies ages ago - specifically with her in mind :)
Happy Birthday for yesterday Moira, hope you had a lovely day!
We'd love to see you over at Cuttlebug Mania, it's a really open theme this time with plenty of scope and the challenge runs for two weeks.
Sunday, 4 September 2016
Pixie's Snippets Playground - Week 245
Hi there! There's a bit of a nip in the air early morning and late evening, we put a duvet back on the bed on Friday (slept so well, it's like a cosy nest again) and the leaves are changing colour - sure signs that Autumn is on the way.
Our surrogate daughter, the wonderful Mama of Len's two beautiful grand daughters over in Germany, had a milestone Birthday this past week and my snippets card was made for her big day.
I already had the die set waiting to be used, I first spotted it over at Liz's blog and then over at Sonia's blog. It gets even better, 'cos Liz bought the die set after seeing it over at Janice's blog HERE back in March this year (I saw it too in fact but hadn't realised it was a die set at that point!). All three girls made fabulous cards for the Playground using the die set (and all three were weekly picks as well!) - this is my first attempt (pinched some ideas about the edging from Sonia - mwah!). I took the photos a couple of weeks ago in really bright Summer sunshine so some of the colours do look slightly washed out/in soft focus:
- snippets of SU's 'Wisteria Wonder' to die cut the double loop edging scallops - which were then glued in place (this is where the Woodware Ultra Fine Nozzle containers are brilliant)
- next die cut the birdcage from a snippet of 'Wisteria Wonder' plus the three little birds(from a snippet of white card) - using the Joy! Lin and Lene 'Birdcage and 3 birds' set of dies
- glued the cage and birdies in place and then punched three teensy little black eyes from a snippet of black card using my smallest hole punch and glued them in place as well
- the sentiment gave me some issues as space was a bit tight and loads of my sentiment stamps and dies are either too large or too long to fit. Found an old Hobbycraft stamp called 'Special Day' in the end - phew! Stamped it using Brilliance 'Pearlescent Lavender' onto a snippet of white card
- then found a circular Spellbinders scalloped edge die to suit and chose the best fit for the plain inner from the Tonic Studios 'Circle Layering' set of dies. This really is such an invaluable set of dies with 14 circles in total - I love it!
- die cut the sentiment, then die cut the scalloped circle from a little snippet of 'Wisteria Wonder' and embossed both edges of the dies using a ball ended tool
- glued the two sentiment circles together and added them to the card - final touch was to use little scraps of 'Wisteria Wonder' to die cut Kai's name and also her age (using First Editions 'Alphabet Sans Serif' and Memory Box 'Classic Numbers' dies). Glued those to the steps and we were done!
Our surrogate daughter, the wonderful Mama of Len's two beautiful grand daughters over in Germany, had a milestone Birthday this past week and my snippets card was made for her big day.
I already had the die set waiting to be used, I first spotted it over at Liz's blog and then over at Sonia's blog. It gets even better, 'cos Liz bought the die set after seeing it over at Janice's blog HERE back in March this year (I saw it too in fact but hadn't realised it was a die set at that point!). All three girls made fabulous cards for the Playground using the die set (and all three were weekly picks as well!) - this is my first attempt (pinched some ideas about the edging from Sonia - mwah!). I took the photos a couple of weeks ago in really bright Summer sunshine so some of the colours do look slightly washed out/in soft focus:
I used:
- 300gsm white card stock, die cut using the main card die from the Spellbinders 'Pop-Ups' 'Happy Days' die set, making sure the fold lines were well embossed before folding them. You can do this by hand or using a 'tan/rubber' embossing mat to run the die cut through your machine a second time
- a sheet of paper from LOTV's 'Timeless Victorian' paper pad was used to die cut the patterned fronts and also the steps on the card base - glued in place using Collall All Purpose glue
- snippets of SU's 'Wisteria Wonder' to die cut the double loop edging scallops - which were then glued in place (this is where the Woodware Ultra Fine Nozzle containers are brilliant)
- next die cut the birdcage from a snippet of 'Wisteria Wonder' plus the three little birds(from a snippet of white card) - using the Joy! Lin and Lene 'Birdcage and 3 birds' set of dies
- glued the cage and birdies in place and then punched three teensy little black eyes from a snippet of black card using my smallest hole punch and glued them in place as well
- the sentiment gave me some issues as space was a bit tight and loads of my sentiment stamps and dies are either too large or too long to fit. Found an old Hobbycraft stamp called 'Special Day' in the end - phew! Stamped it using Brilliance 'Pearlescent Lavender' onto a snippet of white card
- then found a circular Spellbinders scalloped edge die to suit and chose the best fit for the plain inner from the Tonic Studios 'Circle Layering' set of dies. This really is such an invaluable set of dies with 14 circles in total - I love it!
- die cut the sentiment, then die cut the scalloped circle from a little snippet of 'Wisteria Wonder' and embossed both edges of the dies using a ball ended tool
- glued the two sentiment circles together and added them to the card - final touch was to use little scraps of 'Wisteria Wonder' to die cut Kai's name and also her age (using First Editions 'Alphabet Sans Serif' and Memory Box 'Classic Numbers' dies). Glued those to the steps and we were done!
My 'in-house critic' gave it the stamp of approval - apart from his usual observation about any patterned paper being like wallpaper of course!
And this is my third and final entry for Darnell's NBUS (never-before-used-schtuff) challenge #7, which finishes at the end of tomorrow (Monday 5th September). It's standing room only over there but you still have time to play!
Time for a peek at this week's picks:
Cathy nipped in with this really gorgeous mixed media panel - I absolutely adore it. Lots of dimension and the touches of gold are absolutely perfect.
I always look for entries which show us great ways to use up snippets. Sue T did just that with her really lovely patchwork card - and isn't the sentiment just perfect?!
Then Helen hopped in with another simple but so eye catching way of using up snippets - this time it's snippety strips of paper (thought it might be washi tape at first).
I just had to show you this card, made by Trina! Each one of those lilies was individually stamped then masked before the next lily was stamped, right around a masked heart shape. The monochrome shading is just stunning and the pops of red in the sentiment are so perfect. What a card!
I know I feature Sonia's work pretty regularly here - this amazing Neolithic Doirama was actually made by her daughter Prisha as a project for school! I can't even begin to describe it here - you'll have to go and see all the amazing detail for yourselves. Artistic talent certainly runs in the family!
And, after a little absence, Jean returned to play with us - bringing this delightful First Birthday card. The background paper is a patchwork design and I love how Jean has pulled all the colours from that piece of paper into the other layers, the ribbon and buttons - and the image. So cute!
Kim has been playing with little strips of paper, making the most wonderful paper quilled butterfly! Isn't it absolutely beautiful? I really love it and wish I could have as much patience and dexterity!
So those are my picks for this week girls. As ever, not an easy job and I've limited it to seven as am not supposed to be sitting still at the laptop/desk for too long! Should have been three really but sometimes it's impossible to whittle down!
We had two new Playmates last week:
First was Neva with this fabulous 'Oval Pull' card. What a lovely design and such pretty colours too! Neva should fit into the Playground perfectly - her blog name is 'Finding Snippets of Time to Craft'!
And then Sue B skipped in, with this brilliant card. It was also for the Less is More Challenge (use stickers, peel offs etc) and is so perfectly designed and executed!
Welcome to both of you - hope to see you playing along again really soon :)
And it's prize draw time, for the Clearly Besotted Shaker Circle Hooray die and the packet of shaker mix.
Here's our winner:
Congratulations Greta, the early bird did catch the worm this week for sure! Can you please drop me an email with your address in and I'll post your prize off as soon as possible! My email address is on the right hand side bar.
Here's this coming week's prize:
Yes indeedy, it's a Spellbinders 'Pop-Up' 'Happy Days' set of dies - just like the one I used on my card today. And it does work with a machine as small as a Cuttlebug - so long as you tape the card 'base' die to the main card stock you're using for the steps card and turn it by 180 degrees before running it through again as there is a little bit of overhang.
The Snippets Challenge will run for one week and the Playground gates will close at 11am UK time on Saturday 10th September. The gates will open again at
midnight UK time on the same day.
A maximum of ONE entry and please say in a comment if you wish to play and be a possible winner of the prize. Please also link back to the Playground in your blog post to be eligible for the draw.
Mr Linky is below - please let me know if you have any problems linking, it's easy for me to sort out so don't struggle on alone :)
And here's a heads up for you, our Playmate Liz (of Crafty Sunflower) is celebrating reaching 100 followers with these lovely dies as a give away:
and, of course, Parsnip
x
And this is my third and final entry for Darnell's NBUS (never-before-used-schtuff) challenge #7, which finishes at the end of tomorrow (Monday 5th September). It's standing room only over there but you still have time to play!
Time for a peek at this week's picks:


So those are my picks for this week girls. As ever, not an easy job and I've limited it to seven as am not supposed to be sitting still at the laptop/desk for too long! Should have been three really but sometimes it's impossible to whittle down!
We had two new Playmates last week:
Welcome to both of you - hope to see you playing along again really soon :)
And it's prize draw time, for the Clearly Besotted Shaker Circle Hooray die and the packet of shaker mix.
Here's our winner:
A maximum of ONE entry and please say in a comment if you wish to play and be a possible winner of the prize. Please also link back to the Playground in your blog post to be eligible for the draw.
Mr Linky is below - please let me know if you have any problems linking, it's easy for me to sort out so don't struggle on alone :)
And here's a heads up for you, our Playmate Liz (of Crafty Sunflower) is celebrating reaching 100 followers with these lovely dies as a give away:
To help Liz celebrate, and also be in with a chance to win, hop on over to her blog and see what you have to do to play along. Please note, these are Liz's prize over on her blog - the Playground prize this week is the Spellbinders set of dies!
Have a lovely week!
and, of course, Parsnip
x
Friday, 2 September 2016
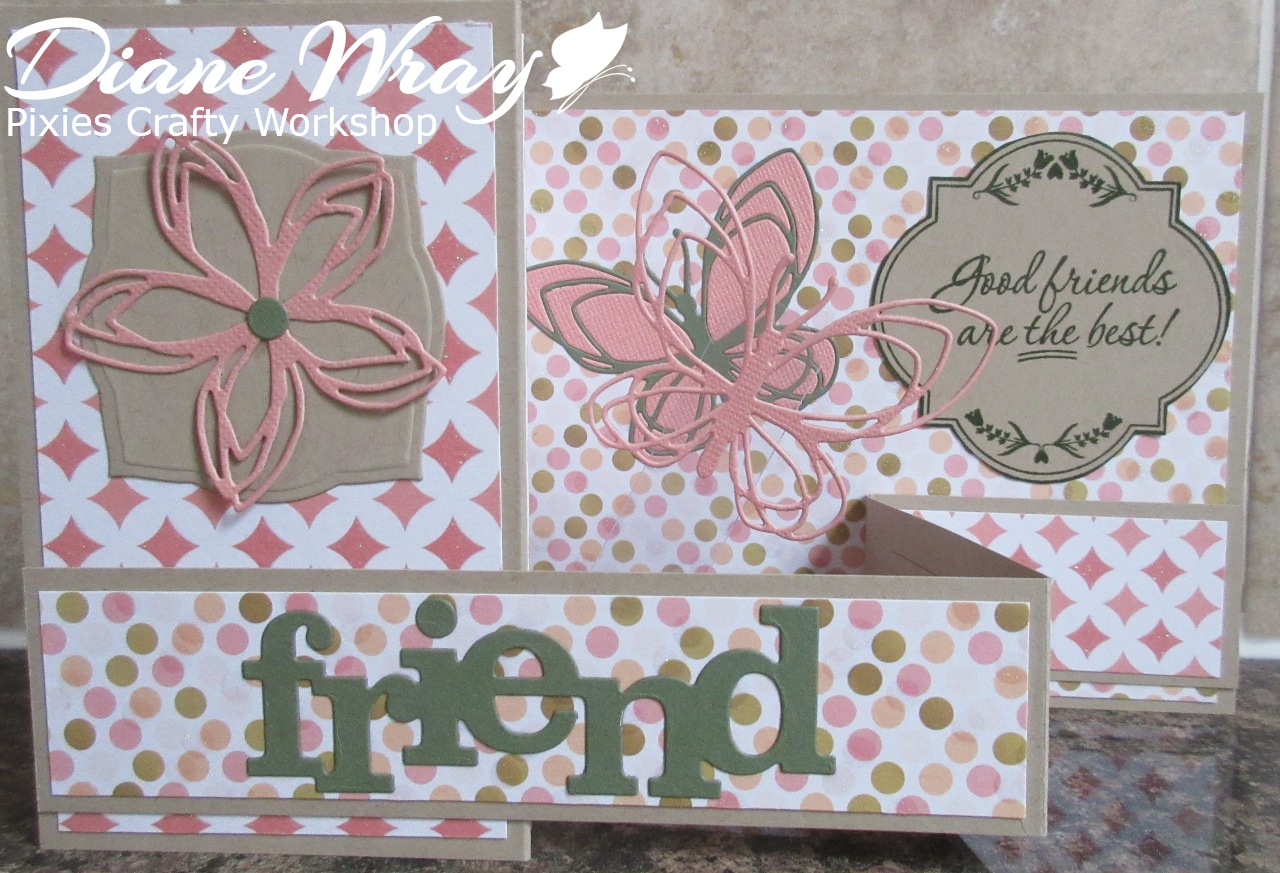
Butterfly Challenge #61 Butterflies +K is for Kraft card and/or Kaleidoscope
I wanted to try out the double Z fold card that Meena made, and she also gave us a really clear little tutorial on how to go about making it. Lynn had also made a super card which was also a weekly pick in the Playground:
And a slightly sideways view so you can see the two butterflies more clearly:
Or perhaps not as clearly as I'd hoped :)
I used:
- SU's 'Crumb Cake' card stock (the closest I have that's 12" wide to Kraft card) for the card base and the narrow Z band - Meena has all the cutting and folding measurements on her tutorial
- patterned card from the Deco Time 'Cardboard patterns' pad (a gift from Jules, thank you again!) to cover all the card base and narrow band panels - the designs have encapsulated sparkle in them and are really lovely
- a snippet of green card from the snippets folder, die cut using the Winnie and Walter 'Friend' cutaway die, which was glued in place
- 'Crumb Cake' snippet, die cut using a Spellbinders Nestabilities die, glued to the card front
- that was topped with a flower, die cut using peach card and the flower die from the Concord & 9th 'Floral and Flutter' set - glued in place. The green centre of the flower is another dot, cut using the 'Friend' die
- the sentiment was stamped using the Inky Doodles 'In my Heart' stamp set for the frame and the words are from the Hero Arts 'Good Friends' sentiments set. I then trimmed round the frame and glued it in place
- that only left the butterflies to do, so I die cut one peach and one green butterfly using the butterfly die from the Concord and 9th 'Floral and Flutter' die set - having first covered the back of the snippets of card with Stick-It double sided adhesive
- used the outline of the green butterfly and the inserts from the peach butterfly and stuck those in place beside the sentiment panel
- that left me with one sticky backed peach outline butterfly so I cut a second one and layered the sticky one on top to give it more rigidity
- cut a half inch wide strip of clear acetate, rounded one end and using very narrow red line tape stuck the butterfly onto the strip
- then cut a one inch wide and five inches long strip of 'Crumb Cake' card and scored and folded either end one inch from the edge
- the most fiddly part of the card was sticking that strip in place, I used red line tape and crossed eyes!
- just had to then stick the acetate strip with the butterfly on the end in place, onto the strip of card I'd just added inside the Z fold of the card
It's important to make sure you stick the free flying butterfly so that the card will actually close - ask me how I know! Luckily I didn't wreck the card when I removed the acetate strip and angled it the other way :)
Another little tip, when you're sticking two identical layers together using sticky adhesive backing like I did with the peach free flying butterfly, is to just pull a little bit of the backing away at a time as you line the two layers up.
I really loved making this card - thanks again Meena for the inspiration! And also a big thank you to Bonnie, this is where I first saw the butterfly die being used and of course had to track it down in the UK!
And a slightly sideways view so you can see the two butterflies more clearly:
Or perhaps not as clearly as I'd hoped :)
I used:
- SU's 'Crumb Cake' card stock (the closest I have that's 12" wide to Kraft card) for the card base and the narrow Z band - Meena has all the cutting and folding measurements on her tutorial
- patterned card from the Deco Time 'Cardboard patterns' pad (a gift from Jules, thank you again!) to cover all the card base and narrow band panels - the designs have encapsulated sparkle in them and are really lovely
- a snippet of green card from the snippets folder, die cut using the Winnie and Walter 'Friend' cutaway die, which was glued in place
- 'Crumb Cake' snippet, die cut using a Spellbinders Nestabilities die, glued to the card front
- that was topped with a flower, die cut using peach card and the flower die from the Concord & 9th 'Floral and Flutter' set - glued in place. The green centre of the flower is another dot, cut using the 'Friend' die
- the sentiment was stamped using the Inky Doodles 'In my Heart' stamp set for the frame and the words are from the Hero Arts 'Good Friends' sentiments set. I then trimmed round the frame and glued it in place
- that only left the butterflies to do, so I die cut one peach and one green butterfly using the butterfly die from the Concord and 9th 'Floral and Flutter' die set - having first covered the back of the snippets of card with Stick-It double sided adhesive
- used the outline of the green butterfly and the inserts from the peach butterfly and stuck those in place beside the sentiment panel
- that left me with one sticky backed peach outline butterfly so I cut a second one and layered the sticky one on top to give it more rigidity
- cut a half inch wide strip of clear acetate, rounded one end and using very narrow red line tape stuck the butterfly onto the strip
- then cut a one inch wide and five inches long strip of 'Crumb Cake' card and scored and folded either end one inch from the edge
- the most fiddly part of the card was sticking that strip in place, I used red line tape and crossed eyes!
- just had to then stick the acetate strip with the butterfly on the end in place, onto the strip of card I'd just added inside the Z fold of the card
It's important to make sure you stick the free flying butterfly so that the card will actually close - ask me how I know! Luckily I didn't wreck the card when I removed the acetate strip and angled it the other way :)
Another little tip, when you're sticking two identical layers together using sticky adhesive backing like I did with the peach free flying butterfly, is to just pull a little bit of the backing away at a time as you line the two layers up.
I really loved making this card - thanks again Meena for the inspiration! And also a big thank you to Bonnie, this is where I first saw the butterfly die being used and of course had to track it down in the UK!
Wednesday, 31 August 2016
Christmas cards and Darnell's NBUS Challenge #7
This is my second entry into Darnell's NBUS #7 Challenge - and
there's a third one coming up in the Snippets Playground on Sunday. I
could almost make a NBUS card each week for a whole year and possibly not
have used all the bought and unused goodies here, sigh.
This card is also for Craftyhazelnut's Christmas Challenge (Use a sentiment) as well as Craftyhazelnut's Christmas Challenge Extra for August (Always anything goes):
I used:
- 4.25" x 5.5" white card blank, tent style
- SU's 'Real Red' card stock, cut slightly smaller than the card front and glued in place
- piece of white card stock, die cut using a die from the Lil' Inkers 'Stitched Rectangles' set of dies
- my NBUS Stampin' Up 'Joyful Nativity' set of stamps. I used the Misti (was making a batch of them at the same time) and first stamped the word JOY in SU's 'Real Red', then the sentiment in Memento 'Tuxedo Black' and finally the angel and the star using Delicata 'Silvery Shimmer'. And how it shimmers in real life too
- glued the panel in place and added a single clear self adhesive gem to the centre of the star
I set out to make six cards but ended up with five (isn't a last minute smear of ink from a finger on a card annoying - especially when it just can't be disguised, sigh).
Psst, I posted off all the 'That Folder' prizes yesterday afternoon (Tuesday) by 1st Class and Airmail. Our local Post Office knows me now - 'Hi there, more craft stuff?'.
This card is also for Craftyhazelnut's Christmas Challenge (Use a sentiment) as well as Craftyhazelnut's Christmas Challenge Extra for August (Always anything goes):
I used:
- 4.25" x 5.5" white card blank, tent style
- SU's 'Real Red' card stock, cut slightly smaller than the card front and glued in place
- piece of white card stock, die cut using a die from the Lil' Inkers 'Stitched Rectangles' set of dies
- my NBUS Stampin' Up 'Joyful Nativity' set of stamps. I used the Misti (was making a batch of them at the same time) and first stamped the word JOY in SU's 'Real Red', then the sentiment in Memento 'Tuxedo Black' and finally the angel and the star using Delicata 'Silvery Shimmer'. And how it shimmers in real life too
- glued the panel in place and added a single clear self adhesive gem to the centre of the star
I set out to make six cards but ended up with five (isn't a last minute smear of ink from a finger on a card annoying - especially when it just can't be disguised, sigh).
Psst, I posted off all the 'That Folder' prizes yesterday afternoon (Tuesday) by 1st Class and Airmail. Our local Post Office knows me now - 'Hi there, more craft stuff?'.
Tuesday, 30 August 2016
Less is More - Week #291 - Recipe
It's recipe week over at Less is More and the theme is 'Sticker, sticky label or peel-off'. The DT have made some wonderful cards and already there are some extremely clever entries as well. Who would have thought that using a peel-off as a mask could be so effective?!
I didn't have much time to play but did need to make some cards in a hurry, to enclose with last week's snippets prizes. So I turned to some stickers and a sentiment stamp and came up with six of these little cards:
I used:
- 3.75" x 3.75" square white card blank
- sentiment stamp that came with the All-Occasion 'That Folder' set and Memento 'London Fog' ink (softer than jet black) - stamped using the Misti, which of course made doing six cards the same a real breeze
- the triple flower 'Hydrangea' sticker is by Martha Stewart and even came with the little pearls on, so it was just a matter of popping it in place
As I said, very quick and easy and I feel I cheated!
I didn't have much time to play but did need to make some cards in a hurry, to enclose with last week's snippets prizes. So I turned to some stickers and a sentiment stamp and came up with six of these little cards:
I used:
- 3.75" x 3.75" square white card blank
- sentiment stamp that came with the All-Occasion 'That Folder' set and Memento 'London Fog' ink (softer than jet black) - stamped using the Misti, which of course made doing six cards the same a real breeze
- the triple flower 'Hydrangea' sticker is by Martha Stewart and even came with the little pearls on, so it was just a matter of popping it in place
As I said, very quick and easy and I feel I cheated!
Sunday, 28 August 2016
Pixie's Snippets Playground - Week 244
Wow, we've had some pretty hot weather here in the Playground this past week. The duck pond has been in great demand for the purposes of cooling down too.
Our little family (or it might be families!) of hedgehogs are eating us out of house and home. We now have two feeding stations set up for them and reckon there could be as many as six of them visiting, in all shapes and sizes. It's almost as if there's a big neon sign flashing on the side gate, which we deliberately had cut high enough for them to come and go, saying 'Hedgie Diner, this way'! :)
My snippets card today is a shaker card, not something I tackle very often to be honest but I've had a 'Never Before Used Schtuff' die here for ages, just waiting to be used. It cries out to be a shaker card (although the die would work well without the shaker element too).
And this card is for Darnell's latest NBUS challenge #7 as well - make sure you join in, I bet every single one of you has something unused to play with for the first time:
I used:
- 4.25" x 5.5" white card blank, tent style
- snippet of gold mirri card, trimmed to an eighth of an inch smaller all round and glued onto the card front
- snippet of black card, die cut using a die from the Lil'Inkers 'Stitched Rectangles' set
- then die cut the circular HOORAY aperture, using a NBUS Clearly Besotted Shaker Shapes 'Circle Hooray' die
- two layers of black fun foam, die cut using a die from the Lil'Inkers 'Stitched
Rectangles' set with a circular aperture die cut to line up behind the black card layer - using a slightly larger plain circle die than the HOORAY die
- glued and red line taped the two layers of black fun foam together and backed them with a circle of white card
- using the piece of black card with the die cut word I worked out where to glue three sequins and stuck them in place onto the white backing card
- die cut a circle of acetate, again using the slightly larger plain circle die, swiped it with an anti-static bag and glued it behind the HOORAY aperture in the piece of black card
- then it was just a case of popping some Lucy's Cards 'Little Things' shaker card gold selection called 'Champagne' into the 'well' of the white card backed fun foam and then gluing the card front on top
- then glued the whole thing to the card itself before adding some little pieces of shaker selection to the front, just to break up the starkness
Ha, despite using the anti-static bag, the shaker stuff does cling a bit to the acetate - but I rather like that. It looks more spread out and still has movement when it's shaken.
Here's the weekly 'peek at the picks' - as always it's a tough choice, I try not to favour the same Playmates too much and also look for ideas that might inspire you:
I love this sweet card, made by Megan. It's a cute little dog, waiting and watching for its owner - and when you open the card up you get a view of the little chap stretched up to peek out :)
I really love the impact of this card, made by KathyK! Wonderful colours and just the one black snippet for the 'frame' - it's fabulous.
I picked this card, made by Pen as the hand drawn water colour pencil flower is just amazing! It was drawn onto a snippet of water colour paper and the frame is also a snippet. Isn't it beautiful?!
What a stunning CAS card, made by Bonnie! A snippet of a Brusho background and then a gold snippet for that beautiful butterfly. It's absolutely fabulous Bonnie, and lots of impact.
Isn't this a beautiful card, made by Shaz in Oz. I just love how well the two main dies (the Piestra panel and the Snowflake Ornament) work together - yet they were released years apart. I have both of them here and would never have thought to combine them! Well done Shaz - and welcome back to the Playground. So pleased that you're recovering.
And last, but not least, Brenda of Floral Fantasies hopped into the Playground with this amazing canvas. It's fabulous and just so much what I would choose in a shop of course, I love pink :) And, Brenda also gives good instructions as to how she made the canvas into such a work of art - yet more inspiration in the Playground!
We have one new Playmate this week:
Helen C from Oz hopped into the Playground with this really fun elephant tag. I love how the darling little hat matches the dotty paper and washi tape - clever touch!
Welcome Helen, I do hope you come back to play with us again.
Now it's prize draw time, for the three embossing folder sets from last week. Only, there are in fact six sets to be won! I saw just how many people loved the set and ran off and bought three more so I could double the number of winners. This week, because it's a bit time consuming, I'll still use the Random number generator but you'll have to trust me on the results. It takes a while to fiddle around copying, editing and then inserting the screen shots into a post.
And the winners are:
#9 - Helen
#54 Sandy J
#8 Jenny L
#61 April
#44 Sue T
#19 Pen
Can I please remind winners that they now have to drop me an email to claim their prize - as well as including their current address. My email addy is on the right hand sidebar as usual!
This coming week's prize is:
A Clearly Besotted Shaker Shapes 'Circle Hooray' die - along with a packet of 'Champagne' shaker card mix to get you going! Just like I used on my snippets card of course. Both items make up the prize and won't be split. I've just checked out the Clearly Besotted website and it looks to me as if this die is discontinued already, it's only been around since last year - sigh.
The Snippets Challenge will run for one week and the Playground gates will close at 11am UK time on Saturday 3rd September. The gates will open again at midnight UK time on the same day.
A maximum of ONE entry and please say in a comment if you wish to play and be a possible winner of a prize. Please also link back to the Playground in your blog post to be eligible for the draw.
Mr Linky is below - please let me know if you have any problems linking, it's easy for me to sort out so don't struggle on alone :)
A couple of challenges to watch out for in the coming week:
Rudolph Day over at ScrappyMo's, which is running right now, to the end of the month.
Darnell's NBUS challenge, in which you use something Never Before Used - hangs head in shame here as I could enter this umpteen times over and still have loads of unused goodies! It began yesterday and runs until 5th September.
Have a great week! Big hug from Parsnip, and of course me.
Our little family (or it might be families!) of hedgehogs are eating us out of house and home. We now have two feeding stations set up for them and reckon there could be as many as six of them visiting, in all shapes and sizes. It's almost as if there's a big neon sign flashing on the side gate, which we deliberately had cut high enough for them to come and go, saying 'Hedgie Diner, this way'! :)
My snippets card today is a shaker card, not something I tackle very often to be honest but I've had a 'Never Before Used Schtuff' die here for ages, just waiting to be used. It cries out to be a shaker card (although the die would work well without the shaker element too).
And this card is for Darnell's latest NBUS challenge #7 as well - make sure you join in, I bet every single one of you has something unused to play with for the first time:
I used:
- 4.25" x 5.5" white card blank, tent style
- snippet of gold mirri card, trimmed to an eighth of an inch smaller all round and glued onto the card front
- snippet of black card, die cut using a die from the Lil'Inkers 'Stitched Rectangles' set
- then die cut the circular HOORAY aperture, using a NBUS Clearly Besotted Shaker Shapes 'Circle Hooray' die
- two layers of black fun foam, die cut using a die from the Lil'Inkers 'Stitched
Rectangles' set with a circular aperture die cut to line up behind the black card layer - using a slightly larger plain circle die than the HOORAY die
- glued and red line taped the two layers of black fun foam together and backed them with a circle of white card
- using the piece of black card with the die cut word I worked out where to glue three sequins and stuck them in place onto the white backing card
- die cut a circle of acetate, again using the slightly larger plain circle die, swiped it with an anti-static bag and glued it behind the HOORAY aperture in the piece of black card
- then it was just a case of popping some Lucy's Cards 'Little Things' shaker card gold selection called 'Champagne' into the 'well' of the white card backed fun foam and then gluing the card front on top
- then glued the whole thing to the card itself before adding some little pieces of shaker selection to the front, just to break up the starkness
Ha, despite using the anti-static bag, the shaker stuff does cling a bit to the acetate - but I rather like that. It looks more spread out and still has movement when it's shaken.
Here's the weekly 'peek at the picks' - as always it's a tough choice, I try not to favour the same Playmates too much and also look for ideas that might inspire you:


Welcome Helen, I do hope you come back to play with us again.
And the winners are:
#9 - Helen
#54 Sandy J
#8 Jenny L
#61 April
#44 Sue T
#19 Pen
Can I please remind winners that they now have to drop me an email to claim their prize - as well as including their current address. My email addy is on the right hand sidebar as usual!
This coming week's prize is:
A Clearly Besotted Shaker Shapes 'Circle Hooray' die - along with a packet of 'Champagne' shaker card mix to get you going! Just like I used on my snippets card of course. Both items make up the prize and won't be split. I've just checked out the Clearly Besotted website and it looks to me as if this die is discontinued already, it's only been around since last year - sigh.
The Snippets Challenge will run for one week and the Playground gates will close at 11am UK time on Saturday 3rd September. The gates will open again at midnight UK time on the same day.
A maximum of ONE entry and please say in a comment if you wish to play and be a possible winner of a prize. Please also link back to the Playground in your blog post to be eligible for the draw.
Mr Linky is below - please let me know if you have any problems linking, it's easy for me to sort out so don't struggle on alone :)
A couple of challenges to watch out for in the coming week:
Rudolph Day over at ScrappyMo's, which is running right now, to the end of the month.
Darnell's NBUS challenge, in which you use something Never Before Used - hangs head in shame here as I could enter this umpteen times over and still have loads of unused goodies! It began yesterday and runs until 5th September.
Have a great week! Big hug from Parsnip, and of course me.
Subscribe to:
Posts (Atom)