Showing posts with label distressing. Show all posts

Friday, 9 November 2012

And I forgot the 'rule of threes'

I made this card a long while ago when I first set out on my blogging journey, for Len's sister-in-law:
I used:

- A5 cream linen card stock

- distressed the background using Tim Holtz distress ink pads in Milled Lavender and Bundled Sage but they just look washed out in the above piccie! As I'm hopeless at drawing straight lines I did the outline stitching (with a 'Puce' Aqua Marker) round the edge using Paper Pizazz's Easy Stitches template. For me this works but the stitches on this A4 template are quite large (you do get quite a variety though). I hadn't even considered doing 'real stitching' back then :)

-  stamped the dressmakers dummy in Versamark Vintage Sepia - the stamp set is a Paper Girl Clear stamp set called the 'Girls Paperie'

- paper pieced the body of the dummy using some pink and cream patterned paper and also cut out flowers from the same paper plus some toning cream paper with the Cuttlebug 'Flowers' die. Almost the very first die set I bought. I then crumpled each layer of the flowers and layered them together with pearl brads. And that's where I forgot the 'rule of threes' and shoved four flowers onto the card - that really grated when I found this photo on an old SD card last week :( The leaves were punched from sage green card using Martha Stewart's 'Frond' punch

- the tape measure (it's 6" long) also comes in the stamp set so I stamped this onto the pink and cream paper, trimmed it and then joined it into a circle before attaching a couple of teeny sage green buttons with some pink embroidery cotton. I found it easier and less bulky to literally sew the buttons to the tape measure rather than stick them on

- the Happy Birthday tag was made using the last scrap of pink and cream paper and a stamp from Elzybells Mini Tag set and Penny Black's Happy Birthday stamp

- then, the finishing touches were just where I felt it looked a bit 'bare' so a few teensy pearls round the dummy's neck, a little pink bow on the tag and then a piece of sage green satin ribbon tied down the left hand side of the card

Anyhow, Maureen liked it despite me breaking rules - but I still wish I'd stuck to three flowers :(

The rain has stopped here - yay! 

Di
x

Wednesday, 7 September 2011

WOYWW 118

Eek, where did last week go to? Wherever it went, it took the sunshine with it :( To brighten ('brighten' can be either a transitive or an intransitive verb - so that's two big words for today!) your day up - it's time for the weekly snoop to see what everyone else is up to. Before I look, I just bet a lot of people will be thinking of Christmas already - this is beginning to worry me! They were even putting out the displays of Christmas chocolates in Sainsburys yesterday for goodness sakes!

This is what's on my desk right now - and it sure ain't Christmas:
 
I've been despairing over the bunch of Tim Holtz Distress Inks that are much dryer than others say they should be since last week and decided to beat the h*ll out of them have another try. Ahem, think I got a bit carried away and now I haven't a clue what to do with the result so it's being moved from one place to another on my desk whilst I wait for inspiration:( I took each of the driest ink pads in turn, furiously rubbed each pad over a small oblong block, spritzed with water and then stamped a sort of patchwork pattern onto watercolour paper. Quite pretty, but so far totally useless!!!

As I already had inky paws it was time to play with cloud backgrounds and masking images. I'd finally come across Woodware Magi-film last week:
It's great stuff!! Much better than trying to mask using a Post-it, which I found kept flipping up - plus you can see through it which makes aligning over the image you want to mask out a doddle! It's re-usable clear film so if you plan to make a few cards using the same image, keep the backing, replace it after using the mask then store it with the stamp for future use - I'm all for saving time and effort:)

First I stamped the Penny Black hedgies onto white card using Memento, and then onto the Magi-film using Stayzon (it would smudge otherwise I'm sure). The little hedgies were then cut out of the film and are on the bottom of the page above waiting for the backing paper to be peeled off.
This is the image after doing the clouds (I posted about these here) then colouring with Pro Markers and a piece of card I'm playing round with for some grass. As always, I made a boo-boo and didn't trim close enough to the images so ended up with a white outline round them. If you have the same problem and you used Tumbled Glass for the clouds, I found that my 'Cool Aqua' Pro Marker was a help to colour over the white patches and a pretty good match too! Well, a blind man on a galloping horse wouldn't notice I suppose :))

And just in case you think it's all organised and tidy here - a swift swing to the right proves otherwise I think!
The messy basket at the front is full of stuff I've been playing with and have yet to put back into their proper places. The basket behind has unused stuff in for more playing and the plastic box right at the front right has Christmas ribbons and lace in. Sheesh! What am I saying - Christmas?! Nothing for it I suppose but to follow suit and begin in earnest!

Before then, I'm off to make another cup of coffee and have a snoop over at Julia's - see you there! I've just had a peek at her desk and it is the most glorious mess - wonderful stuff!! :))

Di
x

Wednesday, 31 August 2011

WOYWW 117

After yesterday afternoon's shenanigans  shopping with Abi for clothes for Marcel the monkey, I think I left my mojo (and dignity) somewhere in town! Dumbo here hadn't really thought about the ramifications (today's big word) of a teenager using crutches plus Marcel the monkey to carry. Yup, I got the job! Despite some amused looks, and one lady shopper even pointing us in the direction of newly born baby shoes (whilst suppressing snorts of laughter) it was successful mission all round really. Four new tops, a pair of shoes and a watch for Marcel - which apparently is going to be set to French time :)) He's gonna look 'tres chic' - although the mission to find him some PJs continues. Hank and Marvin also got a couple of additions to their wardrobe - so at least they're all happy!

So, with a missing mojo not much going on here today craft-wise. After yesterday's try at doing distress inked clouds (see post below for an idea of how it's done and a link to a good video tutorial by Bev Rochester) I've just been generally playing around this morning with distress ink pads etc. looking to see what other backgrounds are possible. Sheesh though, those ink pads do dry out quickly - some have never even been used! Grump, grump.

This is what my desk looks like right now - not very exciting at all, just ink pads, brushes, a mini mister and that pair of scissors still waiting to be cleaned with sticky stuff remover:
Drat, I just leant right onto the patch of damp ink on the right hand side of the mat! One mucky elbow - definitely not a good day! I'm gonna sweep it all to one side, change my top, set the washing machine away , make a cup of coffee (that's the problem, it's been only teas so far today!) and hop around everyone else's desk for inspiration. Why not join me over at Julia's - it's bound to be more fun than it is here right now :)


Di
x

Tuesday, 30 August 2011

Up, up, and away!

I finally bit the bullet and had a go at making a cloud background using these little babies:
A cloud template, cut from plain old white card, an Inkylicious Duster Brush and Tim Holtz Distress Ink pad in Tumbled Glass.

I had a whale of a time, 'pounce' on the stamp with the brush and dab, dab, dab. It certainly isn't my own idea and if you want to see a really good video tutorial hop over to Bev Rochester's blog here. She shows how to mask an image and then stamp clouds, my next step!

It was really just a play as I know that Sarn has been squeaking in delight since she got her little paws on some brushes and I had to see, finally, what it was all about. I'm ashamed to say I'd had the brushes for ages :(

So, I pounced and dabbed like crazy yesterday afternoon - not that it flattened the 'humpy' mat on my desk. Ha, if I hadn't got sensible I'd have pounced and dabbed right the way down the side of my desk, across the floor and down the stairs - it's addictive!!  Having created the clouds background I just knew what to use next - for once. About a week ago I was lucky enough to come across a second hand 'pre-loved' set of Stamping Up butterfly and sentiments stamps, plus the accompanying butterfly shaped stamp - being sold by a fellow blogger! Whoop, whoop - I've secretly hankered after these for eons (not really today's big word but still a grown up one). They arrived in double quick time too.

So, the card which started out as a DL card was trimmed to A6 size and this was the result, I do need more practice but it was fun anyhow:
I love the sentiment - so you don't get dizzy it says 'One person can make such a difference and that person is you' - it could apply to all of you lovely bloggers who hop in here! Then I stamped two butterflies onto some iridescent (now THAT is today's big word!) pinkish paper that I found in my snippets folder, punched them out and layered one on the card flat and the second one on top with its wings all aflutter.

So quick and easy - compared to the marathon it took to make the card I posted on here yesterday :)

As I used snippets I'm entering this into Jules Crafty Snippets Challenge Week 34.

That's my offering for today. Abi and I are taking Marcel shopping for some PJs this afternoon. Yup, Marcel is coming too so we're sure we get the correct fit :)) Hank and Marvin are staying at home with the money to bail us out in case you hear on the news that two females have been evicted from stores, along with a nude monkey, in North Hampshire - Marcel might just whip off his shoes, jeans and little top without going into a changing room first! Oh, and the older of the females will have been wearing a hoodie and large sunglasses for fear of bumping into any of her friends. Oh dear, I think this afternoon is gonna be fun and games!

Di
x

Monday, 9 May 2011

Lily of the Valley - Return of Happiness

Daring Cardmakers current challenge is to feature a May flower, either Hawthorne or Lily of the Valley. I remember my Mum sometimes wearing Lily of the Valley 'scent' so I plumped for that. Her all time favourite perfume though was Chanel No. 5 and to this day that's all I wear (err, clothes too you understand!).

Anyhow, I didn't have a Lily of the Valley stamp so I scouted round the internet and found an image on a 'how to draw' website. I then coloured the image using Pro Markers and set about putting this card together:


It's a 6" x 6" cream square card, topped with paper from an old, and dogeared so I don't feel guilty about chopping it up, music book from a local charity shop. I used Tim Holtz 'Old Paper' distress ink to tone the paper down. The creamy Guipure lace is from my stash, as are the heart charms dangling from beige twine. The tag is from my stash and the gorgeous green pure silk ribbon is from The Ribbon Girl. It's so soft and delicate - you want to just stroke it! The little birdies are from a Woodware Clear Magic stamp set and after colouring them with Pro Markers too I also added layered wings for dimension. The Lily of the Valley image is layered onto a Nesties scalloped square with a Tim Holtz Hinge Clip at the top of the 'frame'.

One of the meanings of the flower Lily of the Valley is 'return of happiness'. That's why I chose the tag saying Joy and Happiness and the two little birds and the hearts. Sometimes, things happen to us in life and we wonder if we'll ever find happiness again - this card spells out hope and it's especially for anyone reading this who might be wondering if happiness will return.

So, enough mushy stuff! I'm entering this card into:

Daring Cardmakers Challenge - May Flowers

I Love Pro Markers - 'Song Title'. My chosen song title is 'Lily of the Valley', written by the fabulous Freddie Mercury of Queen. I've just listened to it again and it's beautiful.

A BIG thank you to everyone who has called by and left comments, 'if friends were flowers, I'd pick you'!!

Di
x

Tuesday, 12 April 2011

Mini Picasso at work

My OH's family are likely to come over from Germany this Summer to visit. Little Mia, aged all of three and a half, absolutely loves drawing. This is what her Mum just posted on their 'family only' blog:


Ooops, I think somone has taken to drawing murals - all over the stairs! There are stairgates in place so Mia must have really stretched her arm through to produce this 'work of art' :)

Tee, hee - I've used the label 'distressing' for this posting, have yet to find out if the damage is permanent but I just bet that Mum was very distressed and that someone small had to stand in the naughty corner for quite a while.

The dilemma is - during the possible visit, how do I lock my craft room securely enough! I can't imagine the carnage if Mia gets in here - little scallywag!!


Di
x

Tuesday, 16 November 2010

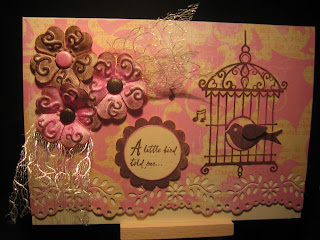
'A little bird told me........' birthday card

I made this card for a friend's birthday - which is today so it's safe to post this :)


I really wanted to distress the background myself but time wasn't on my side to have a real 'play' - mental note to self to plan ahead more! I used a cream card and layered Papermania double sided paper onto it. This paper is great as it has a bit of a vintage look to it, pink and cream on one side and distressed brown on the other. The bottom of the paper has been edged using a Martha Stewart 'Floral Vine' deep edge punch. This is the first Martha Stewart punch I've bought and am now a total convert!

I used a Woodware clear set stamp set called 'Bird Song' and paper pieced the little bird onto the reverse side of the paper (ie. brown) and stuck him onto the card before stamping over the top with his rather splendid cage - using a Brilliance 'Pearlescent Chocolate' ink pad. I also paper pieced a wing so that it looks as if it's on the outside of the cage to give more dimension. Some of this detail has been lost though as the ink is almost the same colour as the brown distressed paper - little lesson there I think :) The birdie's little pink eye was just a teensy bit of the 'confetti' made when I punched the bottom of the pink and cream paper! And even the little musical notes come in the stamp set!

The sentiment was stamped onto plain cream card using 'Pearlescent Chocolate', punched into a circle with my SU punch then layered onto a larger scalloped SU punched circle in the distressed brown.

The flowers were fun too - they're creamy coloured embossed Prima flowers which I swished over with Pearlescent Orchid and Pearlescent Chocolate on a blending sponge, and their centres are card candy (I deepened the pink card candy with some more 'swishing with a blending sponge'). I'll be using more of these flowers - you get loads in a packet and they are made so that you can totally colour match them to your project. Yummy!

Then, before attaching the flowers I added a piece of really gorgeous lacy cream ribbon. I got some of this, also in white, ages ago in Hobbycraft and it's so soft and silky - up until now I've just stroked it and looked at it, as I'm sure many people do with crafty goodies before they realise it really should be used!!

Thanks for calling by!

Di
x

Saturday, 7 August 2010

First try at 'distressing'....


....and Tim Holtz needn't worry about competition! :(

Having been a bit sceptical about distressing techniques I finally decided to have a little dip of a toe into the water. Hmmmm, this is the result!

For the background I just dabbed three distress ink pads (Dried Marigold, Peeled Paint and Walnut Stain.....aren't the names mouthwateringly great) onto my hot stuff mat and misted it with water. I then picked up the 'mess' with a piece of satin silk artcard from Inkylicious. This card is just great, it's at least 300gsm and I think anything less would have just freaked out at the amount of water I'd liberally sprayed! Then I dried it with my heat gun and stared at the resulting 'mess'. OK, so then I stamped a swirl (using a clear Inkadinkado stamp) in Walnut Stain...and this is where perhaps I should have left well alone. But, I misted again and lost the clear definition....boo,hoo!!

But, I'd gotten this far, so I carried out with my sows ear. I had to trim off the edges where the ink had 'pooled' a bit and then layered it onto a cream linen card. The little Gorjuss picture is from one of Gorjuss's sets of toppers and tags, the 'Dream' tag is a Tim Holtz Adage with a little bit of brown edging and the organza ribbon is from my stash (bound to be from Hobbycraft!).

Tentatively I asked the opinion of my 'in-house critic' and was told it looks a 'bit Goth-like'. Yay, just what I'd been trying to achieve - bemused look when I punched the air and hollered 'YESS!!'.

I think this distressing lark is great fun and doubt if you get the same result twice....hopefully the next try WON'T be the same...I want it to be an improvement!!

Learning all zee time though :)

Di
x