Tuesday, 28 February 2023

Rudolph Days Challenge - February 2023

Eek, Mo's February 2023 Rudolph Days Challenge is due to close - so I'm racing in with an upcycled Christmas card:

I used:

- 6.5" x 3.25" white mini slim card blank, tent style

- piece of Tonic 'Scarlet Organza' Tonic satin mirri card, die cut using a die from the Lawn Fawn stitched border 'Mini Slim Stackables' set and glued onto the card front

- I'd already chosen the card to upcycle, so I chopped it down to sit inside the red satin mirri 'frame'

- next I added a silver mirri card sentiment, backed with a white card die cut for dimension - cut using a Tonic Studios 'Mini Moments Merry Christmas' die

- then backed the image layer using thin white foam sheet and Collall All Purpose glue

- then glued it onto the red layer and called it done

I do so love the Tonic range of mirri, satin mirri and pearlescent card for Christmas cards. Their variety of red mirri shades is quite extensive and 'Scarlet Organza' is such a perfect match for the red car!

When cutting down the upcycled card I was pretty ruthless and cut off  the top half which was a background scene of a horse and cart, some hills, trees and a few houses in the distance. I like that the focus is now drawn to the tree with the cardinals - as well as the car - and furry passenger! The card is still quite busy but the original was over fussy, IMHO.

And I still have a good selection of 2022 bought card fronts from ones we've been sent, in reserve to play with!


Monday, 27 February 2023

Cheers!

I very recently discovered the 'Outside the Box' Memory Box challenge, where you need to use at least one Memory Box stamp or die. I have a ton of Memory Box products so this was exciting news. Sadly, they don't send prizes outside the USA/Domestic area - but it's great to get you thinking for sure!

It was such a recent discovery that I more or less decided to wait until March to play as the February #92 challenge closes late on 27th February. But the theme of 'I'll Drink to That' kept on swirling around in my head - and so I whipped up a card on Sunday to enter, here's the link to the Challenge.

I had a load of fun making my card:

I used:

- 5.5" x 4.25" card blank, made using 'Syntegro White Linen Silkweave' textured card, side opening

- a snippet of black card (from the fancy folders that Royal Mail post online postage supplies in) - die cut using the Memory Box 'Piestra Tile' die

- the cocktails are by Tattered Lace from the 'Cocktail Glasses' die set - gifted to me by a very kind friend a good while ago. I die cut them using snippets of the same white card, on the reverse smooth side 

- then spent a happy hour (ha, ha - see what I just said, totally without thinking!) colouring in the die cuts, using Zig pens and a waterbrush

- tickled the contents of the glasses with clear Wink of Stella - not playing game and showing up in the photo of course

- layered the little cocktails onto another layer of the same die cuts for rigidity

- then I could place things in place and work out where I wanted the sentiment to go, before they were actually glued down

- stamped the word 'Celebrate' using a Paper Smooches Stamp from the Sentiment Sampler' set of stamps and a VersaFine Clair 'Nocturne' ink pad - a lovely intense black

- then added the 'Piestra Tiles' panel using a glue pen before adding the cocktails, again with a glue pen ........ along the top of what I imagine to be a rather elegant bar in a swish hotel!

This was such fun to make - I didn't think to use my Arteza Watercolour pencils until I was popping the water brush away. Bad me, sorry Santa! I suspect they would be better for such small detailed areas but we live and we learn.

Apart from linking into the Memory Box challenge above, I'd like to enter this into Darnell's NBUS Challenge #47  - the cocktail glasses die set was having a first outing.

Also, the current Allsorts Week 717 Challenge - under the 'Anything Goes' option.

As to the contents of the cocktails - ask me another! No idea but from left to right I'd hazard a guess at a 'Limoncello Serenade', a 'Mojito' of sorts and finally a 'Peach or Strawberry Daiquiri or Bellini'. Yup, I've been round the cocktail menus in my time. Kept these names clean, you ought to see the ones listed in the menus in Covent Garden's cocktail bars. I used to meet up with a friend there pretty regularly after work before she and I tottered tootled off to find somewhere nice to have a meal - happy days!☺


Sunday, 26 February 2023

Uniko's 11th Birthday

Bev, over at Uniko, is currently celebrating 11 years since she started off her brilliant business. So I made a snippets card to join in with the fun:


My snippets, although I didn't use the black after all

I used:

- 5.5" x 4.25" 'Syntegro White Linen Silkweave' textured card, tent fold

- a piece of the leftover A4 sheet I used for the card card to cut the panel - sized at 5" x 3.75" - then set aside for a while

- stamped the flower head and the leaves onto snippets of bright pink and light green card, using stamps from Uniko's 'Gerbera' set and a  VersaFine Clair 'Nocturne' ink pad

- then die cut the flower head and leaves using the matching dies

 - next I pulled out a 'Happy Birthday' stamp from Uniko's 'Floral Vines' set of stamps and fiddled around working out placements of the flower and the sentiment

- I wanted to add something extra to the background and ideally would have used an embossing folder to partially emboss the panel where the flower would go. However, it was Uniko products only so I settled for using a score board to add a couple of sets of double lines above and below where the sentiment was to be stamped 

- stamped the sentiment using the same 'Nocturne' ink

- glued the panel onto the card front, raised up with a layer of foam sheet for dimension

- then glued the leaves in place, and added the flower head using thin sticky pads for more dimension

- stepped away and resisted the urge to add anything else!

I'd like to enter this card into the following challenge:

Uniko's 11th Birthday Celebrations - you must use only Uniko products (there are some links to freebies if you want to play along), end date is 28th February

Sarn's post for the picks and winner of Challenge # 447 can be found HERE in the Playground.

Dudley Pupdate - poor little guy was pooping for England during the week. He's fine again now thankfully. He's such a little trouper and just gets on with things - unless there's any risk at all of anyone, including Len and myself, stealing his beloved Honka Duck of course. If one of us is left alone with Honka Duck and then dares to move around, such as standing up to open a cupboard - he charges back into the room like a little rocket to carry out a rescue mission. At the same time almost squealing with indignation! I keep telling him that he's a 'big girl's blouse' - Northern expression for being a bit of a wimp. ☺


Sunday, 19 February 2023

Christmas 'Joy and Cheer'

This is my snippets card to kick off challenge #448 in over in the Snippets Playground. Go HERE to join in the fun!


It's a bit deceiving as the vellum on top of the mirri card makes it look as if there's some pale pink card as well!

I used:

- 5.75" x 5.75" white card blank, side opening

- first of all I wanted to cut and assemble the sentiment in order to confirm that the patterned paper I had in mind would work well - the NBUS die set I used is by Memory Box, called appropriately 'Joy and Cheer'

- die cut the actual sentiment once from white card and once from Tonic 'Rose Platinum' mirri card - both were snippets - then glued the mirri layer onto the white one for rigidity as well as dimension

- then die cut the background profile from a vellum snippet

- popped the mirri sentiment onto the vellum layer - using a glue pen 

- trimmed a piece of Tonic (Rose Platinum) mirri card to 5.5" x 5.5"

- I cut the middle out of the mirri card, in a moment of thrift, using a square die by Presscut measuring about 4.5" x 4.5" so I could save that piece for future use

- glued the mirri card 'frame' onto the card front and leveled out the centre by gluing in a piece of white card, die cut using the same square die to be a perfect fit **

- then trimmed my chosen piece of paper from the Crafter's Companion 'Frosty and Bright' paper pad - down to 5.25" x 5.25" and glued it onto the mirri edged layer

- finally, glued the vellum backed sentiment onto the card front - making sure the glue was only behind the actual lettering. The vellum is 150g so it's heatproof and quite thick but I wasn't taking any risks at that stage!

Whist at it, I made a second card exactly the same - of course. 

** The 'cutting out the centre' of the mirri card wasn't one of my better ideas to be honest. It did make gluing the mirri card frame onto the card front less easy to get straight than if it hadn't had so much of the middle removed, basically as it's not rigid of course. C'est la vie - we live and learn! It's still worth bearing in mind if you're desperately trying to get as much out of a particular piece of paper or card as possible of course. Perhaps I'll have a try at taping the 'filler insert' into the card 'frame' from behind before gluing it to the card front another time.

I'd like to enter this card into the following challenges:

Darnell's NBUS Challenge #47 - the Memory Box die set was having a first outing, certainly won't be the last though.

Dudley Pupdate - we think he's going through a 'spotty teenager phase' at the moment. Seeing how far he can push the boundaries - until he's forgets himself and still comes for cuddles of course! 

One example of him being a 'rebellious kid with his baseball cap on backwards' was him going on 'hunger strike' two evenings running - purely as he could smell our meal cooking and thought he might join in and have a share! Pizza one night and boeuf bourguignon the next? I don't think so young man. Nice try though!


Wednesday, 15 February 2023

And then, I met you

I wanted to make a CAS Valentine card for Len - nothing super-slushy - and came up with this:


I used:

- 5.5" x 4.25" side opening card blank, made using Syntego 'White Linen Silkweave' textured card stock, scored, folded and trimmed to size

- die cut a row of hearts from a snippet of plain red card stock, three times and glued them on top of one another for dimension before setting them aside - the die I used is from Positively Papercraft's 'Two Piece Heart set'. 

- then cut a panel measuring 5.25" x 4" from the same sheet of card and scored it on all four sides at .25" from the outer edges

- dug through my stamp sets and found the sentiment I used - from an Avery Elle set called 'And then'

- stamped the sentiment onto the panel, checking where I wanted the row of hearts to be placed, used a Hero Hues Core Inkpad called 'Granite' for a softer look then straight black

- then glued the panel onto the card front

- finally, added the row of triple layered hearts 

The card is a pure white in real life, I forgot once again to tap my lamp setting to the daylight setting when taking the photo. Dumbo!

It went down well with Len, he likes CAS style cards! The sentiment is quite special, I met Len through work in London when we'd both been through traumatic marriage break-ups. We were colleagues and just friends for a good while, I never really expected that he would be into making another commitment. The words 'And then, I met you' sums up that you just never know what's around the corner!

I picked up a great tip from Chrissie, which a lot of you might very well know already. When folding your own scored or even a bought scored card blank, lay the opened out blank onto your scoreboard, butting the top edge of the card and left hand side against the raised edges. Then fold the right hand half over the left, along the score line to butt up against the raised edges then run your bone folder down the fold line - and you should have a folded card blank with perfectly lined up front and back edges.

I'd like to enter this card into:

The current Allsorts Challenge Week 715,  where the theme is 'A/G with the option All About Hearts'. 

Darnell's NBUS Challenge #47. My NBUS items are the hearts die and also the Hero Arts 'Granite' ink pad (thanks to Jennifer McGuire for the tip).


Sunday, 12 February 2023

Playing around with Gummiapan dies

Chrissie Stokes on YouTube is a huge fan of the Swedish company 'Gummiapan' and I can absolutely see why. Their sweet and quirky little dies in particular are SO detailed, very reasonably priced - and postage to the UK is very fair as well.

So, I had a first play the other week and came up with this 'one-off' Christmas card, making up a story as I went along:

I used:

- 5" x 5" square white card blank, cut from Syntego 'White Linen Silkweave' textured card stock, scored, folded and trimmed to size

- then used the flat/plain side of the leftover snippets to make the die cuts for the card of the card - hence no photo of just a bunch of white snippets

- I did cut a piece of the same linen weave card for the image layer, just a bit smaller from another sheet - my middle name isn't Houdini!

- and then the fun began and I used the leftover snippets of white card to die cut a selection of Gummiapan dies - teeny and so sweet as well. I used the following sets, 'Sitting Gnome', 'Fluffy Trees', 'Gift Bags' and 'Lantern with Candles'

- coloured them with my Ziggy Pens and then whined to you lot about how 'flat' the colours looked, even after spraying them with some clear Glimmer Mist

- for the sake of not ruining my work, held off playing any further with coatings and sprays

- the little lantern was a late addition and such fun to make - die cut the lantern and candles from white card, same as all the rest. Coloured the lantern frame with a silver calligraphy pen then decided it would be fun to add some clear acetate (from a snippet of packaging) to look like glass. It looks so good in real life, with the candles stuck in place behind the acetate, using micro dots

- then added all the elements to create a little scene whilst trying to stick to a bit of CAS too

- before sticking things down - using a mix of glue and mini glue dots, I did run some grey Pro marker 'grounding' lines along the bottom of the image panel

- then stuck every little piece into place - even the gift bags are so detailed, one has a teeny lifting handle for goodness sake!

- once everything was in place - I added a spare layered sparkly silver die cut sentiment (another snippet?) that I found in a little pot, left over from my 2022 Christmas card making sessions 

- glued the whole panel onto the card front - finished!

My little story, woven around the card, is that Papa Gnome had been last minute Christmas shopping. Buying his personal gifts for his beloved wife, Mama Gnome. He was well on the way home, but was also really tired from all the other male Gnomes fighting and jostling in a panic just before Christmas. Then he, then spotted a little candle lantern in the woods beckoning to him, beside a tall tree - so he dropped his shopping and immediately leaned back for 40 winks! The gift bags are now leaning against the Gnome's leg! That's the thing with glue dots - they can move around a bit!

This did remind me of many years ago when I worked in Newcastle City Centre and we were rather cruelly made to wait on the 'whims of senior management' but usually did get 'let out' slightly early on Christmas Eve. I loved to walk up the 'main shopping street', all lit with Christmas lights, where the biggest department stores were, to the bus station, past the likes of Fenwicks etc. and quietly smile at the last minute 'male buyers' straight from the pub or an office party. 'Weebling into the stores' .... totally at the mercy of the awaiting and smiling perfume, jewellery and lingerie shop assistants! At that stage they truly didn't care what they spent! Memories!

This past week was kinda busy with this and that, including the optician for me on Tuesday just gone. Absolutely no change, which is really interesting given the cataracts panic button business three years ago by my previous optician. I have total trust in my current practice though - which is a good feeling. If you find a good optician then try to stick with them. Avoid the ones who are there purely to sell their latest frames.

Dudley was 'super-charged' from Monday morning onwards! As soon as we stirred he hopped back up onto the bed, licking, bouncing and generally trying to wake us up - PRONTO! It shows how down he must have felt after the vaccines - it was like having a Jack-in-a-Box in our bedroom!

We've had some warmer days lately so he's had loads of walkies this week and that too has given him some more 'bounce'. Won't be long before it's warm enough for me to go along as well - yay!

Remember that we're halfway through Sarn's Challenge #447 and the latest picks and prize winner are over HERE on the Snippets Playground!

Love, as always, Dudley and yours truly xxx


Sunday, 5 February 2023

More Arteza colouring

Sarn's post starting off Challenge #447 is up and running and can be found HERE in the Playground.

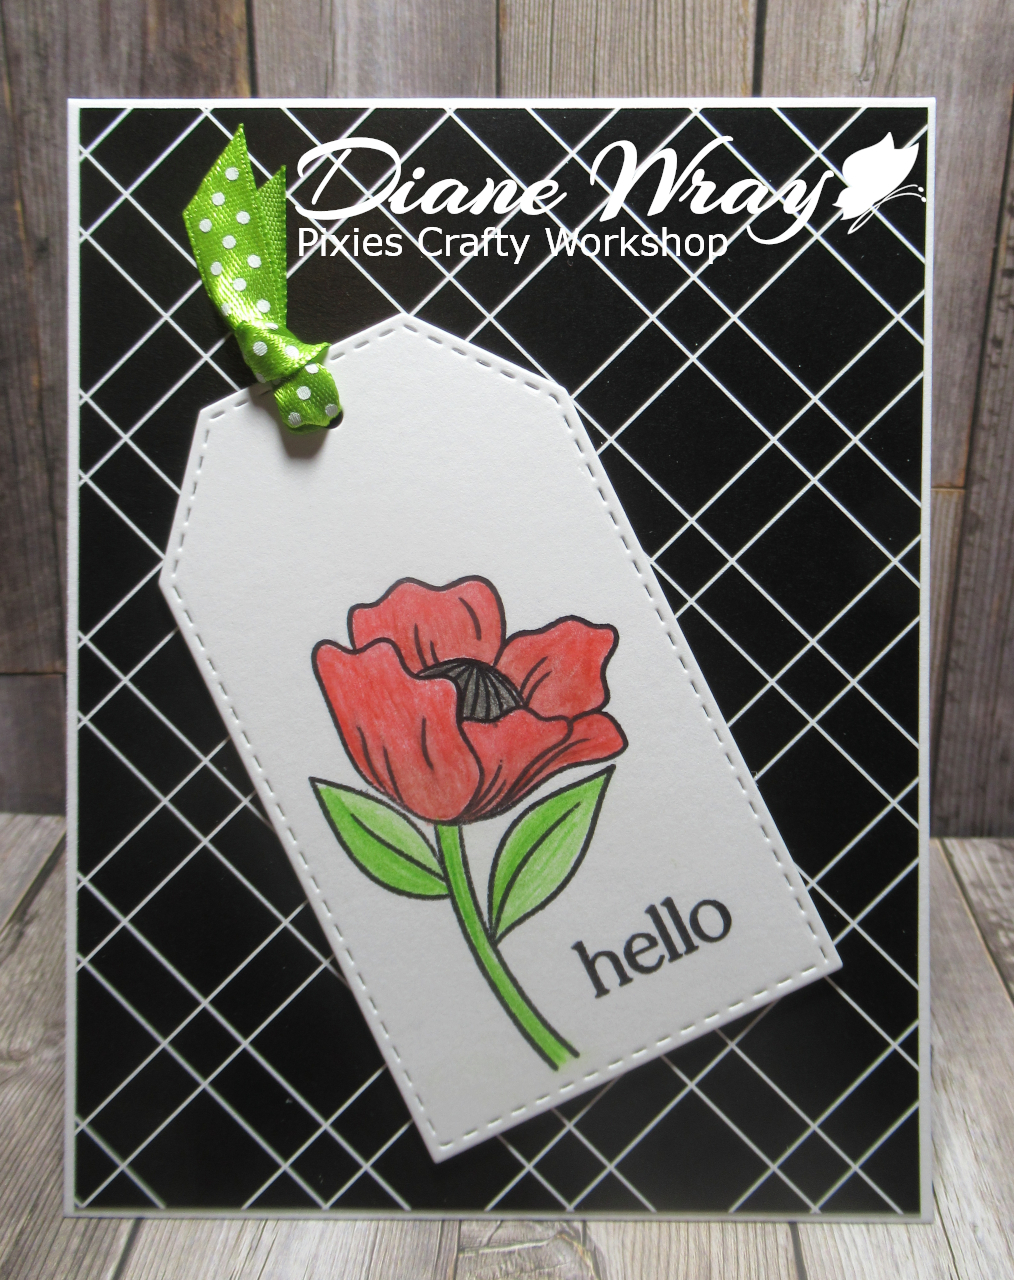
Whilst I had the pencils, waterbrushes, label die etc. out over a week ago, I stamped a second image using the same sweet little Altenew flower stamp onto a further snippet of Mixed Media card, added a snippet of green spotty ribbon - and, shock horror, used the best part of an entire sheet of background paper. This is the result:


My snippets!

I used:

- 5.5" x 4.25" 'Strathmore Mixed Media' card blank, tent fold, used the same card as for the water colouring to be sure of a matching shade of white

- stamped the flower image and the word Hello from the same set onto a snippet of 'Strathmore Mixed Media' card using black Archival ink and a stamp set by Altenew called 'Bold Floral'

- coloured the image using the Arteza pencils and a fine waterbrush - this time trying for the look of a poppy

- die cut the image with sentiment using a label die from an un-named set of dies

- trimmed a piece of paper from the Altenew 'Essential Black & White' paper pack to just smaller than the card front and glued it onto the card front

- threaded a snippet of spotted green satin ribbon through the top of the tag and fixed it to the card front using sticky pads

- finished!

The poppy reminds me that Spring and then Summer will surely be on the way. Let's hope so! The odd thing is, I read recently that this coming Summer might be even more of a scorcher here in the UK than last Summer. Can't we stop the clock at late Spring/early Summer and then skip the intense heat in the UK then begin ticking during Autumn?

Dudley Pupdate: it's been a fairly adventurous week with Dudley. We trimmed his claws, no mean feet feat which usually takes the two of us - me hugging a wriggling bath towel wrapped 'burrito' to my front - with just one paw at a time poking out - plus a rather cross little face glaring and rolling its eyes. Len then sits in front of me to do the 'deed'. The little monkey (Dudley) managed to get his other front paw out and clocked me right in the mouth at one point. Then, desperation set in and he buried his head under one of my arms in sheer surrender - for a few minutes until the fight kicked off again. It's such a shame he doesn't realise it's for his own well being, but the towel trick is a big help. Then later in the week it was tsunami time when we all he had his bath - followed on Friday by his annual trip to the vet. 

It's the first time Dudley has been fazed by going to the vet - even when he went back after his mole removal he was fine. He was really uneasy in the waiting room for some reason. But, he passed his checkup fine - although on the way home, reading his record card I realised that he'd been given his three yearly DHP jab in addition to the annual Lepto jab. He was unwell after the one three years ago so I just kept quiet and crossed my fingers

However, within just a few hours a reaction set in - nothing too serious but Dudley not eating his evening meal is a sure sign he's off colour! He lay around pretty listlessly for the whole evening - but perked up by midnight and allowed Len to hand feed him his favourite meal of steamed chicken breast. Then he slept beside the bed rather than in between us - I think hopping onto the footstool and thence onto the bed was just too much effort for him. Thankfully, by the morning he more or less was back to his usual self. So all in all he's been through the mill this past week - poor little sausage!


Thursday, 2 February 2023

Salvaging a Brushos disaster

I decided to have a go at using my long-neglected Brushos the other week. And, as usual, instead of the really pretty mottled results that others achieve - I ended up with a mess of very slightly variegated greens, partly from over-zealously using two shades of green ...... as well as too much water. So, I dumped it to one side and did something totally different. Brushos and I just do not work well together. Am sure I'm just too heavy handed - but c'est la vie as they say.

However, a day or so later I picked up the discarded Brushos panel, peered at it then gave it a few squirts of Glimmer Mist to add a slight sparkle - then suddenly it began to have possibilities - this is what I ended up making:

Bright mirri gold card, with my red top reflected!

I used:

- 5.5" x 4.125" white linen silk weave card blank, tent style (just slightly smaller than USA A2 size) - confession, due to the odd size Brushos panel I ended up with once I cut the grotty edges off!

- the green Brushos panel, for which I'd used Strathmore Mixed Media card and later I'd also sprayed with some ancient clear Glimmer Mist

- ran the panel through my Cuttlebug using a NBUS Gina K embossing folder called 'Holiday Flora' and hope began to rear its head - that is one fabulous folder!

- trimmed the panel and added some gold gilding wax using NBUS Cadence 'Inca Gold' Finger Wax, I need more practice, please be kind - although I used my right ring finger I suspect that a finger sponge would have less 'give' than the pad of my finger!

- then layered the panel onto a slightly larger snippet of Tonic 'Inca Gold' mirri card and glued it onto the card front

- used a snippet of vellum to die cut the back surround for the word 'Christmas' using a NBUS die from Julie Hickey's gorgeous 'Christmas Profile' die set and set it to one side

- then die cut the word 'Christmas' - using the same Julie Hickey die set - twice from a snippet of white card and once from a snippet of 'Inca Gold' card then glued them together using a glue pen, before attaching the vellum 'profile' layer to the back then setting it to one side

- die cut the word 'Merry' using a 'small Merry' die from years ago by Britannia Dies, two from snippets of white card and once from a snippet of 'Inca Gold' mirri card - glued the layers together using Stix2 'Micro Dots'

- then positioned the two parts of the sentiment die cuts where I wanted them, using some very small Stix2 craft dots to adhere the word 'Christmas' and the fine glue pen to adhere the word 'Merry'

And there it was, done! I used quite a few a lot of items from my NBUS (Never Been USed) baskets. I truly don't need to buy anything crafty for the rest of this year, apart from essential and basic items. Ha, define THAT one! ☺

I also used some items like Stix2 tiny glue dots as well as micro dots for the first time. What a revelation (thanks to Chrissie Stokes on her YouTube Channel). The micro dots are a right 'so and so' to get into if I'm honest - I sat for ages trying to separate the two layers. But, SO worth it! And, I was wise and popped a teeny tiny piece of paper in the corner where I'd worked the layers apart to make life easier in future.

I would like to enter this card into Darnell's latest NBUS Challenge HERE - so much NBUS I almost feel ashamed to admit it! The embossing folder, the gilding wax (in fairness my cheapo ones had solidified) and the lovely Christmas word die as well. I guess the tiny glue dots and the micro dots also count!? Man - me needs to put the spending brakes on!

I would also like to enter the Christmas Craft Creations Challenge HERE  The theme is snippets and you still have time to join in!


Sunday, 29 January 2023

Playing with Arteza watercolour pencils

At least the rain has stopped and Dudley is enjoying his walks without having to dodge the rain. Snowdrops are appearing as well, always a sign that Spring isn't too far away. 

Sarn's post for the picks and winner of Challenge # 445 can be found HERE in the Playground.

Santa, after a strong hint or three, brought me a set of Arteza watercolour pencils for Christmas. I spent time the other week making up a colour chart with both dry and wet colours for each pencil - and I finally sat and played properly with them the other day. Still need loads more practice but for a first attempt I was quietly pleased with my Sunday Snippets card:

 
My snippets, ready to begin!

I used:

- 5.5" x 4.25" 'Strathmore Mixed Media' card blank, tent fold. I used a snippet of the Strathmore card for the watercolouring and it's an off-white so I used more of the same card to be sure of a match

- stamped the flower image and the word Hello from the same set onto a snippet of 'Strathmore Mixed Media' card using black Archival ink and a NBUS stamp set by Altenew called 'Bold Floral'

- next used my colour chart to find the best Arteza tcolours I could to go with a couple of patterned paper snippets (from a Honey Bee paper pad called 'Team Tie Dye')

- coloured the image using the Arteza pencils and a fine waterbrush 

- die cut the image with sentiment using a label die from an un-named NBUS set I've had waiting for a first outing for ages

- trimmed the biggest patterned paper snippet to just smaller than the card front then trimmed down the bolder toning strip before gluing it across the paler piece of paper at a jaunty angle and trimming the excess from each side

-glued the patterned panel onto the card front

- threaded a snippet of spotted organza ribbon through the top o the tag and fixed it to the card front using sticky pads (plus the neat trick of adding some glue stick to the pads before actually setting the label in place - just to allow some wiggle room)

- stepped away and resisted the urge to add anything else!

The Altenew flower stamp is absolutely gorgeous - really sweet with so many potential ways of colouring it.

I'd like to enter this card into the following challenges:

Darnell's NBUS Challenge #46 - the stamp set was having a first outing along with the label die - and also the Arteza watercolour pencils of course

Dudley Pupdate - with the improvement in our weather, Dudley is back to his usual walks routine. To be honest, he's never been a dog who leaps up and down with joy at the sight of his harness and lead. Sometimes, he actually zips under my desk out of the way if I'm not fast enough to stop him. But, once he's out he's fine - he wiggles his perky little rear end all the way (Havanese trait) and we're sure he's all the brighter for it! It's still not quite Purple Peril weather but, when the three of us go out together for a walk/ride together, Dudley is raring to go and doesn't pull to come back home either. It means he doesn't actually favour either one of us - he's happiest when we're all three together - UNLESS one of us is in the kitchen preparing a meal of course!

Dudley has his annual trip to our vet for vaccinations and check up on Friday - fingers crossed all will be fine! Our vet practice is one of the best Animal Hospitals in the county - but, for some reason they just can't keep their vets. All of the vets who know Dudley have left over the past year - and it's nuffin' to do with him either! ☺ We're slightly poised to find another practice if we really find things aren't right. Fingers crossed we won't need to change though.


Thursday, 26 January 2023

A QUESTION

I should have added this to my blog post of yesterday - after I wrote about using hairspray to seal a piece of gilding flakes work. 

I've used my Zig pens recently and - although I love the vibrant colours - I just don't like the very flat and matt result. It's too much like the old powder paints we used at school when I was a kid. 

Hairspray very likely isn't enough and so to get round it I've used a Wink of Stella Clear Sparkle pen (it's for a Christmas card so that's fine, but it wouldn't always be the case) BUT, how wonderful would it be if you could get a gentle paint on Wink of Stella style gloss only pen. Not thick Glossy Accents, or a spray - just a brush applicator without the added sparkle to give a less matt look to work. Is there a gap in the bulging market?

Or do you know of a product - easy application, not a spray and preferably a gentle brush like Wink of Stella but with no sparkles?

That's my current quest and so far it isn't getting very far either! SOB!


Wednesday, 25 January 2023

Playing with gilding flakes

In a few of Chrissie's YouTube videos, she uses gilding flakes - and that set me thinking back to when I too used to play with flakes and double sided adhesive sheet - and so, this Christmas card came about:

 
A closer peep at the shiny leaves!
I used:

- 5.5" x 4.25" Pale Ivory Linen Silkweave card blank (using a sheet of A4 card)  

- then covered a panel of light brown card with a snippet of double sided self-adhesive sheet before applying a coating of Cosmic Shimmer 'Mulled Wine' gilding flakes, gently patting them on at first (you don't need much!) then spreading and buffing them using a piece of 'scoochy foam'

- next, die cut the leaves using an unbranded 'Fragmented Leaves' die bought for me by a special friend - and it's probably my favourite die in the whole world right now!

- the leaves felt slightly sticky after I'd finished, so after having a little think I sprayed them with hairspray and it worked perfectly as a sealant

- more die cutting - a snippet of brown card and a Memory Box 'Woodland Branch' die - which I glued onto the card front using a glue pen

- then die cut the 'JOY' frame onto the card front. It was cut from a snippet of Craft Perfect Pearlescent 'Red Velvet' card using a Die-namics MFT 'JOY photo card frame' die

- stuck the frame onto the card front using very narrow foam strip around the edge (again I used Chrissie's trick of running a glue stick over the sticky surface of the tape before popping it in place onto the background and pressing it down - it's a real game changer!)

- die cut a sweet little bow from the same Red Velvet card, using a Gummiapan 'Rosetta' die

- and finally, popped two leaves and the bow onto the card, to 'hang' from the branch

I made four cards in total - two of the one above and two where I used a pearlised gold 'Joy' frame with the same red bow, leaves and branch, and I like both of them equally.

I'm nothing if not a keen follower of others, possibly too easily influenced for my own good, and Chrissie's videos led me to the Swedish company 'Gummiapan'. Oh my word - their little dies are so detailed and adorable! I hopped over for something else altogether - and the little bows somehow fell into my basket! Their prices are actually very reasonable - so long as you factor in postage and try not to get stung at your end for Customs Duty etc. It was a treat I tell myself and not something I would do every day! 

So - I would like to enter my card into some challenges:


First of all, Charlotte of 'Lady Joyful' runs a super challenge called 'Christmas Craft Creations' - HERE. AND, this month the theme is 'snippets'! Yay! So, I'm entering my snippets card and hope you perhaps will also follow suit. The challenge is open for another couple of weeks and it would be really great if you could steal a march on your 2023 Christmas cards and join in. 

And, of course it's our lovely Mo's Rudolph Days Challenge HERE. This is one challenge I never miss.

Plus, another 'must play along with' challenge - Darnell's NBUS Challenge - HERE. The leaf die set and the little Gummiapan bow dies are both NBUS goodies! 


Sunday, 22 January 2023

Zen!

A while ago I bought some goodies from AALL & Create - and this is the first outing for one of the sets - it really tickles my sense of humour - as well as the irony of it. It's get in the sentiment by the way - not Bet as Len read it - and he's not even a man for the gee-gees or such!


The snippets, in the end I didn't use the smaller piece of bright pink

I used:

- 5" x 7" white card blank, tent style

- at that point I die cut the bright pink backing piece using a NBUS die from the now discontinued Lil'Inker 'Fringe scalloped squares' set of dies. So unusual and bought when Seven Hills Crafts were selling their Lil Inker dies on reduction due to the closure of Lil'Inkers

- die cut the image panel using a square stitched die from The Works, just the right size to sit nicely inside the 'fringed scallop' edges of the bright pink square 

- stamped the image and wording using Memento 'Tuxedo Black' ink and stamps from the AALL & Create super fun stamp set called 'Om Dee'

- coloured the image using Polychromos pencils - matching the colours to the spots in the snippet of patterned paper I'd chosen to use (it came from the Back to Basics' 'Bright Spark' set of papers)

- added the image panel to the bright pink die cut square using narrow foam tape with some pieces here and there around the inner part as well as right around the edges  NB - little tip about adding foam tape below!

- then trimmed a strip of the spotty patterned paper for either side of the card and glued it in place

- glued the image panel in place, at the same time flicking up the scallops around the pink panel, just using my finger nail

 - finished!

The little tip I used when adhering the foam tape covered image panel to the bright pink backing panel was picked up from Chrissie's YouTube channel. Add the foam tape to your piece or panel as usual but, once you peel off the backing ready to add it to whatever you're sticking it to - just run a glue stick along the pieces of foam tape to allow a little bit of 'wiggle room' when you pop it in place. Works a treat!

Here's a link to Chrissie's channel - 'Christine Stokes' - in case you want to take a peek - I'm sure loads of us remember from the days when she and Mandi ran 'Less is More'.

https://www.youtube.com/watch?v=HT3Spk7IRl4.  

I stamped a little sentiment, from the same stamp set, on the insert for the card - it amused me almost as much as the main sentiment - 'Hurry up inner Peace, I don't have all day'. 

It reminds me of when a friend and I used to shoot out from the office once a week at lunchtimes and catch the Metro into Newcastle to join in a Yoga class run close to the University. Looking back, as we were working flexible hours we could take a longer lunch break, but it was still stressful. We were practically still changing out of our leotards at the end as we ran down a long flight of steps from the class to a bakery shop! They sold THE most wonderful grated cheese, onion and salad cream/mayo stottie sarnies I've EVER tasted. Then, hopping about trying to keep warm whilst eating said stottie sarnies and waiting for a bus back to the office. Metro there and bus back seemed to work best for some mad reason. Aha, I think no eating of food was allowed on the Metro! So we could eat our lunch on the bus back to work. After that - I was finished for the rest of the afternoon! Rinse, repeat - we did the same all over again the following week.

This is my snippets card to kick off challenge #446 is over in the Snippets Playground. Go HERE  to join in the fun!

I'd like to enter this card into the following challenges:

Darnell's NBUS Challenge #46 - the never been used items are the stamps set and also the Lil'Inker fringed frames - I LOVE these!

Allsorts Challenge Week 712 'Spots and/or stripes'. It was pure fluke that I chose a snippet of spotted paper for today's card!

Dudley Pupdate - on his recent walks he's been pulling to come back home at every little shortcut he knows, right now it's too cold and icy for me to go along 'for a ride'. 

Dudley is on a trial (by us) of some herbal calming pills. Our hope is/was that he would become less worried when the doorbell rings, a delivery arrives - or even worse, someone arrives to work in the house or garden. Interestingly, the longer jobs soon become part of his routine or acceptance. Even an engineer to service the boiler is accepted once he has been introduced. But the arrival of a grocerydelivery, Amazon order or post unexpectedly really sends him into a worried little heap - and those are the ones we can't totally/precisely time and predict of course.

So - each morning, in his little breakfast dish, for the past week or so - he's has one of those 'beef flavoured' herbal calming pills. They are BIG as well! He needed to be coaxed and fed them at first - and then, bingo, on Thursday morning he was snuffling around and scrunching the last of his little white bowl contents - and yay - he now takes the pills all on his own! Ironic really - they don't make a ha'porth of difference so far as we can tell but at least his 'pill phobia' seems to have gone. Gotta laugh!

The other night, as usual, Dudley snuggled between Len and I when we were in bed - and he (Dudley!) loves to lie sideways! Both of us must have been uncomfortable - I had his face and nose pushed under my arm and Len had the rear end and his amazingly strong hind legs that push when he wants to turn on his back to really 'spread it out and make himself comfortable'. Neither of us said much about the situation - it is what it is really.  I was quietly reading my Kindle and Len was trying to get to sleep. Suddenly - Dudley the 'bed snatcher' decided HE wasn't comfortable after all and launched himself off the bed to curl up on one side of it. 

In an instant - such a teenage kerfuffle of grabbing and sorting of bed clothes went on as we both almost simultaneously gasped ...................'quick, get the duvet and as much of your own side of the bed as you can whilst he's on the floor ...............  to be able to sleep properly!' Need I say more? We slept.


Friday, 20 January 2023

Friday Feast - Slow Cooker Panackelty

... or, as my Mum always said, 'Panhaggerty'. Recipes differ around the North East of England, more than I realised until recently.

I did publish my Mum's 'posher' version of this recipe, goodness knows how many years ago on my blog and this is the LINK ...... if you have leftover roast beef and some rashers of bacon, in place of corned beef. 

However. and this makes sense in these times, I think I've come across the original 'Paneklty' version - which uses corned beef rather then left over roast beef and some bacon rashers. Could easily make a meal for four with extra veggies.

I've also experimented with this recipe. twice using the slow cooker and it works wonderfully well. Right now, in times where we're all watching our pennies - this is THE most scrummy casserole. Probably best served up with some dark green cabbage or kale - and possibly a dollop of horseradish sauce:

Ingredients:

1 340g can of corned beef - I use low salt  - sliced (I do find that slicing the whole block in two from top to bottom once it's out of the can,  then cutting smaller slices is easier - even easier it it's chilled straight from the fridge

2 large onions, halved and thinly sliced

4 large potatoes (baked potato size) - peeled and thinly sliced

200 ml hot gravy made using the water, two beef Oxo cubes and a tablespoonful of Worcestershire sauce or similar (eg Henderson's) 

Method:

Heat the slow cooker to high - mine is 3.5 litres - good for a family of two and even up to four - but you must check as appetites do vary
 
Then do all the slicing as detailed above 

Add half the sliced onion into the slow cooker and then top with half of the corned beef slices and then a layer of half the thin potato slices

Do the same again with the next layer - and you obviously will end up with a layer of potato slices. Nice if they're overlapped a little too

Add the hot Oxo with the Worcestershire sauce mixed in - just pour it over your beautifully layered supper

Pop the slow cooker lid down and walk away leaving it on high for around three and a half hours. Usually that's long enough and a skewer 'poke' will tell you if the potatoes and onions are cooked. Thereafter - I turn it to 'slow' or even 'keep warm' depending on your slow cooker model and then decide what nice green veggies to have with it. Enjoy ......... and also use a slotted spoon to aid in serving!

 
Happy cooking!


Sunday, 15 January 2023

Paper piecing once again!

OK, who opened the rain floodgates? Non-stop rain here for what seems like weeks and no end in sight. I know that the UK isn't the only country suffering - all I can advise is to move your snippets upstairs ...... out of harm's way - and keep life jackets close beside you. It would be funny, if it wasn't so serious for a lot of people!

My post for the picks and winner of Challenge # 444 can be found HERE in the Playground.

Meanwhile, I made a snippets card to give us some hope of Spring and Summer to come:

And these were my snippets:

This was a second try at stamping onto patterned paper - I lost the first stamped images on different papers by placing my trust purely in the Misti bar magnet. Then, when I went to stamp again due to a first weak stamping - wham! The wretched paper moved and I ended with a blurred stamped flower image. Lesson there is only trust a corner and the magnet(s) - not just one side and the magnet bar. So, I raced ahead and promptly forgot to take a piccie of my newly chosen snippets - until they'd been stamped on. BTW, when stamping a sentiment which will be trimmed I always stamp at least one spare in case of any 'cutting wobbles'. ☺

I used:

- 5.25" x 4" white card blank, tent fold

- stamped the flower image onto a snippet of white card using Memento 'Tuxedo Black' ink and a NBUS stamp set by Woodware, called 'Bold Blooms - Vivian'

- to add the leaves to the flower image I used a piece of acetate over the stamped flower to position the two leaf stamps and stamped onto the acetate first - got it right first time - then removed the acetate, leaving the flower panel in place, re-inked the stamps and stamped onto the stem of the flower

- stamped the sentiment from the same set onto a snippet of white card

- next I botched stamped the flower head and the leaves onto snippets of patterned paper (found in the back of a Honey Bee paper pad called 'Team Tie Dye' - one of my favourite paper pads)

- fussy cut the flower bloom and the leaves using small Fiskars embroidery scissors, which are kept purely for paper

- ran the side of the brush end of a black Tombow marker around all the edges patterned fussy cut edges then glued them onto the main image using a Zig glue pen

- trimmed the image to size and mounted it onto a snippet  piece of black card to give a narrow border

- glued the image panel onto the front of the card

- covered the sentiment with a piece of clear adhesive film before trimming away the edges to leave a shiny sentiment strip - much easier than faffing around doing clear embossing when it's only one small item and it really shines beautifully in real life

 - added the sentiment strip to the card front using very narrow foam strips to raise it for some dimension

- final touch, three Memory Box clear self-adhesive 'Fairy Drops'

At one point I almost gave up on this card, especially when the Misti also played up - my fault entirely - glad I soldiered on though.

I have another card to make shortly, and in fact bought the clear adhesive film for that (if my idea works) but it's absolutely super for adding a glossy look to sentiments - yay, hopefully a double win situation!

I'd like to enter this card into the following challenges:

Darnell's NBUS Challenge #46 - the stamp set was having a first outing, also the clear self adhesive film

Allsorts Challenge #711 - the theme is 'A/G with the option of Winter Blues' - I chose anything goes  

We Love Stamping - the theme is 'Favourite Colours' and I adore pink and cream together

Dudley Pupdate - nothing much to report, with the wet and gloomy weather he's not keen on venturing too far. He did meet a friend's new Corgi puppy during the week - but I can't see Arnie being replaced as his 'Bestie' anytime soon! If ever.

Just before bedtime, he always has one of his favourite 'calcium bone wrapped in dried 'chicken' treats'. This evening, Saturday, Len was in bed watching a film and I was across the landing just catching up on some internet browsing and beginning to close down for the night. All of a sudden, I glanced down at Dudley and saw a very cross little face glaring right back at me. He's so sweet and loving that it's a really rare occurrence for him to be upset with us - then we realised - he hadn't had his evening treat! Treat given and all is well again! Little monkey!


Wednesday, 11 January 2023

Wednesday Waffle

I found this post - 11 years old now - but only a couple of you actually saw and commented on it - so it's perhaps worth a repeat as one of the funniest incidents in my boarding school life.

Talking after 'lights out' at boarding school was punishable by various means, warnings, groundings, having to wear school uniform at weekends so that everyone knew you were in 'deep doggy doo-doo' and very often having to get up and totally strip your bed and fold everything neatly before trooping out of the room to stand at intervals down the corridor. Often this would be until you were almost asleep on your feet, and only then could you return to the 'dorm', remake your bed and inevitably fall straight asleep through tiredness. But, it never stopped us from messing around I'm afraid 😉

It certainly wasn't St. Trinian's, but there could be similarities!

In my first year there I shared a room/dorm. with four others - and naturally there were the inevitable ring leaders. 

This particular night one of the ringleaders had the bright idea of playing hide and seek in the dark. So, we dutifully counted to the agreed number and then it was time to search for the 'hider'. The rooms weren't massive so it was always easy to find whoever was hiding. But, before the search could begin, our chattering was heard by a member of staff and the room door was flung open - at which point we heard a muffled squeak of pain from behind the door. But, the teacher in question just roared at us to 'go to sleep immediately' and slammed the door shut again. The door slamming was immediately followed by a whoosh, a thump and stifled groans. When we eventually turned on the light there was a crumpled figure on her knees on the floor, in her PJ's, part way across the room.

In an attempt to beat us at hide and seek the 'hider' had been ultra-clever. She'd taken her bed side chair (bit like an old fashioned dining room chair) and hung it from the pegs on the inside of the door, on which we hung our dressing gowns. Then she'd quietly hopped up onto the chair and was sitting suspended up there waiting for the search to begin when the door was flung open. At that point her knees had crashed against the wall but she stifled her squeaks of pain - damaging furniture was another, much more serious, punishment altogether! And of course, when the door was slammed shut - the momentum had shot the 'hider' out of the chair and across the room - where she landed on her knees once again! Some of the most spectacular bruises I've ever seen as well :))

Sometimes I wonder how we survived. I bet the 'hider' has already had at least one knee replacement!


Monday, 9 January 2023

Christmas cards


Just to say - I have today sorted out and rationalised my Christmas card list and deleted 21 people in total. Yup, shocked me too. A good few are Blogger friends. So, if I sent you a card and you didn't send one to us - you're off my list from now on. It saves all of us money and effort in the end. Not being cruel - just sensible that's all. No offence intended.


Sunday, 8 January 2023

Birthday Celebrations!

The Snippets Playground is celebrating 11 years since I took on the running of it from dear Jules. Where did the time go?

We have a new challenge (with a theme) in the Playground plus a great prize to celebrate. Hop over HERE to visit our Sarn who is running the challenge, and also to find out more.

I made a snippets Birthday card:

Started out with a bunch of snippets, left over from recent cards I've made

I used:

- 5.5" x 4.25" white card blank, tent style

- a snippet/panel of 5.25" x 4" black card, glued onto the card front

- snippet of white card, trimmed to 5" x 3.75"

- then cut lots of 'Happy Birthday' die cuts using a sentiment die from the NBUS Altenew 'Essential Sentiment Strips Die Set' and three different colours of card snippets

- used a glue pen to create a sort of 'brick wall' background with the die cuts. I worked from the top down and then from the bottom up in order to leave a gap just below the centre of the card

- filled the gap with a snippet of black card trimmed down to fit snugly

- then used a 'celebrate' die from the Paper Smooches 'Birthday Wishes' set of dies and a snippet of the red card to cut the scroll script word. That was quite tricky as the sentiment falls into four pieces when it's actually die cut....grrrrr.

- to get around the placement I used a piece of white card which was longer and wider then the space I needed it to fit into and taped the surrounding part (waste) from the die cut in place as a 'template' then carefully added the letters back into the slots using a glue pen, before removing the red 'waste and gluing a second set of the letters on top for more dimension

- trimmed the white panel to size and glued it in place

-  then added the whole panel to the card front using Collall All Purpose glue

- something was missing, so I added a few gold star Josy Rose Hot Fix nail heads

Phew - once again, I potentially bit off more than I could chew as all the die cutting, even using my baby Altenew machine, then the gluing and snipping the sides took ages! The card is destined for Len's G. Nephew Edward later this month - for once I'm a bit ahead of myself!

I'd like to enter this card into Darnell's NBUS Challenge #46 - the set of Altenew dies are NBUS. 

I'm conscious that my last three cards have used very similarly coloured snippets - time for a total change for my next offering!

Dudley is fed up with all the rain we've been having - same as most of us I expect. I suppose at least, so far, it isn't snow! It's a dull and gloomy afternoon as I'm typing this and Dudley is cosied up in one of his favourite spots - under my corner desk with his nose pressed up against my slipper. I'm tempted to get under there with him for a nice snuggle!

Love from Dudley and me,


Sunday, 1 January 2023

Happy New Year!

Many of us will be glad to see the back of 2022 - the year in which we lost our beloved Queen Elizabeth, I lost two close friends and also my guardian (from when my parents returned to the UK and left me at school in Germany) - and several of you suffered much, much closer family bereavements. A year of losses for many of us - but I do try to always remember that 'heartache is the price we pay for love'.

Onto brighter things though - we're into a brand new year, and one in which I so hope that Sarn, myself, Dudley and you, will continue to thrive in the Snippets Playground Challenge. There are so many ways to use up snippets - it's almost endless - sigh, as are the ever-expanding storage holders we keep our snippets in!

Our current Christmas/New Year Challenge is a change from the intensive and massive load of running a Grand Draw. This year, we've gone for one 'Winner Takes All' prize of a 'Your Chosen Favourite Craft Store Gift Voucher' to the value of £50 - or the equivalent value voucher wherever you live. Check out the Snippets Playground if you haven't done so already.

The current challenge has a theme - not something we often do but this is Holiday Season after all! It's - 'Anything BUT Christmas'. As well as using snippets of course and this is what I made. I CASE'd it from my own card, made several years ago - which was in turn had been CASE'd from a SU Demonstrator. And here it is:

The 'snippets' before being attacked. My crafting OCD means I don't like to store snippets of any size with undulating edges if possible!

I used:

- 5.75" x 4" black card blank

- a layer of slightly smaller white card stock, quarter of an inch on each of the four sides

- a layer of smaller again black card stock for the board - I ran it through the Cuttlebug, using Cuttlebug's 'Swiss Dots' folder and then trimmed it to 5.125" (five and an eighth in old money!) x 3.25" - then glued it onto the piece of white card stock

- snippets of red, blue, yellow and green card - punched using SU's 1" square punch and SU's Itty Bitty round punch

- double layered the 'dots' and glued them onto the pieces and used a white Prismacolor pencil to add curves to give the impression of even more dimension 

- added the Lego pieces using thin sticky pads then

- 'happy birthday' sentiment was stamped using a stamp from the 'Happy Messages' set by Stampendous, and a Memento 'Tuxedo Black' ink pad onto a piece/snippet of the same white card as before - sized at 3.125" x 1.625" (the detailed measurements are for my own reference really)

- added the sentiment using thin sticky pads onto the card front - and called it a wrap!

Made for a little neighbour, aged six (Jack).

Dudley Pupdate: Oh what a little scamp he is right now! We think that being rather spoiled over Christmas is reaping its own rewards! The other night, he claimed my space on the bed, and despite spending so much of his time cosied up to me during the day, he let me know with a Grinch-like growl that I wasn't very welcome to disturb his slumber! Len gave him a semi-stern ticking off so he moved - I then woke up in the early hours of the morning to find him (Dudley) snuggled back, right up against me, head back sharing the pillow and snoring gently! And looking so angelic of course!


Sorry the above images are so small and also a bit blurred. I clipped them from a couple of CCTV shots - taken when Dudley went out onto our front drive to give his 'Bestie' Arnie a big hug on Thursday! When they meet they go into 'hug mode' and dance round and round like a couple on the dance floor! So far we haven't managed to catch them on our phones or a standard camera for better definition  - but at least this proves I wasn't fibbing when I mentioned it a while ago!

As I type this we're hoping that the usual mayhem of New Year's Eve fireworks here won't trouble Dudley. So far, so good, although he did jump late on Boxing Day when a barrage went off nearby. He'd been asleep so that was probably what startled him. Our best bet is to have the TV on with the sound up and the London Celebrations streaming - as a distraction from what's going on in the neighbourhood.

Welcome 2023 - we need you to bring happiness and peace into our lives for sure.

Love from Dudley and myself,