Wednesday 27 September 2023

Christmas decoupage and some challenges!

I recently posted a set of decoupaged  'robin Christmas cards' on here - and it reminded me of what a gentle and relaxing technique it is. 

I then spotted someone selling, in a FB 'Decluttering Group', a huge (24!) Christmas bundle of Katy Sue's die cut Christmas decoupage sheets. I've assembled a few images and really love them. This is the first completed card:

I used:

- 6" x 6" square white scalloped card blank, made by Craftwork Cards - it's years since I used a scalloped card and have fallen in love with them all over again - just as well as I have a box full of them in various sizes!

- decoupage sheet called 'Bear with Snowman' from the Katy Sue 'Christmas decoupage bundle' 

- popped out all the pieces, keeping them in their respective layers - snipping off the little 'pips' of card where they'd been attached to the whole sheet as I went

- and this is where things almost went askew (to put it politely) - I usually use thin snipped up sticky pads for the assembly process - but had a wild idea that Pinflair silicone glue for decoupage would be quicker and even cheaper and so had ordered some from Amazon

- I really love the end result but almost gave up in despair partway through - that stuff is sticky and oily at the same time and I hated using it!

- layered the completed decoupage panel, using Collall glue, onto a 5.5" x 5.5" square piece of Tonic 'Firestone Red' mirri card - having run a silver calligraphy pen around the edges of both the image panel and the red mirri card 

- then glued the whole panel onto the front of the card

- added a little tag which also came in the decoupage sheet, having also run a silver calligraphy pen right around the edge - I added the label using thin sticky pads as by then the silicone glue had been given its marching orders - amazing how quickly the tube goes down as well - not a money OR time saver

- before sticking the tag to the image panel I made a dinky little bow using red metallic cord and glued it onto the tag using a tiny drop of 'Glossy Accents', which I'd weighted down using a thick very heavy old acrylic stamping block to let it dry and not make a leap for freedom!

- finished off by adding a couple of the 'extras' including a border strip from the decoupage sheet to the envelope - not something I usually think of doing but am always impressed when others decorate their envelopes!

So, my big lesson was that silicone glue and I do NOT get along well together - it took ages to clean up my glass mat as well as any tool that had come near the stuff - thank goodness for  having a bottle of 'Sticky Stuff Remover'!

Another thing I realised was that some of the topmost layers on the few images I've assembled so far are too small and fiddly to add without jeopardising the look of the whole  thing. So I just glue those flat onto the topmost layer using a glue pen. I'm referring to really teeny, tiny pieces - and it doesn't spoil the 3D effect in any way.

I'd like to enter this card into the following challenges:


Darnell's NBUS Challenge #54 - the whole set of decoupage sheets was my NBUS item 

Sunday 24 September 2023

Sunday Snippets and a thank you card

We're seriously thinking of building an Ark here! The rain has been torrential and temperatures have dropped radically.  I'm not complaining though as it's an improvement on some of the steaming hot weather we had prior to that.

My snippets offering for today is a Thank You card with a really heartfelt sentiment:

A close-up of the sentiment - my camera didn't capture the gorgeous shine of the embossing too well on the main image

The snippets I used for the leaves and the sentiment

I used:

- 5.75" x 5.75" white card blank, side opening
 
- a selection of snippets from the Dalton Manor 'Pearlescent Greens' card pack 

- for the stamped images and sentiment I used MFT's 'Geometric Greenery' set of stamps

- stamped and heat embossed onto the snippets of various shades of green card, using an ancient 'Emboss' pink tinted ink pad and Stampendous 'Pirate Gold' embossing powder (such a true gold!). The embossing pad was so old I had to totally revive it using some of the refill bottle of 'pink refresher gloop' but it worked really well and I will happily carry on using it if/when I do more heat embossing **
 
- die cut the stamped leaves using the matching set of MFT dies and then the sentiment using a die from the MFT 'Mini Mail' set of dies. The sentiment die was a tad too long so I die cut it then replaced it in the die with it partially poking over the straight end to die cut the straight end to suit

- time to assemble the card - bit of a heart in the mouth event after all the work thus far

-  trimmed a piece of white card to a bit smaller than the same size as the card front

- then used a NBUS Penny Black die called 'Curved Stitch' to cut right across the piece of white card, ending up with two curved pieces to use

- dived into the packet of Dalton Manor green pearlescent card and, shudder, had to slice off the end of a piece of A4 unsullied card to used for the 'separation' piece area of the two white curved edge panels held in my sticky paws

- at that point I went for broke and guillotined the right side of the bottom curved layer so that the pattern ended without partial holes

-then did the same with the upper portion of the white panel and glued both parts onto the strip of green card I'd cut just earlier - making sure it was lined up at the right hand end

- then trimmed the complete left hand side, complete with the backing piece of green card to the closest complete holes

- so now I had the width measurement and just trimmed the top of the curved panel to make an exact square

-  ran a gold calligraphy pen around the square front panel and also the sentiment strip for some definition

- glued the unadorned but waved panel onto the card front 

- used easy peel masking tape for a straight line for the leaves across the top portion of the card, which I added using snipped up thin sticky pads 

- did the same with the sentiment strip and called it a wrap!

** That was my first foray into heat embossing for absolutely ages - and I know why! So much of my craft stuff is tucked away on shelves behind custom made sliding doors in categorised and accessible Really Useful Boxes but it's quite a palaver hauling all the bits out to heat emboss the likes of a single card. I just can't craft in total chaos and having everything to hand would probably discombobulate me!

I'm entering this card into Darnell's NBUS Challenge #54 HERE.  The MFT stamps and dies as well as the Penny Black die, were all NBUS items.

The results of The Snippets Challenge # 462 are over on the Snippets Playground blog HERE.

Dudley Pupdate: The change in the weather here has made Dudley very reluctant to venture out in the rain unless it's really essential. We have to literally push him outside at times - any chance of Dudley ever entertaining a proper walk for sheer pleasure in the rain is not in his DNA! I suspect that Len doesn't mind that to be honest - and there's no way I could easily give Dudley a run around the block!

Earlier in the week I had all of Dudley's numerous grooming tools, sprays etc. spread all over our bed to be sorted more logically into additional baskets for easier access and then loaded into a wheeled trolley to be kept in Len's study/small lounge where much of the day to day grooming takes place. And one little guy must have been watching me with growing horror and the fear of an impending grooming session 'cos he went missing! He eventually was located - tucked right down by the hidden side of a guest bed! By that time the sorting out was finished and he had nothing to worry about after all - what a silly sausage! BTW, his new dew claw is doing really well - hooray!

There's still one week of the current Snippets Challenge to go, hope to see you in the Playground soon if you haven't played already - make a card, come and play. No doubt Sarn is getting ready to dispense hot chocolate drinks the way the weather is going! 

Love, as always, from myself and Dudley


Sunday 17 September 2023

Sunday Snippets and a bunch of Christmas robins
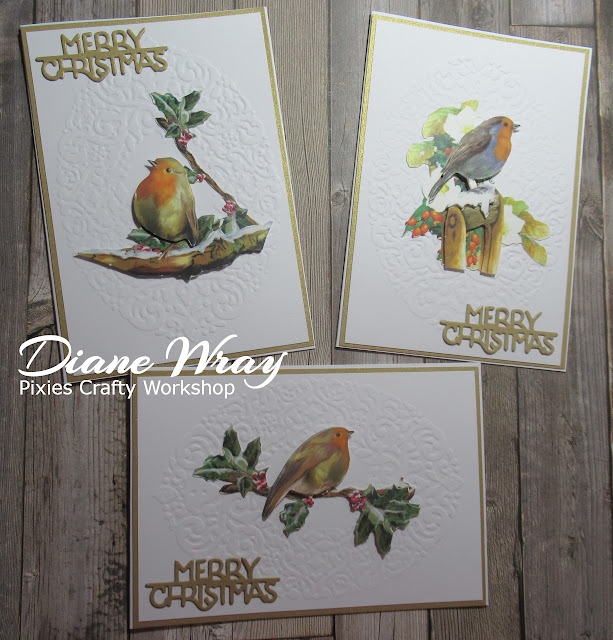
I was digging through a pile of stuff on my desk the other day and came across some decoupage sheets that I'd made a start on then put to one side. Purely so that they could find their way down the increasing pile and be temporarily forgotten - as one does! I suddenly felt in the mood for some evening crafting and assembling a load of decoupage robins using snipped up thin sticky pads fitted the bill nicely. The following day I made up the cards and produced six in no time at all - two of each design:
Sorry, no photos of snippets - they're the scraps of pearlescent gold card that I used for the sentiment die cuts

I used:

- 5.75" x 4" white card blank, side opening

- piece of Tonic pearlescent 'Majestic Gold' card for the outer 'frame' - cut at just under the size of the card blank and glued in place (sometimes wonky, just for fun!)

- piece of white card, embossed using a Sizzix 'Holiday Frame' embossing folder and trimmed to just slightly smaller than the gold layer of card before being glued on top of it

- glued the decoupage robins in place - such fun to play with and so relaxing. They 're made by Craft UK - Line 000430. I bought them years ago at a craft fayre and doubt if they're available now. The beaks are properly lined up - those are shadows you can see.

- then die cut the sentiment twice using the mini Altenew die cutting machine (if you don't have a mini die cutting machine to quickly grab for small dies then you're missing out. The plates are 3" wide and 6" long so it's surprising how versatile such a small machine can be)

- the die I used for the sentiment is one I return to time and time again - Tonic Studios 'Mini Moments Merry Christmas' 

- glued the two sentiments one on top of another for more stability and dimension then glued them onto the card front - using a glue pen

We now have our latest Challenge, run by Sarn, over in the Snippets Playground HERE - with a lovely prize made up of several goodies.

Dudley Pupdate: The drop in temperatures here in Hampshire, and no doubt most of the UK, is SO welcome! We're sleeping well and Dudley is much more settled during the night. The past day or so he's been holding up his left paw where he ripped out the dew claw. Len managed to take a look - a bit like wrestling a box of frogs dealing with Dudley at times - and there's a new claw just poking through the end of his left 'thumb'. Gosh that's got to hurt - rather like teething. But, he still manages to do zoomies around the garden when he's not having a little 'pity party'. We're watching closely of course and are on standby in case he needs to see the vet. In fact, as I do the final check on this post on Saturday, he now seems to be just fine!

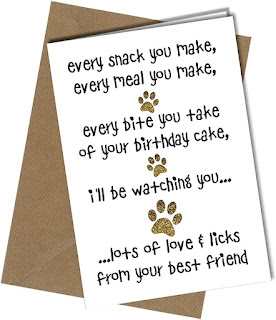
It was my Birthday on Tuesday and, as always, Len came up trumps with his cards for me. The one 'from Dudley' is below - and never was a truer word spoken/written!  


Love from Dudley - and of course me,  


Friday 15 September 2023

Christmas cards and the 'Fractured Card' technique

Ages since i posted on here, other than on a Sunday - gotcha!

I revisited the Fractured Card ' technique the other day. Using just two pieces of patterned paper and one and a bit of 'almost minus a pattern' pieces of beige paper from the same pad - I made four cards. Two of each colour layout and here's a couple of them - the light caught the right hand card so the left hand one is the truer colours:


I used:

- 5.5" x 4.25" cream card blank, side opening

- a snippet of white card measuring an eight of an inch less than the card blank on all four sides as the base for the patterned paper layer

-  whole sheets of 6" x 6" paper from the First Edition 'Perfect Christmas' paper pad

- die cut a piece of beige very lightly patterned card from the paper pad using a die from The Works 'Square Stitched' set of eight dies

- this time I used one of Ann Melvin's sticky pads in the mini Misti - I love it (thanks for the tip-off Val). And  stamped 'MERRY and BRIGHT' using a sentiment from Penny Black's 'Yuletide Wishes' set of stamps and a VersaFine Clair 'Shady Lane' ink pad (think I first spotted Kathy K using this gorgeous colour - love it!) 

- glued the sentiment die cut onto a further piece of the same paper, already die cut with the same die to make it into a double layer then glued it onto the 'base' piece of white card 

- cut four quarter inch wide strips of the beige lightly patterned paper 

- then, one at a time I used a glue pen to glue them from a corner of each side of the sentiment panel, right down to the edge of the white card layer

- flipped the paper over and trimmed off the 'overhanging bits'

- then used the two complimenting patterned papers to 'fill in the blank spaces'. It's very easy, so long as you always butt a 90 degree corner of the patterned paper into the 90 degree angles you've created with the strips

- and also remember to alternate the patterned papers!

- I just trimmed them by hand, first of all roughly so I could move onto the next area and then from the back, using a large pair of Fiskars dressmaking scissors - kept purely for card making. My dressmaking scissors are almost under lock and key key here

- glued the completed panel onto the card blank - finished!

Oh boy, what bliss to have the drop in temperatures here. We've all slept quite well for at least two nights now - not sure how long it will last but we do feel really refreshed!

I had a lovely Birthday on Tuesday - still trying to get round to thank everyone for the lovely cards and good wishes. You helped to make the day wonderful! Mwah!! x 


Sunday 10 September 2023

Sunday Snippets and a fun Birthday card

WARNING: put your sun specs on! I wanted have a play with lots of different coloured snippets - and this is what I came up with:


The snippets - I also added a snippet of black as the card evolved

I used:

- 5.75" x 5.75" square white card blank, side opening

- first of all I die cut the bottom portion of the card using a Memory Box die called 'Cascadia Background Strip' - which left me with a row of apertures

- backed the aperture section using a snippet of double sided adhesive sheet - leaving the backing in place on the inside of the card

- then die cut a load of 'rainbow' coloured pieces from small snippets and inserted them one by one into the apertures - they form almost two complete rainbows with a black one in the centre - fearing for the state of my own sanity doing this fiddle faddle to be honest!

- using the leftovers from the snippets I began with, then die cut a selection of stars using an unbranded 'Stitched Stars' set of dies

- at that point I glued a 5" x 5" square panel to the inside front of the card to hide the double sided sticky panel

- put the stars to one side and returned to the already sized up final remains of the snippets of yellow and green card - along with the leftovers from the black snippet I'd had to fish out along the way

- die cut and glued together the 'happy birthday' dies with their black 'shadow' backings (my original plan had been to use vellum for the backing die cuts but that wasn't going to have an impact). I used Julie Hickey's 'Happy Profile die set' along with her 'Birthday Profile die set' for the sentiment 

- now I had a selection of stars and the sentiment words so just placed the stars slightly randomly  and glued them in place using a glue pen

- finally, added the already glued together 'happy' and 'birthday' sentiment words using thin sticky pad pieces with a coating of glue stick to allow some movement whilst putting them in place

- and that was it - done!

I actually made two identical cards as we have some 'younger' folks Birthday's in the near future. One thing I find is a great advantage when making two identical cards with lots of elements to be positioned is that you can set the layout up on one card with no adhesive and then eyeball it to actually glue the pieces in place on the other card. And of course follow suit with the 'sample' you set up for the layout. Easy peasy.

I'd like to enter this into Darnell's NBUS Challenge #54 HERE. 'Cascadia' die, the star dies AND the Happy Birthday dies were all having a first outing.The stamp set was having its first outing. 

AND, big cheer from me when I spotted that the new Allsorts Challenge Week 745 theme HERE is 'Use die cuts' - and this card certainly does exactly that. 

Sarn has posted the results of Challenge #461 over in the Snippets Playground HERE.  

Dudley Pupdate:  So much for me mentioning last Sunday that we'd had a bit of a nip in the air - this past week has been like Hades here! Not only red hot but also very humid - to the point that my reading specs have steamed up at times! Dudley hasn't been coping at all well with the heat and is constantly on the move trying to find places to keep cool. He's up at around 3am, panting and wanting to be out in the garden - not that it's much cooler there to be honest. But, having a little snuffle around with the huge family of hedgies we're currently feeding does seem to distract him a bit. His paw is doing great - thank you for all the 'virtual' waves and cuddles you sent to him! 

There's still one week of the current challenge left to run! Make a card and come and play - there's a chance to win a nice prize if you join in the draw! See you on the swings!

Love, as always, from myself and Dudley,


Sunday 3 September 2023

Sunday Snippets and a new Challenge #462

Challenge 462 is now up and running over on the Snippets Playground folks! 

As there's been a little bit of a nip in the air lately, I'm ramping up Christmas card production and made this one, using some snippets:

You'll have to trust me that I used some cream snippets, left from cutting the card blank and image panel - as well as a snippet of Tonic's 'Scarlet Organza' mirri card.

I used:

- 6.25" x 3.25" cream 'mini slimline' card blank

- a very slightly smaller layer trimmed from a snippet of Tonic 'Scarlet Organza' mirri card and glued onto the card front

- the image panel was die cut from a snippet of cream card stock, using a die from Lawn Fawn's stitched border 'Large Mini Slimline Stackables' set of dies  

- stamped the stack of robins and sentiment onto the image panel using VersaFine Clair 'Nocturne' ink and a NBUS set of Woodware 'Bubble Robin' stack stamps

- then stamped the individual 'part images' onto snippets of the same cream card

- coloured the robins on the image panel as well as the robin 'part images' on the snippets - using Polychromos pencils and Sansodor blending solution - at this point it was important to colour far enough beyond the stamped 'part image' as it would be die cut using a circular 'bubble' die

- die cut the part images using Woodware's 'Big Bubble' die - made a few mistakes but I'd cut spares and basically my mind wasn't fully on the card at the time

- once I had four images cut into 'bubbles' - I backed them with 'bubbles' of the same size to make a total of three layers to add dimension. An alternative is to 'round' the circle from the back using a foam pad and a large ball embossing tool - either would work fine IMHO

- glued the 'bubbles' onto the images on the image panel using a glue pen and 'wham!' - it sort of sprang into life

- glued the image panel on top of the already adhered mirri card layer and there it was - all done!

Along the way, I did question why Jane Gill designed the 'part image' stamps and didn't just rely on using the outlined images of the robins. But, they would never have lined up perfectly I expect and I'm converted to her way of thinking! Clever lady and I always love her designs. I made two at the same time of course.
  
I'd like to add this card into Darnell's NBUS Challenge #54. The Woodware stamp set and the 'Big Bubble' die were having a first outing. 

Dudley Pupdate: Dudley has been in the wars, poor little guy. He managed to remove one of his (front) dew claws in a rather traumatic fashion. We had one almost sleepless night with him - severely shocked (as we were too). Of course it bled at first and I can't imagine how much it must have hurt him. Len found the offending claw and thankfully, it was a clean removal job he'd done on himself and after loads of cuddles and more than his share of treats, as well as the aforementioned almost sleepless night with him - he's practically back to normal now. We did have the 'poor paw' scenario for a while - which was heartbreaking to see. 

Ha - then I returned home from having some blood tests and he ran to greet me and forgot to hold up his 'sore paw'! Err, hello Dudley - did you forget something? 😉 For now he's only out in our own back garden - away from any dirt he might choose to investigate. As he hates his front paws being touched at the best of times, I can only monitor progress by taking photos, when he's dozing on his back .......... and it's healing really well. 

Love from myself and Dudley (aka 'Sore Paw, Need Sympathy, Dudders' right now) - as always. Life is never dull with him around for sure!


Friday 1 September 2023

Make a note on your calendars ...


Please share the news!