Sunday 27 August 2023

Sunday Snippets and Rudolph Days August 2023

It's hard to believe we're heading towards September really fast. As a September baby, I really love the Autumn and look forward to cosy evenings in front of the dancing flames of the (electric effect only these days) lounge fire, using the slow cooker more for lovely stews and casseroles, not sweltering trying to keep cool with fans blowing from all directions etc and most likely still able to spend time in the log cabin to enjoy the Autumn days and evenings. 

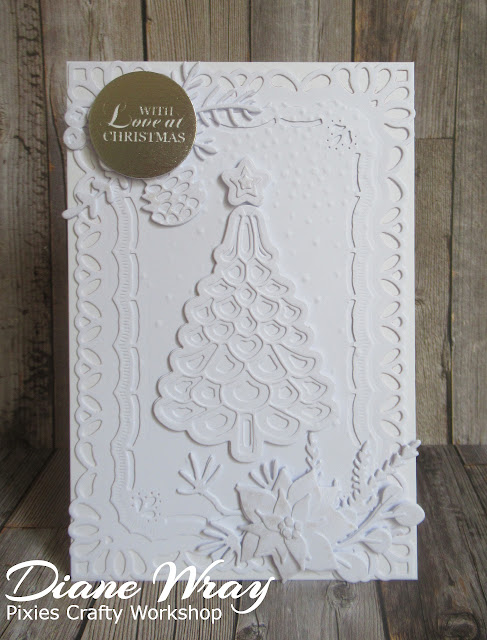
BUT, then the panic as Christmas looms closer. So, my snippets card for today is a Christmas card - and I made two the same whilst the place was in an uproar of umpteen dies and goodness knows what else:
The sentiment circle is bright silver but our shower room (usually a great place to take photos) is bathed in golden light for much of the afternoon and so I had to go with the photo I managed to capture!

And the snippets I used:
I scrabbled around in my box of 'best' white card and found a ton of snippets, which I thought would look more interesting as 'leftovers' from some of the die cutting than just plain white snippets

I used:

- A6 white card blank, tent style

- loads of white snippets and a bundle of dies from the Sizzix Tim Holtz 'Funky Festive' set of dies. I did the die cutting using my Altenew mini die cutting machines and assembled the foliage etc. as I went along as it was much less confusing that way

- I also used white snippets to die cut a Creative Expressions Tree and star using their 'Christmas Tree Triple Layering' die set. Sizzix Micro dot sheets were a life saver when assembling the intricate layers of the tree!

- finally I had what I could see in my mind's eye enough foliage etc. to decorate the card so I then turned to the backing layers and for those I used fresh whole sheets of the same white card and two dies from the Spellbinders 'Resplendent Rectangles' set of dies

-  ran the smaller die cut layer through the Gemini using SU's 'Freshly Falling' embossing folder - and then it was time to assemble! So I went to bed for a good night's sleep to approach the 'White on White Marathon' with renewed energy - the following day

- before I went to bed I did swipe a Wink of Stella clear glimmer layer over a lot of the die cuts - not the main part of the Christmas tree as I liked it how it was, and some of the small foliage pieces only had parts 'glimmered'. Not that it matters as the camera absolutely refused to show the glimmer anyhow

- did my morning yoga session with Dudley (he strikes a cool downward dog pose during our sessions and then back to the card). OK, so truthfully I got up and just trundled into the craft room - but yoga sounds pretty impressive huh?! 

- glued the two pretty Spellbinders die cut panels onto the card front (btw, those intricate Spellbinders dies are not the best cutters so I'd had a tussle the previous day with them)

- then added the Christmas tree using red line tape and popped the star in place with a little SU sticky pad 

- next, it was just a matter of faffing around adding the foliage pieces to two opposite corners using partly glue pens and partly red line tape

- final touches, adhered with pieces of thin sticky pad, were the assembled poinsettia - from the same Sizzix set of dies - plus a sentiment circle by Craftwork cards. It IS silver, and a lovely bright shiny silver too - but once again the light and the camera weren't on my side at all! 

So that was my first 'proper' foray into making a White on White card. I did enjoy the process but am not sure that the time taken is really justifiable. The 'in house critic' hugely approved  - probably as it kept me quiet and occupied for a good while! 

I'm entering this card into two challenges:

Rudolph Days for August - HERE 

Darnell's NBUS Challenge #53 HERE.  The Tim Holtz Sizzix dies were NBUS.

The results of The Snippets Challenge # 460 are over on the Snippets Playground blog HERE

Dudley Pupdate: Poor Dudley, he's super quick to pick up on most 'vibes' - no matter how subtle we are. Every other week, his grooming session includes the application of either anti-flea or anti-tick liquid just in a little strip down his back, between his shoulder blades. In Winter it's just a monthly thing with the 'anti-flea' as the ticks here die off in Autumn. However, he seems to just know when the required vial/tube of a single application of liquid is brought up by Len to where I groom him. He does get groomed but he knows that 'vial application' day is serious stuff! He has light grooms meanwhile and his eyes are cleared every single day - but the 'vial of doom' is something else for him! 

When it was time for Len to lift him onto the table where I work on him, he (Dudley of course) hid right towards the far corner under my desk. He had to be coaxed, quite strongly at one point, but it's only ever verbally - to even stick his nose out from under the desk! I was sitting on my desk chair, pushed back from the desk when he popped his head out. Before Len could even lift him up - Dudley whipped out, put both of his paws up onto my knees and buried his head in my lap as if to hide from his fate. It was heartbreaking - especially as I'm the one who was lined up to do the grooming session! Talk about pulling at the heartstrings!

However,  Duds and I  got through it OK - with Dudley stood up on the table on his hind legs like a boxing hare - fighting me for much of the time. What a scamp!l

There's still one week of the current Snippets Challenge to go, hope to see you in the Playground soon if you haven't played already - make a card and come and play and also have a chance to win a nice prize if you join in the draw! 

Love, as always, from myself and Dudley (aka 'The Boxing Ring Scamp/Champ'!),


Sunday 20 August 2023

Sunday Snippets and the 'Fractured Card' technique

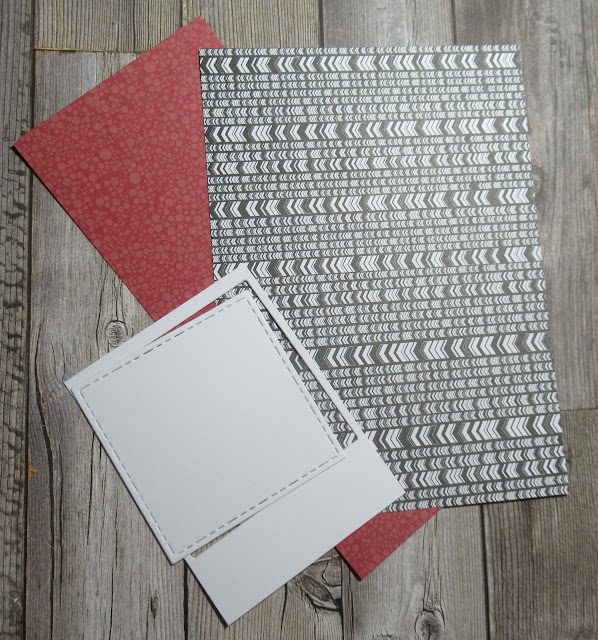
I spotted a 'new to me' technique the other day, perfect for using up a few snippets. and this was my first play, and the snippets I used:


I used:

- 5.5" x 4" white card blank, tent style

-  a snippet of black and white patterned paper, found in the back of my Studio Calico 'Snippets' paper pad - it was only 3.75 " wide, which is why my card blank is slightly narrower than a true A2 size. Trimmed the paper to 5.25" long and put it to one side

- then die cut a snippet of white card using a die from The Works 'Square Stitched' set of eight dies, one of my best bargains ever, but sadly no longer sold by them. The square measures just over 2" square BTW

- for the first time I used some Sizzix grid-lined sticky plastic in the mini Mistii to grip the square whilst I stamped the sentiment **

- stamped 'Happy Birthday' using a sentiment from Woodware's'Deco Sayings set and a VersaFine Clair 'Nocturne' ink pad onto the white square, twisted to a diamond shape

- glued the sentiment onto the piece of black and white patterned paper

- cut four quarter inch wide strips of reddish paper - from the same 'Snippets' paper pad

- then, one at a time I used a glue pen to glue them from a corner of each side of the sentiment panel, right down to the edge of the paper

- flipped the paper over and trimmed off the 'overhanging bits'

- glued the completed panel onto the card blank - finished!

** Another time I will probably stick the double sided Sizzix Sticky mat to a piece of appropriately trimmed thickish acetate to fit inside the Misti aperture. Less mess and curling IMHO. I do have the Misti Sticky mats as well - but the cost makes me shudder 

Here's the link to the best tutorial for making a 'Fractured Card' that I found on YouTube.  There are plenty around, some using mixed papers - even better for using snippets, but this one appealed to me the most, due to the clarity, speed and simplicity.

I might make a bunch of these using Christmas paper - they really are rather effective and so very easy and therapeutic to make, I made this particular card with one of Len's G. Nephews in mind. He will be 18 so I might add a die cut 18 in the lower right hand corner. Still plenty of time to decide though.

We now have our latest Challenge, run by Sarn, over in the Snippets Playground HERE - with a lovely prize made up of several goodies.

Dudley Pupdate: Not much to report about Dudley really, he's been feeling the heat lately, despite the rain and even though we've previously had higher temperatures. I think the 'muggy' atmosphere affects him much as it does us - we tend to turn into sloths! There again, perhaps he's almost ready for yet another 'puppy cut' - whisper that one! 

I thought he'd run away the other day - major panic stations - and a 'dog hunt' through the house and garden. Turns out, there he was quietly cooling off .................... tucked in between the cool porcelain toilet and the tiled walls in the shower room having a little snooze! It seems as if no place is 'off limits', once he makes his mind up. 😃 And the way he looked up, rather indignantly, when I disturbed his dream cracked me up!

Love from Dudley - and of course me,  


Tuesday 15 August 2023

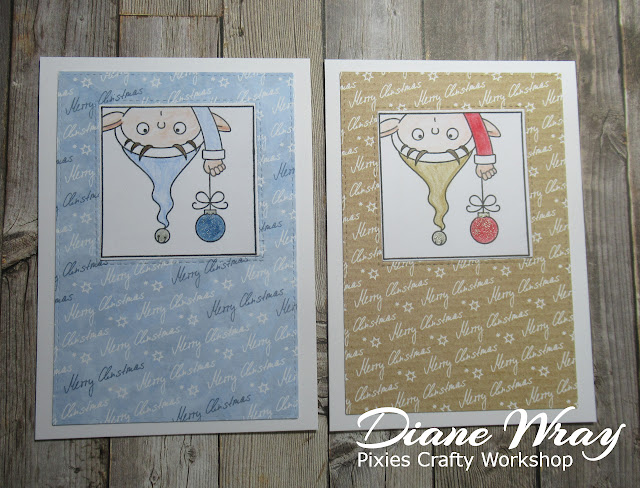
Christmas Kickstart Challenge #77 - 'Just Elfin' Around' - Reminder

Jumping in with a reminder that we're halfway through the current Christmas Kickstart Challenge with Jo's reminder post HERE . It's one of my favourite challenges and always a pleasure to join in with the fun. The current theme is 'Just Elfin' Around'' - ie. one or more elves on a Christmas card of course!

I made two very similar cards, just switched the colours around a bit:


I used: 

- A6 size white card blank, tent style

- image from MFT's 'Christmas sELFies' stamp set, stamped using VersaFine Clair 'Nocturne' ink

- coloured the image using Polychromos pencils plus a little tickle of clear 'Wink of Stella' on the ornament as well as the jaunty little bell on the elf's hat (he's my absolute favourite in the whole set of stamps to be honest!) 

- the backing papers are from what's left of two well loved LOTV Christmas paper pads, die cut with a die by Heffy Doodle from their 'Stitched A6 rectangles' set  

- then die cut a backing layer from the white card which had the image stamped on it, using the same Heffy Doodle die

- things got a little bit 'tricky woo' as it might have been better not to die cut the outline of the backing layer until later on - but no matter, this little ship steamed merrily on, 'toot, toot' on the horn!

- so, I die cut the aperture around the image using the perfectly fitting MFT 'Selfie Square' die on top - into the stitched edge piece of white card, thereby releasing the image ............. and sat pondering my next move for ages as this was 'recovery from potential disaster' time!

- then a little light came on and I taped the white card (removable tape!) complete with aperture on top of the patterned paper and nestled the 'Selfie Square' die into the aperture then die cut it. Bingo, they lined up - success!

- I now had two matching 'frames' which I glued together then glued them onto the card front before losing the plot

- and all that was left was to pop the waste square of patterned paper onto the back of the die cut image to even up the levels, and glue them into the aperture!

- sorry that was so convoluted but I needed to write it here for my own future reference as a way of only die cutting one layer at a time to end up with this card - I needed a lie down afterwards! And Dudley cuddled up for 40 Winks as well!

Many thanks once again to Jo for inviting me to be a Guest Designer over at the Christmas Kickstart Challenge and I'd really love it if you would come along and join in with the challenge - this is the LINK to the Challenge post itself. It's still open until the end of the month, so you have plenty of time to come and play - we need more of you!!.




Sunday 13 August 2023

Sunday Snippets and a 'less than boring' dress!

I wanted to use a stamp set that I was sent a while ago by a lovely friend - and this current 'Snippets Sunday' seemed to be the ideal time:

These are my snippets, only thought to take a photo when they had been stamped onto. But, perhaps it gives you an idea of the basics of paper piecing - and also how my indecisive mind works!

I used:

- mini slimline card blank measuring 6" x 3" white card blank, side opening

- a snippet of white card for the image, which I stamped using VersaFine Clair 'Nocturne' ink and the main image and a sentiment at the same time (go me!) from Woodware's 'Little Black Dress' stamp set

- then die cut the image using a die from Lawn Fawn's stitched border 'Large Mini Slimline Stackables' set of dies and kept an off cut for doing 'pencil colour trials' whilst colouring the stand

- grounded the stand and coloured the 'body form' and stand using Polychromos pencils with a little bit of their silver pencil where the top of the body meets the top 'knob'

- then I stamped the outfit, using the same main stamp plus a few snippets, found in the back of some old and treasured LOTV paper pads. I used the Misty but in hindsight think that using an acrylic block would allow for easier eyeballing and positioning when you're trying to pick out pieces on the paper for paper piecing 

- fussy cut the pieces for the dress then glued them in place with a glue pen - finished!

I'd like to enter this into Darnell's NBUS Challenge #53 HERE. The stamp set was having its first outing. 

Sarn has posted the results of Challenge #459 over in the Snippets Playground HERE. As always, we had some really good entries, which always makes life tricky when the picks are done. We mostly pick our own for our own challenges - but now and then a scream for help will go up. And it always amazes me how close we are in our choices of the eventual picks!

Dudley Pupdate: Rhetorical question - when you have a poo - do you run around in circles doing 'zoomies' to celebrate? Hmm, thought not! That's fine - just wondering, that's all. 

That was a question from Dudley, by the way! Did I even need to say that?

And then of course, later on, you gobble down your evening meal in double quick time just in case it gets stolen by the 'doggy dinner thieves' before crashing out - partly on the landing and also blocking the exit from Mama's craft room! Having managed to already mess up the freshly cleaned carpets throughout the house just for good measure. It's all in a day's work for a canine security guard! 


I gave him a 'Modesty Watermark'! Just in case he sues me for publishing very personal piccies.  He slept soundly and very deeply like that for quite a while, even with me moving around and taking piccies and wot-not. To me, that's when he looks so very vulnerable and yet contented, with a full tummy. 'Forget any intruders - I'm having a snoozelet'! And of course, Honka Duck Mark II is, as always, close by!

There's still one week of the current challenge left to run! Make a card and come and play - there's a chance to win a nice prize if you join in the draw! See you on the swings!

Love, as always, from myself and Dudley,


Sunday 6 August 2023

Sunday Snippets and a little bit of snarky

I lost most of this post so here is a reconstruction - minus any comments you might have made. Just for the record. These are cards I made for Challenge #460 over at The Snippets Playground:


I didn't end up using ALL of the snippets but these are the ones I started out with.

- 5.5" x 4.25" white card blank, side opening

- a 'Dee' stamp from the A & C 'Miss Dee #704' set to stamp the image onto two snippets of white card for the image panels and also onto the green and terracotta snippets - bearing in mind I only needed the middle part of the image (dress and handbag) - using a Versafine Clair 'Nocturne ink pad). All of the patterned snippets were all from the Studio Calico 'Snippets' paper pad - appropriate huh?!

- then stamped the snarky sentiments, using the same ink pad and a 'drive me crazy' sentiment from the 'Dee Says #790' sentiment set. The 'nicer person' sentiment on the second card is from the same set as the image came from. Bit vicious but it did remind me of a particularly unpleasant teacher from my school days! 

- then coloured the images using Polychromos pencils before adding the dresses and handbags - which I switched around 

- trimmed one patterned snippet to a quarter of an imch smaller all round than the card blank and glued it in place. Then had to cut into a fresh sheet to do the same for the other card - but as someone recently commented, we have to cut into fresh sheets to create snippets!

- then die cut the image panels using a die by Heffy Doodle from their 'Stitched A6 rectangles' set 

- spent ages carefully snipping out the dresses and handbags (those were easier!) before gluing them onto the images

- glued the image panels to the card fronts

- the dresses have stamped 'beads' around Dee's neck - so I popped some self-adhesive teeny, tiny pearls in place

- yay, finished!

I'd like to add this card into Darnell's NBUS Challenge #53 

Dudley Pupdate: SORRY folks - that got lost but it's very likely he was into a pickle of one sort or another!

Love from myself and Dudley - as always


Tuesday 1 August 2023

Christmas Kickstart Challenge #77 - 'Elves'

I'm back as Dotty Jo's guest designer for the month of August - over at the Christmas Kickstart Challenge - HERE!  As always, it's a joy to be asked and I do love sticking to a theme - especially when it's a Christmas one.

This time, it's 'Elves' and I had the perfect set of dies, waiting in one of my NBUS baskets for its first outing! Perfick timing.

This is the result:


I used: 

- A6 white card blank, side opening

- a snippet of white card, embossed using the Crafts-Too 'Merry Christmas' embossing folder - then trimmed to leave an eighth of an inch margin around all sides 

- glued the embossed panel onto the card front

- die cut the 'elf' from two layers of black card and glued them together for stability - the dies on the card are all from the Sizzix Tim Holtz 'Santa's Helper' set of dies

- glued the elf at his jaunty angle onto the card front - using a glue pen

- then the fun began! I sat with a pile of red, green and gold snippets, my mini Altenew die cutting machine - and almost went crazy working out 'which die did what' to make the Christmas presents but I succeeded in the end. The trick, at least it works for me, is to cut and assemble ONE present at a time - it takes longer but is a lot less confusing - and also to add a further layer of card behind the main part for both stability and dimension 

- glued the presents and their ribbons together individually as I progressed until I had them all lined up in front of me ready to roll. At that point I discovered I was missing the fully assembled flat shaped present - it was like a man-hunt in here. I'd just swept the little scraps into the waste bin so had to up-end that for a search. Then, I suddenly wondered if I'd accidentally cleared it away with the tiny scraps of unused double sided sticky pads I'd been working with to prepare the presents for sticking onto the card front - and there it was leering at me through the poly bagl Big sigh of relief here

- so the final steps were to add the presents to the front of the card then glue the huge bow onto the top present - using two snippets of thin foam pads on top of one another to bring the level of the top of the bow up to the same as the present box itself

Many thanks to Jo for inviting me to be a Guest Designer over at the Christmas Kickstart Challenge and I'd really love it if you would come along and join in with the challenge - this is the LINK. It's open until the end of the month so you have plenty of time.


I'd also like to enter this card into Darnell's current NBUS #53 challenge for August - HERE. The 'Santa's Helper' set of dies are my NBUS - and they might well remain as 'almost NBUS' for the foreseeable future too! 

Grab our badge to display on your blog.