Pages

Monday, 26 July 2010

Flexible friends


A little bit fiddly but another venture into paper piecing. The image is a 'My Favourite Things' clear acrylic stamp from Dies to Die for - quite small so a little bit tricky - the hardest bit was cutting out the point where the finger and thumb meet forming a circle. Luckily I have a tiny little hole punch....I just knew that would come in 'handy' (pun intended) one day!

The white card was embossed using a Cuttlebug Butterflies folder, and the image was stamped onto white paper for the upper body and bare foot (then coloured with flesh pink watercolour pencil), lilac marbled effect paper for the background, plain lilac paper for the yoga mat, and patterned deeper lilac paper for the yoga outfit. All from my stash. After careful assembly, praying that I didn't lose bits as I made several in one go, the completed image was layered onto deep lilac Core'dinations card, as was the sentiment (also in the stamp set) after being stamped onto lilac marbled efect paper.

For a finishing touch I just added a couple of butterflies - these are so pretty and don't show up so well in my piccie :( They are three dimensional so the wings are two layers and the top layer stands proud really giving the impression that they are fluttering. I think I got them in Hobbycraft a while ago.

My yoga days are over but I liked the link with the sentiment!

Di
x

Saturday, 17 July 2010

Red roses on your Wedding Day!


I made this card last year for a friend's wedding. Her bouquet was going to be predominantly deep red roses (that took a bit of finding out!) and I used a style of card I've used quite a bit over the years which features a rose bouquet as the centrepiece.

The A5 aperture card was from CraftCreations, as was the box. The boxes come flatpacked and are really easy to make up.

First I used some holographic silver sticky backing from my stash behind the aperture and in the base of the box (both before making up of course :)

For the card I made a little bouquet of deep red roses from Wild Orchid Crafts mixed with some really delicate white organza lily-type flowers with long pearl stamens which I'm sure also came from there. Added a few white satin roses with diamante centres and some little silver leaves. These were from my stash but I'm sure Hobbycraft have similar in their wedding stationery section. The stems of the flowers and leaves were then bound with white and silver organza ribbon from Hobbycraft and finished off with little tied ends. The finished bouquet was stuck onto the card using ultra sticky tape The white satin ribbon with the heart sliders on was from Hobbycraft - just right as it had little white roses embroidered on it:) Heart sliders were from www.diamante-buckles.co.uk - they do other shapes such as round and square ones. They really do sparkle too!

The silver bell embellishments came from a local cake decorating shop - I just snipped the pointy bits off the back and attached with ultra sticky tape :) Then some clear bling either side of Best Wishes and Julie and Steve's names using my trusty peeloffs.

As I said, the box was simple to assemble - so long as you remember to line the base beforehand - not that it's always essential. I then decorated the top of the lid with peeloffs, a little bit of red glitter pen (Sakura) on the rose peeloffs and a couple of white glitter heart motifs with some teeny red 'jewels' from my stash. The glitter heart motifs came from The Crafty Cow.

Sorry about the lack of links - not playing ball today for some reason :(

The wedding was lovely, the bride looked stunning and everyone had a wonderful time by the way!

Di
x

Thursday, 15 July 2010

A simple 'Thank You'


These are a good standby - quickly made with cream linen card topped with gold mirri card then a stamped image of trees (from a clear KanBan set), a peeloff 'Thank you' and fuzzy owl sticker by Sandylion. I love Sandylion stickers but it's very much hit and miss finding them in my local garden centre. Pot luck I think it's called!

Di
x

Sunday, 11 July 2010

Paper roses

I've been wanting to try this idea out for a while. Last weekend I nipped into our local Hospice Shop and found a French Dictionery for the grand amount of 75p. This is what I did:

1. Tear out a couple of pages per rose. The dictionery was quite battered so I don't feel too guilty about attacking it!


2. Spray the pages with Memory Mists - I used Pale Ale and Strawberry Daiquiri. I've had the Mists for ages and had never used them until now - need practise I think as it came out a bit blotchy :(


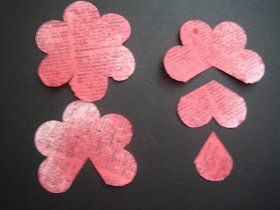
3. Once the pages are dry (they took forever due to my heavy handedness!) then punch out two flower shapes per rose using a large Woodware punch.


4. Then snip petal pieces out as shown in the piccie - I concentrated on the Strawberry Daiquiri rose for now.


5. Now it begins to take shape - overlap and glue the petals as you can see in the piccie - good old fashioned paperclips come in handy at this stage. The two small centre pieces were sort of rolled together after I'd taken this piccie. The bottom end of all pieces should then be snipped off so that the rose will sit flat.


6. Finally, the rose was assembled working from the outside in using Hi-Tack glue to hold the centres of the layers together and curling the petals as I went.

7. Et voilĂ , c'est fini!


Things I would do differently - before assembling I'd 'sparkle' the edges of the petals, it's too tricky once it's done (for me at least). Have been a naughty girl and ordered some Tim Holtz Distress Ink Pads online along with a pack of ordinary water Mister Sprays. From what I've seen I think Tim's luscious colours will be just right for more of these roses - they are quite big, about 2" across...so I'll just have to make some bigger cards won't I?!

Di
x

Saturday, 10 July 2010

House Mouse bathtime


Got these decoupage sheets from Joanna Sheen's online shop. I love House Mouse images and have a few stamps but this was my first venture into House Mouse decoupage. Normally I really enjoy decoupage but this image is the easiest one - the pack comes with some really tricky and intricate ones which will certainly test my patience :) Accidentally snipping off little tails and paws will upset me I know :(

Having said that, they are sooo cute it's worth trying to Percy-Vere!!

I highlighted the 'floating into the air bubbles' with Anita's Glaze and mounted the decoupaged image onto Core'dinations light brown card (I love these packs of card, from QVC, never stuck for a colour...as yet!), then onto a cream linen card and just topped it off with a bit of perfectly matching ribbon from my stash. The ribbon comes from Hobbycraft, it has silver glitter swirls on and they do quite a variety of colours. The only thing is, it's wired, but pulling the thin wire out from each edge is easy and worth the little bit of extra time it takes.

Di
x

Friday, 9 July 2010

Teensy doggies


Following on from my previous post, I made more cards for charity using the same technique, and more of my scraps of card (at this rate I'll be at it forever!) - this time with ickle doggie stickers from Accessorize. Very small 'woofs' from these ones :)

Di
x